ActiveMQ消息队列demo
前言
什么是消息队列?
消息是指在两个独立的系统间传递的数据,这两个系统可以是两台计算机,也可以是两个进程。
消息可以非常简单,可以是简单的字符串,也可以是保存了数据持久化的各种类型的文档集合。
队列是在消息的传输过程中的通道,是保存消息的容器,根据不同的情形,可以有先进先出,优先级队列等区别 。
为什么要使用消息队列?
我个人的理解是主要对业务的解耦,操作异步处理,还有流量削锋等等问题,最终实现高性能,高可用,可伸缩和最终一致性。大家可参考这篇博客:https://blog.csdn.net/seven__________7/article/details/70225830
开始
整合准备工作: 先去官网http://activemq.apache.org/activemq-5154-release.html 下载开发包,我下载的是windows版本的,得到apache-activemq-5.15.4-bin.zip这样一个压缩文件,解压后,打开bin目录下的win32或者win64文件夹(根据自己windows版本),运行activemq.bat(请确保java环境变量无误,否则将闪退 ),保持运行窗口,打开浏览器访问http://127.0.0.1:8161/admin,输入用户名密码(默认均为admin),得到下面的消息队列控制台页面,即完成准备工作。

下面开始代码工作:
新建一个java工程,将开发包中的activemq-all-5.15.4.jar引入项目后即可开始。
(1)使用点对点模式,不可重复消费
创建消息发布者JMSProducer
import javax.jms.Connection;
import javax.jms.ConnectionFactory;
import javax.jms.Destination;
import javax.jms.JMSException;
import javax.jms.MessageProducer;
import javax.jms.Session;
import javax.jms.TextMessage;

import org.apache.activemq.ActiveMQConnection;
import org.apache.activemq.ActiveMQConnectionFactory;

/**
 * 消息发布者
 * @author zxy
 *
 */
public class JMSProducer {

	private static final String USERNAME = ActiveMQConnection.DEFAULT_USER;

	private static final String PASSWORD = ActiveMQConnection.DEFAULT_PASSWORD;

	private static final String BROKERURL = ActiveMQConnection.DEFAULT_BROKER_URL;

	private static final int SENDNUM = 10;

	public static void main(String[] args) {
		ConnectionFactory connectionFactory = null; //连接工厂
		Connection connection = null; //连接
		Session session = null; //会话接收或者发送消息的线程
		Destination destination = null; //消息的目的地
		MessageProducer messageProducer = null; //消息生产者

		//实例化连接工厂
		connectionFactory = new ActiveMQConnectionFactory(USERNAME, PASSWORD, BROKERURL);

		try {
			//通过连接工厂获取连接
			connection = connectionFactory.createConnection();

			connection.start();

			//Boolean.TRUE表示开启事务
			session = connection.createSession(Boolean.TRUE, Session.AUTO_ACKNOWLEDGE);

			//创建消息队列
			destination = session.createQueue("FirstQueue1");

			//创建消息生产者
			messageProducer = session.createProducer(destination);

			//发送消息
			sendMessage(session, messageProducer);

			//事务提交
			session.commit();
		} catch (JMSException e) {
			// TODO Auto-generated catch block
			e.printStackTrace();
		} finally {
			if(connection != null){
				try {
					connection.close();
				} catch (JMSException e) {
					// TODO Auto-generated catch block
					e.printStackTrace();
				}
			}
		}
	}

	public static void sendMessage(Session session, MessageProducer messageProducer){
		for(int i=0;i
创建消息消费者JMSConsumer,两种消费方式:
import javax.jms.Connection;
import javax.jms.ConnectionFactory;
import javax.jms.Destination;
import javax.jms.JMSException;
import javax.jms.MessageConsumer;
import javax.jms.Session;
import javax.jms.TextMessage;

import org.apache.activemq.ActiveMQConnection;
import org.apache.activemq.ActiveMQConnectionFactory;

/**
 * 消息消费者一
 * 不断从队列出口获取消息
 * @author zxy
 *
 */
public class JMSConsumer {

private static final String USERNAME = ActiveMQConnection.DEFAULT_USER;

	private static final String PASSWORD = ActiveMQConnection.DEFAULT_PASSWORD;

	private static final String BROKERURL = ActiveMQConnection.DEFAULT_BROKER_URL;

	public static void main(String[] args) {
		ConnectionFactory connectionFactory = null; //连接工厂
		Connection connection = null; //连接
		Session session = null; //会话接收或者发送消息的线程
		Destination destination = null; //消息的目的地
		MessageConsumer messageConsumer = null; //消息消费者

		//实例化连接工厂
		connectionFactory = new ActiveMQConnectionFactory(USERNAME, PASSWORD, BROKERURL);
		try {
			//通过连接工厂获取连接
			connection = connectionFactory.createConnection();
			connection.start();
			session = connection.createSession(Boolean.FALSE, Session.AUTO_ACKNOWLEDGE);

			//创建消息队列
			destination = session.createQueue("FirstQueue1");

			//创建消息生产者
			messageConsumer = session.createConsumer(destination);

			while(true){
				TextMessage message = (TextMessage)messageConsumer.receive(100000);
				if(message != null){
					System.out.println("收到的消息:" + message.getText());
				}else{
					break;
				}
			}

		} catch (JMSException e) {
			// TODO Auto-generated catch block
			e.printStackTrace();
		} finally {
			if(connection != null){
				try {
					connection.close();
				} catch (JMSException e) {
					// TODO Auto-generated catch block
					e.printStackTrace();
				}
			}
		}
	}

}
import javax.jms.Connection;
import javax.jms.ConnectionFactory;
import javax.jms.Destination;
import javax.jms.JMSException;
import javax.jms.MessageConsumer;
import javax.jms.Session;

import org.apache.activemq.ActiveMQConnection;
import org.apache.activemq.ActiveMQConnectionFactory;

/**
 * 消息消费者二
 * 通过消息监听获取消息
 * @author Administrator
 *
 */
public class JMSConsumer2 {

	private static final String USERNAME = ActiveMQConnection.DEFAULT_USER;

	private static final String PASSWORD = ActiveMQConnection.DEFAULT_PASSWORD;

	private static final String BROKERURL = ActiveMQConnection.DEFAULT_BROKER_URL;

	public static void main(String[] args) {
		ConnectionFactory connectionFactory = null; //连接工厂
		Connection connection = null; //连接
		Session session = null; //会话接收或者发送消息的线程
		Destination destination = null; //消息的目的地
		MessageConsumer messageConsumer = null; //消息消费者

		// 实例化连接工厂
		connectionFactory=new ActiveMQConnectionFactory(USERNAME, PASSWORD, BROKERURL);

		try {
			//通过连接工厂获取连接
			connection = connectionFactory.createConnection();
			connection.start();
			session = connection.createSession(Boolean.FALSE, Session.AUTO_ACKNOWLEDGE);

			//创建消息队列
			destination = session.createQueue("FirstQueue1");

			// 创建消息消费者
			messageConsumer=session.createConsumer(destination);

			// 注册消息监听
			messageConsumer.setMessageListener(new Listener());
		} catch (JMSException e) {
			// TODO Auto-generated catch block
			e.printStackTrace();
		}
	}
}
import javax.jms.JMSException;
import javax.jms.Message;
import javax.jms.MessageListener;
import javax.jms.TextMessage;

/**
 * 消费者二自定义消息监听器
 * @author Administrator
 *
 */
public class Listener implements MessageListener{

	@Override
	public void onMessage(Message message) {
		// TODO Auto-generated method stub
		try {
			System.out.println("收到的消息:"+((TextMessage)message).getText());
		} catch (JMSException e) {
			// TODO Auto-generated catch block
			e.printStackTrace();
		}
	}

}
消费方式一:
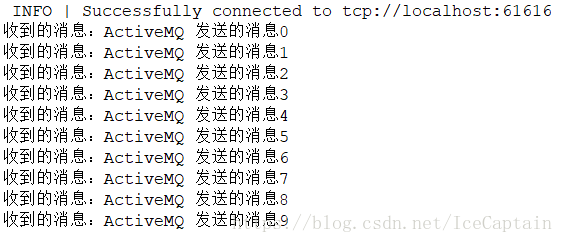
先开启JMSProducer,再开启JMSConsumer,消费结果如下:

消费方式二:
将JMSConsumer2复制一份重命名为JMSConsumer3,将两个先开启,监听消息发布,然后再开启JMSProducer,消费结果如下:
JMSConsumer2:

JMSConsumer3:

浏览器控制台Queues菜单项下可以找到如下结果,消息发布数量与消息消费数量始终保持一致:

(2)使用发布/订阅模式,可重复消费
创建消息发布者JMSProducer,与上述消息发布者其他代码全部一致,将创建消息队列的代码改动即可
import javax.jms.Connection;
import javax.jms.ConnectionFactory;
import javax.jms.Destination;
import javax.jms.JMSException;
import javax.jms.MessageProducer;
import javax.jms.Session;
import javax.jms.TextMessage;

import org.apache.activemq.ActiveMQConnection;
import org.apache.activemq.ActiveMQConnectionFactory;

public class JMSProducer {

	private static final String USERNAME = ActiveMQConnection.DEFAULT_USER;

	private static final String PASSWORD = ActiveMQConnection.DEFAULT_PASSWORD;

	private static final String BROKERURL = ActiveMQConnection.DEFAULT_BROKER_URL;

	private static final int SENDNUM = 10;

	public static void main(String[] args) {
		ConnectionFactory connectionFactory = null; //连接工厂
		Connection connection = null; //连接
		Session session = null; //会话接收或者发送消息的线程
		Destination destination = null; //消息的目的地
		MessageProducer messageProducer = null; //消息生产者

		//实例化连接工厂
		connectionFactory = new ActiveMQConnectionFactory(USERNAME, PASSWORD, BROKERURL);

		try {
			//通过连接工厂获取连接
			connection = connectionFactory.createConnection();
			connection.start();
			session = connection.createSession(Boolean.TRUE, Session.AUTO_ACKNOWLEDGE);

			//创建消息队列
			destination = session.createTopic("FirstTopic1");
			//创建消息生产者
			messageProducer = session.createProducer(destination);

			//发送消息
			sendMessage(session, messageProducer);

			session.commit();
		} catch (JMSException e) {
			// TODO Auto-generated catch block
			e.printStackTrace();
		} finally {
			if(connection != null){
				try {
					connection.close();
				} catch (JMSException e) {
					// TODO Auto-generated catch block
					e.printStackTrace();
				}
			}
		}
	}

	public static void sendMessage(Session session, MessageProducer messageProducer){
		for(int i=0;i
创建消息消费者JMSConsumer,与消息发布者代码改动一致:
import javax.jms.Connection;
import javax.jms.ConnectionFactory;
import javax.jms.Destination;
import javax.jms.JMSException;
import javax.jms.MessageConsumer;
import javax.jms.Session;

import org.apache.activemq.ActiveMQConnection;
import org.apache.activemq.ActiveMQConnectionFactory;

/**
 * 消息消费者
 * @author Administrator
 *
 */
public class JMSConsumer {

	private static final String USERNAME = ActiveMQConnection.DEFAULT_USER;

	private static final String PASSWORD = ActiveMQConnection.DEFAULT_PASSWORD;

	private static final String BROKERURL = ActiveMQConnection.DEFAULT_BROKER_URL;

	public static void main(String[] args) {
		ConnectionFactory connectionFactory = null; //连接工厂
		Connection connection = null; //连接
		Session session = null; //会话接收或者发送消息的线程
		Destination destination = null; //消息的目的地
		MessageConsumer messageConsumer = null; //消息消费者

		// 实例化连接工厂
		connectionFactory=new ActiveMQConnectionFactory(USERNAME, PASSWORD, BROKERURL);

		try {
			//通过连接工厂获取连接
			connection = connectionFactory.createConnection();
			connection.start();
			session = connection.createSession(Boolean.FALSE, Session.AUTO_ACKNOWLEDGE);

			//创建消息队列
			destination = session.createTopic("FirstTopic1");

			// 创建消息消费者
			messageConsumer=session.createConsumer(destination);

			// 注册消息监听
			messageConsumer.setMessageListener(new Listener());
		} catch (JMSException e) {
			// TODO Auto-generated catch block
			e.printStackTrace();
		}
	}
}
将JMSConsumer复制一份重命名为JMSConsumer2,将两个先开启,监听消息发布,然后再开启JMSProducer,消费结果如下:
两者均为一个结果:

浏览器控制台Topics菜单项下可以找到如下结果,消息发布了10条,却消费了20次,即两个消费者重复消费了消息:
![]()
总结:以上即为所有过程,完成了ActiveMQ两种模式小demo 的整合,如有不足,欢迎指正。