【Window】 Screen capture with GDI&DX
【前言】
window常见抓屏技术有 GDI \ DX \ DXGI,
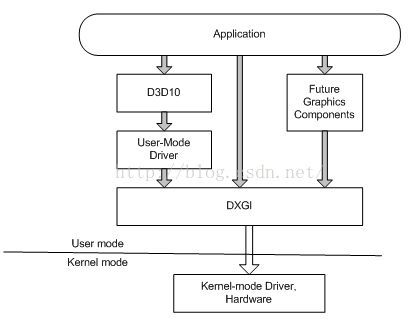
关系如下:
GDI(Graphics Deveice Interface,图形设备接口),利用GDI编程,可以不考虑硬件的具体特性,直接调用Windows API中的图形处理函数处理当前DC即可。这的确很方便,但却是以降低处理速度为代价。因为它不能直接访问硬件,需要通过操作系统间接访问。
Microfost 为迎合市场需求,推出了DirectX。它既能像Windows GDI一样使用方便,又可以直接对硬件抽象层HALL(Hardware Abstranaction Layer)操作,速度比GDI快得多。DirectX 主要包括 DirectDraw Direct3D DirectMusic DirectPaly DirectInput DirectSetup七部分。
也就是说DirectX是GDI的升级。
值得注意的是 , DXGI 只能在window8 或者更新的系统使用。
【GDI】
void gInitGDI()	//
{
	// 获取宽高
	width = GetSystemMetrics(SM_CXSCREEN);
	height = GetSystemMetrics(SM_CYSCREEN);

	gdi_pScreenCapData = new char[width * height * 4];
	memset(gdi_pScreenCapData, 0, width);

	hdc_src = GetDC(GetDesktopWindow());//返回桌面窗口的句柄
	hdc_dest = CreateCompatibleDC(hdc_src);
	hBitmap = CreateCompatibleBitmap(hdc_src, width, height);

	SelectObject(hdc_dest, hBitmap);	//内存hdc 和 bitmap 绑定
}

void gCaptureWithGDI(LPVOID pScreenData)
{
	// 将制定显示屏的截图复制自定义的内存缓冲区
	BitBlt(hdc_dest, 0, 0, width, height, hdc_src, 0, 0, SRCCOPY);


	/* 画一个鼠标 */
	CURSORINFO cursorInfo;
	cursorInfo.cbSize = sizeof(CURSORINFO);
	LRESULT ret = GetCursorInfo(&cursorInfo);
	DrawIcon(hdc_dest, cursorInfo.ptScreenPos.x, cursorInfo.ptScreenPos.y, cursorInfo.hCursor);

	//复制附加位图的位模式向指定的缓冲区。
	GetBitmapBits(hBitmap, width*height * 4, gdi_pScreenCapData);

	// 方法一
	/* 使用CImage 和 HBITMAP构造图像 */
	CImage image;
	image.Attach(hBitmap);
	image.Save(L".\\GDI.bmp");
	image.Detach();


	// 方法二
	/* 自定义头进行写入 */
	BITMAPFILEHEADER hdr;
	BITMAPINFOHEADER info;
	//调色板
	//数据
	memset(&hdr, 0, sizeof(hdr));
	hdr.bfOffBits = sizeof(hdr) + sizeof(info);
	hdr.bfReserved1 = 0;
	hdr.bfReserved2 = 0;
	hdr.bfType = 0x4D42;
	hdr.bfSize = hdr.bfOffBits + width * height * 4;

	memset(&info, 0, sizeof(info));
	info.biSize = sizeof(info);
	info.biWidth = width;
	info.biHeight = -height;	//注意,这里是负值,不然得到的图像会翻转180°
	info.biPlanes = 1;
	info.biBitCount = 32;
	info.biCompression = BI_RGB;
	info.biSizeImage = 0;	//当用BI_RGB格式时,可设置为0。

	FILE *fp = fopen("GDI_HEADER.bmp", "wb");

	fwrite(&hdr, sizeof(hdr), 1, fp);

	fwrite(&info, sizeof(info), 1, fp);

	fwrite(gdi_pScreenCapData, width*height*4, 1, fp);

	fclose(fp);

}
【DirectX】
相关头文件和库:
#include
#pragma comment(lib, "d3d9.lib")

#include
#pragma comment(lib, "d3d11.lib") void gInitDX()
{
BITMAPINFO dx_bitmap_info;
ZeroMemory(&dx_bitmap_info, sizeof(BITMAPINFO));
dx_bitmap_info.bmiHeader.biSize = sizeof(BITMAPINFOHEADER);
dx_bitmap_info.bmiHeader.biBitCount = 32;
dx_bitmap_info.bmiHeader.biCompression = BI_RGB;
dx_bitmap_info.bmiHeader.biWidth = GetSystemMetrics(SM_CXSCREEN);
dx_bitmap_info.bmiHeader.biHeight = -GetSystemMetrics(SM_CYSCREEN); //注意,这里是负数,不然得到的图像会翻转
dx_bitmap_info.bmiHeader.biPlanes = 1;
dx_bitmap_info.bmiHeader.biSizeImage = abs(dx_bitmap_info.bmiHeader.biHeight)*dx_bitmap_info.bmiHeader.biWidth*dx_bitmap_info.bmiHeader.biBitCount / 8;
HDC hdc_src = GetDC(GetDesktopWindow());
dx_hdc_dest = CreateCompatibleDC(hdc_src);
//创建应用程序可以直接写入的、与设备无关的位图(DIB)的函数。此时dx_pScreenCapData 和 dx_hBitmap 拥有相同的内容
dx_hBitmap = CreateDIBSection(hdc_src, &dx_bitmap_info, DIB_RGB_COLORS, &dx_pScreenCapData, NULL, 0);
// 绑定hdc 到 bitmap
SelectObject(dx_hdc_dest, dx_hBitmap);
if (hBitmap == NULL)
{
return ;
}
ReleaseDC(GetDesktopWindow(), hdc_src);
/*-------至此hdc_dest还没被关联------*/
/*-------------------开始D3D的初始化---------------------*/
HWND hWnd = NULL;
D3DDISPLAYMODE ddm;
D3DPRESENT_PARAMETERS d3dpp;
pD3D = Direct3DCreate9(D3D_SDK_VERSION);
if (pD3D == NULL)
return;
LRESULT ret = pD3D->GetAdapterDisplayMode(D3DADAPTER_DEFAULT, &ddm);
if (FAILED(ret))
return;
ZeroMemory(&d3dpp, sizeof(D3DPRESENT_PARAMETERS));
d3dpp.Windowed = true;
d3dpp.Flags = D3DPRESENTFLAG_LOCKABLE_BACKBUFFER;
d3dpp.BackBufferFormat = ddm.Format;
d3dpp.BackBufferHeight = dx_ScreenRect.bottom = ddm.Height;
d3dpp.BackBufferWidth = dx_ScreenRect.right = ddm.Width;
d3dpp.MultiSampleType = D3DMULTISAMPLE_NONE;
d3dpp.SwapEffect = D3DSWAPEFFECT_DISCARD;
d3dpp.hDeviceWindow = hWnd;
d3dpp.PresentationInterval = D3DPRESENT_INTERVAL_DEFAULT;
d3dpp.FullScreen_RefreshRateInHz = D3DPRESENT_RATE_DEFAULT;
ret = pD3D->CreateDevice(D3DADAPTER_DEFAULT, D3DDEVTYPE_HAL, hWnd, D3DCREATE_HARDWARE_VERTEXPROCESSING,
&d3dpp, &pD3DDevice);
if (FAILED(ret))
return;
ret = pD3DDevice->CreateOffscreenPlainSurface(ddm.Width, ddm.Height, D3DFMT_A8R8G8B8,
D3DPOOL_SCRATCH, &pD3DSurface, NULL);
if (FAILED(ret))
return;
}
void gCaptureWithDX(LPVOID pScreenData)
{
LRESULT ret;
/* 获取bit数据 */
pD3DDevice->GetFrontBufferData(0, pD3DSurface);
D3DLOCKED_RECT lockedRect;
ret = pD3DSurface->LockRect(&lockedRect, &dx_ScreenRect, D3DLOCK_NO_DIRTY_UPDATE
| D3DLOCK_NOSYSLOCK | D3DLOCK_READONLY);
if (FAILED(ret))
return;
//CreateDIBSection 绑定 hBitmap 和 dx_pScreenCapData
for (int i = 0; i < dx_ScreenRect.bottom; ++i)
{
memcpy((BYTE*)dx_pScreenCapData+i*dx_ScreenRect.right*32/8,
(BYTE*)lockedRect.pBits+i*lockedRect.Pitch,
dx_ScreenRect.right*32/8);
}
pD3DSurface->UnlockRect();
/* 画一个鼠标 */
CURSORINFO cursorInfo;
cursorInfo.cbSize = sizeof(CURSORINFO);
ret = GetCursorInfo(&cursorInfo);
DrawIcon(dx_hdc_dest, cursorInfo.ptScreenPos.x, cursorInfo.ptScreenPos.y, cursorInfo.hCursor);
/* 使用CImage创建图像 */
CImage image;
image.Attach(dx_hBitmap);
image.Save(L".\\DX.bmp");
image.Detach();
/* 自定义头进行写入 */
BITMAPFILEHEADER hdr;
BITMAPINFOHEADER info;
//调色板
//数据
memset(&hdr, 0, sizeof(hdr));
hdr.bfOffBits = sizeof(hdr) + sizeof(info);
hdr.bfReserved1 = 0;
hdr.bfReserved2 = 0;
hdr.bfType = 0x4D42;
hdr.bfSize = hdr.bfOffBits + width * height * 4;
memset(&info, 0, sizeof(info));
info.biSize = sizeof(info);
info.biWidth = width;
info.biHeight = -height; //注意,这里是负值,不然得到的图像会翻转180°
info.biPlanes = 1;
info.biBitCount = 32;
info.biCompression = BI_RGB;
info.biSizeImage = 0; //当用BI_RGB格式时,可设置为0。
FILE *fp = fopen("DX_HEADER.bmp", "wb");
fwrite(&hdr, sizeof(hdr), 1, fp);
fwrite(&info, sizeof(info), 1, fp);
fwrite(dx_pScreenCapData, width*height * 4, 1, fp);
fclose(fp);
}
