Java设计模式之---装饰者模式
装饰者模式
装饰者模式(Decorator Pattern)也称为包装模式(Wrapper Pattern),结构型设计模式之一。动态将职责附加到对象上,若要扩展功能,装饰者提供了比继承更具弹性的代替方案。
意图:
动态地给一个对象添加一些额外的职责。就增加功能来说,Decorator模式相比生成子类更为灵活。
设计原则:
多用组合,少用继承。
利用继承设计子类的行为,是在编译时静态决定的,而且所有的子类都会继承到相同的行为。然而,如果能够利用组合的做法扩展对象的行为,就可以在运行时动态地进行扩展。类应设计的对扩展开放,对修改关闭。
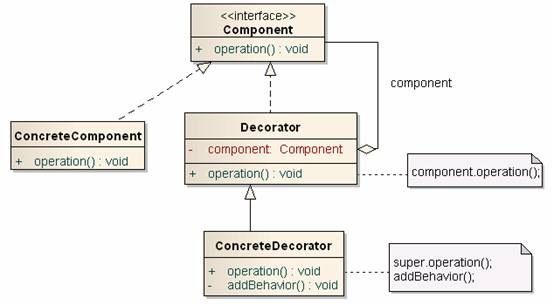
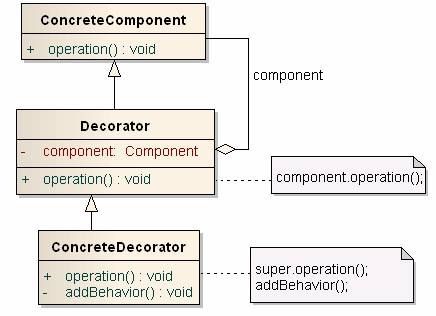
UML类图
通用模式代码
Component:
定义一个对象接口,并添加职责。
public interface Component{
    void operation();
}
Concrete Component:
定义一个对象,实现Component接口
public class ConcreteComponent implements Component{

    public void operation(){
        // Write your code here
    }
}
Decorator:
维持一个指向Component对象的引用,并实现 Component接口。
public abstract class Decorator implements Component{
    private Component component;

    public Decorator(Component component){
        this.component = component;
    }

    public void operation(){
        component.operation();
    }
}
Concrete Decorator:
在Concrete Component的行为之前或之后,加上自己的行为,以“贴上”附加的职责。
public class ConcreteDecoratorA extends Decorator{

    public ConcreteDecorator(Component component){
        super(component);
    }

    public void operation(){
        //addBehaviorA也可以在前面

        super.operation();

        addBehaviorA();
    }

    public void addBehaviorA(){
        //your code
    }
}
public class ConcreteDecoratorB extends Decorator{
public ConcreteDecorator(Component component){
super(component);
}
public void operation(){
//addBehaviorB也可以在前面
super.operation();
addBehaviorB();
}
public void addBehaviorB(){
//your code
}
}Client 客户调用类:
public class Client{
    public static void main(String[] args){
        //构造被装饰的组件对象
        Component component = new ConcreteComponent();

        //根据组件对象构造装饰者对象A并调用,此时相当于给组件对象添加装饰者A的功能方法
        Decorator decorator = new ConcreteDecoratorA(component);
        decorator.operate();

        //根据组件对象构造装饰者对象B并调用,此时相当于给组件对象添加装饰者B的功能方法
        Decorator decorator = new ConcreteDecoratorB(component);
        decorator.operate();
    }
}
组成
- Component:抽象组件
可以是一个接口或一个抽象类,其充当的就是被装饰的原始对象 - Concrete Component:组件具体实现类
装饰的具体对象 - Decorator :抽象装饰者
顾名思义,其职责就是为了装饰我们的组件对象,其内部一定要有一个指向组件对象的引用。大多数情况下,它是抽象类,需要根据不同的装饰逻辑实现不同的具体子类。当然,如果装饰逻辑单一,只有一个的情况下我们可以省略改类直接作为具体的装饰者。 - Concrete Decorator:装饰者都具体实现
抽象装饰者的具体实现 - Client:客户类
模式的简化:
1.如果只有一个Concrete Component类而没有抽象的Component接口时,可以让Decorator继承Concrete Component。
2.如果只有一个Concrete Decorator类时,可以将Decorator和Concrete Decorator合并。
透明性
透明的装饰模式
装饰模式通常要求针对抽象编程。装饰模式对客户端的透明性要求程序不要声明一个ConcreteDecorator类型的变量,而应当声明一个Component类型的变量。装饰模式对客户端是完全透明的含义,如下面的做法:
    Component component = new ConcreteComponent();

    Component componentA = new ConcreteDecoratorA(component);
    componentA.operation();

    Component componentB = new ConcreteDecoratorB(component);
    componentB.operation()
半透明的装饰模式
然而,纯粹的装饰模式很难找到。装饰模式的用意是在不改变接口的前提下,增强所考虑的类的性能。在增强性能的时候,往往需要建立新的公开的方法。这就导致了大多数的装饰模式的实现都是”半透明”(semi-transparent)的,而不是完全”透明”的。换言之,允许装饰模式改变接口,增加新的方法。即声明ConcreteDecorator类型的变量,从而可以调用ConcreteDecorator类中才有的方法:
    Component component = new ConcreteComponent();
    ConcreteDecoratorA decorator = new ConcreteDecoratorA(component);
    decorator.addBehaviorA();
适用性:
以下情况使用Decorator模式
需要扩展一个类的功能,或给一个类添加附加职责。
需要动态的给一个对象添加功能,这些功能可以再动态的撤销。
需要增加由一些基本功能的排列组合而产生的非常大量的功能,从而使继承关系变的不现实。
当不能采用生成子类的方法进行扩充时。一种情况是,可能有大量独立的扩展,为支持每一种组合将产生大量的子类,使得子类数目呈爆炸性增长。另一种情况可能是因为类定义被隐藏,或类定义不能用于生成子类。
优点:
Decorator模式与继承关系的目的都是要扩展对象的功能,但是Decorator可以提供比继承更多的灵活性。
通过使用不同的具体装饰类以及这些装饰类的排列组合,设计师可以创造出很多不同行为的组合。
缺点:
这种比继承更加灵活机动的特性,也同时意味着更加多的复杂性。
装饰模式会导致设计中出现许多小类,如果过度使用,会使程序变得很复杂。
装饰模式是针对抽象组件(Component)类型编程。但是,如果你要针对具体组件编程时,就应该重新思考你的应用架构,以及装饰者是否合适。当然也可以改变Component接口,增加新的公开的行为,实现“半透明”的装饰者模式。在实际项目中要做出最佳选择。
Android源码中装饰者模式实现
Context类在Android中被定义为“上帝对象”,它本质是一个抽象类,其内部定义了大量抽象方法,比如我们常用的startActivity方法。
public abstract class Context {
    /** Return a Resources instance for your application's package. */
    public abstract Resources getResources();

    /** Return PackageManager instance to find global package information. */
    public abstract PackageManager getPackageManager();

    public abstract void startActivity(Intent intent);

    .......
}
而其真正的实现是在ContextImpl中完成的,其代码如下:
class ContextImpl extends Context {

    static ContextImpl createActivityContext(ActivityThread mainThread,
            LoadedApk packageInfo, int displayId, Configuration overrideConfiguration) {

        return new ContextImpl(null, mainThread, packageInfo, null, null, false,
                null, overrideConfiguration, displayId);
    }

    @Override
    public void startActivity(Intent intent) {
        warnIfCallingFromSystemProcess();
        startActivity(intent, null);
    }

     @Override
    public void startActivity(Intent intent, Bundle options) {
        warnIfCallingFromSystemProcess();
        if ((intent.getFlags()&Intent.FLAG_ACTIVITY_NEW_TASK) == 0) {
            throw new AndroidRuntimeException(
                    "Calling startActivity() from outside of an Activity "
                    + " context requires the FLAG_ACTIVITY_NEW_TASK flag."
                    + " Is this really what you want?");
        }
        mMainThread.getInstrumentation().execStartActivity(
                getOuterContext(), mMainThread.getApplicationThread(), null,
                (Activity) null, intent, -1, options);
    }

}
我们知道Activity从类层次上来说是一个Context,其实Activity并非直接继承于Context,而是继承于ContextThemeWrapper。
public class Activity extends ContextThemeWrapper
        implements LayoutInflater.Factory2,
        Window.Callback, KeyEvent.Callback,
        OnCreateContextMenuListener, ComponentCallbacks2,
        Window.OnWindowDismissedCallback {
            ......
        }
而这个ContextThemeWrapper又是继承于ContextWrapper。
public class ContextThemeWrapper extends ContextWrapper {

    public ContextThemeWrapper() {
        super(null);
    }

    @Override
    protected void attachBaseContext(Context newBase) {
        super.attachBaseContext(newBase);
    }
    ......
}
最终ContextWrapper才继承于Context,层次比较复杂,其实这就是一个典型的装饰者模式。
public class ContextWrapper extends Context {
    Context mBase;

    public ContextWrapper(Context base) {
        mBase = base;
    }

    protected void attachBaseContext(Context base) {
        if (mBase != null) {
            throw new IllegalStateException("Base context already set");
        }
        mBase = base;
    }

    @Override
    public Resources getResources()
    {
        return mBase.getResources();
    }

    @Override
    public Context getApplicationContext() {
        return mBase.getApplicationContext();
    }

    @Override
    public void startActivity(Intent intent) {
        mBase.startActivity(intent);
    }
}
Context 就是装饰者模式中的Component。
ContextImpl 就是装饰者模式中的Concrete Component。
ContextWrapper就是装饰者模式中的Decorator。所以我们经常在activity里面使用Context mContext = this ; 语句时,因为activity 最终是继承于Context的。
知道了Context使用了装饰者模式,那么ContextWrapper装饰者中的mBase成员,实际上就是ContextImpl类实例,它就是真正干事的类,比如startActivity等方法都是它执行的。那么这个mBase成员是什么时候被赋值的呢,就需要简单看看activity的启动流程了
一个activity是由ActivityThread类的H(Handler)类启动的,H类收到LAUNCH_ACTIVITY消息后,会执行handleLaunchActivity()方法,然后执行performLaunchActivity()方法:
private Activity performLaunchActivity(ActivityClientRecord r, Intent customIntent) {
     Activity activity = null;
     //加载要启动的activity,得到activity对象
     java.lang.ClassLoader cl = r.packageInfo.getClassLoader();
     activity = mInstrumentation.newActivity(cl, component.getClassName(), r.intent);
     //获取application对象
     Application app = r.packageInfo.makeApplication(false, mInstrumentation);

     //生成一个Context对象,其实就是ContextImpl实例
     Context appContext = createBaseContextForActivity(r, activity);

     activity.attach(appContext, this, getInstrumentation(), r.token,
                        r.ident, app, r.intent, r.activityInfo, title, r.parent,
                        r.embeddedID, r.lastNonConfigurationInstances, config,
                        r.referrer, r.voiceInteractor);

     //执行activity的onCreate方法
     mInstrumentation.callActivityOnCreate(activity, r.state);
}
继续看看ContextImpl实例的生成
 private Context createBaseContextForActivity(ActivityClientRecord r, final Activity activity) {
        //通过ContextImpl的静态方法生成实例
        ContextImpl appContext = ContextImpl.createActivityContext(
                this, r.packageInfo, displayId, r.overrideConfig);

        appContext.setOuterContext(activity);//将activity赋值给ContextImpl实例
        Context baseContext = appContext;

        return baseContext;
}
有了ContextImpl实例,那怎么传给ContextWrapper这个装饰者的mBase成员呢,就在接下来的activity.attach()方法里
    final void attach(Context context, ActivityThread aThread,
            Instrumentation instr, IBinder token, int ident,
            Application application, Intent intent, ActivityInfo info,
            CharSequence title, Activity parent, String id,
            NonConfigurationInstances lastNonConfigurationInstances,
            Configuration config, String referrer, IVoiceInteractor voiceInteractor) {

        //这里调用ContextThemeWrapper的attachBaseContext,
        //最终调用到ContextWrapper里,给mBase成员赋值前面生成的ContextImpl对象
        attachBaseContext(context);

        mFragments.attachHost(null /*parent*/);

        mWindow = new PhoneWindow(this);
        mWindow.setCallback(this);

        mUiThread = Thread.currentThread(); //当前线程,zygote fork出来运行app的线程

        mMainThread = aThread; //ActivityThread实例对象
}
到此activity中Context就讲解完了,一个典型的装饰者模式,我们说Application也是一个Context,那么看看Application的代码
public class Application extends ContextWrapper implements ComponentCallbacks2 {
    final void attach(Context context) {
        attachBaseContext(context);
        mLoadedApk = ContextImpl.getImpl(context).mPackageInfo;
    }
}
上面代码可以知道Application继承于ContextWrapper,所以Application也是一个具体的Context装饰者,同activity一样,在attach()方法里会给ContextWrapper的mBase成员赋值ContextImpl对象。
下面分析下Application,在ActivityThread的H类收到BIND_APPLICATION消息后,这个消息是在启动activity之前的,会调用 handleBindApplication()方法
 private void handleBindApplication(AppBindData data) {
     mInstrumentation = new Instrumentation();
     //生成Application实例
     Application app = data.info.makeApplication(data.restrictedBackupMode, null);
     //执行application的onCreate方法
     mInstrumentation.callApplicationOnCreate(app);
}
继续看看makeApplication方法,它是在LoadedApk.java里
   public Application makeApplication(boolean forceDefaultAppClass,
            Instrumentation instrumentation) {

        Application app = null;

        //appClass就是就是我们自己的Application类名,
        //注意AS调试时若是gradle2.0以上,Instant模式
        //这里会先加载com.android.tools.fd.runtime.BootstrapApplication
        //最后才替换成我们自己的Application
        String appClass = mApplicationInfo.className;
        if (forceDefaultAppClass || (appClass == null)) {//forceDefaultAppClass = false
            appClass = "android.app.Application";
        }

        //生成一个dalvik.system.PathClassLoader类加载器对象,
        //PathClassLoader里有一个BootClassLoader,这就是系统的类加载器
        java.lang.ClassLoader cl = getClassLoader();
        if (!mPackageName.equals("android")) {//非系统app
             //Thread.currentThread().setContextClassLoader(cl);
             //设置当前线程的类加载器
             initializeJavaContextClassLoader();
        }
        //生成ContextImpl实例
        ContextImpl appContext = ContextImpl.createAppContext(mActivityThread, this);
        //加载Application类并生成Application实例
        app = mActivityThread.mInstrumentation.newApplication(
                    cl, appClass, appContext);
        appContext.setOuterContext(app);
   }
最后看看Instrumentation的newApplication方法:
    static public Application newApplication(Class clazz, Context context)
            throws InstantiationException, IllegalAccessException,
            ClassNotFoundException {
        //实例化对象
        Application app = (Application)clazz.newInstance();
        //最终调用到ContextWrapper里,给mBase成员赋值ContextImpl对象
        app.attach(context);
        return app;
    }
通过上面activity和application部分代码的分析,看到了典型的装饰者模式的运用。
完
更多精彩Android技术可以关注我们的微信公众号,扫一扫下方的二维码或搜索关注公共号:


