MongoDB分片集群
文章目录
- 简介
- Shard Keys
- Chunk
- Balancer
- 分片集群的优势
- 分片策略
- 部署
- 规划
- 安装MongoDB
- 前期准备
- 安装MongoDB
- 创建用户
- 关闭hugepage大页内存
- 安装MongoDB3.6
- 配置Shard1
- 启动多实例
- 配置Shard1复制集
- 配置Shard2
- 启动多实例
- 配置Shard1复制集
- 配置Config Servers
- 启动多实例
- 配置Config Servers复制集
- 构建mongos
- 启动多实例
- 添加shard进入集群
- 设置Ranged分片
- 设置hash分片
- 分片集群管理
- Blancer常用操作
- 参考文档
简介
MongoDB使用Sharding(分片)的方式来存储非常大的数据集和高吞吐量操作。数据量非常大的时候会非常挑战单个服务器的性能,存储和计算方面都会造成很大的压力,解决这个问题的方法主要有两种
Vertical Scaling垂直扩展,垂直扩展就是提高单机的性能,但是这种提升总会遇到一个上限Horizontal Scaling水平扩展,水平扩展就是加机器,一台机不行上2台,可能每台机器的处理性能不高,但是都负责存储和计算的一个子集,对集群整体的性能来说可能是更优的
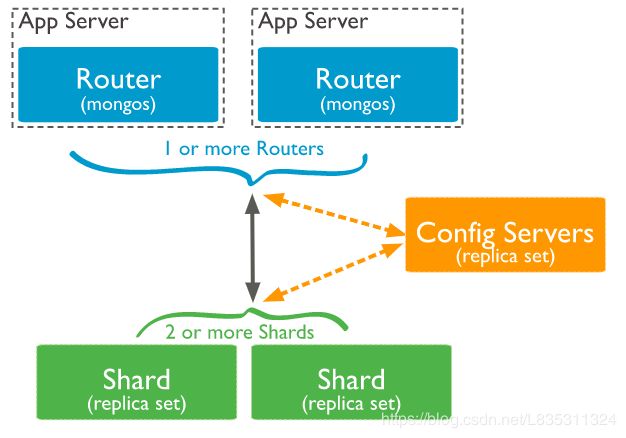
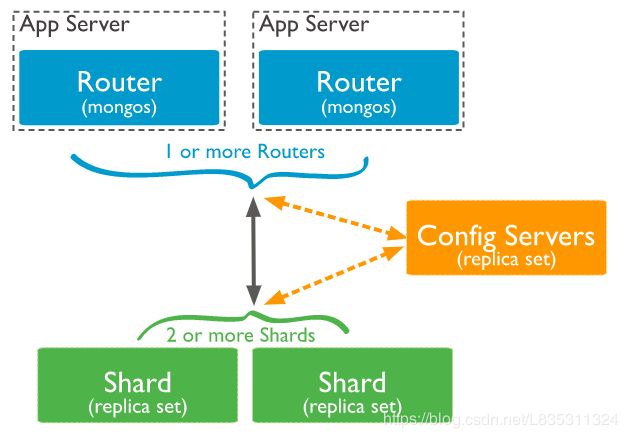
MongoDB分片集群就属于水平扩展,包含的组件如下
- Mongos: 提供对外应用访问,所有操作均通过mongos执行,一般有多个mongos节点
- Config Server:存储集群的元数据,配置信息,路由信息,3.4版本之后默认要配置成副本集
- Shard:每个分片存储数据的一个子集,每个分片可以部署成一个复制集,一般有多个Shard节点,达到数据分片目的
基本的架构图如下
Shard Keys
MongoDB 使用分片键对集合(Collection)进行分片。分片键 由集合(Collection)中每个文档(Document)中存在的不可变字段组成。
对集合分片的时候需要选择分片键,一旦选择之后分片键之后,不能再更改,其次分片集合只能有一个分片键
对非空集合进行分片,集合必须具有 以分片键开头的索引。对于空集合,如果集合尚未具有指定分片键的适当索引,MongoDB将创建索引。
分片键的选择会影响分片群集的性能,效率和可伸缩性。具有最佳硬件和基础结构的群集可能会因选择分片键而受到瓶颈。选择分片键及索引也会影响群集可以使用的分片策略。
Chunk
MongoDB将分片数据划分为Chunk。数据会以Chunk为单位(默认64MB)根据Shard Key 分散到后端1或多个Shard上。小的Chunk数据均衡回比较快,数据分裂频繁,路由节点消耗更多资源,大的Chunk数据分裂少,数据块移动消耗比较大IO资源
Balancer
mongos的一个重要功能,自动巡查所有shard节点上的chunk情况,自动做chunk迁移,Balancer是一个后台进程监视的进程,监控同一个Shrad上Chunk的数量,当Shard上的Chunk数量达到特定迁移阈值时,Balancer会尝试在Shard之间自动迁移Chunk,尽量在每个Shard中达到相同数量的Chunk。平衡的过程对用户和应用程序层完全透明,但在执行过程时可能会对性能产生一些影响。
- 自动运行,检测系统不繁忙的时候做迁移
- 在做节点删除的时候,立即开始迁移工作
- blancer只能在预设定的时间窗口内运行
Balancer迁移Chunk的过程:
- Balancer 进程发送
moveChunk命令给source shard. - source 执行内部
moveChunk命令开始迁移,迁移Chunk期间,对Chunk的操作发送到source shard上,source shard负责处理写请求 - destination shard 创建索引
- destination shard开始请求Chunk的文档,开始接收数据的副本
- 接收完最后的Document之后,会启动同步过程来确保destination shard同步了迁移期间Document发生的更改
- 完全同步之后,source shard连接config数据库和更新这个Chunk的集群元数据信息
- source shrad更新完成元数据信息之后,如果Chunk上没有开启的cursors,则source shard删除它的Document副本
分片集群的优势
- 读写性能提高
- 存储容量增加
- 高可用
分片策略
- Hashed Sharding,Hash分片
分片过程中利用哈希索引作为分片的单个键,且哈希分片的片键只能使用一个字段,而基于哈希片键最大的好处就是保证数据在各个节点分布基本均匀。
- Ranged Sharding,范围分片
基于范围的分片将数据划分为由Shrad key值确定的连续范围。
部署
规划
| 操作系统版本 | IP:PORT | MongoDB版本 | 安装方式 | 角色 |
|---|---|---|---|---|
| CentOS Linux release 7.6.1810 | 192.168.240.21:27017 | 3.6.13 | 二进制包解压 | Router1 |
| CentOS Linux release 7.6.1810 | 192.168.240.21:28018 | 3.6.13 | 二进制包解压 | Router2 |
| CentOS Linux release 7.6.1810 | 192.168.240.21:37017 | 3.6.13 | 二进制包解压 | Config Servers |
| CentOS Linux release 7.6.1810 | 192.168.240.21:38018 | 3.6.13 | 二进制包解压 | Config Servers |
| CentOS Linux release 7.6.1810 | 192.168.240.21:39019 | 3.6.13 | 二进制包解压 | Config Servers |
| CentOS Linux release 7.6.1810 | 192.168.240.21:47017 | 3.6.13 | 二进制包解压 | Shard1 |
| CentOS Linux release 7.6.1810 | 192.168.240.21:48018 | 3.6.13 | 二进制包解压 | Shard1 |
| CentOS Linux release 7.6.1810 | 192.168.240.21:49019 | 3.6.13 | 二进制包解压 | Shard1 |
| CentOS Linux release 7.6.1810 | 192.168.240.21:57017 | 3.6.13 | 二进制包解压 | Shard2 |
| CentOS Linux release 7.6.1810 | 192.168.240.21:58018 | 3.6.13 | 二进制包解压 | Shard2 |
| CentOS Linux release 7.6.1810 | 192.168.240.21:59019 | 3.6.13 | 二进制包解压 | Shard2 |
安装MongoDB
前期准备
关闭防火墙和selinux
systemctl  stop firewalld
setenforce  0
安装MongoDB
创建用户
useradd   mongo
echo "mongo" | passwd mongo --stdin
关闭hugepage大页内存
Transparent Huge Pages(THP)是一种Linux内存管理系统,通过使用更大的内存页面,可以减少具有大量内存的计算机上的Translation Lookaside Buffer(TLB)查找的开销。 但是,数据库工作负载通常在THP上表现不佳,因为它们往往具有稀疏而不是连续的内存访问模式。您应该在Linux机器上禁用THP以确保使用MongoDB获得最佳性能。
cat  /etc/init.d/disable-transparent-hugepages
#!/bin/bash
### BEGIN INIT INFO
# Provides:          disable-transparent-hugepages
# Required-Start:    $local_fs
# Required-Stop:
# X-Start-Before:    mongod mongodb-mms-automation-agent
# Default-Start:     2 3 4 5
# Default-Stop:      0 1 6
# Short-Description: Disable Linux transparent huge pages
# Description:       Disable Linux transparent huge pages, to improve
#                    database performance.
### END INIT INFO

case $1 in
  start)
    if [ -d /sys/kernel/mm/transparent_hugepage ]; then
      thp_path=/sys/kernel/mm/transparent_hugepage
    elif [ -d /sys/kernel/mm/redhat_transparent_hugepage ]; then
      thp_path=/sys/kernel/mm/redhat_transparent_hugepage
    else
      return 0
    fi

    echo 'never' > ${thp_path}/enabled
    echo 'never' > ${thp_path}/defrag

    re='^[0-1]+$'
    if [[ $(cat ${thp_path}/khugepaged/defrag) =~ $re ]]
    then
      # RHEL 7
      echo 0  > ${thp_path}/khugepaged/defrag
    else
      # RHEL 6
      echo 'no' > ${thp_path}/khugepaged/defrag
    fi

    unset re
    unset thp_path
    ;;
esac
关闭大页内存
chmod 755 /etc/init.d/disable-transparent-hugepages  # 设置脚本权限
chkconfig --add disable-transparent-hugepages    # 设置开机启动
/etc/init.d/disable-transparent-hugepages  start  # 关闭内存大页
验证
cat /sys/kernel/mm/transparent_hugepage/enabled
cat /sys/kernel/mm/transparent_hugepage/defrag
都出现
always madvise [never]
表示成功关闭
安装MongoDB3.6
创建目录,如果是都在不同的服务器上可以按照据情况设置mongodb的目录
mkdir -p /mongodb/bin
mkdir -p /mongodb/{27017,28018,37017,38018,39019,47017,48018,49019,57017,58018,59019}/conf
mkdir -p /mongodb/{27017,28018,37017,38018,39019,47017,48018,49019,57017,58018,59019}/log
mkdir -p /mongodb/{37017,38018,39019,47017,48018,49019,57017,58018,59019}/data
mongos没有数据所以不需要创建Router的data目录
上传MongoDB3.6到/usr/local/src目录下
cd /usr/local/src
tar xf mongodb-linux-x86_64-rhel70-3.6.13.tgz
cp /usr/local/src/mongodb-linux-x86_64-rhel70-3.6.13/bin/* /mongodb/bin/
echo 'PATH="$PATH:/mongodb/bin"' >> /etc/profile
source /etc/profile
配置Shard1
创建Shard1配置文件/mongodb/47017/conf/mongodb.conf
# cat /mongodb/47017/conf/mongodb.conf
processManagement:
   fork: true   # 在后台运行
net:
   bindIp: 192.168.240.21   # 监听的IP地址
   port: 47017     # 监听的端口地址
storage:
   dbPath: "/mongodb/47017/data"    # 数据存放路径
systemLog:
   destination: file
   path: "/mongodb/47017/log/mongodb.log"  # 日志位置
   logAppend: true   # 追加形式写日志
storage:
   journal:
      enabled: true
replication:
   replSetName: "sh1" # 设置复制集名称
sharding:
      clusterRole: shardsvr
创建Shard1配置文件/mongodb/48018/conf/mongodb.conf
# cat /mongodb/48018/conf/mongodb.conf
processManagement:
   fork: true   # 在后台运行
net:
   bindIp: 192.168.240.21   # 监听的IP地址
   port: 48018     # 监听的端口地址
storage:
   dbPath: "/mongodb/48018/data"    # 数据存放路径
systemLog:
   destination: file
   path: "/mongodb/48018/log/mongodb.log"  # 日志位置
   logAppend: true   # 追加形式写日志
storage:
   journal:
      enabled: true
replication:
   replSetName: "sh1" # 设置复制集名称
sharding:
      clusterRole: shardsvr
创建Shard1配置文件/mongodb/49019/conf/mongodb.conf
# cat /mongodb/49019/conf/mongodb.conf
processManagement:
   fork: true   # 在后台运行
net:
   bindIp: 192.168.240.21   # 监听的IP地址
   port: 49019     # 监听的端口地址
storage:
   dbPath: "/mongodb/49019/data"    # 数据存放路径
systemLog:
   destination: file
   path: "/mongodb/49019/log/mongodb.log"  # 日志位置
   logAppend: true   # 追加形式写日志
storage:
   journal:
      enabled: true
replication:
   replSetName: "sh1" # 设置复制集名称
sharding:
      clusterRole: shardsvr
不同的实例使用不同port,不同的log路径,以及不同的数据存放路径,其他可以不变
修改权限
chown -R mongo:mongo /mongodb/
启动多实例
sudo -u mongo /mongodb/bin/mongod -f /mongodb/47017/conf/mongodb.conf
sudo -u mongo /mongodb/bin/mongod -f /mongodb/48018/conf/mongodb.conf
sudo -u mongo /mongodb/bin/mongod -f /mongodb/49019/conf/mongodb.conf
配置Shard1复制集
连接其中一个实例,这里连接27017端口的实例
mongo --host 192.168.240.21 --port 47017
配置复制集
> config = {_id:'sh1',members:[
    {_id:0,host: '192.168.240.21:47017'},
    {_id:1,host: '192.168.240.21:48018'},
    {_id:2,host: '192.168.240.21:49019'}
]}
> rs.initiate(config)
执行rs.initiate(config),结果如下,ok为1标识成功
> rs.initiate(config)
{ "ok" : 1 }
配置Shard2
创建Shard2配置文件/mongodb/57017/conf/mongodb.conf
# cat /mongodb/57017/conf/mongodb.conf
processManagement:
   fork: true   # 在后台运行
net:
   bindIp: 192.168.240.21   # 监听的IP地址
   port: 57017     # 监听的端口地址
storage:
   dbPath: "/mongodb/57017/data"    # 数据存放路径
systemLog:
   destination: file
   path: "/mongodb/57017/log/mongodb.log"  # 日志位置
   logAppend: true   # 追加形式写日志
storage:
   journal:
      enabled: true
replication:
   replSetName: "sh2" # 设置复制集名称
sharding:
      clusterRole: shardsvr
创建Shard2配置文件/mongodb/58018/conf/mongodb.conf
# cat /mongodb/58018/conf/mongodb.conf
processManagement:
   fork: true   # 在后台运行
net:
   bindIp: 192.168.240.21   # 监听的IP地址
   port: 58018     # 监听的端口地址
storage:
   dbPath: "/mongodb/58018/data"    # 数据存放路径
systemLog:
   destination: file
   path: "/mongodb/58018/log/mongodb.log"  # 日志位置
   logAppend: true   # 追加形式写日志
storage:
   journal:
      enabled: true
replication:
   replSetName: "sh2" # 设置复制集名称
sharding:
      clusterRole: shardsvr
创建Shard2配置文件/mongodb/59019/conf/mongodb.conf
# cat /mongodb/59019/conf/mongodb.conf
processManagement:
   fork: true   # 在后台运行
net:
   bindIp: 192.168.240.21   # 监听的IP地址
   port: 59019     # 监听的端口地址
storage:
   dbPath: "/mongodb/59019/data"    # 数据存放路径
systemLog:
   destination: file
   path: "/mongodb/59019/log/mongodb.log"  # 日志位置
   logAppend: true   # 追加形式写日志
storage:
   journal:
      enabled: true
replication:
   replSetName: "sh2" # 设置复制集名称
sharding:
      clusterRole: shardsvr
不同的实例使用不同port,不同的log路径,以及不同的数据存放路径,其他可以不变
修改权限
chown -R mongo:mongo /mongodb/
启动多实例
sudo -u mongo /mongodb/bin/mongod -f /mongodb/57017/conf/mongodb.conf
sudo -u mongo /mongodb/bin/mongod -f /mongodb/58018/conf/mongodb.conf
sudo -u mongo /mongodb/bin/mongod -f /mongodb/59019/conf/mongodb.conf
配置Shard1复制集
连接其中一个实例,这里连接27017端口的实例
mongo --host 192.168.240.21 --port 57017
配置复制集
> config = {_id:'sh2',members:[
    {_id:0,host: '192.168.240.21:57017'},
    {_id:1,host: '192.168.240.21:58018'},
    {_id:2,host: '192.168.240.21:59019'}
]}
> rs.initiate(config)
执行rs.initiate(config),结果如下,ok为1标识成功
> rs.initiate(config)
{ "ok" : 1 }
配置Config Servers
创建Config Servers配置文件/mongodb/37017/conf/mongodb.conf
# cat /mongodb/37017/conf/mongodb.conf
processManagement:
   fork: true   # 在后台运行
net:
   bindIp: 192.168.240.21   # 监听的IP地址
   port: 37017     # 监听的端口地址
storage:
   dbPath: "/mongodb/37017/data"    # 数据存放路径
systemLog:
   destination: file
   path: "/mongodb/37017/log/mongodb.log"  # 日志位置
   logAppend: true   # 追加形式写日志
storage:
   journal:
      enabled: true
replication:
   replSetName: "config" # 设置复制集名称
sharding:
    clusterRole: configsvr
创建Config Servers配置文件/mongodb/38018/conf/mongodb.conf
# cat /mongodb/38018/conf/mongodb.conf
processManagement:
   fork: true   # 在后台运行
net:
   bindIp: 192.168.240.21   # 监听的IP地址
   port: 38018     # 监听的端口地址
storage:
   dbPath: "/mongodb/38018/data"    # 数据存放路径
systemLog:
   destination: file
   path: "/mongodb/38018/log/mongodb.log"  # 日志位置
   logAppend: true   # 追加形式写日志
storage:
   journal:
      enabled: true
replication:
   replSetName: "config" # 设置复制集名称
sharding:
    clusterRole: configsvr
创建Config Servers配置文件/mongodb/39019/conf/mongodb.conf
# cat /mongodb/39019/conf/mongodb.conf
processManagement:
   fork: true   # 在后台运行
net:
   bindIp: 192.168.240.21   # 监听的IP地址
   port: 39019     # 监听的端口地址
storage:
   dbPath: "/mongodb/39019/data"    # 数据存放路径
systemLog:
   destination: file
   path: "/mongodb/39019/log/mongodb.log"  # 日志位置
   logAppend: true   # 追加形式写日志
storage:
   journal:
      enabled: true
replication:
   replSetName: "config" # 设置复制集名称
sharding:
    clusterRole: configsvr
不同的实例使用不同port,不同的log路径,以及不同的数据存放路径,其他可以不变
修改权限
chown -R mongo:mongo /mongodb/
启动多实例
sudo -u mongo /mongodb/bin/mongod -f /mongodb/37017/conf/mongodb.conf
sudo -u mongo /mongodb/bin/mongod -f /mongodb/38018/conf/mongodb.conf
sudo -u mongo /mongodb/bin/mongod -f /mongodb/39019/conf/mongodb.conf
配置Config Servers复制集
连接其中一个实例,这里连接37017端口的实例
mongo --host 192.168.240.21 --port 37017
配置复制集
> config = {_id:'config',members:[
    {_id:0,host: '192.168.240.21:37017'},
    {_id:1,host: '192.168.240.21:38018'},
    {_id:2,host: '192.168.240.21:39019'}
]}
> rs.initiate(config)
执行rs.initiate(config),结果如下,ok为1标识成功
> rs.initiate(config)
{
        "ok" : 1,
        "operationTime" : Timestamp(1562831526, 1),
        "$gleStats" : {
                "lastOpTime" : Timestamp(1562831526, 1),
                "electionId" : ObjectId("000000000000000000000000")
        },
        "$clusterTime" : {
                "clusterTime" : Timestamp(1562831526, 1),
                "signature" : {
                        "hash" : BinData(0,"AAAAAAAAAAAAAAAAAAAAAAAAAAA="),
                        "keyId" : NumberLong(0)
                }
        }
}
构建mongos
创建Config Servers配置文件/mongodb/27017/conf/mongodb.conf
# cat /mongodb/27017/conf/mongodb.conf
processManagement:
   fork: true   # 在后台运行
net:
   bindIp: 192.168.240.21   # 监听的IP地址
   port: 27017     # 监听的端口地址
systemLog:
   destination: file
   path: "/mongodb/27017/log/mongodb.log"  # 日志位置
   logAppend: true   # 追加形式写日志
sharding:
    configDB: config/192.168.240.21:37017,192.168.240.21:38018,192.168.240.21:39019
创建Config Servers配置文件/mongodb/28018/conf/mongodb.conf
# cat /mongodb/28018/conf/mongodb.conf
processManagement:
   fork: true   # 在后台运行
net:
   bindIp: 192.168.240.21   # 监听的IP地址
   port: 28018     # 监听的端口地址
systemLog:
   destination: file
   path: "/mongodb/28018/log/mongodb.log"  # 日志位置
   logAppend: true   # 追加形式写日志
sharding:
    configDB: config/192.168.240.21:37017,192.168.240.21:38018,192.168.240.21:39019
修改权限
chown -R mongo:mongo /mongodb/
启动多实例
sudo -u mongo /mongodb/bin/mongos -f /mongodb/27017/conf/mongodb.conf
sudo -u mongo /mongodb/bin/mongos -f /mongodb/28018/conf/mongodb.conf
添加shard进入集群
连接mongos实例,这里连接27017端口的实例
mongo --host 192.168.240.21 --port 27017
添加Shard1复制集到分片集群
格式为
sh.addShard( "/s1-mongo1.example.net:27018")
具体命令如下
mongos> use admin
mongos> db.runCommand({addshard:"sh1/192.168.240.21:47017,192.168.240.21:48018,192.168.240.21:49019",name:"shard1"})
当返回为ok为1表示添加成功
{
        "shardAdded" : "shard1",
        "ok" : 1,
        "operationTime" : Timestamp(1562832858, 4),
        "$clusterTime" : {
                "clusterTime" : Timestamp(1562832858, 4),
                "signature" : {
                        "hash" : BinData(0,"AAAAAAAAAAAAAAAAAAAAAAAAAAA="),
                        "keyId" : NumberLong(0)
                }
        }
}
添加Shard2复制集到分片集群
mongos> use admin
mongos> db.runCommand({addshard:"sh2/192.168.240.21:57017,192.168.240.21:58018,192.168.240.21:59019",name:"shard2"})
当返回为ok为1表示添加成功
{
        "shardAdded" : "shard2",
        "ok" : 1,
        "operationTime" : Timestamp(1562833111, 2),
        "$clusterTime" : {
                "clusterTime" : Timestamp(1562833111, 2),
                "signature" : {
                        "hash" : BinData(0,"AAAAAAAAAAAAAAAAAAAAAAAAAAA="),
                        "keyId" : NumberLong(0)
                }
        }
}
列出所有Shard
db.runCommand({listshards:1})
查看集群状态
sh.status()
连接28018端口重复上述操作
设置Ranged分片
连接其中一个mongos实例,这里连接27017端口的实例
mongo --host 192.168.240.21 --port 27017
激活ranged的数据库分片功能
mongos> use ranged
mongos> sh.enableSharding("ranged")
返回结果ok为1表示成功
{
        "ok" : 1,
        "operationTime" : Timestamp(1562834266, 8),
        "$clusterTime" : {
                "clusterTime" : Timestamp(1562834266, 8),
                "signature" : {
                        "hash" : BinData(0,"AAAAAAAAAAAAAAAAAAAAAAAAAAA="),
                        "keyId" : NumberLong(0)
                }
        }
}
创建索引
mongos> use ranged
mongos> db.range1.ensureIndex({id:1})
返回结果ok为1,表示成功
{
        "raw" : {
                "sh2/192.168.240.21:57017,192.168.240.21:58018,192.168.240.21:59019" : {
                        "createdCollectionAutomatically" : true,
                        "numIndexesBefore" : 1,
                        "numIndexesAfter" : 2,
                        "ok" : 1
                }
        },
        "ok" : 1,
        "operationTime" : Timestamp(1562834503, 4),
        "$clusterTime" : {
                "clusterTime" : Timestamp(1562834503, 4),
                "signature" : {
                        "hash" : BinData(0,"AAAAAAAAAAAAAAAAAAAAAAAAAAA="),
                        "keyId" : NumberLong(0)
                }
        }
}
开启分片
mongos> use admin
mongos> db.runCommand({shardcollection:"ranged.range1",key:{id:1}})
返回的结果ok为1表示成功
{
        "collectionsharded" : "ranged.range1",
        "collectionUUID" : UUID("66b0656b-deac-4634-9add-b7ee2506c861"),
        "ok" : 1,
        "operationTime" : Timestamp(1562834559, 7),
        "$clusterTime" : {
                "clusterTime" : Timestamp(1562834559, 7),
                "signature" : {
                        "hash" : BinData(0,"AAAAAAAAAAAAAAAAAAAAAAAAAAA="),
                        "keyId" : NumberLong(0)
                }
        }
}
集合分片验证
mongos> use ranged
mongos> for(i=1;i<50000;i++){db.range1.insert({"id":i,"name":"shenzhen","age":20,"data":new Date()})};
mongos> db.range1.stats()
分片结果测试,连接后端shard1和shrad2
mongo --host 192.168.240.21 --port 47017
查看范围分片是否成功
use ranged
db.range1.count();
设置hash分片
连接其中一个mongos实例,这里连接28018端口的实例
mongo --host 192.168.240.21 --port 28018
激活hashed的数据库分片功能
mongos> use hashed
mongos> sh.enableSharding("hashed")
返回结果,ok为1表示成功
{
        "ok" : 1,
        "operationTime" : Timestamp(1562840136, 6),
        "$clusterTime" : {
                "clusterTime" : Timestamp(1562840136, 6),
                "signature" : {
                        "hash" : BinData(0,"AAAAAAAAAAAAAAAAAAAAAAAAAAA="),
                        "keyId" : NumberLong(0)
                }
        }
}
创建索引
mongos> use hashed
mongos> db.hashed1.ensureIndex({id:"hashed"})
返回结果,ok为1表示成功
{
        "raw" : {
                "sh1/192.168.240.21:47017,192.168.240.21:48018,192.168.240.21:49019" : {
                        "createdCollectionAutomatically" : true,
                        "numIndexesBefore" : 1,
                        "numIndexesAfter" : 2,
                        "ok" : 1
                }
        },
        "ok" : 1,
        "operationTime" : Timestamp(1562840333, 3),
        "$clusterTime" : {
                "clusterTime" : Timestamp(1562840333, 3),
                "signature" : {
                        "hash" : BinData(0,"AAAAAAAAAAAAAAAAAAAAAAAAAAA="),
                        "keyId" : NumberLong(0)
                }
        }
}
开启hash分片
mongos> use admin
mongos> sh.shardCollection("hashed.hashed1", { id : "hashed" } )
结果输出ok为1表示成功
{
        "collectionsharded" : "hashed.hashed1",
        "collectionUUID" : UUID("09c1f882-c257-4abe-b556-ee9568f51c12"),
        "ok" : 1,
        "operationTime" : Timestamp(1562840542, 26),
        "$clusterTime" : {
                "clusterTime" : Timestamp(1562840542, 26),
                "signature" : {
                        "hash" : BinData(0,"AAAAAAAAAAAAAAAAAAAAAAAAAAA="),
                        "keyId" : NumberLong(0)
                }
        }
}
hash分片验证
mongos> use hashed
mongos> for(i=1;i<50000;i++){db.hashed1.insert({"id":i,"name":"shenzhen","age":20,"data":new Date()})};
mongos> db.hashed1.stats()
分片结果测试,连接后端shard1和shrad2
mongo --host 192.168.240.21 --port 47017
查看hash分片是否成功
use hashed
db.hashed1.count()
分片集群管理
- 查看分片集群状态
sh.status()
- 判断是否shard集群
db.runCommand({isdbgrid:1})
- 列出分片信息
db.runCommand({listshards:1})
- 列出开启分片的数据库
use config
db.databases.find({"partitioned":true})
db.databases.find() //列出所有数据库分片情况
- 查看分片键
use config
db.collections.find()
- 删除分片节点
db.runCommand({removeShard:"shard2"})
- 添加新的分片
sh.addShard( "rs1/mongodb0.example.net:27018" )
Blancer常用操作
- 关闭Balancer,备份数据库的时候,需要关闭
sh.stopBalancer()
- 开启
sh.startBalancer()
sh.setBalancerState(true)
- 自定义,自动平衡进行的时间段
db.settings.update({_id:"balancer"},{$set:{activeWindow:{start:"00:00",stop:"5:00"}}},true)
- 关闭某个集合的balance
sh.disableBalancing("students.grades")
- 开启某个集合的balance
sh.enableBalancing("students.grades")
- 确定某个集合的balance是开启或关闭
sh.getSiblingDB("config").collections.findOne({id:""}).
参考文档
- https://www.2cto.com/database/201804/735734.html
- https://docs.mongodb.com/v3.6/


