如何在win10+VS2017环境下新建一个简单的WDF示例程序
上一课我们在win10系统+VS2017开发环境下搭建了WDK驱动程序开发环境的搭建,详见我的博客【如何在win10+VS2017环境下安装USB驱动开发套件WDK】,今天我们来尝试建立一个最简单的KDM示例工程。
提前说明:本博客所建立的示例工程的源码,我上传在了CSDN里【https://download.csdn.net/download/leon1741/10957680】,大家可以自行去下载。不过遗憾的是,现在CSDN资源的下载积分规则改了,不能由上传者来设置该资源的下载积分,而是由系统自动适配的。因此,这个资源的下载积分目前需要5分,有点多,我其实想设置成免费或者最多1分的,可是系统不让我改。希望各位的积分值够用,或者希望系统过段时间自动把下载积分值降下来吧…
第一步:新建工程
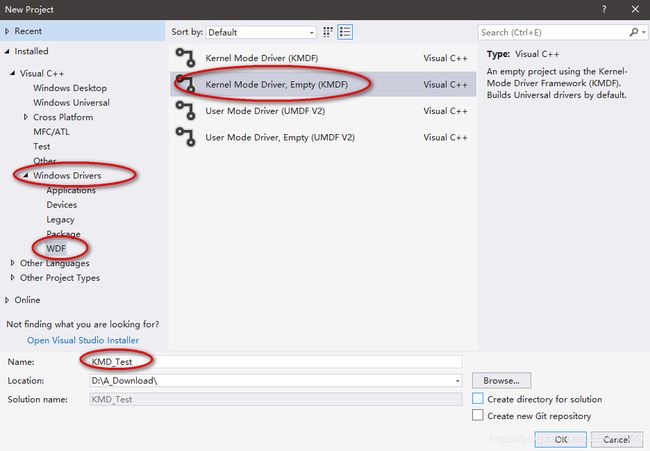
记得要选择WDF模型下的空KMD驱动项目,项目名我输的是KMD_Test,大家可以自己更改。
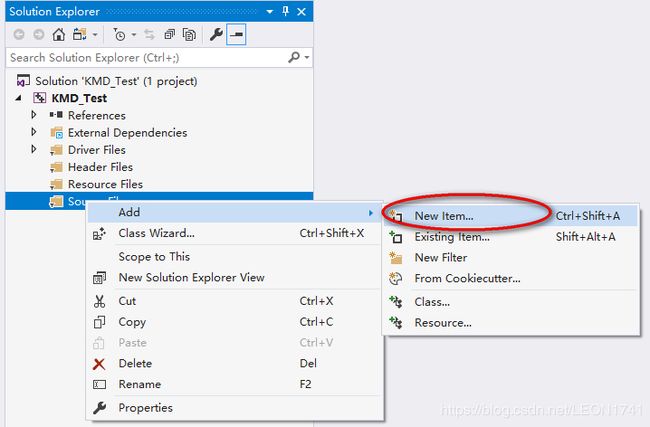
第二步、输入代码
在源代码文件夹上右击,选择新建一个空白文件。
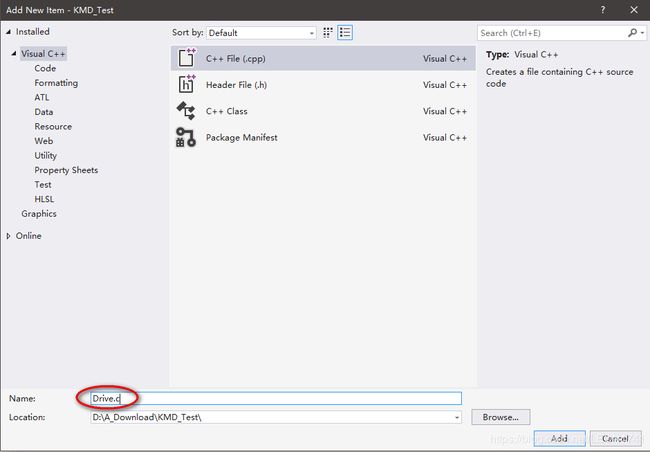
输入文件名为Drive.c。请注意,不是Drive.cpp,而是Drive.c!
在文件中输入以下内容:
#include 第三步:项目配置
首先切换到x64平台下,选择debug模式。

然后打开项目属性的窗口,完成以下设置:
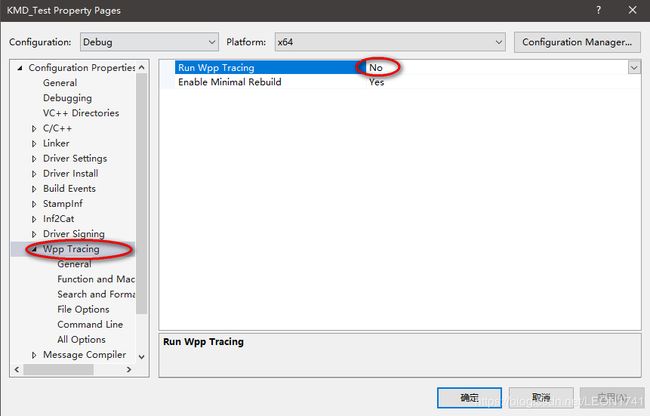
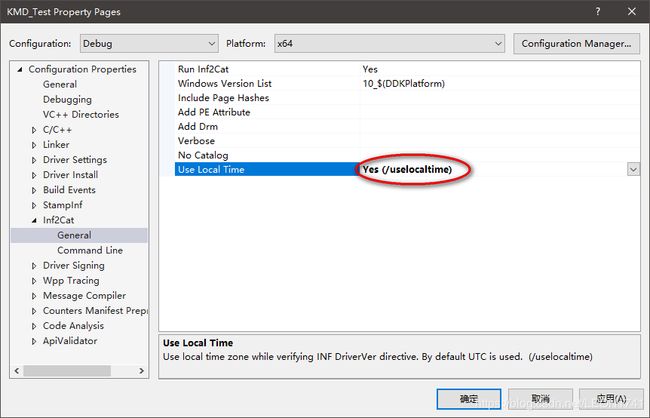
第四步、全文编译
无需其他操作,点击编译按钮即可!
1>------ Build started: Project: KMD_Test, Configuration: Debug x64 ------
1>Building 'KMD_Test' with toolset 'WindowsKernelModeDriver10.0' and the 'Universal' target platform.
1>C:\Program Files (x86)\Microsoft Visual Studio\2017\Community\Common7\IDE\VC\VCTargets\Microsoft.CppBuild.targets(402,5): warning MSB8038: Spectre mitigation is enabled but Spectre mitigated libraries are not found.  Verify that the Visual Studio Workload includes the Spectre mitigated libraries.  See https://aka.ms/Ofhn4c for more information.
1>Stamping x64\Debug\KMD_Test.inf
1>Stamping [Version] section with DriverVer=02/14/2019,18.56.35.708
1>Drive.c
1>KMD_Test.vcxproj -> D:\A_Download\KMD_Test\x64\Debug\KMD_Test.sys
1>Done Adding Additional Store
1>Successfully signed: D:\A_Download\KMD_Test\x64\Debug\KMD_Test.sys
1>
1>Driver is a Universal Driver.
1>........................
1>Signability test complete.
1>
1>Errors:
1>None
1>
1>Warnings:
1>None
1>
1>Catalog generation complete.
1>D:\A_Download\KMD_Test\x64\Debug\KMD_Test\kmd_test.cat
1>[0x7FF9F8B95140] ANOMALY: meaningless REX prefix used
1>[0x7FF9F8B95180] ANOMALY: meaningless REX prefix used
1>[0x7FF9F8B95380] ANOMALY: meaningless REX prefix used
1>[0x7FF9F8B935F0] ANOMALY: meaningless REX prefix used
1>[0x7FF9F8B91FD0] ANOMALY: meaningless REX prefix used
1>Done Adding Additional Store
1>Successfully signed: D:\A_Download\KMD_Test\x64\Debug\KMD_Test\kmd_test.cat
1>
1>Done building project "KMD_Test.vcxproj".
========== Build: 1 succeeded, 0 failed, 0 up-to-date, 0 skipped ==========
编译出来的驱动程序,均放在”项目目录\Debug\KMD_Test“目录下:

- KMD_Test.sys – 最关键的内核模式驱动文件;
- KMD_Test.inf – 安装驱动时提供给系统使用的信息文件;
- KMD_Test.cat – 安装程序用来鉴别驱动签名状态的目录文件;
注:以上全部过程,均是参考微软官方的指导文档执行下来,大家若有兴趣可以自行参阅【Write a KMDF Hello World driver】。
另外,也可以参考微软在github上提供的一份全套示例参考【https://github.com/Microsoft/Windows-driver-samples】。
OK,新建的工程已经顺利编译成功,驱动程序也已经生成完毕,本篇到此为止。下一篇我们将继续研究如何进行驱动程序的调试和安装。
篇后语:
这里补充一下,安装完WDK之后,如果去编译其他的C++工程,有可能会遇到【LINK : fatal error LNK1104: 无法打开文件“MSVCRTD.lib”】之类的问题,请不要慌张,不要去网上乱找,这个问题的原因其实很简单,参考我的另一篇博客【如何解决win10+VS2017+WDK环境下编译C++程序提示error LNK1104无法打开文件*.lib的问题】即可!