Linux系统搭建SVN教程
前景提要:最近正在学习如何在Linux系统搭建SVN,在网上也找到了很多相关教程,但是我发现很多教程都是只讲了一半的,什么意思呢?我们一般搭建SVN是为了做版本控制的,而网上的部分教程只讲了如何搭建svn仓库,却没有说如何自动部署代码到项目。为此我在这做个整合。
1.安装svn
yum -y install subversion1.1安装成功:
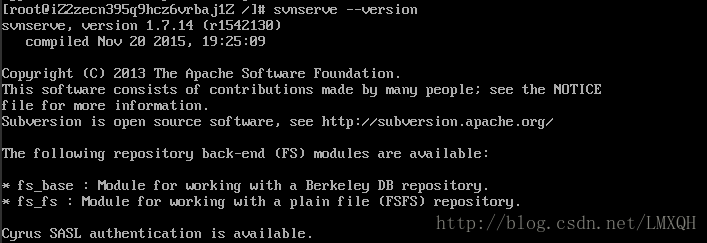
1.2查看版本号,确认是否正确安装
svnserve --version 2.搭建产品仓库
2.1 建立svn根目录(可自定义)
mkdir /svn2.2建立产品仓库
mkdir -p /svn/test
svnadmin create /svn/test
2.3修改配置文件
vim /svn/test/conf/svnserve.conf 主要修改的地方:
anon-access = none       //默认是只读read
auth-access = write      //认证后有写入权限
password-db = passwd     //帐号密码配置文件
authz-db = authz         //权限配置文件
realm = test             //改成自己的版本库 生效范围
修改后文件内容如下:
### This file controls the configuration of the svnserve daemon, if you
### use it to allow access to this repository.  (If you only allow
### access through http: and/or file: URLs, then this file is
### irrelevant.)
### Visit http://subversion.tigris.org/ for more information.
[general]
### These options control access to the repository for unauthenticated
### and authenticated users.  Valid values are "write", "read",
### and "none".  The sample settings below are the defaults.
anon-access = none # 注意这里必须设置,否则所有用户不用密码就可以访问
auth-access = write
### The password-db option controls the location of the password
### database file.  Unless you specify a path starting with a /,
### the file's location is relative to the directory containing
### this configuration file.
### If SASL is enabled (see below), this file will NOT be used.
### Uncomment the line below to use the default password file.
password-db = passwd
### The authz-db option controls the location of the authorization
### rules for path-based access control.  Unless you specify a path
### starting with a /, the file's location is relative to the the
### directory containing this file.  If you don't specify an
### authz-db, no path-based access control is done.
### Uncomment the line below to use the default authorization file.
authz-db = authz
### This option specifies the authentication realm of the repository.
### If two repositories have the same authentication realm, they should
### have the same password database, and vice versa.  The default realm
### is repository's uuid.
realm = test
[sasl]
### This option specifies whether you want to use the Cyrus SASL
### library for authentication. Default is false.
### This section will be ignored if svnserve is not built with Cyrus
### SASL support; to check, run 'svnserve --version' and look for a line
### reading 'Cyrus SASL authentication is available.'
# use-sasl = true
### These options specify the desired strength of the security layer
### that you want SASL to provide. 0 means no encryption, 1 means
### integrity-checking only, values larger than 1 are correlated
### to the effective key length for encryption (e.g. 128 means 128-bit
### encryption). The values below are the defaults.
# min-encryption = 0
# max-encryption = 256
2.4设置passwd用户账号信息
vim /svn/test/conf/passwd### This file is an example password file for svnserve.
### Its format is similar to that of svnserve.conf. As shown in the
### example below it contains one section labelled [users].
### The name and password for each user follow, one account per line.
### 在下面添加用户和密码,每行一组username = password
[users]
# harry = harryssecret
# sally = sallyssecret
test = password #在此设置用户名和密码只用在文档后面加一句话即可,test代表你要设的用户名,password代表你要设置的密码,此处设置是为了在本地连接之用
2.5设置authz,设置用户访问权限
vim /svn/test/conf/authz 在文件末尾添加以下代码即可:
devteam = test          //创建一个devteam的组,并制定一个用户test
[test:/]                //制定test目录的权限
@devteam = rw           //项目组的成员对test都有读写权限。
2.6启动svn
svnserve -d -r /svn默认的启动端口号为3690;
-d : 表示以daemon方式(后台运行)运行;
-r /svn : 指定根目录是/svn;
2.6.1检查是否启动
netstat -tunlp | grep svn如果显示以下信息说明启动成功
tcp 0 0 0.0.0.0:9999 0.0.0.0:* LISTEN 10973/svnserve
最后就可以通过客户端(小乌龟)进行访问 svn://{your-server-ip}:/test/ 根据提示输入账号密码即可
以上基本实现了对svn的搭建,接下来将讲解如何自动部署代码到项目
如果只是完成了上面的搭建,你可能会发现从本地上传的代码在服务器是无法找到的。这是因为svn 存储的是二进制的文件,所以想要实现版本控制还要多部署一步。
3.1配置post-commit文件
进入到hooks目录下:
cd /svn/test/hooks执行以下代码:
cp post-commit.tmpl post-commit修改 post-commit 文件
vim post-commit将post-commit里面的全部内容清除,替换成以下代码:
#!/bin/sh
export LANG=zh_CN.UTF-8
/usr/bin/svn update --username test --password 123456 /var/www/test
其中第一行意思是:用sh来解析这个脚本,因为各种shell的语法有细微的差别
第二行是编码格式:这里我使用的是UTF-8
最后一行/usr/bin/svn 是svn的路径,不是项目路径,应该都是一样的,后半句分别是用户名、密码、和项目路径。
test 代表用户名,123456则表示密码 ,也就是我们在前面配置的账号和密码。而后面的/var/www/test则是你自己项目的所在位置。本地svn上传的文件将会上传到此目录。
修改post-commit的可执行权限
chmod 755 post-commit最后进入到你的项目目录,本例是/var/www/test
cd /var/www/test接下来checkout整个项目
svn checkout svn://{您的服务器地址}:{端口号}/test . //注意目录后面还有一个点端口号一般为:3690
至此,Linux系统搭建svn全部完成。
参考链接:
1.http://www.cnblogs.com/mitang/p/4309762.html
2.https://bbs.aliyun.com/read/255009.html?pos=18

