Android JPush(极光推送)的使用教程
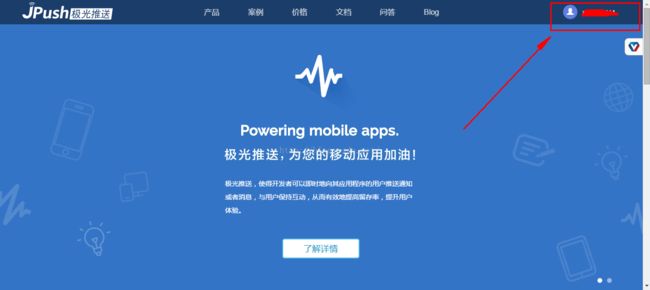
注册号以后,创建应用
2、点击创建应用
3、在创建应用界面输入自己项目的应用名和应用的包名,输入后点击创建我的应用按钮就可以完成创建。
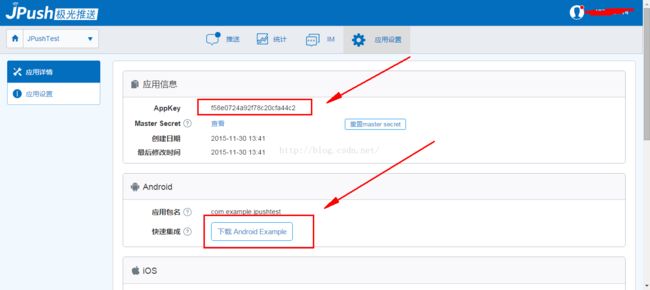
4、创建完成后就能看到以下界面,这个界面中的AppKey就是我们等下要用的Key。该系统还帮你自动完成可一个属于你的Demo,供你参考,可以点击下载Android Example 下载。
这样就完成了应用的创建,接下来就是下载SDK以便后面集成是使用。
下载SDK,根据以下步骤进入
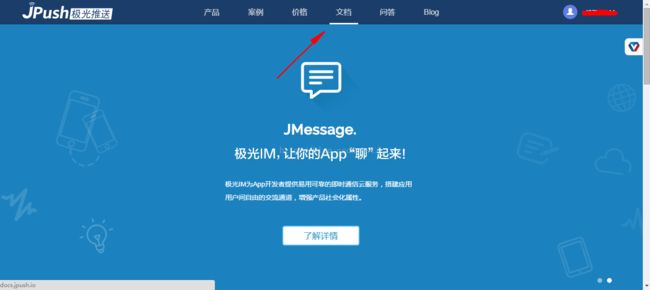
1、先进入官网、点击文档
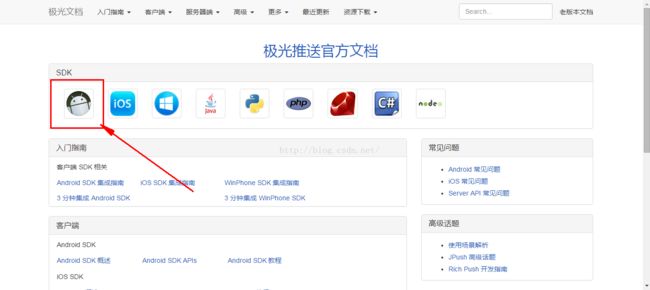
2、进入文档页面后点击android图标
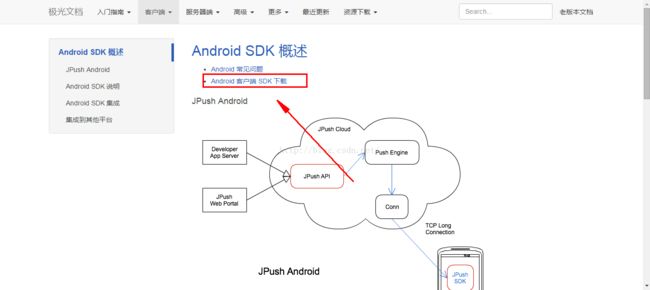
3、进入android SDK页面,点击Android 客户端 SDK下载
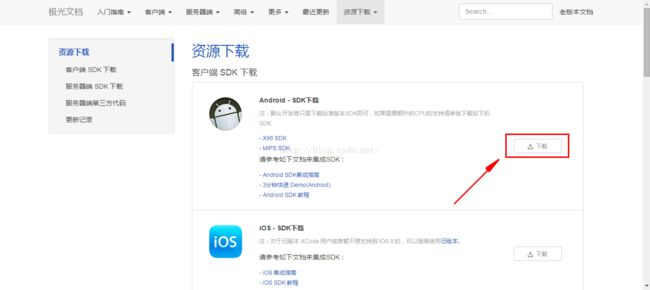
4、在客户端SDK下载中,点击下载
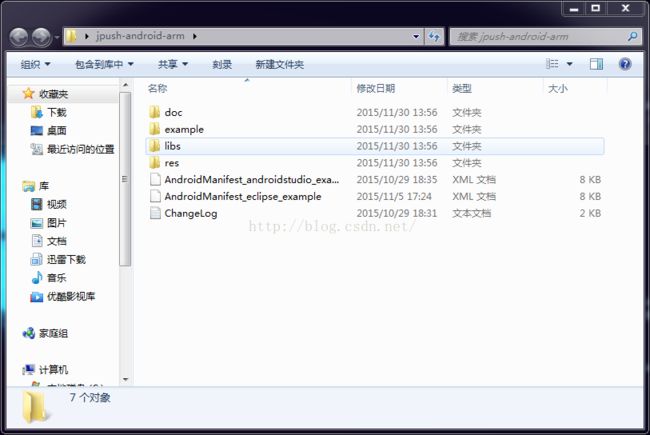
5、下载完成后解压,可以得到以下文件
接写来就可以开始SDK的集成了,接下来就根据官方的文档开始操作
1、导入 SDK 开发包到你自己的应用程序项目
--复制 libs/jpush-sdk-release2.x.y.jar 到工程 libs/ 目录下
--复制 libs/armeabi(和 armeabi-v7a/arm64-v8a)/中so文件 到工程libs/下对应的CPU目录下
--复制 res/drawable-hdpi 中的资源文件到工程的 res/drawable-hdpi/ 目录下
--复制 res/layout 中的布局文件到工程的 res/layout/ 目录下
--复制 res/values 中的布局文件到工程的 res/values/ 目录下
2.配置 AndroidManifest.xml
根据 SDK 压缩包里的 AndroidManifest.xml 样例文件,来配置应用程序项目的 AndroidManifest.xml 。
主要步骤为:
- 复制备注为 "Required" 的部分
- 将备注为替换包名的部分,替换为当前应用程序的包名
- 将AppKey替换为在Portal上注册该应用的的Key,例如(9fed5bcb7b9b87413678c407)
Eclipse中AndroidManifest 示例(黄色为配置权限 红色字为注意点 绿色为自定义Receiver接收自定义消息的 后面会讲到 可不写)
AndroidManifest.xml权限配置: "1.0" encoding="utf-8"?>"http://schemas.android.com/apk/res/android" package="您应用的包名" android:versionCode="100" android:versionName="1.0.0" > "11" android:targetSdkVersion="17" /> " 您应用的包名.permission.JPUSH_MESSAGE" android:protectionLevel="signature" />"您应用的包名.permission.JPUSH_MESSAGE" /> "android.permission.RECEIVE_USER_PRESENT" /> "android.permission.INTERNET" /> "android.permission.WAKE_LOCK" /> "android.permission.READ_PHONE_STATE" /> "android.permission.WRITE_EXTERNAL_STORAGE" /> "android.permission.READ_EXTERNAL_STORAGE" /> "android.permission.VIBRATE" /> "android.permission.MOUNT_UNMOUNT_FILESYSTEMS" /> "android.permission.ACCESS_NETWORK_STATE" /> "android.permission.WRITE_SETTINGS" /> "android.permission.ACCESS_COARSE_LOCATION" /> "android.permission.ACCESS_WIFI_STATE" /> "android.permission.CHANGE_WIFI_STATE" /> "android.permission.ACCESS_FINE_LOCATION" /> "android.permission.ACCESS_LOCATION_EXTRA_COMMANDS" /> "android.permission.CHANGE_NETWORK_STATE" /> 应用包名及appkey替换: <application android:icon="@drawable/ic_launcher" android:label="@string/app_name" android:name="你的Application"> <service android:name="cn.jpush.android.service.PushService" android:enabled="true" android:exported="false" > cn.jpush.android.intent.REGISTER" /> " "cn.jpush.android.intent.REPORT" /> "cn.jpush.android.intent.PushService" /> "cn.jpush.android.intent.PUSH_TIME" /> <service android:name="cn.jpush.android.service.DaemonService" android:enabled="true" android:exported="true"> <receiver android:name="cn.jpush.android.service.PushReceiver" android:enabled="true" > "cn.jpush.android.intent.DaemonService" /> "您应用的包名"/> "1000"> "cn.jpush.android.intent.NOTIFICATION_RECEIVED_PROXY" /> "您应用的包名"/> "android.intent.action.USER_PRESENT" /> "android.net.conn.CONNECTIVITY_CHANGE" /> <activity android:name="cn.jpush.android.ui.PushActivity" android:configChanges="orientation|keyboardHidden" android:exported="false" > "android.intent.action.PACKAGE_ADDED" /> "android.intent.action.PACKAGE_REMOVED" /> "package" /> <service android:name="cn.jpush.android.service.DownloadService" android:enabled="true" android:exported="false" > "cn.jpush.android.ui.PushActivity" /> "android.intent.category.DEFAULT" /> "您应用的包名" /> "cn.jpush.android.service.AlarmReceiver" /> <receiver android:name="您自己定义的Receiver" android:enabled="true"> cn.jpush.android.intent.REGISTRATION" /> " "cn.jpush.android.intent.MESSAGE_RECEIVED" /> "cn.jpush.android.intent.NOTIFICATION_RECEIVED" /> "cn.jpush.android.intent.NOTIFICATION_OPENED" /> "cn.jpush.android.intent.ACTION_RICHPUSH_CALLBACK" /> "cn.jpush.android.intent.CONNECTION" /> "您应用的包名" /> "JPUSH_CHANNEL" android:value="developer-default"/> "JPUSH_APPKEY" android:value="你的k值"/>
创建 一个类继承Application
public class ExampleApplication extends Application {
@Override
        public void onCreate() {
            super.onCreate();
    JPushInterface.setDebugMode(true);
    JPushInterface.init(this);
    }
}
这样就完成了,去官网推送一天消息试试
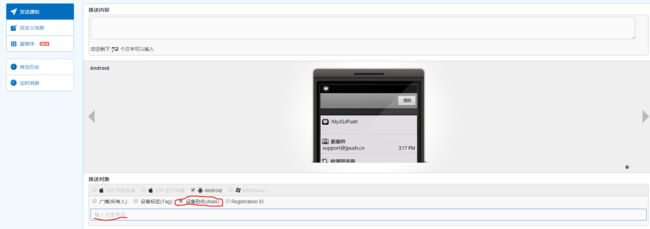
在个人中心中,选择推送--》发送通知--》输入推送内容--》立即发送
要是在手机上收到推送的消息,就说明推送成功了!!!
上面为最简单的 下面开始讲讲其他功能
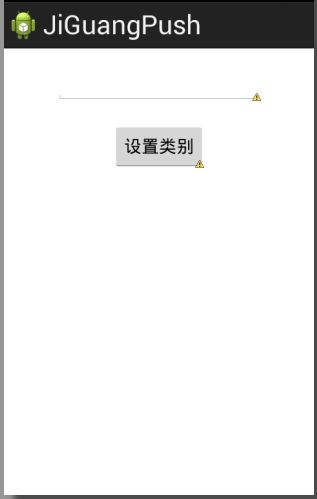
1.固定推送
activity_main.xml
"http://schemas.android.com/apk/res/android"
    xmlns:tools="http://schemas.android.com/tools"
    android:layout_width="match_parent"
    android:layout_height="match_parent"
    tools:context=".MainActivity" >

    <EditText
        android:id="@+id/editText"
        android:layout_width="wrap_content"
        android:layout_height="wrap_content"
        android:layout_alignParentTop="true"
        android:layout_centerHorizontal="true"
        android:layout_marginTop="20dp"
        android:ems="10" >


    <Button
        android:id="@+id/button"
        android:layout_width="wrap_content"
        android:layout_height="wrap_content"
        android:layout_below="@+id/editText"
        android:layout_centerHorizontal="true"
        android:layout_marginTop="21dp"
        android:text="设置类别" />
MainActivity.java
package com.bwie.test;

import cn.jpush.android.api.JPushInterface;
import android.os.Bundle;
import android.app.Activity;
import android.view.Menu;
import android.view.View;
import android.view.View.OnClickListener;
import android.widget.Button;
import android.widget.EditText;
import android.widget.Toast;

public class MainActivity extends Activity {

    private EditText editText;
    private Button button;

    @Override
    protected void onCreate(Bundle savedInstanceState) {
        super.onCreate(savedInstanceState);
        setContentView(R.layout.activity_main);
        editText = (EditText) findViewById(R.id.editText);
        button = (Button) findViewById(R.id.button);
        button.setOnClickListener(new OnClickListener() {

            @Override
            public void onClick(View v) {
                // TODO Auto-generated method stub
                //向服务器修改自己的类别
                JPushInterface.setAlias(MainActivity.this, editText.getText().toString(), null);

                Toast.makeText(MainActivity.this, "success", 0).show();

            }
        });
    }


}
好了 试试点击设备别名 输入自己的设备名就可以固定推送了
2.自定义消息 会用到Receiver 别忘了上面绿色的
MyReceiver.java
package com.bwie.test;

import cn.jpush.android.api.JPushInterface;
import android.content.BroadcastReceiver;
import android.content.Context;
import android.content.Intent;
import android.os.Bundle;
import android.widget.Toast;

public class MyReceiver extends BroadcastReceiver{

    @Override
    public void onReceive(Context context, Intent intent) {
        // TODO Auto-generated method stub
        //判断borad接受的类型
        if(intent.getAction().equals(JPushInterface.ACTION_MESSAGE_RECEIVED)){
            //获得message的内容
            Bundle bundle=intent.getExtras();
            String title = bundle.getString(JPushInterface.EXTRA_TITLE);
            String message = bundle.getString(JPushInterface.EXTRA_MESSAGE);
            //吐司自定义内容
            Toast.makeText(context, "message title"+title+"content:"+message, 1).show();
        }
    }

}
好了 试试
能吐司就对了
AndroidStudio中AndroidManifest 示例
"1.0" encoding="utf-8"?"http://schemas.android.com/apk/res/android" package="您应用的包名" android:versionCode="205" android:versionName="2.0.5" > "11" android:targetSdkVersion="17" /> <permission android:name="${applicationId}.permission.JPUSH_MESSAGE" android:protectionLevel="signature" /> "${applicationId}.permission.JPUSH_MESSAGE" /> "android.permission.RECEIVE_USER_PRESENT" /> "android.permission.INTERNET" /> "android.permission.WAKE_LOCK" /> "android.permission.READ_PHONE_STATE" /> "android.permission.WRITE_EXTERNAL_STORAGE" /> "android.permission.READ_EXTERNAL_STORAGE" /> "android.permission.WRITE_SETTINGS" /> "android.permission.VIBRATE" /> "android.permission.MOUNT_UNMOUNT_FILESYSTEMS" /> "android.permission.ACCESS_NETWORK_STATE" /> "android.permission.ACCESS_WIFI_STATE" /> "android.permission.ACCESS_COARSE_LOCATION" /> "android.permission.CHANGE_WIFI_STATE" /> "android.permission.ACCESS_FINE_LOCATION" /> "android.permission.ACCESS_LOCATION_EXTRA_COMMANDS" /> "android.permission.CHANGE_NETWORK_STATE" /> <application android:icon="@drawable/ic_launcher" android:label="@string/app_name"> <activity android:name="cn.jpush.android.ui.PushActivity" android:configChanges="orientation|keyboardHidden" android:theme="@android:style/Theme.NoTitleBar" android:exported="false"> <service android:name="cn.jpush.android.service.DownloadService" android:enabled="true" android:exported="false" > <service android:name="cn.jpush.android.service.PushService" android:enabled="true" android:exported="false"> "cn.jpush.android.ui.PushActivity" /> "android.intent.category.DEFAULT" /> "${applicationId}" /> <service android:name="cn.jpush.android.service.DaemonService" android:enabled="true" android:exported="true"> "cn.jpush.android.intent.REGISTER" /> "cn.jpush.android.intent.REPORT" /> "cn.jpush.android.intent.PushService" /> "cn.jpush.android.intent.PUSH_TIME" /> <receiver android:name="cn.jpush.android.service.PushReceiver" android:enabled="true" android:exported="false"> "cn.jpush.android.intent.DaemonService" /> "${applicationId}"/> "1000"> "cn.jpush.android.intent.NOTIFICATION_RECEIVED_PROXY" /> "${applicationId}" /> "android.intent.action.USER_PRESENT" /> "android.net.conn.CONNECTIVITY_CHANGE" /> "android.intent.action.PACKAGE_ADDED" /> "android.intent.action.PACKAGE_REMOVED" /> "package" /> "cn.jpush.android.service.AlarmReceiver" /> <receiver android:name="您自己定义的Receiver" android:enabled="true"> "cn.jpush.android.intent.REGISTRATION" /> "cn.jpush.android.intent.MESSAGE_RECEIVED" /> "cn.jpush.android.intent.NOTIFICATION_RECEIVED" /> "cn.jpush.android.intent.NOTIFICATION_OPENED" /> "cn.jpush.android.intent.ACTION_RICHPUSH_CALLBACK" /> "cn.jpush.android.intent.CONNECTION" /> "${applicationId}" /> "JPUSH_CHANNEL" android:value="developer-default"/> "JPUSH_APPKEY" android:value="您应用applicationId对应的appKey" />
