Android 控件之 Fragment
以前我们写 Android 布局时,都是把所有控件都放入 Activity 的布局文件中,这样当我们想添加或者删除一个控件时,就会很不方便。google 在 Android 3.0 (API level 11) 开始引入了 Fragment。
Fragment 中文意思即:碎片,片段。你可以将它看做是一个 Activity 的“子Activity”,我们通过一个小例子来看具体代码:
一、 静态使用 Fragment:
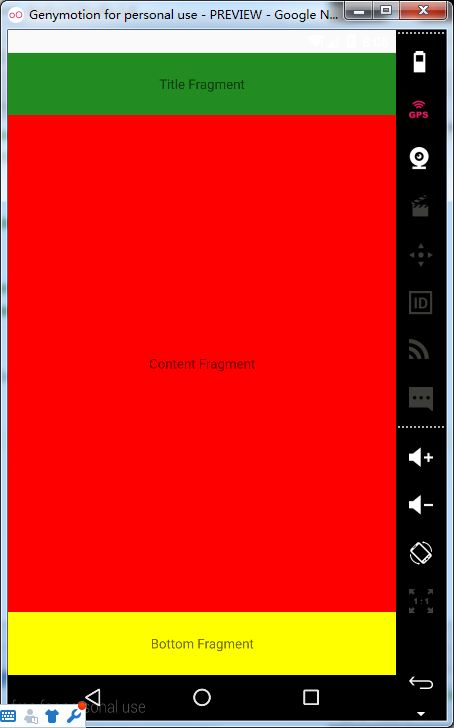
1.0 这是最简单的一种方式,在 Activity 布局文件中通过标签引入 Fragment
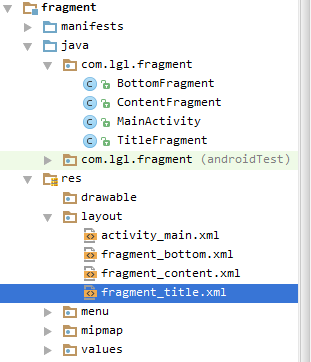
2.0 项目结构图:
3.0 fragment_title.xml:
fragment_title.xml、fragment_content.xml、fragment_bottom.xml 三个布局文件除了背景颜色,其他都一样,这里就只贴一个了
<FrameLayout xmlns:android="http://schemas.android.com/apk/res/android"
    xmlns:tools="http://schemas.android.com/tools"
    android:layout_width="match_parent"
    android:layout_height="match_parent"
    tools:context="com.lgl.fragment.TitleFragment">

    <TextView
        android:layout_width="match_parent"
        android:layout_height="match_parent"
        android:gravity="center"
        android:background="#228B22"
        android:text="Title Fragment" />

FrameLayout>
4.0 activity_main.xml:
<LinearLayout xmlns:android="http://schemas.android.com/apk/res/android"
    android:layout_width="match_parent"
    android:layout_height="match_parent"
    android:orientation="vertical">

    <fragment
        android:id="@+id/title"
        android:name="com.lgl.fragment.TitleFragment"
        android:layout_width="fill_parent"
        android:layout_height="0dp"
        android:layout_weight="1" />

    <fragment
        android:id="@+id/content"
        android:name="com.lgl.fragment.ContentFragment"
        android:layout_width="fill_parent"
        android:layout_height="0dp"
        android:layout_weight="8" />

    <fragment
        android:id="@+id/bottom"
        android:name="com.lgl.fragment.BottomFragment"
        android:layout_width="fill_parent"
        android:layout_height="0dp"
        android:layout_weight="1" />

LinearLayout>
5.0 TitleFragment:
TitleFragment、ContentFragment、BottomFragment 三个 Activity 也都差不多,这里也只贴一个
package com.lgl.fragment;

import android.os.Bundle;
import android.app.Fragment;
import android.view.LayoutInflater;
import android.view.View;
import android.view.ViewGroup;

public class TitleFragment extends Fragment {

    @Override
    public View onCreateView(LayoutInflater inflater, ViewGroup container,
                             Bundle savedInstanceState) {
        return inflater.inflate(R.layout.fragment_title, container, false);
    }

}
6.0 MainActivity:
MainActivity 什么都没写
package com.lgl.fragment;

import android.os.Bundle;
import android.support.v7.app.AppCompatActivity;

public class MainActivity extends AppCompatActivity {

    @Override
    protected void onCreate(Bundle savedInstanceState) {
        super.onCreate(savedInstanceState);
        setContentView(R.layout.activity_main);
    }

}
二、动态使用 Fragment
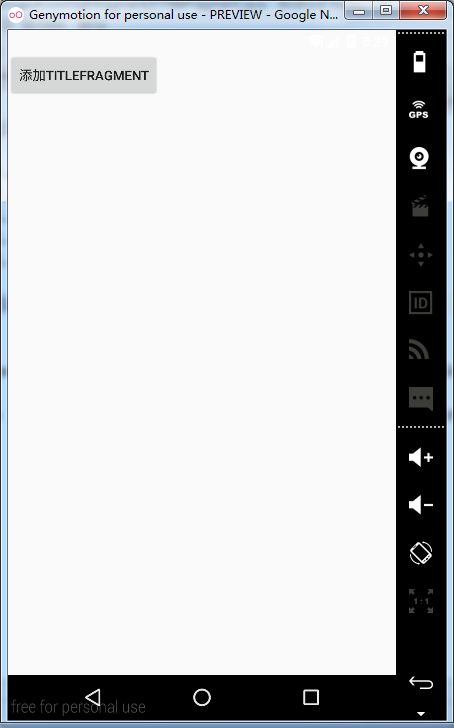
1.0 我们通过点击 Button 来动态添加 Fragment,如下图:
单击 Button ,动态添加 TitleFragment
每点击一次 Button 都会添加一个 TitleFragment
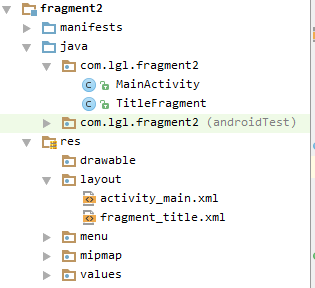
2.0 项目结构图:
3.0 fragment_title.xml:
<FrameLayout xmlns:android="http://schemas.android.com/apk/res/android"
    xmlns:tools="http://schemas.android.com/tools"
    android:layout_width="match_parent"
    android:layout_height="match_parent"
    tools:context="com.lgl.fragment2.TitleFragment">

    <TextView
        android:layout_width="match_parent"
        android:layout_height="match_parent"
        android:background="#FF0000"
        android:text="动态添加TitleFragment" />

FrameLayout>
4.0 activity_main.xml:
<LinearLayout xmlns:android="http://schemas.android.com/apk/res/android"
    android:layout_width="match_parent"
    android:layout_height="match_parent"
    android:orientation="vertical">

    <LinearLayout
        android:id="@+id/title_layout"
        android:layout_width="fill_parent"
        android:layout_height="wrap_content"
        android:orientation="vertical"/>

    <Button
        android:id="@+id/addTitleFragment"
        android:layout_width="wrap_content"
        android:layout_height="wrap_content"
        android:text="添加TitleFragment"/>

LinearLayout>
5.0 TitleFragment:
package com.lgl.fragment2;

import android.os.Bundle;
import android.app.Fragment;
import android.view.LayoutInflater;
import android.view.View;
import android.view.ViewGroup;

public class TitleFragment extends Fragment {

    @Override
    public View onCreateView(LayoutInflater inflater, ViewGroup container,
                             Bundle savedInstanceState) {
        return inflater.inflate(R.layout.fragment_title, container, false);
    }

}
6.0 MainActivity:
package com.lgl.fragment2;

import android.app.Fragment;
import android.app.FragmentManager;
import android.app.FragmentTransaction;
import android.os.Bundle;
import android.support.v7.app.AppCompatActivity;
import android.view.View;
import android.widget.Button;

public class MainActivity extends AppCompatActivity {

    private Button add;

    @Override
    protected void onCreate(Bundle savedInstanceState) {
        super.onCreate(savedInstanceState);
        setContentView(R.layout.activity_main);

        add = (Button) findViewById(R.id.addTitleFragment);
        add.setOnClickListener(new View.OnClickListener() {
            @Override
            public void onClick(View v) {
                //new 一个TitleFragment对象
                TitleFragment title = new TitleFragment();
                //获取 FragmentManager
                FragmentManager manager = getFragmentManager();
                //得到 FragmentTransaction
                FragmentTransaction transaction = manager.beginTransaction();
                //重点:使用 activity_main.xml 文件中定义的 LinearLayout 来承载这个 Fragment
                transaction.add(R.id.title_layout, title);
                //提交
                transaction.commit();
            }
        });

    }

}


