缘起
日前帮朋友安装设定 Hexo 环境时发觉,Node.js 对一般使用者来说实在太遥远, 为了执行 Hexo,需另安装 Xcode(Mac) 与许多相关的开发环境,那不是一般使用者会用上的东西。 在那之后就不断注意能简化 Hexo 入门门槛的设定流程。
看到 珠联璧合:利用 Koding 为静态博客搭建在线编辑环境,觉得是个不错的解决方案。
利用 Koding 云端开发环境,使用者无须在本机端安装 Node.js 执行环境。 虽仍需花时间设定 Koding 上的环境,但可跨电脑、平台编写与发布部落格, 外出旅行时,一台平板电脑就可以编写与发布部落格文章了!
Koding 简介
我知道你和 PCMan 一样只想看范例,以下简介可以略过
Koding 是个云端开发与社群平台,提供 Linux 虚拟主机环境与完整的 WebUI, 可以透过浏览器在 Koding 上进行主机配置、架设网站与系统开发测试等。
- koding 提供完整 Linux 作业系统 (Ubuntu 13.04, Raring Ringtail)
- 提供 sudo 以安装系统软体与操作
- 预设安装好 npm
- 预设安装好 git
- 预设架好 apache
koding.com这是一个免费的云端开发平台,也相当于透过浏览器去操作一个VM > (virtual > machine),可以完全依照自己的需要去部属开发环境、架设网站等等,这主机也可以执行JavaScript、PHP、Perl、Python、Ruby等语言,写完可以在线上预览、执行。不过要注意的是有基本容量限制1G。
他也有社交的功能,就像一般社交网站一般,可以发文分享、讨论交流,也有为数不少不同类型的Group,他把社交化功能与Web > IDE结合得还不错。遇到一些开发相关问题,也还可以透过线上的社群直接发问。
[笔记] 13/12/02 Node.js分享讲座 之 Koding « > 菜鸟的升级日记goo.gl/zPL7nV/
本篇介绍如何设定 Koding 上的环境。
预备工作
- Github 帐号(点此申请 Github 帐号)
- Koding 帐号(点此申请 Koding 帐号)
申请方式和一般网站大同小异,~~我很懒~~这儿就跳过不介绍如何申请了。帐号申请后请记得收信验证信箱位址。
安装 Hexo 执行环境
注册后连上 Koding 网站,点选左上方功能列的 "Terminal",可看到画面如下:
因 Koding 预设已安装好 Node.js / npm 环境,直接输入下列命令即可安装 Hexo 系统。
sudo npm install -g hexo
输入后会看到 npm 开始安装 hexo 如下:
npm http GET https://registry.npmjs.org/hexo
npm http 304 https://registry.npmjs.org/hexo
npm http GET https://registry.npmjs.org/async/0.2.9
npm http GET https://registry.npmjs.org/express/3.4.7
...
...
...
hexo@2.4.5 /usr/lib/node_modules/hexo
├── graceful-fs@2.0.1
├── sprintf-js@0.0.7
├── colors@0.6.2
├── marked@0.3.0
├── async@0.2.9
├── chokidar@0.8.1
├── ejs@0.8.5
├── highlight.js@8.0.0
├── optimist@0.6.0 (wordwrap@0.0.2, minimist@0.0.5)
├── lodash@2.4.1
├── moment@2.5.0
├── stylus@0.42.0 (css-parse@1.7.0, debug@0.7.4, mkdirp@0.3.5, glob@3.2.8, sax@0.5.8)
├── warehouse@0.1.12 (lodash@2.2.1)
├── yamljs@0.1.4 (glob@3.1.21, argparse@0.1.15)
├── nib@1.0.2 (stylus@0.37.0)
├── swig@1.2.2 (uglify-js@2.4.10)
└── express@3.4.7 (methods@0.1.0, merge-descriptors@0.0.1, range-parser@0.0.4, cookie-signature@1.0.1, fresh@0.2.0, debug@0.7.4, buffer-crc32@0.2.1, cookie@0.1.0, mkdirp@0.3.5, commander@1.3.2, send@0.1.4, connect@2.12.0)
跑完后可以执行 hexo 确认是否已正确安装
$ hexo
若 hexo 安装正确,会出现简单说明讯息如下:
Usage: hexo 设定 Hexo 部落格专案资料夹
安装完 hexo 后需要建立 hexo 部落格专案资料夹,里面存放部落格文章、布景主题、Plugins...等。
Init hexo blog folder
透过下列命令可在 Koding VM 的 {$HOME}/blog 建立 hexo 专案资料夹
$ cd
$ mkdir blog
$ cd blog
$ hexo init
输入后可看到 Hexo 初始化专案资料夹如下:
[info] Creating file: source/_posts/hello-world.md
[info] Creating file: package.json
[info] Creating file: .gitignore
[info] Copying file: _config.yml
[info] Copying file: scaffolds/draft.md
[info] Copying file: scaffolds/page.md
[info] Copying file: scaffolds/photo.md
[info] Copying file: scaffolds/post.md
[info] Creating folder: source/_drafts
[info] Creating folder: scripts
[info] Copying theme data...
[info] Initialization has been done. Start blogging with Hexo!
更换部落格布景主题
Themes 这儿有 Hexo 部落格布景主题列表,可找个喜欢的部落格布景。 大多数的部落格布景安装方式都雷同。以下以 AWE 为范例说明:
$ cd ~/blog
$ git clone https://github.com/kywk/hexo-theme-awe.git themes/awe
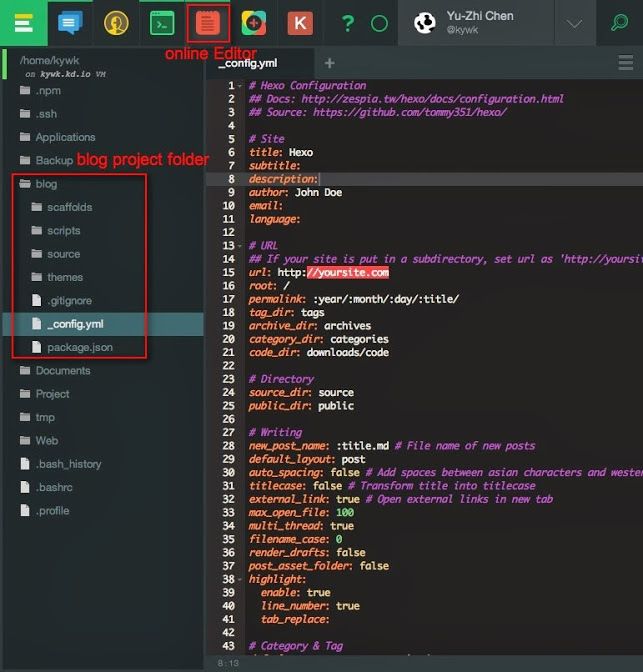
利用 Koding 的编辑器修改 _config.yml,将 theme 设成 awe _config.yml 为部落格主要设定资讯,部落格标题、作者资讯亦在这个档案进行设定。
在 Koding 的编辑器看到资料夹结构如下图:
配置 Github
Hexo 生成的部落格为静态档案,可直接 hosting 在任何 Web Server 上,相当多人将其放置于 Github 上。 Github Page 分成 Personal/Project 两种,本文仅介绍 Personal Page 的设置。
Github Page 设定
先在 Github 上建立一个新的 repository,专案名称需为 你的帐号.github.io
然后修改 _config.yml 中 deploy 资讯如下,可直接利用 Koding ACE 编辑器进行修改
deploy:
  type: github
  repository: https://github.com/你的帐号/你的帐号.github.com.git
  branch: master
ssh-key
为方便存取 Github,建议建立 ssh-key。以下仅简述步骤,详细介绍在 Generating SSH Keys · GitHub Help
在终端机输入指令:
$ ssh-keygen -t rsa -C "your_email@example.com"
利用编辑器开启 ~/.ssh/id_rsa.pub,参考 Generating SSH Keys Step3 的步骤, 将 ~/.ssh/id_rsa.pub 的内容贴上 Github.
Happy blogging
上述步骤完成后,即可利用浏览器在 Koding 上正常操作 Hexo 来建立部落格文章与发布到 github 了。
建立新文章
$ hexo new "title"
发布到 github
$ hexo d (deploy)
在 Koding 上建立 hexo 环境最大的好处是跨平台、装置,可以随时随地编写部落格文章, 无须安装 Node.js / Git / ... 等开发工具。 然而文章都放在 Koding 上亦有网路速度不佳与存取不便的缺点。
via kywk


