概述
我们先来看看Spark官方文档对于Spark Streaming的定义:Spark Streaming是对Spark核心API的扩展,并且是一个具有可伸缩,高吞吐,容错特性的实时数据流处理框架。它支持多种数据源作为数据,比如Kafka,Flume,Kinesis或者TCP sockets,并且可以使用RDD高等函数,比如map, reduce, join和window,来实现复杂的数据处理算法。最终,处理后的数据可以输出到文件系统。数据库或者实时图表中。实际上,你还可以使用Spark的机器学习包和图处理包来对数据进行处理。
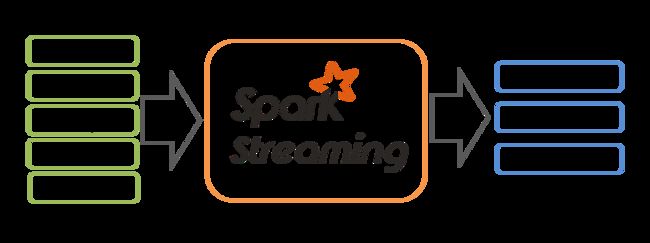
事实上在Spark Streaming内部是这样工作的。Spark Streaming接收实时流数据,然后把数据切分成一个一个的数据分片。最后每个数据分片都会通过Spark引擎的处理生成最终的数据文件。
Spark Streaming提供了一个高等级的抽象,名为discretized stream或DStream,来表示一个连续的数据流。DStrem可以从一个输入流数据源创建,比如Kafka,Flume,Kinesis,或者通过对其他DStream应用一些高等操作来获得。实际上在Spark内部DStream就是一系列的RDD分片。
快速开始
在真正开始接触Spark Streaming程序细节之前,我们先看一看一个Spark Streaming的简单例子长成什么样子,我们需要统计一下文本中单词的词频,数据来源为TCP Socket。接下来,我们看一下吧。
首先我们引入了Spark Stream执行过程中需要用到的类和一些来自于StreamingContext的隐式装换。其中StreamingContext是Spark中所有流处理功能的入口点,我们使用两个本地线程,同时定义了数据分片时间间隔为1秒。
import org.apache.spark._
import org.apache.spark.streaming._
import org.apache.spark.streaming.StreamingContext._ // not necessary since Spark 1.3

// Create a local StreamingContext with two working thread and batch interval of 1 second.
// The master requires 2 cores to prevent from a starvation scenario.

val conf = new SparkConf().setMaster("local[2]").setAppName("NetworkWordCount")
val ssc = new StreamingContext(conf, Seconds(1))
通过这个StreamingContext,我们可以从一个TCP数据源接收流式数据,在这里我们需要指定主机和端口。
// Create a DStream that will connect to hostname:port, like localhost:9999
val lines = ssc.socketTextStream("localhost", 9999)
这个名为lines的DStream对象从数据服务器接收数据,DStream中德每一条数据都是一行文本,接下来我们使用空格来对数据进行分割,形成一个一个的单词。
// Split each line into words
val words = lines.flatMap(_.split(" "))
我们应用的flatMap这个DStream操作会把每一行数据切分成一个一个的单词,然后把所有DStream中所有行切分成的单词形成一个新的words DStream。接下来我们要对words进行词频统计。
import org.apache.spark.streaming.StreamingContext._ // not necessary since Spark 1.3
// Count each word in each batch
val pairs = words.map(word => (word, 1))
val wordCounts = pairs.reduceByKey(_ + _)

// Print the first ten elements of each RDD generated in this DStream to the console
wordCounts.print()
这个words DStream通过一个map(一对一)操作生成一个新的(word, 1) DStream,接下来通过reduce方法,我们可以得到每个数据分片的词频数据,然后通过wordCounts.print()方法打印出来。
注意,这个时候Spark Stream并没有启动,我们只是定义了DStream数据源以及要对DStream做什么操作。想要启动Spark Stream,我们需要执行StreamingContext的start方法。
ssc.start()             // Start the computation
ssc.awaitTermination()  // Wait for the computation to terminate
这个例子的完整代码你可以从SparkStreaming例子NetworkWordCount获取。
下面我们来运行一下这个例子,保证你已经成功部署Spark环境。首先我们启动netcat向端口发送数据。
$ nc -lk 9999
接下来启动NetworkWordCount实例,在Spark的根目录下运行下面命令。
$ ./bin/run-example streaming.NetworkWordCount localhost 9999
流处理程序接受9999端口发送的数据,每秒形成一个数据分片,然后进行处理,并打印。
# TERMINAL 1:
# Running Netcat

$ nc -lk 9999

hello world
# TERMINAL 2: RUNNING NetworkWordCount

$ ./bin/run-example streaming.NetworkWordCount localhost 9999
...
-------------------------------------------
Time: 1357008430000 ms
-------------------------------------------
(hello,1)
(world,1)
...
基本概念
接下来我们通过一个简单的例子来描述Spark Streaming的一些基本概念。
引入
我们可以通过maven或者sbt来管理Spark Streaming的依赖包。
    org.apache.spark
    spark-streaming_2.11
    2.1.0
libraryDependencies += "org.apache.spark" % "spark-streaming_2.11" % "2.1.0"
如果你使用Kafka,Flume和Kinesis作为你的数据源,你必须引入相对应的依赖包park-streaming-xyz_2.11,因为Spark Streaming的核心API并不支持这些数据源。
| 数据源 | 依赖包 |
|---|---|
| Kafka | spark-streaming-kafka-0-8_2.11 |
| Flume | spark-streaming-flume_2.11 |
| Kinesis | spark-streaming-kinesis-asl_2.11 [Amazon Software License] |
初始化StreamingContext
我们可以通过SparkConf对象来初始化一个StreamingContext的实例:
import org.apache.spark._
import org.apache.spark.streaming._

val conf = new SparkConf().setAppName(appName).setMaster(master)
val ssc = new StreamingContext(conf, Seconds(1))
其中appName是你的应用名称,这个名字会显示在Spark的Web UI界面上。而master则是Spark,Mesos或者Yarn集群的URL地址,当然你也可以使用"local[*]"来启动本地模式运行。不过使用集群方式运行的话,我们一般不推荐使用setMaster方法来把设置写死在代码中,而是在spark-submit的时候使用--master参数来动态指定。但是在本地调试的时候,可以直接使用这种方式。(注意:我们在创建StreamingContext实例的时候,会自动创建一个SparkContext,我们可以使用ssc.sparkContext来访问)。
批次间隔时间要根据应用对延迟的需求和集群的资源来配置(在性能调优部分我们会详细介绍)。
我们当然也可以使用SparkContext来创建一个StreamingContext。
import org.apache.spark.streaming._

val sc = ...                // existing SparkContext
val ssc = new StreamingContext(sc, Seconds(1))
在context被初始化后,你还需要做如下几点:
- 通过input DStream来定义输入源
- 通过DStream的转换操作和输出操作来定义流数据处理规则
- 开始接受数据并处理:streamingContext.start()
- 等待流处理终止(或者出现异常退出):streamingContext.awaitTermination()
- 手动终止流处理:streamingContext.stop()
需要注意的点:
- 一旦context被启动,任何新的流计算逻辑都无法被加入和设置
- 一旦context被终止,它就不能重新启动了
- 在同一时间,同一JVM中只能创建一个StreamingContext实例
- 调用StreamingContext的stop方法会同时终止SparkContext,想要不终止SparkContext,你需要给stop方法设置一个参数来禁止SparkContext的终止。
- 一个SparkContext可以创建多个StreamingContext,当然你需要在前一个StreamingContext终止之后再创建新的StreamingContext(当然你需要防止在这个过程中SparkContext被终止)。
Discretized Streams (DStreams)
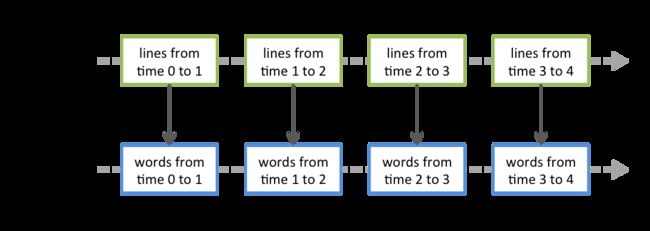
Discretized Stream或者DStream是StreamingContext提供的最基本的抽象,它代表了一系列连续的数据片,包括从数据源哪里接收到的数据和通过各种转换操作得到的输出数据。在Spark内部,DStream就是一系列连续的RDD(弹性分布式数据集)。每一个DStream中的RDD包含了明确的时间间隔内的数据,如下图所示。
每一个我们定义在DStream上面的操作都是作用在底层的RDD上面。比如我们前面例子中的词频统计操作,flatMap操作作用在了lines DStream中德每一个RDD上面并生成了一个words DStream。这个过程正如下图所示。
这些底层RDD上面的操作,都会被Spark引擎所处理。而DStream操作则隐藏了大多数的细节,并提供给我们一个非常好用的高层次的API,对于DStream支持的操作,我们会在下一节进行讲解。
Input DStreams and Receivers
Input DStream是一个从流数据源接受流数据的DStream。在快速开始的例子中,lines就是一个Input DStream,它从netcat server接受流数据。任何一个Input DStream(除了file stream,后面我们会讲到) 都会关联一个Receiver对象,这个对象负责从流数据源接收流数据然后放到内存中等待处理。
Spark Streaming提供了两种类型的流数据源:
- 基本数据源:由StreamingContext API直接提供的数据源,比如file stream和socket connections
- 高级数据源:比如Kafka,Flame,Kinesis等数据源,这些需要额外的工具类库支持。在引入这一节中,我们提到过这些工具类。
下面的章节中,我们会依次对这些数据源进行说明。
注意,如果你想要在你的流处理程序中启用多个不同的数据源,那么你只需要创建多个Input DStream。这样就会有多个Receiver来同时接收不同的流数据。需要注意的是,Spark的work/executor是一个长时间运行的应用。因此,一定要记住一个Spark Streaming应用程序需要分配足够的核心来处理接收的数据,以及运行接收器。
要记住的点:
- 我们在本地运行一个Spark Streaming应用程序千万不要使用"local"或者"local[1]"作为master URL。这一位置只有一个线程用来运行本地程序,如果你使用了一个带有Receiver的Input DStream(比如sockets,Kafka,Flame等),这个唯一的线程就会用来接收流数据,那么也就没有多余的线程来出来这些接收的数据了。因此,在本地运行的时候要使用"local[n]"(n > numbert of receivers)。
- 在集群上运行Spark Streaming应用程序一样,我们至少要启动n个线程(n > numbert of receivers),否则不会有多余的线程来处理数据。
基本数据源
我们已经在前面的快速开始例子中展示了ssc.socketTextStream(...),它创建了一个从TCP端口接收文本数据的DStream。除此之外,Spark Streaming还为我们提供了一个创建从文件接收数据的DStream。
- File Stream:从任何文件系统的文件中读取数据,并兼容HHDFS API。创建方式:
streamingContext.fileStream[KeyClass, ValueClass, InputFormatClass](dataDirectory)
/**
Spark Streaming会监控目录dataDirectory,然后处理任何在这个目录中创建的文件(嵌套目录不支持),注意:
1. 数据文件必须都有同样的格式
2. 数据文件必须通过moving或者renaming方式来创建在监控目录中。
3. 一旦数据文件移动到监控目录中就不能再改变了,持续追加的新数据并不能被识别。

对于普通的文本文件,有一个更简单的方法streamingContext.textFileStream(dataDirectory)。并且File Stream没有Receiver,也就不用占用处理核心了。
*/
- 基于用户自定义Receivers的DStream:你可以根据自己的需求来定义Receiver,并依次来创建DStream,关于这一点我们之后会详细说到。
- RDDs队列作为Stream:你可以通过一组RDDs来创建一个DStream,通过方法streamingContext.queueStream(queueOfRDDs)。这组RDDs中德每一个RDD都作为DStream的一个数据片,然后通过流处理程序进行相应的处理。
高级数据源
这一类的数据源需要依赖non-spark的包才能运行,其中一些更需要大量复杂的依赖包(比如Kafka和Flame)。因此为了最小化依赖冲出问题,创建这些数据源的方法都被移到了一些独立的包里,你在需要的时候可以引入到你的应用中。
这些高级数据源是不能直接在spark-shell中使用的,因此带有这些高级数据源的应用不能在spark-shell中进行试验。如果你真的需要再spark-shell中使用这些高级数据源,你需要下载这些依赖包然后把他们加入到类路径中。
高级数据源推荐使用版本:
- Kafka: Spark Streaming 2.1.0 is compatible with Kafka broker versions 0.8.2.1 or higher. See the Kafka Integration Guide for more details.
- Flume: Spark Streaming 2.1.0 is compatible with Flume 1.6.0. See the Flume Integration Guide for more details.
- Kinesis: Spark Streaming 2.1.0 is compatible with Kinesis Client Library 1.2.1. See the Kinesis Integration Guide for more details.
数据接受器的可靠性
Spark Streaming中基于可靠新来说有两种数据源。一种数据源(Kafka和Flame)允许对传输的数据进行确认。系统从这些具有可靠性的数据源接受的数据都是确保正确的,它可以保证在任何错误的情况下数据都不丢失。
- Reliable Receiver - 当接收数据的并存储在Spark中德时候,一个Reliable Receiver会发送确认信号给一个Reliable Source。
- Unreliable Receiver - 一个Unreliable Receiver并不会在接收数据的时候发送确认信号给数据源。这用于不支持确认的数据源,或者是一个reliable sources,但是并不需要使用复杂的确认过程。
DStreams的转换操作
像RDD一样,转换操作允许Input DStream中的数据转换。DStream支持很多正常Spark RDD上的转换操作,我们来看看一看都有什么。
| 转换操作 | 说明 |
|---|---|
| map(func) | 对原DStream中的每一个数据元素执行func函数,结果组成一个新的DStream并返回。 |
| flatMap(func) | 类似于map,但是每一个输入项都可以映射到一个或者多个输出项。 |
| filter(func) | 对原DStream种的每一个数据元素执行func函数,所有返回值为true的元素组成一个新的DStream并返回。 |
| repartition(numPartitions) | 通过改变分区数来控制DStream的并行程度。 |
| union(otherStream) | 把两个DStream组合在一起新城一个新的DStream并返回。 |
| count() | 计算DStream中每一个RDD中的元素数量,并组成一个新的DStream并返回。 |
| reduce(func) | 对原DStream中的每元素使用func函数进行迭代计算(func函数接收两个参数返回一个值,参数值类型和返回值类型需要和DStream中元素类型一致),返回值作为下一次调用func函数的一个参数,另一个参数是DStream中的下一个元素。最终每个RDD的执行结果形成一系列的单元素RDD。 |
| countByValue() | 这个函数用于统计原DStream中每个元素出现的频次,比如作用在一个元素类型为K的DStream上,那么结果为一个元素类型为[K, Long]类型的新DStream。 |
| reduceByKey(func, [numTasks]) | 当作用在一个(k,v)对的DStream上时,形成一个新的(k,v)对DStream。新DStream种的元素是对原DStream种的元素按照k值进行聚合操作,其中func为聚合函数。 |
| join(otherStream, [numTasks]) | 对两个DStream按照key执行内连接,比如一个(k,v1)和一个(k,v2)两个DStream执行join,结果为(k,(v1,v2))的DStream。 |
| transfor(func) | 通过对原DStream中每一个RDD应用RDD-to-RDD函数,来创建一个新的DStream。这个可以在DStream中的任何RDD操作用使用。 |
| updateStateByKey(func) | 利用func函数来更新源DStream中每一个key的状态,来形成一个新的状态DStream。它可以用来管理DStream的任何状态数据。 |
UpdateStateByKey Operation
这个updateStateByKey操作允许你管理状态,并可以不断地使用新的状态信息来更新这个状态。要使用这个操作,你需要两步操作:
- 定义状态 - 这个状态可以使任意类型的
- 定义状态更新函数 - 声明一个函数来定义如何通过之前的状态和RDD数据集来更新新的状态。
Spark会把状态更新函数应用于每一个RDD中每一个Key对应数据集Seq,不论这个新的数据分片中是否有数据。如果状态更新函数返回None,那么这个key-value对就会被废弃了。
下面我们用一个例子来对这个状态更新函数进行说明。在这个例子中,我们会对文本输入流的数据进行词频统计。定义这个状态类型为Int,状态更新函数如下:
def updateFunction(newValues: Seq[Int], runningCount: Option[Int]): Option[Int] = {
    val newCount = ...  // add the new values with the previous running count to get the new count
    Some(newCount)
}
这个函数作用于一个文本输入流上,会按word进行词频统计生成键值对(word,n)。
val runningCounts = pairs.updateStateByKey[Int](updateFunction _)
在执行过程中,newValues是当前RDD中的(word,1)键值对中的value值组成的Seq,runningCount是之前统计的key对应的value状态值。我们将其累加,得到新的状态值。
Transform Operation
Treansform操作可以对允许任何RDD-to-RDD的装换函数,作用在DStream上。通过这个操作,我们可以利用一些DStream不支持但是RDD支持的API,可以让我们的程序更加灵活。举个例子,把DStream中的每一个数据集和另外的一个数据集做Join操作,这个DStream的join部没有对这个进行支持,所以我们需要使用transform操作,先把DStream转化为RDD然后在进行join。
下面的例子中,我们将进行一个数据清洗操作。首先我们要把输入数据和一份已经处理好的数据(来自于HDFS中)做join,然后再根据相应的规则进行过滤。
val spamInfoRDD = ssc.sparkContext.newAPIHadoopRDD(...) // RDD containing spam information

val cleanedDStream = wordCounts.transform { rdd =>
  rdd.join(spamInfoRDD).filter(...) // join data stream with spam information to do data cleaning
  ...
}
注意,这个操作会在每一个时间间隔内被执行一次,所以它允许你做实时的RDD操作。都可以在每一个批次间,改变比如改变分区数,广播变量等等。
Window Operation
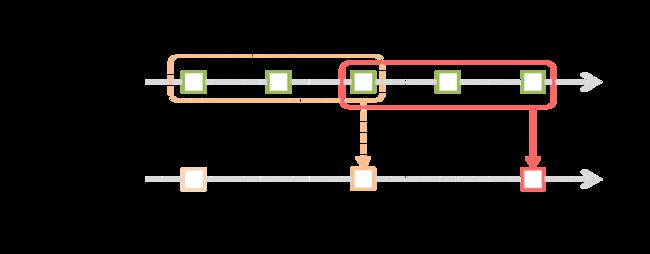
Spark Streaming允许一个windowed computations,他可以让你在一个sliding window上应用一些transformactions操作。下面这张图,对这个进行了描述。
上图所示,我们定义了一个窗口,这个窗口会在源DStream上进行滑动,落在这个窗口内的源DStream数据会被合并为一个windowed DStream,而你可以对这个windowed DStream定义若干transformactions。图示的这个窗口大小为3个time units,并且每次滑动2个time units。所以我们在定义窗口的时候需要两个参数:
- window length - 这个定义了窗口的大小
- silding interval - 滑动时间间隔,也就是个窗口每次向后滑动的时间间隔
必须注意的是:这两个参数都必须是源DStream的batch interval的整数倍。
接下来,我们用一个例子来演示一下window operation。我们每隔10秒钟,统计一个过去30秒内从Input DStream中接受的单词词频。为了实现这个需求,我们需要在过去30秒的数据形成的(word,1)上执行reduceByKey操作,对应的window operation为reduceByKeyAndWindow。
// Reduce last 30 seconds of data, every 10 seconds
val windowedWordCounts = pairs.reduceByKeyAndWindow((a:Int,b:Int) => (a + b), Seconds(30), Seconds(10))
通用的window operations有如下这些,所有的operations函数都需要两个参数:window length和silding interval。
| Transformation | Meaning |
|---|---|
| window(windowLength,slideInterval) | 通过定义窗口大小和滑动时间间隔,返回一个新的windowed DStream。 |
| countByWindow(windowLength,slideInterval) | 计算每一个时间窗口内的RDD中元素数量 |
| reduceByWindow(func,windowLength,slideInterval) | 对时间窗口内的DStream使用func函数进行迭代计算,func(x,y)函数的输入分别是上一次迭代的结果和DStream中的下一个数据元素。 |
| reduceByKeyAndWindow(func,windowLength,slideInterval,[numTasks]) | 对时间窗口内的DStream数据(K,V)键值对,并使用func函数对按key分组后的数据进行聚合操作并返回一个新的(K,V)DStream。 |
| reduceByKeyAndWindow(func,invFunc,windowLength,slideInterval, [numTasks]) | 这是对reduceByKeyAndWindow函数的改进,具有更好的性能。每当一个新的窗口到来的时候,与之前重合部分的DStream数据片并不重新计算,而是直接使用之前的计算结果,然后只对新的数据分片进行计算。然后把新的计算结果和之前已经计算的结果进行合并,得到新的窗口的聚合结果。 |
| countByValueAndWindow(windowLength,slideInterval,[numTasks]) | 对时间窗口内的每个元素统计出现的频次,形成一个新的(K,V)对DStream。 |
Join Operation
最后,我们来看看在Spark Streaming中做各种join operation是多么的简单。
Stream-stream joins
Stream可以非常简单地与其他Stream进行join。
val stream1: DStream[String, String] = ...
val stream2: DStream[String, String] = ...
val joinedStream = stream1.join(stream2)
在这里,每个batch interval内stream1产生的RDD都会和stream2产生的RDD做join,当然你还可以做leftOuterJoin,rightOuterJoin,,fullOuterJoin操作。同样这些操作还可以应用于windowed DStream。
val windowedStream1 = stream1.window(Seconds(20))
val windowedStream2 = stream2.window(Minutes(1))
val joinedStream = windowedStream1.join(windowedStream2)
Stream-dataset joins
这个已经在DStream.transform操作中提到过了。在这里我们重新演示一下如何把一个DStream和一个RDD数据集做join操作。
val dataset: RDD[String, String] = ...
val windowedStream = stream.window(Seconds(20))...
val joinedStream = windowedStream.transform { rdd => rdd.join(dataset) }
实际上,你可以动态改变需要关联的RDD,因为transform会在每一个window上执行,所以你可以在每次执行transform时重新加载RDD来达到动态关联的效果。
Output Operations on DStreams
Output operations允许把DStream中的数据推送到外部系统中,比如数据库或者文件系统。因为output operations是真正的让外部系统来消费DStream数据,所以他会触发DStream上定义的transformactions。我们来看一下DStream支持的output operations。
| Output Operation | Meaning |
|---|---|
| print() | 在driver node上,打印DStream中每个批次数据的的前10条记录,这对与开发和调试非常有用。 |
| saveAsTextFiles(prefix, [suffix]) | 保存DStream中的数据为文本文件。每个批次数据生成的文件名由前后缀格式确定:"prefix-TIME_IN_MS[.suffix]"。 |
| saveAsObjectFiles(prefix, [suffix]) | 保存DStream中的数据为序列化后的Java对象。每个批次产生的数据文件命名规范为前后缀格式:"prefix-TIME_IN_MS[.suffix]"。 |
| saveAsHadoopFiles(prefix, [suffix]) | 保存DStream中的数据在Hadoop文件系统中。每个批次产生的数据文件命名规范为前后缀格式:"prefix-TIME_IN_MS[.suffix]"。 |
| foreachRDD(func) | 应用中最通常被使用的output operator,它可以使func函数作用在DStream中的每一个RDD上面。这个函数可以把RDD中的数据推送到外部系统,比如存储成文件或者写入到数据库中。注意,这个函数会运行在driver的线程上,然后把其内部定义的RDD actions作用在DStream RDD上。 |
使用foreachRDD的正确姿势
DStream.foreachRDD操作是非常强大的,他可以以最简单粗暴的方式把数据推送到外部系统上。为了能够正确的并且高效的使用这个output operation。我们需要避免以下常出现的错误使用方式。
通常情况下导出DStream数据到外部系统需要创建一个连接,使用这个连接来推送数据到外部系统。所以某些开发人员就会尝试在driver中创建一个连接,然后在worker中使用它。就像下面这样:
dstream.foreachRDD { rdd =>
  val connection = createNewConnection()  // executed at the driver
  rdd.foreach { record =>
    connection.send(record) // executed at the worker
  }
}
这种方式是不对的,你在driver上定义了connection,然后把他们序列化后给到worder去使用。因为这些connection对象几乎不可能跨机器使用的。它会引起一个serializable exception。正确的做法是在worker上面创建connection。
可是下面的方法会为每一个DStream中的元素创建一个connection,效率是十分低下的。
dstream.foreachRDD { rdd =>
  rdd.foreach { record =>
    val connection = createNewConnection()
    connection.send(record)
    connection.close()
  }
}
通常情况下,创建connection对象是需要时间和资源开销的。因此为每一个数据元素创建和销毁connection必然带来了不必要的开销,降低了整个系统的吞吐量。因此,最好的解决方案是使用RDD.foreachPartition来为每一个数据分片创建一个connection对象,然后使用这个对象发送分片数据到外部系统,完成之后销毁这个对象。
dstream.foreachRDD { rdd =>
  rdd.foreachPartition { partitionOfRecords =>
    val connection = createNewConnection()
    partitionOfRecords.foreach(record => connection.send(record))
    connection.close()
  }
}
我们可以进一步优化代码,让多个RDD数据分片复用这些connection。我们用一个静态的connection pool来管理这些connection,让RDD数据分片复用这些connection来推送数据到外部系统。
dstream.foreachRDD { rdd =>
  rdd.foreachPartition { partitionOfRecords =>
    // ConnectionPool is a static, lazily initialized pool of connections
    val connection = ConnectionPool.getConnection()
    partitionOfRecords.foreach(record => connection.send(record))
    ConnectionPool.returnConnection(connection)  // return to the pool for future reuse
  }
}
当然这个connection pool是一个懒加载的,connection会根据需求来创建,并会在一定时间空闲后被销毁,这样才是一个高效的系统。
最后还有几点要注意的:
- DStream的output operation是懒加载的,就像RDD上面定义的actions一样。具体来说,DStream的output operation中定义的RDD actions会作用在接收的数据上。因此,如果你的应用程序没有任何output operation,或者output operation中没有定义任何RDD actions比如DStream.foreachRDD( )。那么你的应用就不会真正被执行,只是在不断地接收数据。
- 另外,output operation在一个时间点只有一个可以被执行。执行顺序是按照被定义的顺序。
DataFrame and SQL Operations
你可以非常容易的在Spark Streaming应用中使用DataFrame and SQL。这需要你在使用StreamingContext的同时使用SparkContext来创建一个SaprkSession。更好的一点是,它可以从driver崩溃重启中恢复。通过定义一个延迟加载的单例SparkSessionSingleton来实现。通过下面的例子我们来演示一下,在这里我们修改了之前的例子,使用DataFrame and SQL来实现词频统计。我们把每一个RDD都转化为DataFrame,然后注册成临时表并进行SQL统计查询。
/*
 * Licensed to the Apache Software Foundation (ASF) under one or more
 * contributor license agreements.  See the NOTICE file distributed with
 * this work for additional information regarding copyright ownership.
 * The ASF licenses this file to You under the Apache License, Version 2.0
 * (the "License"); you may not use this file except in compliance with
 * the License.  You may obtain a copy of the License at
 *
 *    http://www.apache.org/licenses/LICENSE-2.0
 *
 * Unless required by applicable law or agreed to in writing, software
 * distributed under the License is distributed on an "AS IS" BASIS,
 * WITHOUT WARRANTIES OR CONDITIONS OF ANY KIND, either express or implied.
 * See the License for the specific language governing permissions and
 * limitations under the License.
 */
// scalastyle:off println
package org.apache.spark.examples.streaming
import org.apache.spark.SparkConf
import org.apache.spark.rdd.RDD
import org.apache.spark.sql.SparkSession
import org.apache.spark.storage.StorageLevel
import org.apache.spark.streaming.{Seconds, StreamingContext, Time}
/**
 * Use DataFrames and SQL to count words in UTF8 encoded, '\n' delimited text received from the
 * network every second.
 *
 * Usage: SqlNetworkWordCount
 *  and  describe the TCP server that Spark Streaming would connect to receive data.
 *
 * To run this on your local machine, you need to first run a Netcat server
 *    `$ nc -lk 9999`
 * and then run the example
 *    `$ bin/run-example org.apache.spark.examples.streaming.SqlNetworkWordCount localhost 9999`
 */
object SqlNetworkWordCount {
def main(args: Array[String]) {
if (args.length < 2) {
System.err.println("Usage: NetworkWordCount  ")
System.exit(1)
    }
StreamingExamples.setStreamingLogLevels()
// Create the context with a 2 second batch size
val sparkConf = new SparkConf().setAppName("SqlNetworkWordCount")
val ssc = new StreamingContext(sparkConf, Seconds(2))
// Create a socket stream on target ip:port and count the
// words in input stream of \n delimited text (eg. generated by 'nc')
// Note that no duplication in storage level only for running locally.
// Replication necessary in distributed scenario for fault tolerance.
val lines = ssc.socketTextStream(args(0), args(1).toInt, StorageLevel.MEMORY_AND_DISK_SER)
val words = lines.flatMap(_.split(" "))
// Convert RDDs of the words DStream to DataFrame and run SQL query
    words.foreachRDD { (rdd: RDD[String], time: Time) =>
// Get the singleton instance of SparkSession
val spark = SparkSessionSingleton.getInstance(rdd.sparkContext.getConf)
import spark.implicits._
// Convert RDD[String] to RDD[case class] to DataFrame
val wordsDataFrame = rdd.map(w => Record(w)).toDF()
// Creates a temporary view using the DataFrame
      wordsDataFrame.createOrReplaceTempView("words")
// Do word count on table using SQL and print it
val wordCountsDataFrame =
        spark.sql("select word, count(*) as total from words group by word")
      println(s"========= $time =========")
      wordCountsDataFrame.show()
    }
    ssc.start()
    ssc.awaitTermination()
  }
}
/** Case class for converting RDD to DataFrame */
case class Record(word: String)
/** Lazily instantiated singleton instance of SparkSession */
object SparkSessionSingleton {
@transient  private var instance: SparkSession = _
def getInstance(sparkConf: SparkConf): SparkSession = {
if (instance == null) {
      instance = SparkSession
        .builder
        .config(sparkConf)
        .getOrCreate()
    }
    instance
  }
}
// scalastyle:on println
你可以在另一个线程上执行基于streaming data注册的表的SQL查询工作(也就是与StreamingContext异步执行)。你需要确认你已经设置了StreamingContext能够保留满足SQL查询的数据。由于StreamingContext并不知道异步的SQL查询什么时候完成,它有可能会在SQL查询完成之前删除流数据。举个例子,如果你要在最近一个批次上做查询,并且这个查询需要执行5分钟的时间,你需要调用streamingContext.remember(Minutes(5))来保存5分钟的流数据。
Caching / Persistence
与RDDs一样,Spark同样允许开发人员把Streaming Data持久化到内存中。使用DStream的persist()方法可以自动地把DStream中的每一个RDD都存储到内存中。这对于需要多次参与计算的数据是非常有意义的。对于基于window的计算(比如reduceByWindow和reduceByWindowAndKey),和基于state的计算(比如updateStateByKey)都是隐式调用的。因此由window操作产生的DStream会自动存储在内存中的,并不需要开发者调用persist()方法。
对于从网络接受的流数据,Spark默认的方式是保存两份副本来保证容错性。
与RDD不同的是,DStream的默认持久化方式是serialized in memory。
Checkpointing
因为SparkStreaming程序都是7*24小时在运行的,所以SparkStreaming程序必须要能够从非应用程序逻辑错误中恢复(比如系统原因,JVM崩溃等)。为了实现这一点,Spark Streaming需要checkpoint足够的信息来保证其可以在在问题出现后恢复。有两种类型的数据需要设置检查点。
- Metadata checkpointing - 保存streaming computation信息在高可用型的存储系统上,比如HDFS。这可以用在从灾难中恢复Streaming应用的Driver。
- Configuration - The configuration that was used to create the streaming application.
- DStream operations - The set of DStream operations that define the streaming application.
- Incomplete batches - Batches whose jobs are queued but have not completed yet.
- Data checkpointing - 保存生成的RDD在可靠地存储系统中。这对于一些跨多个数据分片的带有状态的transformactions是非常有必要的。在这些transformactions中,生成的RDD依赖于之前数据分片的RDD,这会导致依赖关系链的长度随着时间不断增加。为了为恢复时候避免这种无边界的增长,我们必须把这些有状态的transformactions产生的RDD中间结果存储在可靠系统中,来切断这种依赖链。
何时启用checkpoint
有如下需求的时候,你需要设置checkpoint。
- Usage of stateful transformations - 如果你在你的应用程序中使用了updateStateByKey和reduceByKeyAndWindow(带有可以函数),那么你就需要设置checkpoint路径保证定期的为RDD设置检查点。
- Recovering from failures of the driver running the application-Metadata checkpoints用来恢复过程信息。
如何启用checkpoint
可以通过在一个容错的可靠型存储系统中设置checkpoint dictionary来启用checkpointing,这可以通过streamingContext.checkpoint(checkpointDirectory)来完成。这会允许你使用stateful transformations。另外的,如果你想要你的应用能够在driver崩溃后恢复,那么你需要重写你的Streaming Application使其具有如下两个行为。
- 如果你是第一次启动系统,它会创建一个新的StreamingContext,配置好所有的streaming operation然后使用start开启流处理。
- 当应用程序从灾难中恢复,系统会使用checkpoint来恢复StreamingContext。
要想启用checkpoint机制,我们需要通过StreamingContext.getOrCreate来实现。
// Function to create and setup a new StreamingContext
def functionToCreateContext(): StreamingContext = {
  val ssc = new StreamingContext(...)   // new context
  val lines = ssc.socketTextStream(...) // create DStreams
  ...
  ssc.checkpoint(checkpointDirectory)   // set checkpoint directory
  ssc
}

// Get StreamingContext from checkpoint data or create a new one
val context = StreamingContext.getOrCreate(checkpointDirectory, functionToCreateContext _)

// Do additional setup on context that needs to be done,
// irrespective of whether it is being started or restarted
context. ...

// Start the context
context.start()
context.awaitTermination()
如果checkpointDirectory存在的话,系统会使用checkpoint来恢复StreamingContext。如果目录不存在(比如第一次运行的时候),系统会使用functionToCreateContext方法来创建StreamingContext,并且设置DStream。可以参考如下的完整例子。
/*
 * Licensed to the Apache Software Foundation (ASF) under one or more
 * contributor license agreements.  See the NOTICE file distributed with
 * this work for additional information regarding copyright ownership.
 * The ASF licenses this file to You under the Apache License, Version 2.0
 * (the "License"); you may not use this file except in compliance with
 * the License.  You may obtain a copy of the License at
 *
 *    http://www.apache.org/licenses/LICENSE-2.0
 *
 * Unless required by applicable law or agreed to in writing, software
 * distributed under the License is distributed on an "AS IS" BASIS,
 * WITHOUT WARRANTIES OR CONDITIONS OF ANY KIND, either express or implied.
 * See the License for the specific language governing permissions and
 * limitations under the License.
 */

// scalastyle:off println
package org.apache.spark.examples.streaming

import java.io.File
import java.nio.charset.Charset

import com.google.common.io.Files

import org.apache.spark.{SparkConf, SparkContext}
import org.apache.spark.broadcast.Broadcast
import org.apache.spark.rdd.RDD
import org.apache.spark.streaming.{Seconds, StreamingContext, Time}
import org.apache.spark.util.{IntParam, LongAccumulator}

/**
 * Use this singleton to get or register a Broadcast variable.
 */
object WordBlacklist {

  @volatile private var instance: Broadcast[Seq[String]] = null

  def getInstance(sc: SparkContext): Broadcast[Seq[String]] = {
    if (instance == null) {
      synchronized {
        if (instance == null) {
          val wordBlacklist = Seq("a", "b", "c")
          instance = sc.broadcast(wordBlacklist)
        }
      }
    }
    instance
  }
}

/**
 * Use this singleton to get or register an Accumulator.
 */
object DroppedWordsCounter {

  @volatile private var instance: LongAccumulator = null

  def getInstance(sc: SparkContext): LongAccumulator = {
    if (instance == null) {
      synchronized {
        if (instance == null) {
          instance = sc.longAccumulator("WordsInBlacklistCounter")
        }
      }
    }
    instance
  }
}

/**
 * Counts words in text encoded with UTF8 received from the network every second. This example also
 * shows how to use lazily instantiated singleton instances for Accumulator and Broadcast so that
 * they can be registered on driver failures.
 *
 * Usage: RecoverableNetworkWordCount
 *    and  describe the TCP server that Spark Streaming would connect to receive
 *   data.  directory to HDFS-compatible file system which checkpoint data
 *    file to which the word counts will be appended
 *
 *  and  must be absolute paths
 *
 * To run this on your local machine, you need to first run a Netcat server
 *
 *      `$ nc -lk 9999`
 *
 * and run the example as
 *
 *      `$ ./bin/run-example org.apache.spark.examples.streaming.RecoverableNetworkWordCount \
 *              localhost 9999 ~/checkpoint/ ~/out`
 *
 * If the directory ~/checkpoint/ does not exist (e.g. running for the first time), it will create
 * a new StreamingContext (will print "Creating new context" to the console). Otherwise, if
 * checkpoint data exists in ~/checkpoint/, then it will create StreamingContext from
 * the checkpoint data.
 *
 * Refer to the online documentation for more details.
 */
object RecoverableNetworkWordCount {

  def createContext(ip: String, port: Int, outputPath: String, checkpointDirectory: String)
    : StreamingContext = {

    // If you do not see this printed, that means the StreamingContext has been loaded
    // from the new checkpoint
    println("Creating new context")
    val outputFile = new File(outputPath)
    if (outputFile.exists()) outputFile.delete()
    val sparkConf = new SparkConf().setAppName("RecoverableNetworkWordCount")
    // Create the context with a 1 second batch size
    val ssc = new StreamingContext(sparkConf, Seconds(1))
    ssc.checkpoint(checkpointDirectory)

    // Create a socket stream on target ip:port and count the
    // words in input stream of \n delimited text (eg. generated by 'nc')
    val lines = ssc.socketTextStream(ip, port)
    val words = lines.flatMap(_.split(" "))
    val wordCounts = words.map((_, 1)).reduceByKey(_ + _)
    wordCounts.foreachRDD { (rdd: RDD[(String, Int)], time: Time) =>
      // Get or register the blacklist Broadcast
      val blacklist = WordBlacklist.getInstance(rdd.sparkContext)
      // Get or register the droppedWordsCounter Accumulator
      val droppedWordsCounter = DroppedWordsCounter.getInstance(rdd.sparkContext)
      // Use blacklist to drop words and use droppedWordsCounter to count them
      val counts = rdd.filter { case (word, count) =>
        if (blacklist.value.contains(word)) {
          droppedWordsCounter.add(count)
          false
        } else {
          true
        }
      }.collect().mkString("[", ", ", "]")
      val output = "Counts at time " + time + " " + counts
      println(output)
      println("Dropped " + droppedWordsCounter.value + " word(s) totally")
      println("Appending to " + outputFile.getAbsolutePath)
      Files.append(output + "\n", outputFile, Charset.defaultCharset())
    }
    ssc
  }

  def main(args: Array[String]) {
    if (args.length != 4) {
      System.err.println("Your arguments were " + args.mkString("[", ", ", "]"))
      System.err.println(
        """
          |Usage: RecoverableNetworkWordCount
          |     .  and  describe the TCP server that Spark
          |     Streaming would connect to receive data.  directory to
          |     HDFS-compatible file system which checkpoint data  file to which the
          |     word counts will be appended
          |
          |In local mode,  should be 'local[n]' with n > 1
          |Both  and  must be absolute paths
        """.stripMargin
      )
      System.exit(1)
    }
    val Array(ip, IntParam(port), checkpointDirectory, outputPath) = args
    val ssc = StreamingContext.getOrCreate(checkpointDirectory,
      () => createContext(ip, port, outputPath, checkpointDirectory))
    ssc.start()
    ssc.awaitTermination()
  }
}
// scalastyle:on println
另外,使用getOrCreate需要部署底层的应用来保证driver程序可以在灾难后自动重启。
请注意,对RDD启用checkpoint会导致额外的存储开销。这可能会影响到这些参与checkpoint的RDD所在批次的处理时间。因此,checkpoint的时间间隔需要小心设置。尤其是对于小批次(1s间隔),对RDD设置checkpoint会导致明显的降低应用的吞吐量。相反,checkpoint设置的间隔太大又会导致依赖链和任务量的增长,这也是有问题的。对于stateful transformations需要设置checkpoint,那么多个批次之间的间隔我们通常情况下设置最少为10秒。可以通过dstream.checkpoint(checkpointInterval)来设置。一般情况下,checkpoint间隔为5-10个DStream时间片为最佳。
累加器和广播变量
在Spark Streaming程序中累加器和广播变量并不能从checkpoint中恢复。如果你想要使checkpoint同样能对累加器和广播变量适用,你就得创建一个延时加载的单例实例,以便它们能够在driver崩溃重启后恢复。看一下下面这个例子。
object WordBlacklist {

  @volatile private var instance: Broadcast[Seq[String]] = null

  def getInstance(sc: SparkContext): Broadcast[Seq[String]] = {
    if (instance == null) {
      synchronized {
        if (instance == null) {
          val wordBlacklist = Seq("a", "b", "c")
          instance = sc.broadcast(wordBlacklist)
        }
      }
    }
    instance
  }
}

object DroppedWordsCounter {

  @volatile private var instance: LongAccumulator = null

  def getInstance(sc: SparkContext): LongAccumulator = {
    if (instance == null) {
      synchronized {
        if (instance == null) {
          instance = sc.longAccumulator("WordsInBlacklistCounter")
        }
      }
    }
    instance
  }
}

wordCounts.foreachRDD { (rdd: RDD[(String, Int)], time: Time) =>
  // Get or register the blacklist Broadcast
  val blacklist = WordBlacklist.getInstance(rdd.sparkContext)
  // Get or register the droppedWordsCounter Accumulator
  val droppedWordsCounter = DroppedWordsCounter.getInstance(rdd.sparkContext)
  // Use blacklist to drop words and use droppedWordsCounter to count them
  val counts = rdd.filter { case (word, count) =>
    if (blacklist.value.contains(word)) {
      droppedWordsCounter.add(count)
      false
    } else {
      true
    }
  }.collect().mkString("[", ", ", "]")
  val output = "Counts at time " + time + " " + counts
})
应用部署
为了运行一个Spark Streaming应用,你需要完成以下几点。
- Cluster with a cluster manager - 这是任何Spark应用运行最基本的要求。
- Package the Application JAR - 如果要使用spark-submit来运行的话,你需要把你的Spark Streaming应用程序打成一个JAR包。你不需要提供Spark和Spark Streaming在这个JAR中。不过,当你的应用用到了高级数据源(如Kafka,Flame等),你必须把它们引用的额外JAR包引入的你的应用运行环境里面来。举个例子你的应用使用了KafkaUtils,就不得不把spark-streaming-kafka-0-8_2.11,以及它所依赖的所有JAR,加入到你的应用程序中。
- Configuring sufficient memory for the executors - 因为接收到的数据会存在内存中,所以你需要给executors配置足够量的内存来容纳接收到的数据。请注意如果你定义了10分钟的window操作,那么你就要保证至少内存中能够容纳下10分钟的数据,所以内存的需求取决于你的应用的需要。
- Configuring checkpointing - 如果你需要使用checkpoint,那么你就需要配置checkpoint dictionary在一个可靠的存储中(HDFS,S3等)。这样系统就会在这个目录中写入checkpoint信息用于恢复。
- Configuring automatic restart of the application driver - 为了能够让driver程序能够在失败后重启,你需要部署一个底层应用来对driver进程进行监控,一旦发现driver崩溃,能够重新启动driver。对于不同的集群有不同的解决方式。
- Spark Standalone - Spark应用可以提交到Spark Standalone集群上来运行,driver程序则可以运行在集群的任何一个节点上。而且,Standalone cluster manager可以对driver进行监控,一旦driver程序发生任何携带非零退出码的错误,或者因为运行driver的节点出现故障的情况下重新运行dirver程序。
- YARN - Yarn supports a similar mechanism for automatically restarting an application. Please refer to YARN documentation for more details.
- Mesos - Marathon has been used to achieve this with Mesos.
- Configuring write ahead logs - 从Spark1.2开始,我们提供了write ahead logs机制来保证强大的容错能力。一旦启用,系统会把所有接受的数据存储在你配置的checkpoint dictionary中,当然这个目录必须是在可靠存储系统中的。它会防止在driver重启过程中数据丢失,以此来保证0数据丢失,使用spark.streaming.receiver.writeAheadLog.enable=true来启用这个功能。然而这种方式会带来额外的损耗,可能会影响到数据的吞吐量。当然,你可以启动更多地receiver来对吞吐量进行修正。另外,Spark建议你在启用了write ahead logs机制的同时,关闭对接受数据保留备份的机制。你可以通过改变input stream的storage level为StorageLevel.MEMORY_AND_DISK_SER来实现。当使用S2(或者其他不支持flushing的文件系统)的时候,记得启用spark.streaming.driver.writeAheadLog.closeFileAfterWrite和spark.streaming.receiver.writeAheadLog.closeFileAfterWrite.
- Setting the max receiving rate - 如果集群资源不足以支撑你的streaming application能够足够快的处理数据,可以限制receiver每秒接受的数据量。可以通过设置receiver的spark.streaming.receiver.maxRate属性或者对于采用Kafka方案时的spark.streaming.kafka.maxRatePerPartition属性。从Spark1.5开始,我们可以通过启用backpressure,来让Spark可以根据负载来动态的调整接受速率,要启用这个方案,需要设置spark.streaming.backpressure.enabled=true。


