mybatis3.4.5源码跟读
贴一段简单的mybatis使用时的测试代码
(其他配置文件省略了,如果要搭建环境推荐一个清晰的博客: https://www.cnblogs.com/xdp-gacl/p/4261895.html )
package test;

import java.io.IOException;

import org.apache.ibatis.io.Resources;
import org.apache.ibatis.session.SqlSession;
import org.apache.ibatis.session.SqlSessionFactory;
import org.apache.ibatis.session.SqlSessionFactoryBuilder;
import org.junit.Test;
import org.junit.runner.RunWith;
import org.springframework.beans.factory.annotation.Autowired;
import org.springframework.test.context.ContextConfiguration;
import org.springframework.test.context.junit4.SpringJUnit4ClassRunner;

import com.uu.UserMapper;

public class T {

	@Test
	public void test() {
		SqlSessionFactory sqlSessionFactory = getSessionFactory();
		SqlSession sqlSession = sqlSessionFactory.openSession();
		UserMapper userMapper = sqlSession.getMapper(UserMapper.class);
		userMapper.deleteOne();
		System.out.println("success");
		sqlSession.commit();
	}

	// Mybatis 通过SqlSessionFactory获取SqlSession, 然后才能通过SqlSession与数据库进行交互
	private static SqlSessionFactory getSessionFactory() {

		SqlSessionFactory sessionFactory = null;
		String resource = "mybatis-config.xml";
		try {
			sessionFactory = new SqlSessionFactoryBuilder().build(Resources.getResourceAsReader(resource));
			//new Configuration();
		} catch (IOException e) {
			e.printStackTrace();
		}
		return sessionFactory;
	}
}
代码入口是 SqlSessionFactoryBuilder
1、Resources.getResourceAsReader(resource) 是将配置文件解析封装成一个 java.io.Reader 对象,这个可以不用关注;
2、new SqlSessionFactoryBuilder 这一行代码也没有复杂的操作,只是返回一个 org.apache.ibatis.session.SqlSessionFactoryBuilder 对象;
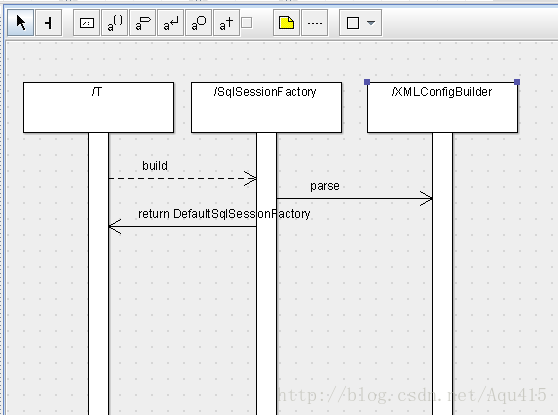
3、构建SqlSessionFactory的逻辑在build里面
上图中实例化
org.apache.ibatis.builder.xml.XMLConfigBuilder.XMLConfigBuilder(Reader, String, Properties)时,做了具体的配置文件读取和封装;
待续。。。
SqlSession sqlSession = sqlSessionFactory.openSession();最终调用的是
org.apache.ibatis.session.defaults.DefaultSqlSessionFactory.openSessionFromDataSource(ExecutorType, TransactionIsolationLevel, boolean)private SqlSession openSessionFromDataSource(ExecutorType execType, TransactionIsolationLevel level, boolean autoCommit) {
Transaction tx = null;
try {
final Environment environment = configuration.getEnvironment();
final TransactionFactory transactionFactory = getTransactionFactoryFromEnvironment(environment);
tx = transactionFactory.newTransaction(environment.getDataSource(), level, autoCommit);
final Executor executor = configuration.newExecutor(tx, execType);
return new DefaultSqlSession(configuration, executor, autoCommit);
} catch (Exception e) {
closeTransaction(tx); // may have fetched a connection so lets call close()
throw ExceptionFactory.wrapException("Error opening session. Cause: " + e, e);
} finally {
ErrorContext.instance().reset();
}
}这里创建了事务,并实例化了一个 Executor 对象,一并封装进了 DefaultSqlSession对象返回;
5、接下来获得Mapper
UserMapper userMapper = sqlSession.getMapper(UserMapper.class);最终调试调用到
org.apache.ibatis.binding.MapperRegistry.getMapper(Class, SqlSession)

 @SuppressWarnings("unchecked")
  public  T getMapper(Class type, SqlSession sqlSession) {
    final MapperProxyFactory mapperProxyFactory = (MapperProxyFactory) knownMappers.get(type);
    if (mapperProxyFactory == null) {
      throw new BindingException("Type " + type + " is not known to the MapperRegistry.");
    }
    try {
      return mapperProxyFactory.newInstance(sqlSession);
    } catch (Exception e) {
      throw new BindingException("Error getting mapper instance. Cause: " + e, e);
    }
  }
public T newInstance(SqlSession sqlSession) {
final MapperProxy mapperProxy = new MapperProxy(sqlSession, mapperInterface, methodCache);
return newInstance(mapperProxy);
}
@SuppressWarnings("unchecked")
protected T newInstance(MapperProxy mapperProxy) {
return (T) Proxy.newProxyInstance(mapperInterface.getClassLoader(), new Class[] { mapperInterface }, mapperProxy);
}
看到这里就大概明白了Mapper对象是通过 JDK 提供的动态代理机制实现的。