RabbitMQ消息队列的学习
近期又要用到消息队列的相关知识,但是发现好多都忘了..重新看文档开始吧
2018-09-04
关于向创建消费者的时候,竟然忘了,无从下手,只能重新去看官方文档: 官方介绍的几种方式:
(1):第一种是通过AmqpListener 自己编写,然后从rabbitMQ消息队列中获取消息:
Polling Consumer
The AmqpTemplate itself can be used for polled Message reception. By default, if no message is available, null is returned immediately;
也可以设置时间:具体的api参考官网说明:官网 ,但是呢这种方式是同步的
(2)第二种是通过SpringBoot的特点而产生的,基于注解的方式@RabbitListener 方式
(2):第二种呢是通过 MessageListenerContainer接口:,关于这个接口的说明:
For asynchronous Message reception, a dedicated component (not the AmqpTemplate) is involved. That component is a container for a Message consuming callback. We will look at the container and its properties in just a moment, but first we should look at the callback since that is where your application code will be integrated with the messaging system. There are a few options for the callback starting with an implementation of the MessageListener interface:
如果想异步接收消息,有一个重要的组件:是一个Container,内部包含了所有具有回调功能的类
然后呢,至于如何填充,spring-amqp提供了一个接口MessageListener接口:
public interface MessageListener {
    void onMessage(Message message);
}
如果消息消费是基于Channel的,则可以实现ChannelAwareMessageListener 接口
我们可以发现这个接口指定了类型需要为Message类型,那如果我们想处理自动以的pojo的话该如何呢:答案是通过MessageListenerAdapter,这里有个注意点,那就是需要指明处理消息的方法:
MessageListenerAdapter listener = new MessageListenerAdapter(somePojo);
listener.setDefaultListenerMethod("myMethod");
指定myMethod 这个方法去处理消息,当然这也不是固定的,只需要继承这个Adapter,然后重写getListenerMethodName)_然后动态指定即可
Talk is cheap 一步一步测吧
配置文件:
@Configuration
public class RabbitMQTestConfiguration
{
	@Bean
	public ConnectionFactory connectionFactory()
	{
		CachingConnectionFactory cachingConnectionFactory=new CachingConnectionFactory();
		cachingConnectionFactory.setUsername("guest");
		cachingConnectionFactory.setPassword("guest");
		cachingConnectionFactory.setAddresses("localhost");
		cachingConnectionFactory.setPort(5672);
		return cachingConnectionFactory;
	}
	@Bean
	public RabbitTemplate rabbitTemplate()
	{
		RabbitTemplate rabbitTemplate=new RabbitTemplate();
		rabbitTemplate.setConnectionFactory(connectionFactory());
		return rabbitTemplate;
	}
	@Bean
	public RabbitAdmin rabbitAdmin()
	{
		RabbitAdmin rabbitAdmin=new RabbitAdmin(connectionFactory());
		rabbitAdmin.declareExchange(testExchange());
		return rabbitAdmin;
	}
	@Bean
	public TopicExchange testExchange()
	{
		return new TopicExchange("test");
	}
	@Bean
	public Queue testQueue()
	{
		return new Queue("test");
	}
	@Bean
	public Binding testBinding()
	{
		return BindingBuilder.bind(testQueue()).to(testExchange()).with("test");
	}
	@Bean
	public SimpleMessageListenerContainer container()
	{
		SimpleMessageListenerContainer container=new SimpleMessageListenerContainer();
		container.setConnectionFactory(connectionFactory());
		container.setAcknowledgeMode(AcknowledgeMode.AUTO);
		container.setQueues(testQueue());
		container.setMessageListener(consumer());
//		MessageListenerAdapter adapter=new MessageListenerAdapter();
//		adapter.setDelegate(new Object());
//		adapter.setDefaultListenerMethod("");
		return container;
	}
	@Bean
	public MyRabbitMQPubisher publisher()
	{
		return new MyRabbitMQPubisher();
	}
	@Bean
	public MyRabbitConsumer consumer()
	{
		return new MyRabbitConsumer();
	}
}
Consumer:
public class MyRabbitConsumer implements ChannelAwareMessageListener
{
	Logger log=LoggerFactory.getLogger(MyRabbitConsumer.class);
	@Override
	public void onMessage(Message message, Channel channel) throws Exception
	{
		log.info("[自定义消息转换器捕获到消息],message:{}",message);
	}
}
Publisher:
public class MyRabbitMQPubisher
{
	@Autowired
	private RabbitTemplate rabbitTemplate;

	public void publish(String routingKey,Serializable data)
	{
		rabbitTemplate.convertAndSend("test", "test", data);
	}
}
测试发送:
@Test
	public void testSendMsg()
	{
		SimpleMessage message=new SimpleMessage("simple test");
		publisher.publish("test", message);
	}
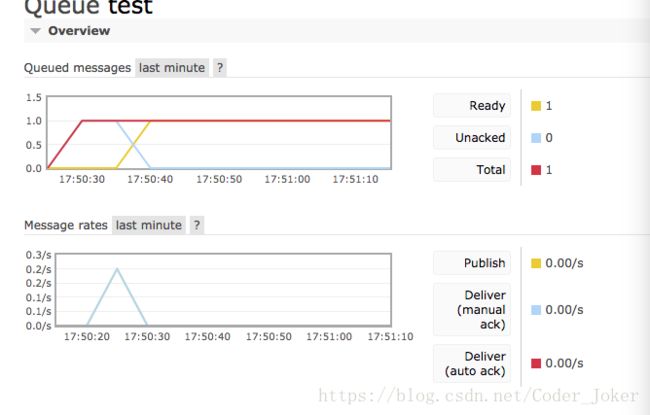
右键测试发现已经发送出去了:
上面的Consumer是通过实现MessageListener接口实现的,下面我们用自定义方法的方式实现:
public class MyCustomzieConsumer
{
	private Logger logger=LoggerFactory.getLogger(MyCustomzieConsumer.class);
	public void consume(Serializable data)
	{
		logger.info("[自定义consumer]捕获到消息,message:{}",data);
	}
}
然后只需要在config中修改下配置即可:
	@Bean
	public SimpleMessageListenerContainer container()
	{
		SimpleMessageListenerContainer container=new SimpleMessageListenerContainer();
		container.setConnectionFactory(connectionFactory());
		container.setQueues(testQueue());
//		container.setMessageListener(consumer());
		MessageListenerAdapter adapter=new MessageListenerAdapter();
		adapter.setDelegate(consumer());
		adapter.setDefaultListenerMethod("consume");
		container.setMessageListener(adapter);
		return container;
	}
注释之前的consumer,然后利用adapter指定consumer类和具体执行的方法:consume
至于注解的方式就不演示了
华丽的分割线================================================================================================================================================================================================
接下来思考这个问题,服务端发送消息,如果确保消息成功发送了,客户端消费消息,如何提示rabbitmq消息消费成功了,中间的任意一个环节断电了怎么办
关于发送消息确认官网给出了提示:
Publisher Confirms and Returns
Confirmed and returned messages are supported by setting the CachingConnectionFactory's publisherConfirms and publisherReturns properties to 'true' respectively.

When these options are set, Channel s created by the factory are wrapped in an PublisherCallbackChannel, which is used to facilitate the callbacks. When such a channel is obtained, the client can register a PublisherCallbackChannel.Listener with the Channel. The PublisherCallbackChannel implementation contains logic to route a confirm/return to the appropriate listener. These features are explained further in the following sections.

Also see simplePublisherConfirms in the section called “Scoped Operations”.
可以通过在connecitonFactory中设置publlisherConfirms(true)和publisherReturns(true)
修改配置:
	@Bean
	public ConnectionFactory connectionFactory()
	{
		CachingConnectionFactory cachingConnectionFactory=new CachingConnectionFactory();
		cachingConnectionFactory.setUsername("guest");
		cachingConnectionFactory.setPassword("guest");
		cachingConnectionFactory.setAddresses("localhost");
		cachingConnectionFactory.setPort(5672);
		cachingConnectionFactory.setPublisherConfirms(true);
		cachingConnectionFactory.setPublisherReturns(true);
		return cachingConnectionFactory;
	}
添加配置:
    @Bean
	public ConfirmCallback confirmCallBack()
	{
		return new MyConfirmCallBackFunc();
	}
	@Bean
	public ReturnCallback returnCallBack()
	{
		return new MyReturnCallBack();
	}
	@Bean
	public RabbitTemplate rabbitTemplate()
	{
		RabbitTemplate rabbitTemplate=new RabbitTemplate();
		rabbitTemplate.setConnectionFactory(connectionFactory());
		rabbitTemplate.setConfirmCallback(confirmCallBack());
		rabbitTemplate.setReturnCallback(returnCallBack());
		return rabbitTemplate;
	}
测试之前先了解一下概念:什么是ConfirmCallBack:
根据RabbitMq官网定义,rabbitmq代理(broker)对发布者(publishers)的确认被称作发布者确认(publisher confirms),这种机制是Rabbitmq对标准Amqp协议的扩展。因此通过这种机制可以确认消息是否发送给了目标。也就是说message是否正确完好的发送到了broker中
而ReturnCallback:
For returned messages, the template’s mandatory property must be set to true, or the mandatory-expression must evaluate to true for a particular message. This feature requires a CachingConnectionFactory that has its publisherReturns property set to true (see the section called “Publisher Confirms and Returns”). Returns are sent to to the client by it registering a RabbitTemplate.ReturnCallback by calling setReturnCallback(ReturnCallback callback).
ReturnCallBack使用时需要通过RabbitTemplate 的setMandatory方法设置变量mandatoryExpression的值为true或者"true",该值可以是一个表达式或一个Boolean值。当为TRUE时,如果消息无法发送到指定的消息队列那么ReturnCallBack回调方法会被调用。
================================================================================================
我们先来测试ConfirmCallBack:
@Slf4j
public class MyConfirmCallBackFunc implements ConfirmCallback
{
	@Override
	public void confirm(CorrelationData correlationData, boolean ack, String cause)
	{
		if(ack)
		{
			log.info("[消息队列确认服务],确认消息已经发送成功");
		}else {
			log.info("[消息队列确认服务],服务发送失败,原因:{}",cause);
		}
	}

}
测试发送到不存在exchange和queue中
	@Test
	public void testSendToUnknownExchange()
	{
		HashMapdata=new HashMap<>();
		data.put("user", "joker");
		publisher.publishPojo("aaaa", "test", data);
} 测试发送到不存在queue中
@Test
	public void testSendToUnknowQueue()
	{
		HashMapdata=new HashMap<>();
		data.put("user", "joker");
		publisher.publishPojo("aaaa", data);
	}
从结果可知,只要exchange存在,就会发送成功,但是呢,这时候是会调用returnCallBack的,因为找不到指定的queue
至此关于确认和失败差不多算是入门了.
================================================================================================额外衍生一点,就是关于分布式事务下该如何解决一致性呢,跟网上的其余博客一样,也采取新增表的方式,新增一个message表,主键为uuid形式,有个状态码,当操作A完成后再message中插入一条记录,记录如果插入成功,则发布一条信息,如果成功发布了则更新message表中的状态为已发布..然后就是消费端的事情了,具体的明天再补吧,
那么该如何确认消息呢:
在这种情况是是需要获取到特定的key的,那么该如何获取的,结果就是通过CorrelateData来获取和发送,RabbitTemplate有自定义的api,
	@Override
	public void convertAndSend(String exchange, String routingKey, final Object object, CorrelationData correlationData)
			throws AmqpException {
		send(exchange, routingKey, convertMessageIfNecessary(object), correlationData);
	}
这样,在ConfirmCallback就能获取到我们的主键了,从而我们可以在表中进行我们下一步的操作了
样式代码在 here,大佬们给个star可好


