RabbitMQ 快速入门——简单队列模式
一、入门程序
需求:使用简单模式完成消息传递
步骤:
- 创建工程(生产者、消费者)
- 分别添加依赖
- 编写生产者发送消息
- 编写消费者接收消息
1.1 添加依赖
分别在生产者和消费者的 pom.xml 文件中添加如下依赖:
<project xmlns="http://maven.apache.org/POM/4.0.0"
         xmlns:xsi="http://www.w3.org/2001/XMLSchema-instance"
         xsi:schemaLocation="http://maven.apache.org/POM/4.0.0 http://maven.apache.org/xsd/maven-4.0.0.xsd">
    <modelVersion>4.0.0modelVersion>

    <groupId>org.examplegroupId>
    <artifactId>rabbitmq-producerartifactId>
    <version>1.0-SNAPSHOTversion>

    <dependencies>
        <dependency>
            <groupId>com.rabbitmqgroupId>
            <artifactId>amqp-clientartifactId>
            <version>5.6.0version>
        dependency>
        <dependency>
            <groupId>com.rabbitmqgroupId>
            <artifactId>amqp-clientartifactId>
            <version>5.6.0version>
            <scope>compilescope>
        dependency>
    dependencies>

    <build>
        <plugins>
            <plugin>
                <groupId>org.apache.maven.pluginsgroupId>
                <artifactId>maven-compiler-pluginartifactId>
                <version>3.8.0version>
                <configuration>
                    <source>1.8source>
                    <target>1.8target>
                configuration>
            plugin>
        plugins>
    build>

project>
1.2 生产者 Producer
import com.rabbitmq.client.Channel;
import com.rabbitmq.client.Connection;
import com.rabbitmq.client.ConnectionFactory;

import java.io.IOException;
import java.util.concurrent.TimeoutException;

/**
 * 发送消息
 */
public class ProducerHelloWorld {
    public static void main(String[] args) throws IOException, TimeoutException {
        // 1.创建连接工厂
        ConnectionFactory factory = new ConnectionFactory();
        // 2.设置参数
        factory.setHost("IP地址");
        factory.setPort(5672);
        factory.setVirtualHost("/test");
        factory.setUsername("admin");
        factory.setPassword("admin");
        // 3.创建连接 Connection
        Connection connection = factory.newConnection();
        // 4.创建Channel
        Channel channel = connection.createChannel();
        // 5.创建队列Queue
        /*
        * queueDeclare(String queue, boolean durable, boolean exclusive, boolean autoDelete,
                                 Map arguments)
        *   queue:队列的名称
        *   durable:设置是否持久化。为 true 则设置队列为持久化。持久化的队列会存盘,在服务器重启的时候可以保证不丢失相关信息。
        *   exclusive:设置是否排他。为 true 则设置队列为排他的。有两层含义:
        *           1.是否独占,只能有一个消费者监听这队列
        *           2.当 Connection 关闭时是否删除队列
        *   autoDelete:设置是否自动删除。为 true 则设置队列为自动删除。
        *   arguments:设置队列的其他一些参数
        *
        * */
        channel.queueDeclare("hello_world", true, false, false, null);
        // 6.发送消息
        /*
        * basicPublish(String exchange, String routingKey, boolean mandatory, BasicProperties props, byte[] body)
        *   exchange:交换器的名称,指明消息需要发送到哪个交换器中。如果设置为空字符串,则消息会被发送到 RabbitMQ 默认的交换器中。
        *   routingKey:路由键,交换器根据路由键将消息存储到相应的队列之中。如果使用默认交换器,RoutingKey 需要跟队列名保持一致。
        *   props:消息的基本属性集
        *   body:消息体(payload),真正需要发送的消息
        * */

        String body = "hello rabbitmq~~~";
        channel.basicPublish("", "hello_world", null, body.getBytes());

        // 释放资源
        channel.close();
       	connection.close();
    }
}
queueDeclare 方法详解
queueDeclare 有两个重载方法:
Queue.DeclareOk queueDeclare() throws IOException;

Queue.DeclareOk queueDeclare(String queue, boolean durable, boolean exclusive, boolean autoDelete,
                                 Map<String, Object> arguments) throws IOException;
不带任何参数的 queueDeclare 方法默认创建一个由 RabbitMQ 命名的(类似这种 amq.gen-LhQzlgv3GhDOv8OIDabOXA 名称,这种队列也称之为匿名队列)、排他的、自动删除的、非持久化的队列。
方法的参数详细说明如下:
- queue:队列的名称
- durable:设置是否持久化。为 true 则设置队列为持久化。持久化的队列会存盘,在服务器重启的时候可以保证不丢失相关信息。
- exclusive:设置是否排他。为 true 则设置队列为排他的。如果一个队列被声明为排他队列,该队列仅对首次声明它的连接可见,并在连接断开时自动删除。这里需要注意三点:排他队列是基于连接(Connection)可见的,同一个连接的不同心道(Channel)是可以同时访问同一连接创建的排他队列;“首次”是指如果一个连接已经声明了一个排他队列,其他连接是不允许建立同名的排他队列的,这个与普通队列不同;即使该队列是持久化的,一旦连接关闭或者客户端退出,该排他队列都会被自动删除,这种队列适用于一个客户端同时发送和读取消息的应用场景。关于排他队列的介绍也可以看下这篇文章:RabbitMQ排他性队列
- autoDelete:设置是否自动删除。为 true 则设置队列为自动删除。自动删除的前提是:至少有一个消费者连接到这个队列,之后所有与这个队列连接的消费者都断开时,才会自动删除。不能把这个参数错误地理解为:“当连接到此队列的所有客户端断开时,这个队列自动删除”,因为生产者客户端创建这个队列,或者没有消费者客户端与这个队列连接时,都不会自动删除这个队列。
- arguments:设置队列的其他一些参数,如 x-message-ttl、x-expires、x-max-length、x-max-length-bytes、x-dead-letter-exchange、x-dead-letter-routing-key、x-max-priority 等。
注意要点:
生产者和消费者都能够使用 queueDeclare 来声明一个队列,但是如果消费者在同一个信道上订阅了另一个队列,就无法再声明队列了,必须先取消订阅,然后将信道置为“传输”模式,之后才能声明队列。
basicPublish 方法详解
basicPublish 的几个重载方法:
void basicPublish(String exchange, String routingKey, BasicProperties props, byte[] body) throws IOException;

void basicPublish(String exchange, String routingKey, boolean mandatory, BasicProperties props, byte[] body) throws IOException;

void basicPublish(String exchange, String routingKey, boolean mandatory, boolean immediate, BasicProperties props, byte[] body) throws IOException;
对应的具体参数解释如下:
- exchange:交换器的名称,指明消息需要发送到哪个交换器中。如果设置为空字符串,则消息会被发送到 RabbitMQ 默认的交换器中。
- routingKey:路由键,交换器根据路由键将消息存储到相应的队列之中。如果使用默认交换器,RoutingKey 需要跟队列名保持一致。
- props:消息的基本属性集,其包含 14 个属性成员,分别有 contentType、contentEncoding、headers(Map
- byte[] body:消息体(payload),真正需要发送的消息
1.3 消费者 Consumer
import com.rabbitmq.client.*;
import java.io.IOException;
import java.util.concurrent.TimeoutException;
public class ConsumerHelloWorld {
public static void main(String[] args) throws IOException, TimeoutException {
ConnectionFactory factory = new ConnectionFactory();
factory.setHost("IP地址");
factory.setPort(5672);
factory.setVirtualHost("/test");
factory.setUsername("admin");
factory.setPassword("admin");
Connection connection = factory.newConnection();
Channel channel = connection.createChannel();
// 接收消息
Consumer consumer = new DefaultConsumer(channel){
/*
* consumerTag:消费者标签,用来区分多个消费者
* envelope:获取一些信息,交换器,路由key等等
* properties:配置信息
* body:消息
* */
@Override
public void handleDelivery(String consumerTag, Envelope envelope, AMQP.BasicProperties properties, byte[] body) throws IOException {
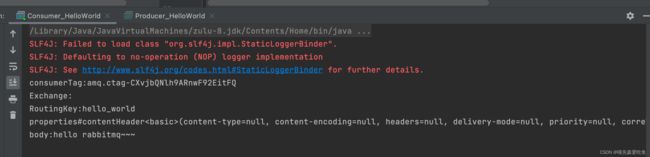
System.out.println("consumerTag:" + consumerTag);
System.out.println("Exchange:" + envelope.getExchange());
System.out.println("RoutingKey:" + envelope.getRoutingKey());
System.out.println("properties" + properties);
System.out.println("body:" + new String(body));
}
};
/*
* basicConsume(String queue, boolean autoAck, Consumer callback)
* queue:队列名称
* autoAck:设置是否自动确认。建议设置成false,即不自动确认
* callback:设置消费者的回调函数。用来处理 RabbitMQ 推送过来的消息,比如
* DefaultConsumer,使用时需要客户端重写其中的方法(handleDelivery)
*
* */
channel.basicConsume("hello_world", true, consumer);
}
}
运行结果:
二、代码改进
抽取生产者以及消费者中公共部分,即创建连接工厂、设置参数、创建连接以及创建信道等内容,形成Util工具类
import com.rabbitmq.client.Channel;
import com.rabbitmq.client.Connection;
import com.rabbitmq.client.ConnectionFactory;

import java.io.IOException;
import java.util.concurrent.TimeoutException;

public class RabbitMqUtil {

    public static Channel getChannel() throws IOException, TimeoutException {
        // 1.创建连接工厂
        ConnectionFactory factory = new ConnectionFactory();
        // 2.设置参数
        factory.setHost("IP地址");
        factory.setPort(5672);
        factory.setVirtualHost("/test");
        factory.setUsername("admin");
        factory.setPassword("admin");
        // 3.创建连接
        Connection connection = factory.newConnection();
        // 4.创建信道
        Channel channel = connection.createChannel();
        return channel;
    }

    public static Connection getConnection() throws IOException, TimeoutException {
        ConnectionFactory factory = new ConnectionFactory();
        factory.setHost("IP地址");
        factory.setPort(5672);
        factory.setVirtualHost("/test");
        factory.setUsername("admin");
        factory.setPassword("admin");
        return factory.newConnection();
    }
}
生产者代码改进
import com.itheima.util.RabbitMqUtil;
import com.rabbitmq.client.Channel;
import com.rabbitmq.client.Connection;

import java.io.IOException;
import java.util.concurrent.TimeoutException;

/**
 * 发送消息
 */
public class ProducerHelloWorld {
    public static void main(String[] args) throws IOException, TimeoutException {
        Connection connection = RabbitMqUtil.getConnection();
        // 4.创建Channel
        Channel channel = connection.createChannel();
        // 5.创建队列Queue
        /*
        * queueDeclare(String queue, boolean durable, boolean exclusive, boolean autoDelete,
                                 Map arguments)
        *   queue:队列的名称
        *   durable:设置是否持久化。为 true 则设置队列为持久化。持久化的队列会存盘,在服务器重启的时候可以保证不丢失相关信息。
        *   exclusive:设置是否排他。为 true 则设置队列为排他的。有两层含义:
        *           1.是否独占,只能有一个消费者监听这队列
        *           2.当 Connection 关闭时是否删除队列
        *   autoDelete:设置是否自动删除。为 true 则设置队列为自动删除。
        *   arguments:设置队列的其他一些参数
        *
        * */
        channel.queueDeclare("hello_world", true, false, false, null);
        // 6.发送消息
        /*
        * basicPublish(String exchange, String routingKey, boolean mandatory, BasicProperties props, byte[] body)
        *   exchange:交换器的名称,指明消息需要发送到哪个交换器中。如果设置为空字符串,则消息会被发送到 RabbitMQ 默认的交换器中。
        *   routingKey:路由键,交换器根据路由键将消息存储到相应的队列之中。如果使用默认交换器,RoutingKey 需要跟队列名保持一致。
        *   props:消息的基本属性集
        *   body:消息体(payload),真正需要发送的消息
        * */

        String body = "hello rabbitmq~~~";
        channel.basicPublish("", "hello_world", null, body.getBytes());

        // 释放资源
        channel.close();
        connection.close();
    }
}
消费者代码改进
import com.itheima.util.RabbitMqUtil;
import com.rabbitmq.client.*;

import java.io.IOException;
import java.util.concurrent.TimeoutException;

public class ConsumerHelloWorld {
    public static void main(String[] args) throws IOException, TimeoutException {
        Connection connection = RabbitMqUtil.getConnection();
        Channel channel = connection.createChannel();
        // 接收消息
        Consumer consumer = new DefaultConsumer(channel){

            /*
            * consumerTag:消费者标签,用来区分多个消费者
            * envelope:获取一些信息,交换器,路由key等等
            * properties:配置信息
            * body:消息
            * */
            @Override
            public void handleDelivery(String consumerTag, Envelope envelope, AMQP.BasicProperties properties, byte[] body) throws IOException {
                System.out.println("consumerTag:" + consumerTag);
                System.out.println("Exchange:" + envelope.getExchange());
                System.out.println("RoutingKey:" + envelope.getRoutingKey());
                System.out.println("properties" + properties);
                System.out.println("body:" + new String(body));
            }
        };
        /*
        * basicConsume(String queue, boolean autoAck, Consumer callback)
        *   queue:队列名称
        *   autoAck:设置是否自动确认。建议设置成false,即不自动确认
        *   callback:设置消费者的回调函数。用来处理 RabbitMQ 推送过来的消息,比如
        *           DefaultConsumer,使用时需要客户端重写其中的方法
        *
        * */
        channel.basicConsume("hello_world", true, consumer);

    }
}
三、总结
上述入门案例中其实使用的是如下的简单模式:
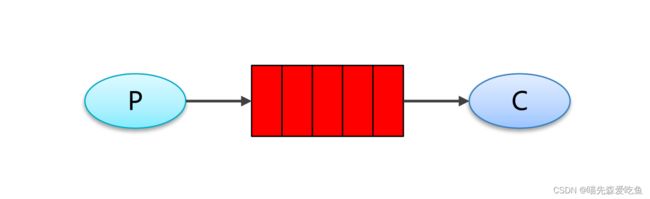
在上图的模型中,有以下概念:
- P:生产者,也就是要发送消息的程序
- C:消费者,消息的接收者,会一直等待消息到来
- queue:消息队列,图中红色部分,类似一个邮箱,可以缓存消息;生产者向其中投递消息,消费者从其中取出消息