整理中...
文本布局
TextLayout = Glyphs + Locations
参考:活字印刷
Glyphs(字型)?
- 字符的图形形式(A Graphical Representation of Characters)。
- 字符 + 字体 -> 字型 (Character + font -> glyph)。
- 图形系统中字型编码:
CGGlyph(Glyph IDs for the graphics systems: CGGlyph)。
示例
+ (void)ctu_drawAttributedText:(NSAttributedString *)attributedText
                     textRange:(NSRange)textRange
                        inRect:(CGRect)rect
                      context:(CGContextRef)context
{
    NSAssert(context != NULL, @"context is NULL !");
    if (context == NULL ||
        attributedText == nil ||
        attributedText.length == 0 ||
        CGRectIsEmpty(rect) ||
        textRange.length == 0) return;

    /* Push a copy of the current graphics state onto the graphics state stack.*/
    CGContextSaveGState(context);
    {
        CGContextSetTextMatrix(context, CGAffineTransformIdentity);
        CGContextTranslateCTM(context, CGRectGetMinX(rect), CGRectGetMaxY(rect));
        CGContextScaleCTM(context, 1.0f, -1.0f);

        CTFramesetterRef framesetter = CTFramesetterCreateWithAttributedString((__bridge CFAttributedStringRef)attributedText);

        CGRect _rect = CGRectMake(0,0,
                                  CGRectGetWidth(rect),
                                  CGRectGetHeight(rect));

        CGPathRef path = CGPathCreateWithRect(_rect,
                                              nil);

        CFRange _textRange = CFRangeMake(textRange.location, textRange.length);

        CTFrameRef frame = CTFramesetterCreateFrame(framesetter,
                                                    _textRange,
                                                    path,
                                                    nil);
        CTFrameDraw(frame, context);

        CFRelease(frame);
        CFRelease(path);
        CFRelease(framesetter);
    }
    /* Restore the current graphics state from the one on the top of the
     graphics state stack, popping the graphics state stack in the process. */
    CGContextRestoreGState(context);

}
CoreText
当前版本0.1
点击此处-显示原文
Introduction
CoreText是的iOS3.2+和OSX10.5+中的文本引擎,让您精细的控制文本布局和格式。它位于在UIKit中和CoreGraphics/Quartz之间的最佳点。* UIKit中你有的文本空间,你可以通过XIB简单的使用文本控件在屏幕上显示文字,但你不能改变个别字的颜色。*
CoreGraphics/Quartz你可以做几乎可以胜任所有的工作,但是你需要计算每个字形的在文本中的位置,并绘制在屏幕上。*
CoreText正好位于两者之间!你可以完全控制位置,布局,属性,如颜色和大小,但CoreText布局需要你自己管理-从自动换行到字体渲染等等。
如果你正在创建一个iPad上的杂志或书籍的应用程序,使用CoreText非常方便。这个CoreText教程将带你如何使用CoreText创建一个杂志应用你将学习如何:* 奠定格式化的上下文本在屏幕上* 微调文本的外观* 向文本内容中添加图片* 最后创建一个杂志的应用程序,它加载文本标记来轻松地控制渲染文本的格式* 最后吃掉你的脑子
建立一个核心文本项目为了充分利用这个CoreText教程,您首先要知道iOS开发的基础知识。如果你是iOS开发新手,首先你应该看看的一些基础教程.事不宜迟,让我们通过自己开发一个简单的《杂志》应用程序:
- 创建应用的时候选
Single View Application* 添加CoreText.framework
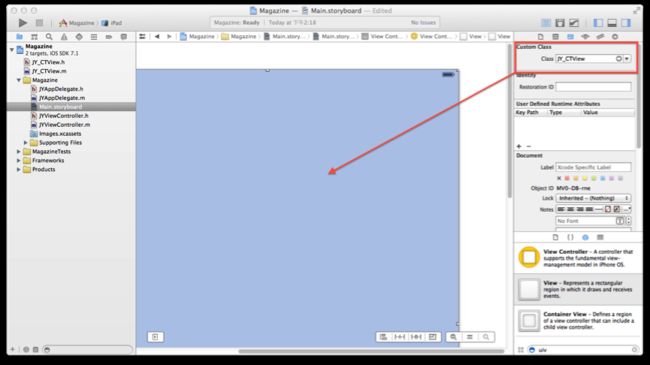
- 添加一个CoreText View在
UIView的drawRect:方法中使用CoreText。 - 创建一个
JY_CTView继承自UIView。* 其次,在Storyboard中添加一个UIView,就像这样: - 最后在 drawRect函数中绘制文本
苍老师
-(void)drawRect:(CGRect)rect{
// Drawing code
 CGContextRef ref = UIGraphicsGetCurrentContext();
CGMutablePathRef path = CGPathCreateMutable();
//1
 CGPathAddRect(path, NULL, self.bounds);
NSAttributedString* attString = [[NSAttributedString alloc] initWithString:@"苍老师!"];
//2
   CTFramesetterRef framesetter = CTFramesetterCreateWithAttributedString((CFAttributedStringRef)attString);
//3
 CTFrameRef frame = CTFramesetterCreateFrame(framesetter, CFRangeMake(0, attString.length), path, NULL);
CTFrameDraw(frame, ref);
//4
 CFRelease(framesetter);
//5
 CFRelease(path); CFRelease(frame);}
好吧让我们来讨论这个,使用上面的注释标记来指定每个部分:
在这里,你需要创建一个边界,在区域的路径中您将绘制文本。(就是说我给你指定一个帐号,你必需给指定帐号汇钱)。在Mac和iOS上
CoreText支持不同的形状,如矩形和圆。在这个简单的例子中,您将使用整个视图范围为在那里您将通过创建从self.bounds一个CGPath参考绘制矩形。在核心文字你不使用的
NSString,而是NSAttributedString,如下图所示。NSAttributedString是一个非常强大的NSString衍生类,它允许你申请的格式属性的文本。就目前而言,我们不会使用格式 - 这里只是创建了一个纯文本字符串。CTFramesetter当采用CoreText绘制文本最重要的一个类,它管理你的字体引用和你的文本绘制框架。就目前而言,你需要知道的是,CTFramesetterCreateWithAttributedString为您创建一个CTFramesetter,保留它,并用附带的属性字符串初始化它。在这部分中,之后使用CTFramesetterCreateFrame得到frame用framesetter和path,(我们选择整个字符串在这里),并在绘制时,文字会出现在矩形CTFrameDraw在提供的大小在给定上下文后绘制,苍老师5. 最后,所有使用的对象被释放请注意,您使用一套像CTFramesetterCreateWithAttributedString和CTFramesetterCreateFrame功能,而不是直接使用Objective-C对象CoreText类时。你可能会认为自己“为什么我会要再次使用C,我认为我应该用Objective-C去完成?”好了,很多iOS上的底层库中都在使用标准C,因为速度和简单。不过别担心,你会发现CoreText函数很容易。只是一个要记住最重要的一点:不要忘记使用CFRelease释放内存。不管你信不信,这就是你使用CoreText绘制一些简单的文本-
点击运行:
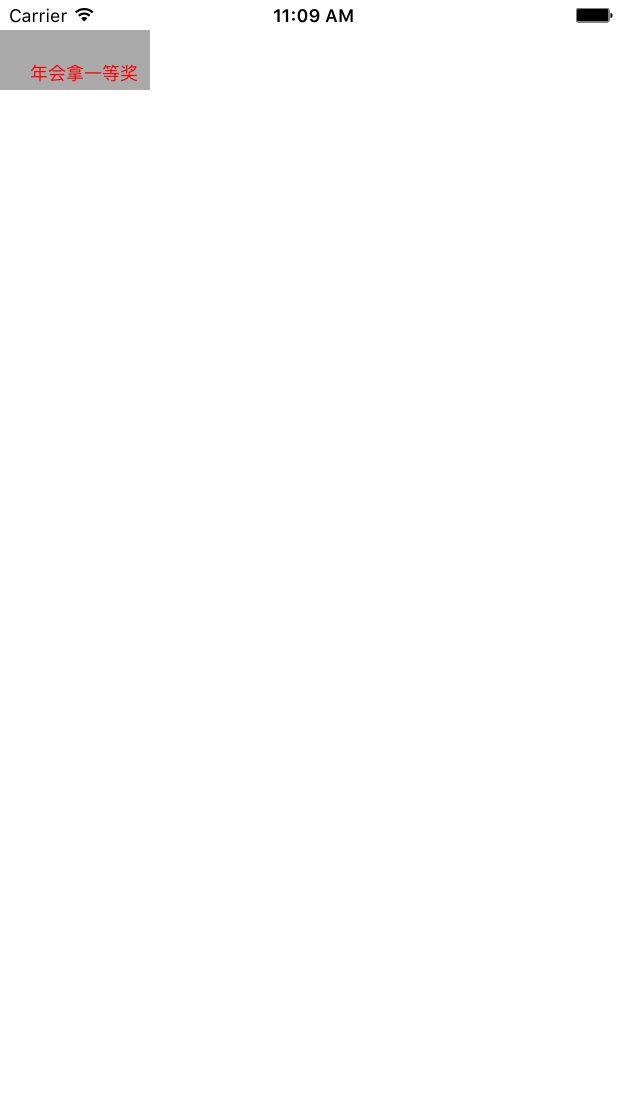
嗯!这不是我的苍老师?因为像许多低级别的API,CoreText采用了Y坐标系翻转。因为这个使事情变得更糟,内容也呈现向下翻转!(CoreText因为是用了笛卡尔坐标系),请记住,如果你混合UIKit的绘画和CoreText绘画,你可能会得到奇怪的结果让我们来解决的内容方向!
修改代码
-(void)drawRect:(CGRect)rect{
 // Drawing code
CGContextRef ref = UIGraphicsGetCurrentContext();
//flip the coordinate system
CGContextSetTextMatrix(conRef, CGAffineTransformIdentity);
CGContextTranslateCTM(conRef, 0, self.bounds.size.height);
CGContextScaleCTM(conRef, 1.0, -1.0);  CGMutablePathRef
path = CGPathCreateMutable();
//1
CGPathAddRect(path, NULL, self.bounds);
NSAttributedString* attString = [[NSAttributedString alloc] initWithString:@"苍老师!"];
//2
 CTFramesetterRef framesetter = CTFramesetterCreateWithAttributedString((CFAttributedStringRef)attString);
//3
CTFrameRef frame = CTFramesetterCreateFrame(framesetter, CFRangeMake(0, attString.length), path, NULL);
CTFrameDraw(frame, ref);
//4
CFRelease(framesetter);
//5
 CFRelease(path);
 CFRelease(frame);}
这是非常简单的代码,刚刚翻转的内容通过应用转换到视图的上下文。每一次绘制文本的时候只需要复制/粘贴它(就是把这一行代码在绘制文本前,从copy过去就行了)。
再次运行一下,看苍老师是不是又回来了。
The Core Text Object Model(Core Text对象模型)
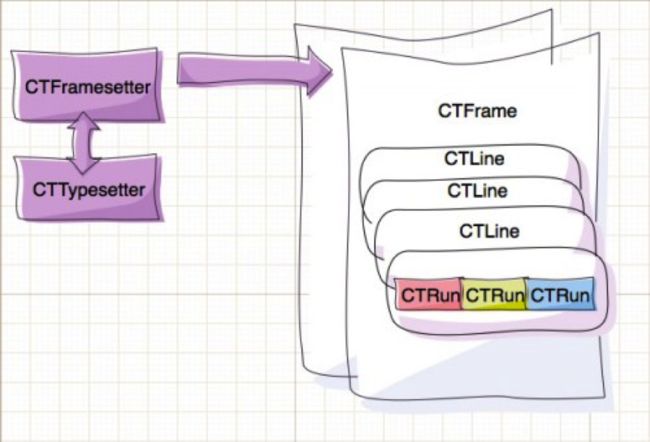
如果你是一个有点困惑CTFramesetter和CTFrame没关系。在这里,我会做一个简短解释CoreText是如何呈现的文字内容。下面看起来像是CoreText对象模型:
您可以用
NSAttributedString创建一个
CTFramesetterRef,同时
CTTypesetter的实例将自动为您创建,管理您的字体类。
接下来您使用CTFramesetter创建一个或多个CTFrame您在其中会呈现文本。
当你创建一个CTFrame您要它文字将其矩形的范围内呈现,然后CoreText自动为文本的每一行文字,
创建一个CTLine(注意一个CTRun,每个CTRun块具有相同的格式 )例子,核心文本将创建一个CTRun如果你有几个单词在一排红色,接着又CTRun加粗句子。再等等,非常重要的 - 你没有创建CTRun实例,CoreText创建它根据你提供的NSAttributedString中的属性每个CTRun的对象可以采取不同的属性,所以你必须很好地控制字距、连字,宽度,高度等。
Onto the Magazine App!(杂志应用程序)
要创建这个杂志的应用程序, 我们需要标记一些文本具有不同的属性的能力。我们可以做到这一点通过直接使用在NSAttributedString中的方法如setAttributes:range,但是在实践中这是笨拙的处理方式(除非你喜欢刻意写一吨的代码!)所以为了让事情更简单与合作,我们将创建一个简单的文本标记解析器,这将使我们能够使用简单的标签来在杂志内容设置格式。
- 选择File>New>New File。
- 选择iOS>Cocoa Touch>Objective-C class*。
- 然后单击下一步。输入NSObject为父类。
- 单击下一步,命名新类MarkupParser。
- 然后单击保存。
//MarkupParser.h
#import
#import
@interface JYMarkParser : NSObject
@property(strong,nonatomic) NSString* font;
@property(strong,nonatomic) UIColor* color;
@property(strong,nonatomic) UIColor* strokeColor;
@property(assign,readwrite) float strokeWidth;
@property(strong,nonatomic) NSMutableArray* images;
-(NSAttributedString*)attrStringFromMark:(NSString*)html;
@end
//MarkupParser.m
#import "JYMarkParser.h"
@implementation JYMarkParser
-(id)init
{
  self = [super init];
  if (self)
  {
    self.font = @"Arial";
    self.color = [UIColor blackColor];
    self.strokeColor = [UIColor whiteColor];
    self.strokeWidth = 0.0;
    self.images = [NSMutableArray array];
  }
  return self;
}
-(NSAttributedString*)attrStringFromMark:(NSString*)markup
{
 return nil;
}
-(void)dealloc
{
  self.font = nil;
  self.color = nil;
  self.strokeColor = nil;
  self.images = nil;
}
@end
正如你看到你开始解析器代码很简单,它只是包含属性来保存字体,文本颜色,笔画宽度和笔画颜色。
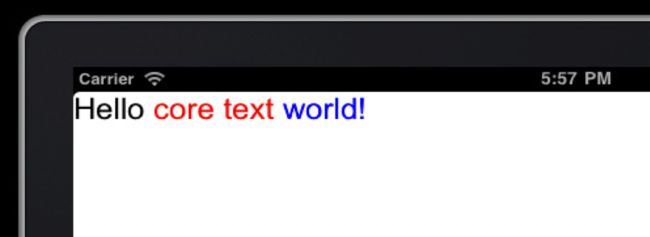
稍后我们将添加里面的文字图像,所以你需要保持在文字图像列表的数组。编写解析器通常是很艰苦的工作,所以我要告诉你如何建立一个非常非常简单的使用正则表达式。本教程的解析器将非常简单,只支持打开标签 - 即标记将设置标记后的文本的样式,样式将应用到一个新的标签被发现。该文本标记看起来像这样:并产生这样的输出:
对于本教程的目的,这样的标记将是相当足够了。为你的项目可以进一步开发它,如果你想更牛B的功能的话。
Let’s go在attrStringFromMark:方法中添加以下内容:
-(NSAttributedString*)attrStringFromMark:(NSString*)markup
{
    NSMutableAttributedString* aString = [[NSMutableAttributedString alloc] initWithString:@""];
    //1
    NSError* error = nil;
    //(.*?).通配符 *?匹配上一个元素零次或多次,但次数尽可能少。
    //^匹配必须从字符串或一行的开头开始。
    //<>的位置
    NSRegularExpressionOptions options = NSRegularExpressionCaseInsensitive|NSRegularExpressionDotMatchesLineSeparators;
    NSRegularExpression* regex = [[NSRegularExpression alloc]initWithPattern:@"(.*?)(<[^>]+>|\\Z)"
                                                                     options:options
                                                                       error:&error];
    //2
    NSArray* chunks = [regex matchesInString:markup
                                     options:0
                                       range:NSMakeRange(0, markup.length)];
    if (error)
    {
        NSLog(@"解析标签出现错误:%@\n%@",[error userInfo],error);
        //返回原来的字符串
        return [[NSAttributedString alloc] initWithString:markup];
    }
}
有两个章节,这里包括:
首先,初始化一个空的
NSMutableAttributedString接下来,你需要创建一个正则表达式来匹配文本和标签快。这个正则表达式将匹配基本文本字符串和下列标记,正则表达式选找匹配的字符串,直到你遇到
<然后匹配任何数量的字符,直到你遇到>或者\n。为什么要创建这个正则表达式?我们将用它来搜索字符串的每个匹配的地方,然后
a. 找到要修改样式的字符串,然后
b. 根据解析出来的样式,改变字符串的颜色,字体等。重复1、2的步骤改变每一处样式。很简单的解析器,不是吗?现在数组chunks中你拥有了所有的标记和需要修改的文本,你需要循chunks从其中取得要字符串和样式
-(NSAttributedString*)attrStringFromMark:(NSString*)mark
{
    NSMutableAttributedString* aString = [[NSMutableAttributedString alloc] initWithString:@""];
    NSError* error = nil;
    //(.*?).通配符 *?匹配上一个元素零次或多次,但次数尽可能少。
    //^匹配必须从字符串或一行的开头开始。
    //<>的位置
    NSRegularExpressionOptions options = NSRegularExpressionCaseInsensitive|NSRegularExpressionDotMatchesLineSeparators;
    NSRegularExpression* regex = [[NSRegularExpression alloc]initWithPattern:@"(.*?)(<[^>]+>|\\Z)"
                                                                     options:options
                                                                       error:&error];
    NSArray* chunks = [regex matchesInString:mark
                                     options:0
                                       range:NSMakeRange(0,
                                                         mark.length)];
    //1
    if (error) { NSLog(@"解析标签出现错误:%@\n%@",[error userInfo],error);
        //返回原来的字符串
        return [[NSAttributedString alloc] initWithString:mark];
    }
    // NSLog(@"%@",chunks);
    for (NSTextCheckingResult* result in chunks)
    {
        //字符串切割
        NSArray* parts = [[mark substringWithRange:result.range] componentsSeparatedByString:@"<"];
        //1;
        CTFontRef fontRef = CTFontCreateWithName((__bridge CFStringRef)self.font, 24.0f, NULL);
        //apply the current text style
        //2
        NSDictionary* attrs = @{(id)kCTForegroundColorAttributeName: (id)self.color.CGColor,
                                (id)kCTFontAttributeName:(__bridge id)fontRef,
                                (id)kCTStrokeColorAttributeName:(__bridge id)self.strokeColor.CGColor,
                                (id)kCTStrokeWidthAttributeName:[NSNumber numberWithFloat:self.strokeWidth]};
        [aString appendAttributedString:[[NSAttributedString alloc] initWithString:parts[0]
                                                                        attributes:attrs]];
        CFRelease(fontRef);
        //是否带属性,处理新的样式 3
        if (parts.count>1)
        {
            NSString* tag = parts[1];
            if ([tag hasPrefix:@"font"])
            {
                //stroke color
                NSRegularExpression* scReg = [[NSRegularExpression alloc]initWithPattern:@"(?<=strokeColor=\")\\w+"
                                                                                 options:0
                                                                                   error:nil];
                [scReg enumerateMatchesInString:tag
                                        options:0
                                          range:NSMakeRange(0, tag.length)
                                     usingBlock:^(NSTextCheckingResult *result, NSMatchingFlags flags, BOOL *stop)
                {
                    if ([[tag substringWithRange:result.range] isEqualToString:@"none"])
                    {
                        self.strokeWidth = 0.0;
                    }
                    else
                    {
                        self.strokeWidth = -3.0;
                        SEL colorSel = NSSelectorFromString([NSString stringWithFormat:@"%@Color",[tag substringWithRange:result.range]]);
                        self.strokeColor = [UIColor performSelector:colorSel];
                    }
                }];
                //Color
                NSRegularExpression* colorReg = [[NSRegularExpression alloc] initWithPattern:@"(?<=color=\")\\w+"
                                                                                     options:0
                                                                                       error:nil];
                [colorReg enumerateMatchesInString:tag
                                           options:0
                                             range:NSMakeRange(0, tag.length)
                                        usingBlock:^(NSTextCheckingResult *result, NSMatchingFlags flags, BOOL *stop)
                 {
                     SEL colorSel = NSSelectorFromString([NSString stringWithFormat: @"%@Color", [tag substringWithRange:result.range]]);
                     self.color = [UIColor performSelector:colorSel];
                 }];
                //face
                NSRegularExpression* faceRegex = [[NSRegularExpression alloc] initWithPattern:@"(?<=face=\")[^\"]+"
                                                                                      options:0
                                                                                        error:NULL];
                [faceRegex enumerateMatchesInString:tag
                                            options:0
                                              range:NSMakeRange(0,
                                                                [tag length])
                                         usingBlock:^(NSTextCheckingResult *match, NSMatchingFlags flags, BOOL *stop)
                {
                    self.font = [tag substringWithRange:match.range];
                }];
            }
        }
    }
    //end of font parsing 结束字体解析
    return aString;
}
尼玛,这是一个很大的代码!但不用担心,我们在这里逐节介绍:
- 快速枚举
chunks数组中我们用正则找到的NSTextCheckingResult对象,对“chunks”数组中的元素用<字符分割(<是标签的起始)。其结果,在parts [0]中的内容添加到aString中(aString是一个NSAttributedString),接下来在parts[1]中你有标记的内容为后面的文本改变格式。 - 其次,你创建一个字典保持一系列的格式化选项- 这是你可以通过格式属性的
NSAttributedString的方式。看看这些Key的名称- 他们是苹果定义的常量(详情请围观参考)。通过调用appendAttributedString:新的文本块与应用格式被添加到结果字符串。 - 最后,你检查如果有文字后发现了一个标记;如果以
font开头的正则表达式每一种可能的标记属性。对于face属性的字体的名称保存在self.font,为color我和你做了一点改变:对文本值red采取的是colorRegex,然后选择器redColor被创建和执行在UIColor类 - 这(嘿嘿)返回一个红色的的UIColor实例(在实际中可以使用#FFFFFFFF这种方式装换成颜色,网上有自己找找),请注意这个技巧只适用于的UIColor的预定义的颜色(如果你调用了一个UIColor中不存在的方法,你的代码会奔溃!)但是这足以满足本教程。stroke color属性的工作原理很像颜色属性,但如果则strokeColor的值为none刚刚设置笔触widht到0.0,所以stroke没有将被应用到的文本。
Note:如果你好奇在本节中正则表达式是如何工作,请阅读NSRegularExpression class reference。
没错!绘制格式化文本的一半工作完成- 现在用attrStringFromMark:可以得到一个有标记的NSAttributedString输出到CoreText。
因此,让我们传递一个字符串来呈现,并尝试一下!打开JY_CTView.m,修改drawRect::
-(void)drawRect:(CGRect)rect
{
    // Drawing code
    CGContextRef ref = UIGraphicsGetCurrentContext();
    //flip the coordinate system
    CGContextSetTextMatrix(conRef, CGAffineTransformIdentity);
    CGContextTranslateCTM(conRef, 0, self.bounds.size.height);
    CGContextScaleCTM(conRef, 1.0, -1.0);
    CGMutablePathRef path = CGPathCreateMutable();
    //1
    CGPathAddRect(path, NULL, self.bounds);
    //Parser tag
    JYMarkParser* p = [[JYMarkParser alloc]init];
    NSAttributedString * attString = [p attrStringFromMark: @"Hello core text world!"];
    CTFramesetterRef framesetter = CTFramesetterCreateWithAttributedString((CFAttributedStringRef)attString);
    //3 CTFrameRef frame =
    CTFramesetterCreateFrame(framesetter, CFRangeMake(0, attString.length), path, NULL); CTFrameDraw(frame, ref);
    //4
    CFRelease(framesetter);
    //5
    CFRelease(path);
    CFRelease(frame);
}
你上面做一个新的解析器,给它一块标记,它给你返回格式化的文本。点击运行和自己试试看!
是不是真棒?由于50行的解析,我们不必处理文本范围和代码重文本格式,我们现在可以只使用一个简单的文本在 Magazine app中。此外刚刚编写的简单的解析器,可以无限扩展,支持一切你需要的功能。A Basic Magazine Layout(一个基础的杂志布局)
到目前为止,我们的文字显示出来,它是一个很好的第一步。但对于一本杂志,我们希望有列 - 而这正是CoreText变得特别方便。在继续进行布局代码,让我们先加载一个更长的字符串到应用程序,所以我们有一些足够长的多行换行。把这个点击下载test.txt拷贝到项目中。
然后在JYController中添加一下代码
#import "JYViewController.h"#import "JY_CTView.h"#import "JYMarkParser.h"@interface JYViewController()@property (weak, nonatomic) IBOutlet JY_CTView *contentView;@end@implementation JYViewController- (void)viewDidLoad{ [super viewDidLoad]; NSString* string = [NSString stringWithContentsOfFile:[[NSBundle mainBundle] pathForResource:@"test" ofType:@"txt"] encoding:NSUTF8StringEncoding error:nil]; JYMarkParser* mp = [[JYMarkParser alloc]init]; [_contentView setAttString:[mp attrStringFromMark:string]];}@end```当应用程序的视图被加载,应用程序从`test.txt`的读取文本,将其转换为一个属性字符串,然后设置在窗口的视图`attString`属性。我们还没有添加该属性到`JY_CTView`,所以让我们添加了下!在`JY_CTView.h`定义这3个实例变量:```float frameXOffset```、```float frameYOffset; ```、```NSAttributedString* attString;```然后加入相应的代码`JY_CTView.h`来定义`attString`一个属性:```#import "JY_CTColumnView.h"@interface JY_CTView : UIView{ CGFloat _frameXOffset; CGFloat _frameYOffset;}@property(nonatomic,copy) NSAttributedString* attString;```在运行之前先删除```JY_CTView.m```的```drawRect:```方法中相关代码```//Parser tagJYMarkParser* p = [[JYMarkParser alloc]init];NSAttributedString * attString = [p attrStringFromMark: @"Hello core text world!"];```现在,您可以再次点击运行来查看该文本文件的内容的视图。酷!...  这个文本如何分列?幸运的是核心文本提供了一个方便的功能 -`CTFrameGetVisibleStringRange`。这个函数告诉你多少文字会放入一个给定的`frame`。这样的想法是 - 创建列,检查多少文字适合在里面,如果有更多的 - 创建另一列,首先 - 我们将会有列,那么页面,然后一整本杂志,所以......让我们使我们的`JY_CTView`子类`UIScrollView`中得到自由分页和滚动!打开CTView.h和更改继承关系`@interface JY_CTView : UIScrollView`OK!我们已经得到了自由滚动和翻页现已推出。我们要启用分页在一分钟内。截至目前,我们正在创建我们的`CTFramesetter`和`CTFrame`在`drawRect:`方法内。当你有列和不同的格式最好是做所有这些计算一次。所以,我们要做的是拥有新的类`JY_CTColumnView`.因此,要总结:`JY_CTView`是要采取搭理滚动,分页和建设列,`JY_CTColumnView`实际上会呈现在屏幕上的内容。这个类确实差不多就是这样- 它只是呈现CTFrame。我们将在该杂志的每个文本列上创建它的一个实例。让我们首先添加一个属性来保存我们的`JY_CTView`的`frames`并声明`buildFrames`方法,它会做的列设置:```@property(nonatomic,strong) NSMutableArray* frames;-(void)buildFrames;```现在`buildFrames`可以创建文本框,并将其存储在“frames”数组。让我们添加这样做的代码。```-(void)buildFrames{ _frameXOffset = 20; //1 _frameYOffset = 20; self.pagingEnabled = YES; self.delegate = self; self.frames = [NSMutableArray array]; CGMutablePathRef path = CGPathCreateMutable();//2 CGRect textFrame = CGRectInset(self.bounds, _frameXOffset, _frameYOffset); CGPathAddRect(path, NULL, textFrame); CTFramesetterRef framesetter = CTFramesetterCreateWithAttributedString((__bridge CFAttributedStringRef)_attString); int textPos = 0;//3 int columnIndex = 0; while (textPos 让我们来看看代码
- 这里我们做一些设置 - 定义X和Y偏移,启用分页并创建一个空的
frames数组 -
buildFrames继续通过创建一个路径和视图的边界frame(稍有偏差,所以我们有边距) - 该段说明
textPos,这将保持当前位置的文本。这也声明columnIndex,这将计算已经创建多少列。 - 这里的
while循环运行,直到我们到达了文本的末尾。在循环中,我们创建一个列范围:colRect是的CGRect,要看columnIndex保持当前列的原点和大小。请注意,我们正在不断建立列在右边(不能跨,然后向下)。 - 这使得利用
CTFrameGetVisibleStringRange功能要弄清楚什么部分的字符串可以容纳在CGRect(在这种情况下,文本列)。textPos是这个范围的长度增加,所以下一列的建设可以在下一循环开始(如果有多个文本剩余)。 - 而不是像绘画前
frame在这里,我们把它传递给新创建的JY_CTColumnView,我们将其存储在self.frames数组为以后的使用,我们把它作为子视图(ScrollView中)。 - 最后,
totalPages持有所产生的总页数,以及JY_CTView的contentSize属性设置,所以当有内容多于一页,我们得到滚动是自由的。现在,让我们也调用buildFrames当所有的CoreText设置完成了。里面JYViewController.m添加在viewDidLoad中的结尾:[_contextView buildFrames]还有一件事让新代码尝试前做,在文件JY_CTView.m找到方法的drawRect:将其删除。我们现在做的所有绘制在JY_CTColumnView类中,所以我们不需要drawRect:方法,专注实现ScrollView的功能。好吧……点击运行,你会看到成列的文本,还可以进行拖动。 我们有列格式化文本,但我们错过的图片。原来绘制的图像与文字的核心是不那么容易 - 这毕竟是一个文本框架。但由于这样的事实,我们已经有了一个小标记解析器我们要拿到里面的文字图像!
Drawing Images in Core Text(CoreText中绘制图像)
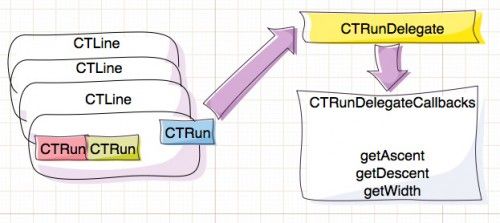
基本上核心文本不具有绘制图像的可能性。然而,因为它是一个布局引擎,可以做的是给要画一幅画留下一个空的空间。而且,由于你的代码已经在drawRect:方法里面。你自己绘制一张图片很容易。让我们来看看如何在文本留下空白用于绘制图像,记住所有的文字块是CTRun实例!你只需设置一个委托为给定的CTRun并且委托对象负责要让CoreText知道CTRun的上升空间,下降空间和宽度。像这样:
当
CoreText到达一
CTRun其中有一个
CTRunDelegate它会询问委托- 多么宽,我应该留给这个块的数据,有多高,应该是什么?这样,在你建立的文本空白处 - 然后你画你的图片在那个非常的地方。让我们先添加一个
IMG标签支持在我们的小标记解析器!打开
JYMarkupParser并且找到
} //end of font parsing;
在这一行后面,立即添加下面的代码添加为IMG标签的支持:
if ([tag hasPrefix:@"img"]) { __block NSNumber* width = [NSNumber numberWithInt:0]; __block NSNumber* height = [NSNumber numberWithInt:0]; __block NSString* fileName = @""; //width NSRegularExpression* widthRegex = [[NSRegularExpression alloc] initWithPattern:@"(?<=width=\")[^\"]+" options:0 error:NULL] ; [widthRegex enumerateMatchesInString:tag options:0 range:NSMakeRange(0, [tag length]) usingBlock:^(NSTextCheckingResult *match, NSMatchingFlags flags, BOOL *stop){ width = [NSNumber numberWithInt: [[tag substringWithRange: match.range] intValue] ]; }]; //height NSRegularExpression* faceRegex = [[NSRegularExpression alloc] initWithPattern:@"(?<=height=\")[^\"]+" options:0 error:NULL] ; [faceRegex enumerateMatchesInString:tag options:0 range:NSMakeRange(0, [tag length]) usingBlock:^(NSTextCheckingResult *match, NSMatchingFlags flags, BOOL *stop){ height = [NSNumber numberWithInt: [[tag substringWithRange:match.range] intValue]]; }]; //image NSRegularExpression* srcRegex = [[NSRegularExpression alloc] initWithPattern:@"(?<=src=\")[^\"]+" options:0 error:NULL]; [srcRegex enumerateMatchesInString:tag options:0 range:NSMakeRange(0, [tag length]) usingBlock:^(NSTextCheckingResult *match, NSMatchingFlags flags, BOOL *stop){ fileName = [tag substringWithRange: match.range]; }]; //add the image for drawing [self.images addObject: [NSDictionary dictionaryWithObjectsAndKeys: width, @"width", height, @"height", fileName, @"fileName", [NSNumber numberWithInt: [aString length]], @"location", nil] ]; NSLog(@"%@", [NSDictionary dictionaryWithObjectsAndKeys: width, @"width", height, @"height", fileName, @"fileName", [NSNumber numberWithInt: [aString length]], @"location", nil]); //render empty space for drawing the image in the text //1 CTRunDelegateCallbacks callbacks; callbacks.version = kCTRunDelegateVersion1; callbacks.getAscent = ascentCallback; callbacks.getDescent = descentCallback; callbacks.getWidth = widthCallback; callbacks.dealloc = deallocCallback; NSDictionary* imgAttr = [NSDictionary dictionaryWithObjectsAndKeys: //2 width, @"width", height, @"height", nil]; CTRunDelegateRef delegate = CTRunDelegateCreate(&callbacks, (__bridge void *)(imgAttr)); //3 NSDictionary *attrDictionaryDelegate = [NSDictionary dictionaryWithObjectsAndKeys: //set the delegate (__bridge id)delegate, (NSString*)kCTRunDelegateAttributeName, nil]; //add a space to the text so that it can call the delegate [aString appendAttributedString:[[NSAttributedString alloc] initWithString:@" " attributes:attrDictionaryDelegate]];}
让我们来看看所有的新代码 - 实际上解析IMG标签和解析字体标签确实几乎是一样的,通过使用3个正则表达式你有效地检索img标签的宽度,高度和src属性。当完成 - 你添加一个新的NSDictionary持有你刚刚解析出来的信息,再加上图像在文本的位置,最后添加到self.images中。
现在看第1 部分- CTRunDelegateCallbacks是一个C结构体,持有引用功能。这个结构体提供了你想传递给CTRunDelegate的信息。正如你已经可以猜到的getWidth被调用来提供对CTRun的宽度,getAscent提供CTRun的高度。在你上面的代码提供该些处理程序的函数名; 稍后我们要添加的函数主体。
第2节是非常重要的 – imgAtt字典持有的图像的尺寸; 这个对象将被retain一下在非ARC,因为它将要传递给函数处理-所以,当getAscent处理函数触发时它会得到参数imgAttr字典,然后读取图片的高度,并且提供值给CoreText。(就是这个feel倍爽)!CTRunDelegateCreate
在第3节创建一个委托实例和绑定的回调与数据参数。在接下来的步骤中,您需要创建的属性字典(以同样的方式作为上述字体的格式),不能直接使用CTRunDelegateRef。到最后你加一个空格去触发delagate图像将被渲染。
下一步,你已经预料,是提供的回调函数给委托:
/* Callbacks */static void deallocCallback( void* ref ){ ref =nil;}static CGFloat ascentCallback( void *ref ){ return [(NSString*)[(__bridge NSDictionary*)ref objectForKey:@"height"] floatValue];}static CGFloat descentCallback( void *ref ){ return [(NSString*)[(__bridge NSDictionary*)ref objectForKey:@"descent"] floatValue];}static CGFloat widthCallback( void* ref ){ return [(NSString*)[(__bridge NSDictionary*)ref objectForKey:@"width"] floatValue];}
ascentCallback,descentCallback和widthCallback读各属性从字典中并且提供给CoreText。deallocCallback做的是什么?它释放的字典保存的图像信息- 这就是所谓的当CTRunDelegate得到释放,让你有机会做你的内存管理。现在,您的解析器处理“IMG”标签,让我们也调整CTView来呈现它们。我们需要一种方法来将图像数组发送到视图,让我们结合设置属性字符串和图像转声明一个新方法。
添加的代码:
JY_CTView.h@property(nonatomic,strong) NSArray* images;-(void)setAttString:(NSAttributedString*)attString withImages:(NSArray*)imgs;JY_CTView.m-(void)setAttString:(NSAttributedString *)attString withImages:(NSArray *)imgs{ self.attString = attString; self.images = imgs;}
现在,CTView准备接受与图像数组,让我们来分析并且使用他们。去JYViewController.m并找到行[contentView setAttString:attString]; - 用下面的替换:[_contentView setAttString:attString withImages:mp.images];
如果您查找attrStringFromMark:在JYMarkupParser类,你会看到它保存所有的图像标记数据到self.images。这是现在您所传递什么直接向CTView。渲染图像,我们就必须知道图像应该出现在什么地方。要找到那个地方我们需要知道若干个值的由来:* contentOffset当内容被滚动* CTView的frame偏移(frameXOffset,frameYOffset)* CTLine原点坐标(CTLine可能在例如段落的开头已偏移)* CTRun的原点和CTLine的原点之间的距离 让我们来渲染这些图片!首先,我们需要更新JY_CTColumnView类:
//JY_CTColumnView.h@property(nonatomic,strong) NSMutableArray *images;```
//JY_CTColumnView.m- (void)drawRect:(CGRect)rect{ // Drawing code CGContextRef conRef = UIGraphicsGetCurrentContext(); //flip the coordinate system CGContextSetTextMatrix(conRef, CGAffineTransformIdentity); CGContextTranslateCTM(conRef, 0, self.bounds.size.height); CGContextScaleCTM(conRef, 1.0, -1.0); CTFrameDraw((__bridge CTFrameRef)_ctFrame, conRef); for (NSArray* imageData in self.images) { UIImage* img = [imageData objectAtIndex:0]; CGRect imgBounds = CGRectFromString([imageData objectAtIndex:1]); CGContextDrawImage(conRef, imgBounds, img.CGImage); }}
所以用这个代码更新我们添加代码和一个名为Images属性,
我们将不断出现在每个文本列中的图像列表。

为了避免声明的又一新的类来保存保存图像内的图像数据,我们存储图像内的图像数据用NSArray:
1. 一个UIImage实例
2. 图像边界-图像在文字中的原点和大小而现在,计算图像“的位置,并将它们附加到相应的文本列的代码:
-(void)attachImagesWithFrame:(CTFrameRef)f inColumnView:(JY_CTColumnView*)col{ //drawing images NSArray *lines = (NSArray )CTFrameGetLines(f); //1 CGPoint origins[[lines count]]; CTFrameGetLineOrigins(f, CFRangeMake(0, 0), origins); //2 int imgIndex = 0; //3 NSDictionary nextImage = [self.images objectAtIndex:imgIndex]; int imgLocation = [[nextImage objectForKey:@"location"] intValue]; //find images for the current column CFRange frameRange = CTFrameGetVisibleStringRange(f); //4 while ( imgLocation < frameRange.location ) { imgIndex++; if (imgIndex>=[self.images count]) return; //quit if no images for this column nextImage = [self.images objectAtIndex:imgIndex]; imgLocation = [[nextImage objectForKey:@"location"] intValue]; } NSUInteger lineIndex = 0; for (id lineObj in lines) { //5 CTLineRef line = (__bridge CTLineRef)lineObj; for (id runObj in (NSArray *)CTLineGetGlyphRuns(line)) { //6 CTRunRef run = (__bridge CTRunRef)runObj; CFRange runRange = CTRunGetStringRange(run); if ( runRange.location <= imgLocation && runRange.location+runRange.length > imgLocation ) { //7 CGRect runBounds; CGFloat ascent;//height above the baseline CGFloat descent;//height below the baseline runBounds.size.width = CTRunGetTypographicBounds(run, CFRangeMake(0, 0), &ascent, &descent, NULL); //8 runBounds.size.height = ascent + descent; CGFloat xOffset = CTLineGetOffsetForStringIndex(line, CTRunGetStringRange(run).location, NULL); //9 runBounds.origin.x = origins[lineIndex].x + self.frame.origin.x + xOffset + _frameXOffset; runBounds.origin.y = origins[lineIndex].y + self.frame.origin.y + _frameYOffset; runBounds.origin.y -= descent; UIImage *img = [UIImage imageNamed: [nextImage objectForKey:@"fileName"] ]; CGPathRef pathRef = CTFrameGetPath(f); //10 CGRect colRect = CGPathGetBoundingBox(pathRef); CGRect imgBounds = CGRectOffset(runBounds, colRect.origin.x - _frameXOffset - self.contentOffset.x, colRect.origin.y - _frameYOffset - self.frame.origin.y); [col.images addObject: //11 [NSArray arrayWithObjects:img, NSStringFromCGRect(imgBounds) , nil] ]; //load the next image //12 imgIndex++; if (imgIndex < [self.images count]) { nextImage = [self.images objectAtIndex: imgIndex]; imgLocation = [[nextImage objectForKey: @"location"] intValue]; } } } lineIndex++; }}
我知道这一段代码非常的不好看,忍受一下教程一会就结束了。这是最后的冲刺阶段。我们一部分一部分的看:
1. CTFrameGetLines给你返回CTLine对象的数组。
2. 得到CTFrameRef中所有CTLineRef的原点(Origin) - 简而言之:你得到所有的文本行的左上角坐标列表。
3. 你的第一个图像的属性数据载入nextImage,imgLoaction是图片在文本中的位置。
4. CTFrameGetVisibleStringRange为您提供了可见的文本范围为您所渲染的frame - 即你得到你呈现目前文本的哪一部分,那么你通过图像数组循环,直到你找到的第一个图像,这是在你呈现目前的frame。换句话说 -你快进到相关的一段文字在渲染此刻的图片。
5. 从文本中取出每一行(从CTFrame中取出CTLine)。
6. 得到文本中每一行中的每一小块(从CTLine中取出CTRun)。
7. 检查nextImage是否在当前CTRun的范围之内-若然,那么你必须去,并继续渲染图片在这个精确的点。
8. 你弄清楚CTRun的高度和宽度,通过使用CTRunGetTypographicBounds方法。
9. 你计算出CTRun原点坐标,通过使用CTLineGetOffsetForStringIndex和其他偏移。
10. 加载图片使用给定的文件名,并得到当前列的矩形,并最终在图片所需要的矩形来显示。
11. 您创建一个NSArray使用UIImage和计算出来的frame,你将它添加到CTColumnView的图像列表
12. 读取下一张图片OK,最后一个小步骤:找到JY_CTView中找到`[content setCTFrame:(id)frame]`并且在这一行下面添加如下:
[self attachImagesWithFrame:frame inColumnView:content];
现在你有了代码,唯独没有丰富的内容,不用担心我给你准备了一些内容,如下:
1. 下载、解压并且把它导入到你的工程中URL:xiaoxiao。
2. 更改代码如下
NSString* string = [NSString stringWithContentsOfFile:[[NSBundle mainBundle] pathForResource:@"zombies" ofType:@"txt"] encoding:NSUTF8StringEncoding error:nil];JYMarkParser* mp = [[JYMarkParser alloc]init];NSAttributedString* attString =[mp attrStringFromMark:string];[_contentView setAttString:attString withImages:mp.images];[_contentView buildFrames];
点击运行 只是一个最后一步。说我们要在合理的列中的文本,使其充满整个列的整个宽度。添加下面的代码来实现这一目标:
-(void)setAttString:(NSAttributedString )attString withImages:(NSArray )imgs{ self.images = imgs; CTTextAlignment alignment = kCTJustifiedTextAlignment; CTParagraphStyleSetting settings[ ] = { {kCTParagraphStyleSpecifierAlignment, sizeof(alignment), &alignment}, }; CTParagraphStyleRef paragraphStyle = CTParagraphStyleCreate(settings, sizeof(settings) / sizeof(settings[0])); NSDictionary attrDictionary = [NSDictionary dictionaryWithObjectsAndKeys: (__bridge id)paragraphStyle, (NSString)kCTParagraphStyleAttributeName, nil]; NSMutableAttributedString stringCopy = [[NSMutableAttributedString alloc] initWithAttributedString:attString]; [stringCopy addAttributes:attrDictionary range:NSMakeRange(0, [attString length])]; self.attString = (NSAttributedString)stringCopy;}
想要更多的段落样式,请查阅文档。从而获取更多的段落样式。When to use Core Text and why?现在,你的杂志APP和CoreText已经完成,也许你会问:“为什么我们使用CoreText而不使用UIWebView”。不要忘了UIWebView的是一个成熟的Web浏览器,使用它来形象化单个文本大材小用。想象一下,你有你的10多个标签的UI,这意味着你要消耗10个Safaris的内存(好吧,差不多,但你明白了吧)。所以,请记住:UIWebView的是一个很好的网页浏览器,当你需要的是一种高效的文本渲染引擎请使用CoreText。Where To Go From Here?以下是我们在开发的上述CoreText教程完整的CoreText示例项目。如果你想要更多支持,可以去了解CoreText。

看看应用程序是否可以添加以下一功能:
1. 添加更多的标签
2. CTRun支持更多的样式
3. 添加更多的段落样式
4. 添加到自动将样式应用到字边界,段落,句子的能力
5. 启用连字和字距 - 它实际上是很酷,效果 “if”和“fi”;)因为我知道你已经在思考如何扩大解析器引擎超出了我,包括在这个简短的教程我对你两条建议:
> a. 学习HTML解析,参考:HMTL-Parser
b. 或者创建你自己的语法解析器,做任何想知道你想出使用的OBJ - C ParseKit如果您有任何疑问,请百度

