这篇文章是关于保存saving恢复restore模型model与变量variales。
保存与恢复变量Variables
估算器Estimator自动保存和恢复变量到model_dir目录。
tf.train.saver类提供了保存save和恢复restore图的全部或部分变量的方法。它保存为checkpoint文件到指定目录,将变量映射为tensor张量。
保存变量
使用tf.train.Saver()方法创建saver并使用它来管理图的变量。示例代码:
import tensorflow as tf
import os

v1 = tf.get_variable("v1", shape=[3], initializer = tf.zeros_initializer)
v2 = tf.get_variable("v2", shape=[5], initializer = tf.zeros_initializer)

#定义一些运算操作
inc_v1 = v1.assign(v1+1)
dec_v2 = v2.assign(v2-1)

#初始化变量
init_op = tf.global_variables_initializer()

#自动添加默认图的所有变量,保存和恢复
saver = tf.train.Saver()

dir_path = os.path.dirname(os.path.realpath(__file__))
sum_path=os.path.join(dir_path,'temp/test1.ckpt') #不要使用斜杠

with tf.Session() as sess:
  sess.run(init_op)
  inc_v1.op.run()
  dec_v2.op.run()

  #执行保存操作.
  save_path = saver.save(sess, sum_path)
  print("Model saved in path: %s" % save_path)
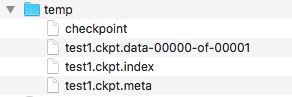
这将在当前文件夹下创建一个temp文件夹,并写入若干文件(test.ckpt只是一个文件前缀,并不是仅仅一个文件),如下:
恢复变量
tf.train.saver不仅保存,也可以恢复,当你从文件恢复变量的时候,不需要事先初始化它们。使用下面的代码把它放在和上面代码文件一起,注意这里的v1,v2并没有使用initializer参数初始数值。
import tensorflow as tf
import os

tf.reset_default_graph()

v1 = tf.get_variable("v1", shape=[3])
v2 = tf.get_variable("v2", shape=[5])

saver = tf.train.Saver()

dir_path = os.path.dirname(os.path.realpath(__file__))
sum_path=os.path.join(dir_path,'temp/test1.ckpt') #不要使用斜杠
with tf.Session() as sess:
  saver.restore(sess, sum_path)
  print("Model restored.")
  print("v1 : %s" % v1.eval())
  print("v2 : %s" % v2.eval())
运行后会输出
v1 : [1. 1. 1.]
v2 : [-1. -1. -1. -1. -1.]
这明显是上一段代码存储的assign后的数据。
选择哪些变量需要保存和恢复
参数为空的时候tf.train.Saver会自动保存和恢复所有的变量。有些时候我们只想保存或恢复部分变量,比如我们使用5个神经层进行了训练,稍后我们又希望改为6个神经层但是仍然保持就有的权重,这时候我们就只希望恢复旧的权重值而不是全部。
- 变量list列表(变量名作为名称)
- 字典dict(键名作为名称)
下面的两个示例,第一个保存v2变量,第二个读取v2变量
#第一遍运行,保存v2
import tensorflow as tf
import os

tf.reset_default_graph()

#在第二遍运行时候可以修改v1的[3]为2,但不可以修改v2的[5],会导致与存储的变量形状不同而失败
v1 = tf.get_variable("v1", [3], initializer = tf.zeros_initializer)
v2 = tf.get_variable("v2", [5], initializer = tf.zeros_initializer)

saver = tf.train.Saver({"v2": v2})

dir_path = os.path.dirname(os.path.realpath(__file__))
sum_path=os.path.join(dir_path,'temp/test3.ckpt') #不要使用斜杠

with tf.Session() as sess:
    v1.initializer.run() #因为v1没有被保存,所以需要初始化
    v2.initializer.run() #第二遍运行时候注释此行
    saver.save(sess, sum_path) #第二遍运行时候注释此行

    print("v1 : %s" % v1.eval())
    print("v2 : %s" % v2.eval())
读取的代码
#第二遍运行用,只读取v2
import tensorflow as tf
import os

tf.reset_default_graph()

#在第二遍运行时候可以修改v1的[3],但不可以修改v2的[5],会导致与存储的变量形状不同而失败
v1 = tf.get_variable("v1", [2], initializer = tf.zeros_initializer)
v2 = tf.get_variable("v2", [5], initializer = tf.zeros_initializer)

saver = tf.train.Saver({"v2": v2})

dir_path = os.path.dirname(os.path.realpath(__file__))
sum_path=os.path.join(dir_path,'temp/test3.ckpt') #不要使用斜杠

with tf.Session() as sess:
    v1.initializer.run() #因为v1没有被保存,所以需要初始化
    saver.restore(sess, sum_path) #读取v2

    print("v1 : %s" % v1.eval())
    print("v2 : %s" % v2.eval())
- 可以创建多个Saver保存不同的子集变量,同一变量可以保存在不同的Saver的list。只有在
Saver.restore()执行的时候才会被恢复。 - 对于没有被保存的变量,必须要单独初始化。
- 可以使用
print_tensors_in_checkpoint_file查看存储在checkpoint文件内的变量。 - 默认使用
tf.Variables.name作为保存名,创建Saver的时候也可以选择其他名称,
查看检查点checkpoint内存储的变量
使用inspect_checkpoint可以查看检查点中的变量:
import tensorflow as tf
import os
from tensorflow.python.tools import inspect_checkpoint as chkp

dir_path = os.path.dirname(os.path.realpath(__file__))
sum_path=os.path.join(dir_path,'temp/test3.ckpt')

#打印全部
chkp.print_tensors_in_checkpoint_file(sum_path,tensor_name='',all_tensors=True,all_tensor_names=True)

# 只打印v1,由于上一个案例中没有存储v1,所以会失败
chkp.print_tensors_in_checkpoint_file(sum_path,tensor_name='v1',all_tensors=True,all_tensor_names=False)

#只打印v2
chkp.print_tensors_in_checkpoint_file(sum_path,tensor_name='v2',all_tensors=True,all_tensor_names=False)
模型的保存与恢复概览
Model包含了Variables,graph以及图的matadata元数据。
保存或恢复整个模型需要使用SavedModel,它提供了高级的系统和工具用来生成、消耗和变换模型。TensorFlow提供了几个方法影响SavedModel,包括tf.saved_model,tf.Estimator,CLI
创建和载入SavedModel
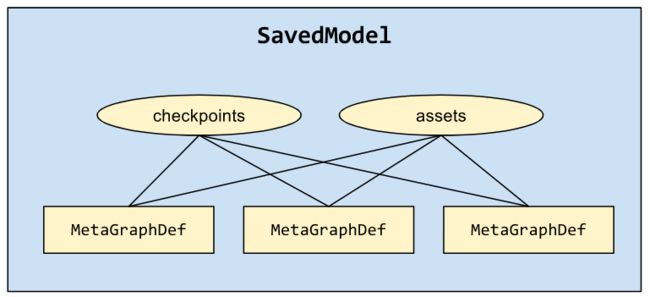
SavedModelBuilder提供了保存多个MataGraphDef的功能。MataGraph是一个数据流图dataflow graph加上变量、资源和签名Signature。MataGraphDef是MataGraph的一个协议缓冲,Signature是一个graph的输入和输出。
如果多个MataGraphDef都关联到一个同名的资源,那么只有第一个版本会被保留。
以下示意代码,不可运行
export_dir = ...
...
builder = tf.saved_model.builder.SavedModelBuilder(export_dir)
with tf.Session(graph=tf.Graph()) as sess:
  ...
  builder.add_meta_graph_and_variables(sess,
                                       [tag_constants.TRAINING],
                                       signature_def_map=foo_signatures,
                                       assets_collection=foo_assets)
...
#添加第二个MetaGraphDef用于推测.
with tf.Session(graph=tf.Graph()) as sess:
  ...
  builder.add_meta_graph([tag_constants.SERVING])
...
builder.save()
使用Python载入一个SavedModel
三个参数:
- 需要载入的graph和变量到哪个会话Session
- 需要载入的MataGraphDef标记tags
- 目录位置
载入之后,MataGraphDef的变量、资源和签名子集都存储到session中。
示意代码:
export_dir = ...
...
with tf.Session(graph=tf.Graph()) as sess:
  tf.saved_model.loader.load(sess, [tag_constants.TRAINING], export_dir)
  ...
结合Estimators使用SavedModel
当我们训练完成一个模型之后,可以将其部署在本地或云端,可以向他发起请求获取结果。因此必须首先导出为标准的SavedModel。
- 指定相关节点nodes和提供的API(Classify、Regress、Predict)
- 导出模型为SavedModel
- 在本地运行模型服务,请求预测
准备输入服务
类似训练中的input_fn,serving_input_receiver_fn函数负责接受请求并准备数据。它实现以下目标:
- 想提供服务的graph添加一个palceholder,将被用来注入预测请求
- 添加一些新的操作,把输入的数据格式转为模型期望的张量
这个函数返回一个tf.estimator.export.ServingInputReceiver对象,它打包了placeholder和结果特征张量。
预测请求以tf.Examples格式到达,serving_input_receiver_fn创建单个字符串placeholder接收它们,并向graph添加一个tf.parse_example用来解析。
编写serving_input_receiver_fn必须传递一个解析规则parsing specification,用来告知解析器,期待哪些特征名以及如何转为期望的张量。
解析规格是一个字典dict,特征名到tf.FixedLenFeature, tf.VarLenFeature, tf.SparseFeature。这个解析规格不能包含任何标签label、权重列weight columns,因此与训练时候用的解析方法不同。
feature_spec = {'foo': tf.FixedLenFeature(...),
                'bar': tf.VarLenFeature(...)}

def serving_input_receiver_fn():
  """An input receiver that expects a serialized tf.Example."""
  serialized_tf_example = tf.placeholder(dtype=tf.string,
                                         shape=[default_batch_size],
                                         name='input_example_tensor')
  receiver_tensors = {'examples': serialized_tf_example}
  features = tf.parse_example(serialized_tf_example, feature_spec)
  return tf.estimator.export.ServingInputReceiver(features, receiver_tensors)
导出估算器
导出模型的函数
estimator.export_savedmodel(export_dir_base, serving_input_receiver_fn)
这个方法创建一个新的图,首先呼叫serving_input_receiver_fn()来获取特征张量,然后呼叫estimator的model_fn()来给予这些特征张量生成图。它启动一个全新的会话,恢复最近的检查点到这个会话,最后它在给定目录下创建一个基于时间戳的目录,为此会话保存SavedModel的一个MataGraphDef。(可以在这里回收旧的导出垃圾避免堆积)
指定自定义模型的输出
在自定义训练model_fn()的时候,必须使用tf.estimator.EstimatorSpec来填充export_outputs。这是一个字典{name:output}格式描述输出签名,以便于导出和服务时候使用。
对于单个预测的情况,这个字典只包含一个元素,名称不要紧。但是对于一个多头模型,每个头都表示这个字典的一个入口,这种情况下在运行服务的时候,名称字符串将被用作特定头的输入。
每个输出值都必须是ExportOutput对象,比如tf.estimator.export.ClassificationOutput, tf.estimator.export.RegressionOutput, ,tf.estimator.export.PredictOutput.
本地运行导出模型服务
使用Tensorflow Serving载入SavedModel并作为一个gRPC服务曝光。
安装TensorFlow Serving之后,使用下面命令创建和运行服务:
bazel build //tensorflow_serving/model_servers:tensorflow_model_server
bazel-bin/tensorflow_serving/model_servers/tensorflow_model_server --port=9000 --model_base_path=$export_dir_base
这将在9000端口启动一个gRPC监听服务。
向本地服务请求预测
这里有一些代码片段,仅供参考
from grpc.beta import implementations

channel = implementations.insecure_channel(host, int(port))
stub = prediction_service_pb2.beta_create_PredictionService_stub(channel)

request = classification_pb2.ClassificationRequest()
example = request.input.example_list.examples.add()
example.features.feature['x'].float_list.value.extend(image[0].astype(float))

result = stub.Classify(request, 10.0)  # 10 secs timeout
使用CLI工具查看和执行SavedModel
CLI命令行工具可以查看和执行SavedModel。例如,可以使用它来查看model的签名SignatureDef。CLI允许你快速确认输入的张量形状shape和类型dtype与模型匹配。如果你需要测试你的模型,你可以传入各种格式的简单输入来获取输出。
安装SavedModel CLI
如果使用pre-build TensorFlow安装包安装的,那么CLI已经安装在bin\saved_model_cli。
如果从源代码安装的TensorFlow,那么使用下面命令安装:
$ bazel build tensorflow/python/tools:saved_model_cli
命令概览
对于SavedModel的一个MataGraphDef,CLI支持以下两个命令:
- show,显示MataGraphDef的计算
- run,运行MataGraphDef的计算
show命令
一个SavedModel包含多个MataGraphDef,通过它们的标记tag-sets识别。启动模型服务,你需要知道每个模型的SignatureDef,就是它的输入和输出。可以使用show命令检查SavedModel的层级。
usage: saved_model_cli show [-h] --dir DIR [--all]
[--tag_set TAG_SET] [--signature_def SIGNATURE_DEF_KEY]
例如下面的代码显示了SavedModel内所有可用的MataGraphDef:
$ saved_model_cli show --dir /tmp/saved_model_dir
The given SavedModel contains the following tag-sets:
serve
serve, gpu
下面的代码显示了一个MataGraphDef内所有可用的SignatureDef:
$ saved_model_cli show --dir /tmp/saved_model_dir --tag_set serve
The given SavedModel `MetaGraphDef` contains `SignatureDefs` with the
following keys:
SignatureDef key: "classify_x2_to_y3"
SignatureDef key: "classify_x_to_y"
SignatureDef key: "regress_x2_to_y3"
SignatureDef key: "regress_x_to_y"
SignatureDef key: "regress_x_to_y2"
SignatureDef key: "serving_default"
如果一个MataGraphDef有多个tag在tag-sets里面,必须指定多个tag:
$ saved_model_cli show --dir /tmp/saved_model_dir --tag_set serve,gpu
要显示某个指定的SignatureDef的全部输入输出,传递SignatureDef的key到signatrue_def选项,这可以让你知道张量的值、类型和形状:
$ saved_model_cli show --dir \
/tmp/saved_model_dir --tag_set serve --signature_def serving_default
The given SavedModel SignatureDef contains the following input(s):
inputs['x'] tensor_info:
    dtype: DT_FLOAT
    shape: (-1, 1)
    name: x:0
The given SavedModel SignatureDef contains the following output(s):
outputs['y'] tensor_info:
    dtype: DT_FLOAT
    shape: (-1, 1)
    name: y:0
Method name is: tensorflow/serving/predict
要显示全部的信息,使用--all
$ saved_model_cli show --dir /tmp/saved_model_dir --all
MetaGraphDef with tag-set: 'serve' contains the following SignatureDefs:

signature_def['classify_x2_to_y3']:
The given SavedModel SignatureDef contains the following input(s):
inputs['inputs'] tensor_info:
    dtype: DT_FLOAT
    shape: (-1, 1)
    name: x2:0
The given SavedModel SignatureDef contains the following output(s):
outputs['scores'] tensor_info:
    dtype: DT_FLOAT
    shape: (-1, 1)
    name: y3:0
Method name is: tensorflow/serving/classify

...

signature_def['serving_default']:
The given SavedModel SignatureDef contains the following input(s):
inputs['x'] tensor_info:
    dtype: DT_FLOAT
    shape: (-1, 1)
    name: x:0
The given SavedModel SignatureDef contains the following output(s):
outputs['y'] tensor_info:
    dtype: DT_FLOAT
    shape: (-1, 1)
    name: y:0
Method name is: tensorflow/serving/predict
run命令
run命令执行graph的计算,传进输入,显示输出。语法格式如下:
usage: saved_model_cli run [-h] --dir DIR --tag_set TAG_SET --signature_def
                           SIGNATURE_DEF_KEY [--inputs INPUTS]
                           [--input_exprs INPUT_EXPRS] [--outdir OUTDIR]
                           [--overwrite] [--tf_debug]
- --inputs,传入包含numpy ndarray的文件
- --input_exprs,传入Python表达式
- --input_examples,传入
tf.train.Example
--inputs
可以传入多个文件名,逗号分隔。支持格式如:
- .npy,包含numpy ndarray对象,可以直接转为输入张量。不需要指定variable_name
- .npz,可选指定variable_name,不指定则只读取一个文件到特定输入张量key
- python pickle format(序列化的python对象),如果不指定variable_name那么全部内容都会被传递到特定key,如果指定那么将自动把pickle内对象作为dict,只提取匹配name的对象。
--inputs_exprs
比较适合简单的测试使用。
--inputs_examples
对于每个输入键,它使用一个字典列表,每个字典是一个tf.train.Example实例,字典的键就是特征,值就是特征值列表,例如
Save Output
默认输出到stdout,如果--outdir传入一个目录,那么将输出为一个.npy文件。使用--overwrite覆盖旧文件.
Tensorflow Debugger整合(tfdbg)
如果--tf_debug被指定将启用debugger显示实时的图和子图。
run的完整示例
已知:
- 模型简单的对x1,x2相加,输出y
- 模型内所有张量形状都是(-1,1)
- 有两个npy文件:
- /tmp/my_data1.npy, 包含 numpy ndarray [[1], [2], [3]].
- /tmp/my_data2.npy, 包含numpy ndarray [[0.5], [0.5], [0.5]].
$ saved_model_cli run --dir /tmp/saved_model_dir --tag_set serve \
--signature_def x1_x2_to_y --inputs x1=/tmp/my_data1.npy;x2=/tmp/my_data2.npy \
--outdir /tmp/out
Result for output key y:
[[ 1.5]
 [ 2.5]
 [ 3.5]]
稍加改动,不再使用两个npy,而是使用npz和pickle文件,
$ saved_model_cli run --dir /tmp/saved_model_dir --tag_set serve \
--signature_def x1_x2_to_y \
--inputs x1=/tmp/my_data1.npz[x];x2=/tmp/my_data2.pkl --outdir /tmp/out \
--overwrite
Result for output key y:
[[ 1.5]
 [ 2.5]
 [ 3.5]]
再改为使用python表达式
$ saved_model_cli run --dir /tmp/saved_model_dir --tag_set serve \
--signature_def x1_x2_to_y --inputs x1=/tmp/my_data1.npz[x] \
--input_exprs 'x2=np.ones((3,1))'
Result for output key y:
[[ 2]
 [ 3]
 [ 4]]
开启debugger:
$ saved_model_cli run --dir /tmp/saved_model_dir --tag_set serve \--signature_def serving_default --inputs x=/tmp/data.npz[x] --tf_debug
SavedModel目录文件结构
assets/
assets.extra/
variables/
    variables.data-?????-of-?????
    variables.index
saved_model.pb|saved_model.pbtxt
- assets,资源,文件夹,包含辅助文件,例如词汇;当载入特定MetaGraphDef的时候,资源将被拷贝到SavedModel目录并被载入。
- assets.extra,附加资源文件夹,用户可以添加自己的资源到这里,高级库,不会被graph载入,也不会被SavedModel管理。
- variables,变量,文件夹,包含
tf.train.Saver的输出。 - saved_model.pb,saved_model.pbtxt,这是SavedModel的协议缓冲,包含了graph的定义和MataGraphDef协议缓冲。
探索人工智能的新边界
如果您发现文章错误,请不吝留言指正;
如果您觉得有用,请点喜欢;
如果您觉得很有用,感谢转发~
END