本篇blog的使用的d3版本为d3.js v5.9.2
将按照简要介绍、实验及意义进行
简要
d3.js通过data join(数据绑定)创建,更新及销毁元素,如何操作元素则是通过selection。总结如下 
其中,selection的三种状态就将data与elements结合在一起,进行对元素的控制
他们之前的关系如图所示(图片来源:Thinking with Joins)
接下来用实验进一步说明区别吧
实验
主要会用到以下几个API:
selection.data():返回代表update的selection,同时定义enter selection和exit selection,update按上图理解表示又有数据又有元素
selection.enter():返回enter selection,enter中文为“进入”,我理解为有数据但无元素,可以进入图表
selection.exit():返回exit selection,exit中文为“退出”,我理解为无数据绑定的元素,可以退出图表
selection.join():对已绑定数据的元素做插入,移除多余,更新数据,可以简化操作
初始HTML及CSS
HTML如下
CSS如下
.chart div{
    font: 10px sans-serif;
    background-color: steelblue;
    text-align: right;
    padding: 3px;
    margin: 1px;
    color: white;
}
接下来以四种情况熟悉enter,update与exit:
- chart下无子元素
- chart下子元素少于数据(其实和上一种差不多,但为了方便观察列出来)
- chart下子元素数量等于数据
- chart下子元素数量多于数据
chart下无子元素
数据及JS代码如下
const data = [10,55,33];
let selection = d3.select('.chart')
    .selectAll('div')
    .data(data);
console.log(selection);
(注意这里每一个selection是一个数组对象,每一个元素为一个数组)
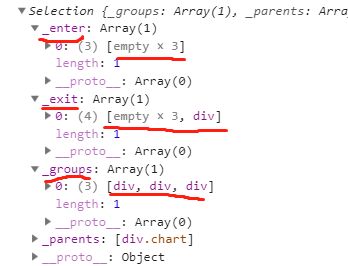
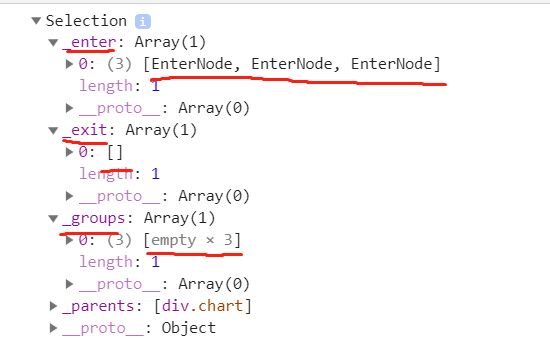
_groups:这里是代表update的selection,既有数据,又有元素;无元素的数据则用empty表示
enter:有数据,无元素
exit:无数据,有元素
对于enter,可通过selection.enter()进行操作
let enterSelection = selection.enter();
console.log(enterSelection);

enterSelection.append('div')
    .style('width', d => d * 10 + 'px')
    .text(d => d);
chart下子元素少于数据
const data = [10,55,33];
let selection = d3.select('.chart')
    .selectAll('div')
    .data(data);
    // .style('width', d => d * 10 + 'px') //注释去掉就会设置第一个div的width
    // .text(d => d);
console.log(selection);

let enterSelection = selection.enter();
console.log(enterSelection);

enterSelection.append('div')
    .style('width', d => d * 10 + 'px')
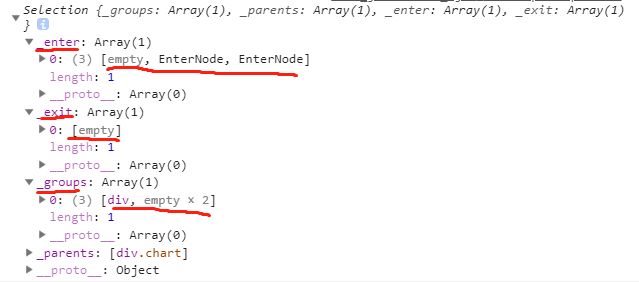
.text(d => d);enter:.chart下有一个div,且这个div有数据绑定,故enter的第一个元素用empty表示,三个数据剩下两个用EnterNode表示
exit:.chart下有一个div,但他有数据绑定,所以exit中这个div用一个empty表示
_groups(这里表示update selection):.chart下的有一个div并且绑定上了数据,剩余两个数据没有元素绑定,故用empty表示
chart下子元素数量等于数据
const data = [10,55,33];
let selection = d3.select('.chart')
    .selectAll('div')
    .data(data);
    // .style('width', d => d * 10 + 'px')
    // .text(d => d);
console.log(selection);
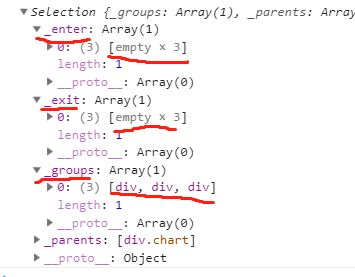
道理同上
chart下子元素数量多于数据
const data = [10,55,33];
let selection = d3.select('.chart')
    .selectAll('div')
    .data(data);
    // .style('width', d => d * 10 + 'px')
    // .text(d => d);
console.log(selection);

可见exit下多了最后一个未绑定数据的元素,即对应图片中的最后一个元素
可通过selection.exit()对其进行操作
let exitSelection = selection.exit();
console.log(exitSelection);

exitSelection.remove();
selection.join()简化操作
之前无论是对enter,exit以及update的操作可能都需要通过selection.enter()及selection.exit()等API获取selection,使用selection.join()可以极大地简化操作,同时局部渲染提高了效率
以下根据之前的例子简单举例
子元素少于数据或无子元素
let selection = d3.select('.chart')
    .selectAll('div')
    .data(data).join('div')
    .style('width', d => d * 10 + 'px')
    .text(d => d);
子元素多于数据
let selection = d3.select('.chart')
    .selectAll('div')
    .data(data).join('div')
    .style('width', d => d * 10 + 'px')
.text(d => d);js是同样的代码,同时把多余的元素删去了
data join意义
1.有利于动态数据的可视化编程
以上仅仅只是静态数据,但我们可以扩展到动态的数据,如data数组元素增加或减少,三种状态使得我们便于操作数据,仅仅只需使用selection.join()或者selection.remove()等等
2.编程更偏向声明式
当数据大小改变,或数据量增多减少时,不需要使用if或者for等语法。update,enter及exit三种状态结合API使得语法简练,大幅度提升编程效率
3.方便添加动画效果
其实意义同第一条很相像,三种状态可以方便我们对进入图表或退出图表的元素创建动画,例子如下
const data = [10,55,33];
const t = d3.transition()//定义动画变换
    .duration(500)
    .ease(d3.easeLinear);

let selection = d3.select('.chart')
    .selectAll('div')
    .data(data).join('div').style('width', 0).
    transition(t) //使用动画变换
    .style('width', d => d * 10 + 'px')
    .text(d => d);
这样就会有动画效果了
总结
解决了一直好奇的问题,初步入门,有不对或建议请大佬指正
参考资料
Thinking with Joins
编程范式:命令式编程(Imperative)、声明式编程(Declarative)和函数式编程(Functional)
selection.data()
selection.enter()
selection.exit()
selection.join()


