前言
spring security 可以对网站进行用户访问控制(验证|authentication)和用户授权(authorization)。两者也在springboot 手册中明说到: authentication (who are you?) and authorization (what are you allowed to do?)。用户授权结合OAuth进行api或者第三方接入控制授权(授权),本文使用security进行用户登录,验证用户合法性(验证)。
参考:
1、官网,网站安全控制;
2、博客,用户登录验证a;用户登录验证b
1、创建不受访问限制的项目
1.1、初始化项目
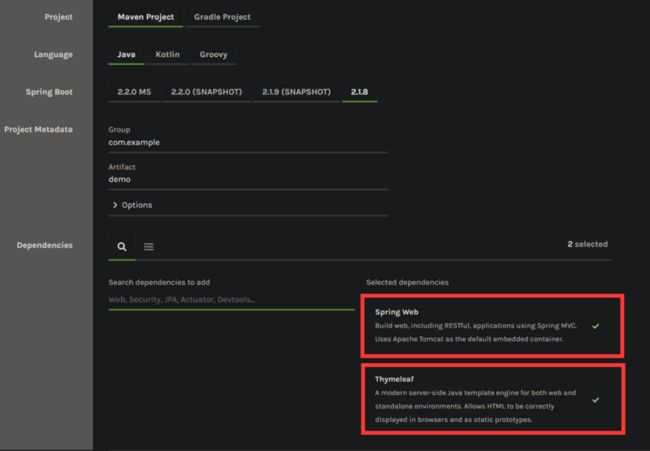
在Spring Initializr 或者编辑器中生成空白项目,maven依赖添加web和thymeleaf就可以了,如下图:
1.2、创建两个展示界面
src/main/resources/templates/home.html


    home


    Home Page
    click here to see a greeting.
希望通过上面这个界面跳转到 /hello,hello界面内容如下:
src/main/resources/templates/hello.html


        Hello World!


        Hello world!
页面创建完成后,配置路由控制界面跳转,通过配置文件方式添加路由:
package com.noel.handbook.accesscontroll.config;

import org.springframework.context.annotation.Configuration;
import org.springframework.web.servlet.config.annotation.ViewControllerRegistry;
import org.springframework.web.servlet.config.annotation.WebMvcConfigurer;

@Configuration
public class MvcConfig implements WebMvcConfigurer {

    @Override
    public void addViewControllers(ViewControllerRegistry registry) {
        // TODO Auto-generated method stub
        registry.addViewController("/home").setViewName("/home");
        registry.addViewController("/").setViewName("/home");
        registry.addViewController("/login").setViewName("/login");
        registry.addViewController("/hello").setViewName("/hello");
    }
}通过重写WebMvcConfigurer 的addViewControllers方法,添加四个路由,login界面在下面创建。
到现在,可以运行项目,浏览器输入地址ip:端口/ 或者 ip:端口/home查看界面输出,界面之间和url地址之间可以随意跳转。
2、添加security
我们想控制用户需要登录后才显示hello界面,并输出登录者的用户名。
pom添加如下依赖:
pom.xml

    org.springframework.boot
    spring-boot-starter-security
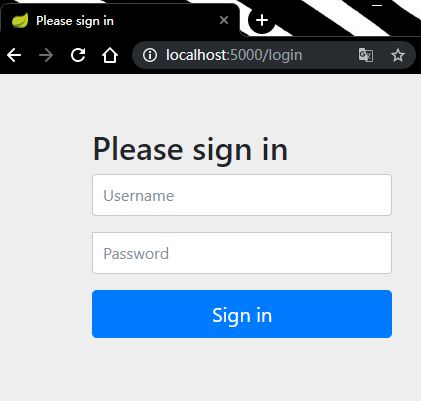
然后我们限制重启项目,可以看见控制台会输出一个密码。访问任意界面会显示一个springboot的默认登录界面:
2.1、 设置访问控制
package com.noel.handbook.accesscontroll.config;

import org.springframework.context.annotation.Bean;
import org.springframework.context.annotation.Configuration;
import org.springframework.security.config.annotation.web.builders.HttpSecurity;
import org.springframework.security.config.annotation.web.configuration.EnableWebSecurity;
import org.springframework.security.config.annotation.web.configuration.WebSecurityConfigurerAdapter;
import org.springframework.security.core.userdetails.User;
import org.springframework.security.core.userdetails.UserDetails;
import org.springframework.security.core.userdetails.UserDetailsService;
import org.springframework.security.provisioning.InMemoryUserDetailsManager;

@Configuration
@EnableWebSecurity
public class WebSecurityConfig extends WebSecurityConfigurerAdapter {

    @Bean
    @Override
    protected UserDetailsService userDetailsService() {
        // TODO Auto-generated method stub
        UserDetails user = User.withDefaultPasswordEncoder().username("noel").password("123").roles("USER").build();
        return new InMemoryUserDetailsManager(user);
    }

    @Override
    protected void configure(HttpSecurity http) throws Exception {
        // TODO Auto-generated method stub
        http
        .authorizeRequests()
        .antMatchers("/", "/home").permitAll()
        .anyRequest().authenticated()
        .and()
        .formLogin()
        .loginPage("/login").permitAll()
        .and()
        .logout().permitAll();
    }
}添加了一个继承WebSecurityConfigurerAdapter 的配置类,重写两个方法添加一些配置,并添加注解@EnableWebSecurity,开启Spring Security。userDetailsService()这里实现了一个存在于内存中的用户,用户名是noel,密码是123,该用户的角色是USER,该角色spring 有自己的一套方法,一般以ROLE_开头的字符串说明。之后进行用户信息在数据库中的验证实现。 By the way, 不要忘了方法上的@Bean注解,不添加会无法成功登录。configure(HttpSecurity http)定义了路径/和/home不需要访问控制,其它路径需要认证之后才能访问。登录成功后会跳转到用户之前想要访问的页面,loginPage("/login")自定义了一个用户登录界面,就不会是刚才的默认登录界面。
2.2、自定义登录界面
src/main/resources/templates/login.html
login
无效用户名和密码
已登出
用户通过访问上面页面,在表单输入用户姓名noel、密码123后提交到/login进行登录验证,登录成功后表示验证成,否则跳转到/login?logout,返回错误信息。
2.3、 用户等出
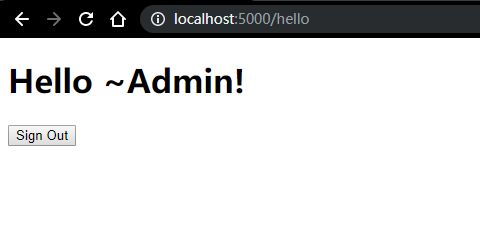
更改hello界面,显示登录成功后的用户姓名和登出按钮。
        Hello World!


        Hello [[${#httpServletRequest.remoteUser}]]!
/logout登出成功会跳转到/login?logout。
3、验证mysql数据库存放的用户
3.1、相关配置
因为平时我们可能比较频繁与写数据库操作逻辑,所以,下面的主要以代码为主,逻辑应该比较清晰。
用户表:三个字段,其中type为用户权限等级,0为管理员,1为普通用户,在用户权限检查(CustomUserDetailsService)中会用到。添加了一个admin用户,密码是123456 的BCrypt加密结果
DROP TABLE IF EXISTS `user`;
CREATE TABLE `user` (
  `Id` int(11) NOT NULL AUTO_INCREMENT,
  `userName` varchar(255) DEFAULT NULL COMMENT '姓名',
  `password` varchar(255) DEFAULT NULL COMMENT '密码',
  `type` INTEGER DEFAULT 0,
  PRIMARY KEY (`Id`)
) ENGINE=MyISAM AUTO_INCREMENT=4 DEFAULT CHARSET=utf8 COMMENT='用户表';

INSERT INTO `user` VALUES ('0', 'Admin', '$2a$10$7HMxhcXQXp5vtVm.fmWyK.NUYNrB1.6/FUfq3PiFnOnenCp/CVIDa', '1');添加mysql和mybatis maven 依赖:
pom.xml

    mysql
    mysql-connector-java
    runtime


    org.mybatis.spring.boot
    mybatis-spring-boot-starter
    2.1.0
yml配置:设置数据库访问和mapper位置。
spring:
  datasource:
    url: jdbc:mysql://ip:3306/数据库名?useUnicode=true&charset=UTF-8&useAffectedRows=true&useSSL=false
    username: 数据库登录用户名
    password: 数据库登录密码
    driver-class-name: com.mysql.jdbc.Driver

mybatis:
  mapper-locations: classpath:mapper/*.xml
  type-aliases-package: com.noel.handbook.accesscontroll.model
数据库语句mapper/userMapper.xml: 根据用户名查询一个用户。
3.2、 获取用户
获取用户:
package com.noel.handbook.accesscontroll.dao;

import org.apache.ibatis.annotations.Mapper;
import org.apache.ibatis.annotations.Param;

import com.noel.handbook.accesscontroll.model.UserModel;

@Mapper
public interface IUser {

    /**
     * 根据用户名获取一个用户
     * @return 用户信息
     * @author noel
     * @date 2019年9月7日
     */
    UserModel getUser(@Param("name")String name);
}
package com.noel.handbook.accesscontroll.model;
import lombok.AllArgsConstructor;
import lombok.Data;
import lombok.NoArgsConstructor;
@Data
@AllArgsConstructor
@NoArgsConstructor
public class UserModel {
private String name;
private String pwd;
private Integer type;
}3.3、 接入Security并验证用户
/**
* Title: UserDetailsService.java
* Description: 系统用户信息校验,权限检查
* Copyright: Copyright (c) 2019
* Company: cbpm
* @author noel
* @date 2019年9月6日
 */
package com.noel.handbook.accesscontroll;

import java.util.ArrayList;
import java.util.List;

import javax.annotation.Resource;

import org.slf4j.Logger;
import org.slf4j.LoggerFactory;
import org.springframework.security.core.authority.SimpleGrantedAuthority;
import org.springframework.security.core.userdetails.User;
import org.springframework.security.core.userdetails.UserDetails;
import org.springframework.security.core.userdetails.UserDetailsService;
import org.springframework.security.core.userdetails.UsernameNotFoundException;
import org.springframework.stereotype.Service;

import com.noel.handbook.accesscontroll.dao.IUser;
import com.noel.handbook.accesscontroll.model.UserModel;

/**
 * 用户权限检查
 * @author noel
 * @date 2019年9月6日
 */
@Service
public class CustomUserDetailsService implements UserDetailsService{

    private static final Logger log = LoggerFactory.getLogger(CustomUserDetailsService.class);

    @Resource
    private IUser iUser;

    /* (non-Javadoc)
     * @see org.springframework.security.core.userdetails.UserDetailsService#loadUserByUsername(java.lang.String)
     */
    @Override
    public UserDetails loadUserByUsername(String arg0) throws UsernameNotFoundException {
        // TODO Auto-generated method stub
        UserModel userModel = iUser.getUser(arg0);
        log.info("验证机制里面的用户",userModel);
        if(null == userModel) {
            throw new UsernameNotFoundException("用户不存在");
        }
        List authorities = new ArrayList();
        if(userModel.getType()==0) {
            authorities.add(new SimpleGrantedAuthority("ROLE_ADMIN"));
        }else {
            //其它所有用户都认为是普通用户
            authorities.add(new SimpleGrantedAuthority("ROLE_USER"));
        }
        return new User(userModel.getName(), userModel.getPwd(), authorities);
    }

} 以上思路是:根据用户名从数据库获取到用户信息,以及用户权限。如果登录失败,则返回错误信息并停留在登录界面;如果登录成功,则将用户名、密码、权限封装到SimpleGrantedAuthority。
package com.noel.handbook.accesscontroll.config;

import javax.annotation.Resource;

import org.springframework.beans.factory.annotation.Autowired;
import org.springframework.context.annotation.Configuration;
import org.springframework.security.config.annotation.authentication.builders.AuthenticationManagerBuilder;
import org.springframework.security.config.annotation.web.builders.HttpSecurity;
import org.springframework.security.config.annotation.web.configuration.EnableWebSecurity;
import org.springframework.security.config.annotation.web.configuration.WebSecurityConfigurerAdapter;
import org.springframework.security.crypto.bcrypt.BCryptPasswordEncoder;

import com.noel.handbook.accesscontroll.CustomUserDetailsService;

@Configuration
@EnableWebSecurity
public class WebSecurityConfig extends WebSecurityConfigurerAdapter {

    @Resource
    private CustomUserDetailsService userDetailsService;

//    @Bean
//    @Override
//    protected UserDetailsService userDetailsService() {
//        // TODO Auto-generated method stub
//        UserDetails user = User.withDefaultPasswordEncoder().username("noel").password("123").roles("USER").build();
//        return new InMemoryUserDetailsManager(user);
//    }

    @Override
    protected void configure(HttpSecurity http) throws Exception {
        // TODO Auto-generated method stub
        //...
    }

    @Override
    @Autowired
    protected void configure(AuthenticationManagerBuilder auth) throws Exception {
        // TODO Auto-generated method stub
        auth.userDetailsService(userDetailsService).passwordEncoder(new BCryptPasswordEncoder());
    }
}用户验证方法由UserDetailsService改为重写WebSecurityConfigurerAdapter的configure(AuthenticationManagerBuilder auth)方法,security将数据库查询的用户密码和界面传入的密码进行比较,一致则登录成功并跳转,否则停留在登录界面并返回错误信息。
结果:
源码地址: GITHUB


