使用gperftools对程序进行性能分析
gperftools是google出品的一个性能分析工具,相关介绍可见:
https://github.com/gperftools/gperftools/wiki
gperftools性能分析通过抽样方法完成,默认是1秒100个样本,即一个样本是10毫秒,因此程序运行时间要长一些。
1、安装gperftools
1.1、安装automake
sudo apt-get install automake
1.2、编译安装libunwind
从https://github.com/libunwind/libunwind/releases下载最新版本的libunwind源码包
解压到/usr/local/src目录
cd 解压源码目录
./autogen.sh
./configure
make -j6
make install
1.3、编译安装gperftools
从https://github.com/gperftools/gperftools/releases下载最新版本的gperftools源码包
解压到/usr/local/src目录
cd 解压源码目录
./autogen.sh
./configure
make -j6
make install
1.4、安装图像分析生成工具
sudo apt-get install graphviz
2、使用
2.1、运行一段时间就会正常退出的程序的性能分析
这种情况,我们可以直接在代码中插入性能分析函数。示例代码如下:
#include
#include

void f()
{
    int i;
    for (i=0; i<1024*1024; ++i)
    {
        char *p = (char*)malloc(1024*1024*120);
        free(p);
    }
}

int main()
{
    ProfilerStart("test.prof");//开启性能分析
    f();
    ProfilerStop();//停止性能分析
    return 0;
}
编译运行,注意编译时需要连接tcmalloc和profiler库。运行后会生成test.prof文件,然后用pprof就可以生成text的分析报告,具体如下:
root@ubuntu:/home/zte/test/perf# gcc not_run_alway.c -ltcmalloc -lprofiler
root@ubuntu:/home/zte/test/perf# ./a.out
PROFILE: interrupts/evictions/bytes = 14/0/776
root@ubuntu:/home/zte/test/perf# pprof --text a.out test.prof
Using local file a.out.
Using local file test.prof.
Total: 14 samples
       3  21.4%  21.4%        3  21.4% SpinLock::Unlock (inline)
       3  21.4%  42.9%        3  21.4% __GI_madvise
       2  14.3%  57.1%        2  14.3% SpinLock::Lock (inline)
       1   7.1%  64.3%        1   7.1% TCMalloc_PageMap2::get (inline)
       1   7.1%  71.4%        4  28.6% do_malloc_pages
       1   7.1%  78.6%        2  14.3% tcmalloc::PageHeap::Delete
       1   7.1%  85.7%        2  14.3% tcmalloc::PageHeap::New
       1   7.1%  92.9%        4  28.6% tcmalloc::PageHeap::ReleaseAtLeastNPages
       1   7.1% 100.0%        1   7.1% tcmalloc::PageHeap::RemoveFromFreeList
       0   0.0% 100.0%        2  14.3% SpinLockHolder (inline)
       0   0.0% 100.0%        3  21.4% TCMalloc_SystemRelease
       0   0.0% 100.0%       14 100.0% __libc_start_main
       0   0.0% 100.0%       14 100.0% _start
       0   0.0% 100.0%        4  28.6% do_allocate_full (inline)
       0   0.0% 100.0%       10  71.4% do_free_pages
       0   0.0% 100.0%        4  28.6% do_malloc (inline)
       0   0.0% 100.0%       14 100.0% f
       0   0.0% 100.0%       14 100.0% main
       0   0.0% 100.0%        1   7.1% tcmalloc::PageHeap::Carve
       0   0.0% 100.0%        3  21.4% tcmalloc::PageHeap::DecommitSpan
       0   0.0% 100.0%        1   7.1% tcmalloc::PageHeap::GetDescriptor (inline)
       0   0.0% 100.0%        4  28.6% tcmalloc::PageHeap::IncrementalScavenge
       0   0.0% 100.0%        1   7.1% tcmalloc::PageHeap::MergeIntoFreeList
       0   0.0% 100.0%        3  21.4% tcmalloc::PageHeap::ReleaseLastNormalSpan
       0   0.0% 100.0%        4  28.6% tcmalloc::allocate_full_malloc_oom
       0   0.0% 100.0%        3  21.4% ~SpinLockHolder (inline)
输出数据解析:
每行包含6列数据,依次为:
1 分析样本数量(不包含其他函数调用)
2 分析样本百分比(不包含其他函数调用)
3 目前为止的分析样本百分比(不包含其他函数调用)
4 分析样本数量(包含其他函数调用)
5 分析样本百分比(包含其他函数调用)
6 函数名
样本数量相当于消耗的CPU时间。
整个函数消耗的CPU时间相当于包括函数内部其他函数调用所消耗的CPU时间
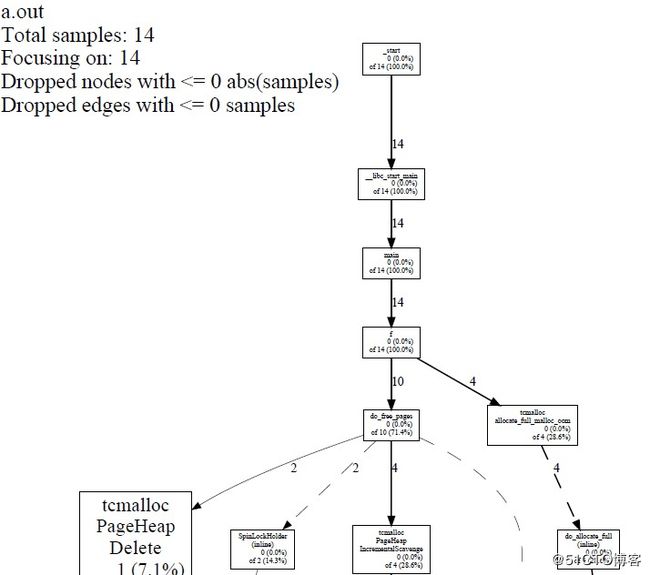
运行命令生成函数调用树形式的pdf分析报告:
pprof --pdf a.out test.prof >test.pdf 
树上的每个节点代表一个函数,节点数据格式:
1、函数名 或者 类名+方法名
2、不包含内部函数调用的样本数 (百分比)
3、of 包含内部函数调用的样本数 (百分比) #如果没有内部调用函数则这一项数据不显示
2.2 一直运行的程序的性能分析
一直运行的程序由于不能正常退出,所以不能采用上面的方法。我们可以用信号量来开启/关闭性能分析,具体代码如下:
#include
#include
#include
#include

void gprofStartAndStop(int signum) {
    static int isStarted = 0;
    if (signum != SIGUSR1) return;

    //通过isStarted标记未来控制第一次收到信号量开启性能分析,第二次收到关闭性能分析。
    if (!isStarted){
        isStarted = 1;
        ProfilerStart("test.prof");
        printf("ProfilerStart success\n");
    }else{
        ProfilerStop();
        printf("ProfilerStop success\n");
    }
}

void f()
{
    int i;
    for (i=0; i<1024*1024; ++i)
    {
        char *p = (char*)malloc(1024*1024);
        free(p);
    }
}

int main()
{
    signal(SIGUSR1, gprofStartAndStop);

    while(1){
        printf("call f\n");
        f();
        sleep(1);//为了防止死循环,导致信号处理函数得不到调度
    }
    return 0;
}
编译运行如下:
root@ubuntu:/home/zte/test/perf# gcc run_always.c -ltcmalloc -lprofiler
root@ubuntu:/home/zte/test/perf# ./a.out
通过kill命令发送信号给进程来开启/关闭性能分析:
用top命令查看进程的PID
kill -s SIGUSR1 PID //第一次运行命令启动性能分析
kill -s SIGUSR1 PID //再次运行命令关闭性能分析,产生test.prof
后续分析报告生成同2.1,不再赘述。