(一)概述
本文基于Hadoop1.0.0版本的源代进行分析,研究用户从输入作业提交命令到作业提交到jobTracker的整个流程,其中涉及到的组件JobClient和JobTracker的具体工作细节。
(二)具体分析
从源代码来看,hadoop作业的提交过程是比较简单的,主要包含了几个过程:运行提交作业脚本、创建目录、上传作业文件以及产生InputSplit文件。
(1)提交作业命令过程
假设用户用java写了一个MapReduce程序,并且打包成了一个jar文件,wordCount.jar,然后运行下面命令进行作业的提交操作:
$HADOOP_HOME/bin/hadoop jar xx.jar \
-D mapred.job.name="wordCount" \
-D mapred.reduce.tasks=5 \
-files=resources1.txt,resources2.txt \
-libjars=depend.jar \
-archives=dictionary.zip \
-input /test/input \
-output /test/output
然后,我们在来看看$HADOOP_HOME/bin/hadoop 脚本对作业提交jar命令处理,调用了org.apache.hadoop.util.RunJar类。
在RunJar类中通过unJar(File jarFile, File toDir)方法对jar进行解压;创建相应的临时目录然后将运行参数传递给MapReduce程序运行。源码定位到org.apache.hadoop.util.RunJar类的main方法:
/** Run a Hadoop job jar.  If the main class is not in the jar's manifest,
   * then it must be provided on the command line. */
  public static void main(String[] args) throws Throwable {
    String usage = "RunJar jarFile [mainClass] args...";
    if (args.length < 1) {
      System.err.println(usage);
      System.exit(-1);
    }
    int firstArg = 0;
    String fileName = args[firstArg++];
    File file = new File(fileName);
    String mainClassName = null;
    JarFile jarFile;
    try {
      jarFile = new JarFile(fileName);
    } catch(IOException io) {
      throw new IOException("Error opening job jar: " + fileName)
        .initCause(io);
    }
    Manifest manifest = jarFile.getManifest();
    if (manifest != null) {
      mainClassName = manifest.getMainAttributes().getValue("Main-Class");
    }
    jarFile.close();
    if (mainClassName == null) {
      if (args.length < 2) {
        System.err.println(usage);
        System.exit(-1);
      }
      mainClassName = args[firstArg++];
    }
        //进行相应的一些目录处理工作
    mainClassName = mainClassName.replaceAll("/", ".");
    File tmpDir = new File(new Configuration().get("hadoop.tmp.dir"));
    tmpDir.mkdirs();
    if (!tmpDir.isDirectory()) {
      System.err.println("Mkdirs failed to create " + tmpDir);
      System.exit(-1);
    }
    final File workDir = File.createTempFile("hadoop-unjar", "", tmpDir);
    workDir.delete();
    workDir.mkdirs();
    if (!workDir.isDirectory()) {
      System.err.println("Mkdirs failed to create " + workDir);
      System.exit(-1);
    }
    Runtime.getRuntime().addShutdownHook(new Thread() {
        public void run() {
          try {
            FileUtil.fullyDelete(workDir);
          } catch (IOException e) {
          }
        }
      });
    unJar(file, workDir);//解压jar包

    ArrayList classPath = new ArrayList();
    classPath.add(new File(workDir+"/").toURL());
    classPath.add(file.toURL());
    classPath.add(new File(workDir, "classes/").toURL());
    File[] libs = new File(workDir, "lib").listFiles();
    if (libs != null) {
      for (int i = 0; i < libs.length; i++) {
        classPath.add(libs[i].toURL());
      }
    }

    ClassLoader loader =
      new URLClassLoader(classPath.toArray(new URL[0]));
    Thread.currentThread().setContextClassLoader(loader);
    Class mainClass = Class.forName(mainClassName, true, loader);
    Method main = mainClass.getMethod("main", new Class[] {
      Array.newInstance(String.class, 0).getClass()
    });
    String[] newArgs = Arrays.asList(args)
      .subList(firstArg, args.length).toArray(new String[0]);
    try {
      main.invoke(null, new Object[] { newArgs });
    } catch (InvocationTargetException e) {
      throw e.getTargetException();
    }
  }
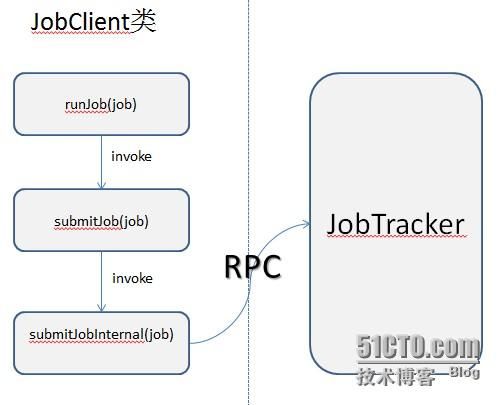
用户在提交MapReduce程序是已经设置好了各种参数,像作业名称、ReduceTask和MapTask类等,最终调用JobClient类的runJob方法,如果是新API则调用waitForCompletion(true)方法进行作业的提交,之后经过以下步骤作业将达到JobTracker端。
(2)作业文件上传过程
作业从JobClient提交到JobTracker之前,首先会将作业文件和生成的Split文件上传到HDFS中(生成Split文件将会在下面第三小节说),上传动作主要在JobClient类中的submitJobInternal(job)中完成,下面来仔细看看源代码:
/**
   * Internal method for submitting jobs to the system.
   * @param job the configuration to submit
   * @return a proxy object for the running job
   * @throws FileNotFoundException
   * @throws ClassNotFoundException
   * @throws InterruptedException
   * @throws IOException
   */
  public
  RunningJob submitJobInternal(final JobConf job
                               ) throws FileNotFoundException,
                                        ClassNotFoundException,
                                        InterruptedException,
                                        IOException {
    /*
     * configure the command line options correctly on the submitting dfs
     */
    return ugi.doAs(new PrivilegedExceptionAction() {
      public RunningJob run() throws FileNotFoundException,
      ClassNotFoundException,
      InterruptedException,
      IOException{
        JobConf jobCopy = job;
        Path jobStagingArea = JobSubmissionFiles.getStagingDir(JobClient.this,
            jobCopy);
        JobID jobId = jobSubmitClient.getNewJobId();
        Path submitJobDir = new Path(jobStagingArea, jobId.toString());
        jobCopy.set("mapreduce.job.dir", submitJobDir.toString());
        JobStatus status = null;
        try {
          populateTokenCache(jobCopy, jobCopy.getCredentials());
          copyAndConfigureFiles(jobCopy, submitJobDir);
          // get delegation token for the dir
          TokenCache.obtainTokensForNamenodes(jobCopy.getCredentials(),
                                              new Path [] {submitJobDir},
                                              jobCopy);
          Path submitJobFile = JobSubmissionFiles.getJobConfPath(submitJobDir);
          int reduces = jobCopy.getNumReduceTasks();
          InetAddress ip = InetAddress.getLocalHost();
          if (ip != null) {
            job.setJobSubmitHostAddress(ip.getHostAddress());
            job.setJobSubmitHostName(ip.getHostName());
          }
          JobContext context = new JobContext(jobCopy, jobId);
          // Check the output specification
          if (reduces == 0 ? jobCopy.getUseNewMapper() :
            jobCopy.getUseNewReducer()) {
            org.apache.hadoop.mapreduce.OutputFormat output =
              ReflectionUtils.newInstance(context.getOutputFormatClass(),
                  jobCopy);
            output.checkOutputSpecs(context);
          } else {
            jobCopy.getOutputFormat().checkOutputSpecs(fs, jobCopy);
          }

          jobCopy = (JobConf)context.getConfiguration();
          // Create the splits for the job
          FileSystem fs = submitJobDir.getFileSystem(jobCopy);
          LOG.debug("Creating splits at " + fs.makeQualified(submitJobDir));
          int maps = writeSplits(context, submitJobDir);
          jobCopy.setNumMapTasks(maps);
          // write "queue admins of the queue to which job is being submitted"
          // to job file.
          String queue = jobCopy.getQueueName();
          AccessControlList acl = jobSubmitClient.getQueueAdmins(queue);
          jobCopy.set(QueueManager.toFullPropertyName(queue,
              QueueACL.ADMINISTER_JOBS.getAclName()), acl.getACLString());
          // Write job file to JobTracker's fs
          FSDataOutputStream out =
            FileSystem.create(fs, submitJobFile,
                new FsPermission(JobSubmissionFiles.JOB_FILE_PERMISSION));
          try {
            jobCopy.writeXml(out);
          } finally {
            out.close();
          }
          //
          // Now, actually submit the job (using the submit name)
          //
          printTokens(jobId, jobCopy.getCredentials());
          status = jobSubmitClient.submitJob(
              jobId, submitJobDir.toString(), jobCopy.getCredentials());
          JobProfile prof = jobSubmitClient.getJobProfile(jobId);
          if (status != null && prof != null) {
            return new NetworkedJob(status, prof, jobSubmitClient);
          } else {
            throw new IOException("Could not launch job");
          }
        } finally {
          if (status == null) {
            LOG.info("Cleaning up the staging area " + submitJobDir);
            if (fs != null && submitJobDir != null)
              fs.delete(submitJobDir, true);
          }
        }
      }
    });
  }
逐行看,首先看25行,JobClient会向JobTracker要到一个StagingAreaDir目录,其主要用途是作为HDFS作业文件的上传目录,管理员可以自行配置,配置可看JobTracker的getStagingAreaDirInternal(String user)方法:
private String getStagingAreaDirInternal(String user) throws IOException {
  final Path stagingRootDir =
    new Path(conf.get("mapreduce.jobtracker.staging.root.dir",
          "/tmp/hadoop/mapred/staging"));//默认的StagingAreaDir配置项
  final FileSystem fs = stagingRootDir.getFileSystem(conf);
  return fs.makeQualified(new Path(stagingRootDir,
                            user+"/.staging")).toString();
}
继续看回JobClient的submitJobInternal(job)方法第27行jobSubmitClient.getNewJobId(),通过这方法会向JobTracker申请一个JobId;第29行,可以看到mapreduce.job.dir属性,该属性的默认值是${mapreduce.jobtracker.staging.root.dir}/${user}/.staging/${jobId},其主要是存储具体用户具体作业的相关文件存放目录,我们上50070瞧一把:
接着再看33行copyAndConfigureFiles(jobCopy, submitJobDir)方法,这方法主要是将作业文件上传到HDFS,然后通过DistributedCache放到Cache中,
/**
   * configure the jobconf of the user with the command line options of
   * -libjars, -files, -archives
   * @param job the JobConf
   * @param submitJobDir
   * @throws IOException
   */
  private void copyAndConfigureFiles(JobConf job, Path jobSubmitDir)
  throws IOException, InterruptedException {
    short replication = (short)job.getInt("mapred.submit.replication", 10);//这里默认将作业文件的副本数调整为10的
    copyAndConfigureFiles(job, jobSubmitDir, replication);
    // Set the working directory
    if (job.getWorkingDirectory() == null) {
      job.setWorkingDirectory(fs.getWorkingDirectory());
    }
  }
注意一点:作业文件在HDFS上的副本数默认是为10的。进入copyAndConfigureFiles(job, jobSubmitDir, replication)看看一小段代码:
                            .
                            .
FileSystem.mkdirs(fs, submitJobDir, mapredSysPerms);
    Path filesDir = JobSubmissionFiles.getJobDistCacheFiles(submitJobDir);
    Path archivesDir = JobSubmissionFiles.getJobDistCacheArchives(submitJobDir);
    Path libjarsDir = JobSubmissionFiles.getJobDistCacheLibjars(submitJobDir);
    // add all the command line files/ jars and archive
    // first copy them to jobtrackers filesystem

    if (files != null) {
      FileSystem.mkdirs(fs, filesDir, mapredSysPerms);
      String[] fileArr = files.split(",");
      for (String tmpFile: fileArr) {
        URI tmpURI;
        try {
          tmpURI = new URI(tmpFile);
        } catch (URISyntaxException e) {
          throw new IllegalArgumentException(e);
        }
        Path tmp = new Path(tmpURI);
        Path newPath = copyRemoteFiles(fs,filesDir, tmp, job, replication);//上传作业本地温江到HDFS
        try {
          URI pathURI = getPathURI(newPath, tmpURI.getFragment());
          DistributedCache.addCacheFile(pathURI, job);//通过DistributedCache工具将作业文件放到Cahe中
        } catch(URISyntaxException ue) {
          //should not throw a uri exception
          throw new IOException("Failed to create uri for " + tmpFile, ue);
        }
        DistributedCache.createSymlink(job);
      }
    }

    if (libjars != null) {
      FileSystem.mkdirs(fs, libjarsDir, mapredSysPerms);
                            .
                            .
源代码追踪到这里,我们会不会产生这样的疑问:既然作业文件已经上传到了HDFS并且副本数默认高达10个了,那为什么还要将作业文件通过DistributedCache放到Cache中呢?
这个是考虑到TaskTracker在执行多个任务时候的效率问题。首先作业提交后DistributedCache将文件上传到HDFS上的固定目录中,然后JobTracker的任务调度器会将对应的任务依照任务本地性原则派发到各个TaskTracker上。接着,任何一个TaskTracker收到该作业的第一个任务后,就会有DistributedCache自动将作业文件Cache到节点本地目录下,并且会对压缩文件进行解压,如:.zip,.jar,.tar等等,然后开始任务。最后,对于同一个TaskTracker接下来收到的任务,DistributedCache不会重复去下载作业文件,而是直接运行任务。如果一个作业的任务数很多,这种设计避免了在同一个节点上对用一个job的文件会下载多次,大大提高了任务运行的效率。
JobClient的submitJobInternal(job)方法看到这里,作业文件上传阶段已经基本完成(除了Split信息和conf的xml文件),接下来的是生产Split文件的过程,我们在下面一下节讨论。
(3)产生InputSplit文件过程
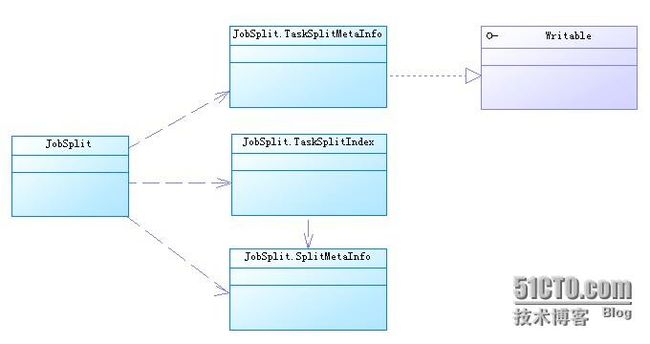
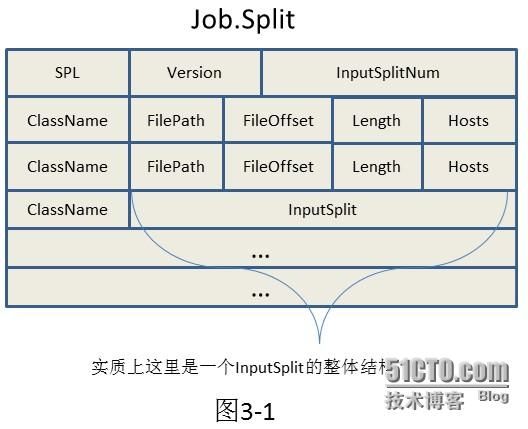
用户提交MapReduce作业后到真正到达JobTracker之前,JobClient会调用InputFormat的getSplit方法生产InputSplit的相关信息。其中包括InputSplit元数据信息和原始InputSplit,其分别保对应${mapreduce.jobtracker.staging.root.dir}/${user}/.staging/${jobId}目录下的job.split和job.splitmetainfo文件。具体的切片算法这里不再说,因为在上一篇blog已经说过。首先,从宏观上了解一下JobSplit类,其UML表示如下:
SplitMetaInfo类
SplitMetaInfo类描述了一个InputSplit的元数据信息,其结构如下:
/**
 * This represents the meta information about the task split.
 * The main fields are
 *     - start offset in actual split
 *     - data length that will be processed in this split
 *     - hosts on which this split is local
 */
public static class SplitMetaInfo implements Writable {
  private long startOffset;//该InputSplit元信息在job.split文件中的偏移量
  private long inputDataLength;//该InputSplit数据长度
  private String[] locations;//该InputSplit的host列表
                ...
}
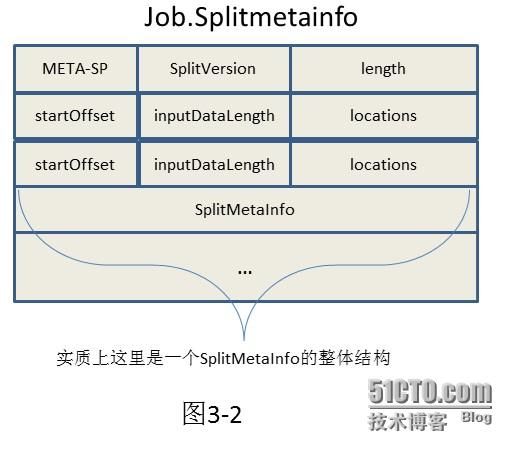
所有的InputSplit对应的SplitMetaInfo都存储在job.splitmetainfo文件中,从代码中可以看出其文件的组织结构如图3-2:
第一行表示头信息,"META-SP"用于表示InputSplit元数据,splitVersion表示该文件版本号(当前默认值为1),length表示InputSplit的数目。
头信息之后的都是一个个拆分开来的SplitMetaInfo,其字段意思请看上面代码说明。JobTracker初始化时需要读取job.splitmetainfo文件去创建MapTask任务,同时会根据locations值去判断任务本地性进而为taskTracker分配任务,然后根据length来确定MapTask数目。
SplitMetaInfo类
TaskSplitMetaInfo用于保存InputSplit元信息的数据结构,其变量如下:
/**
   * This represents the meta information about the task split that the
   * JobTracker creates
   */
  public static class TaskSplitMetaInfo {
    private TaskSplitIndex splitIndex;//Split元信息在job.split文件中的位置
    private long inputDataLength;//InputSplit的长度
    private String[] locations;//InputSplit的hosts列表
            ....
}
作业初始化时,JobTracker会从文件job.splitmetainfo中获取数据填充上面变量。其中splitIndex变量保存了新任务处理的数据位置信息在job.split文件中的索引,以便TaskTracker从JobTracker收到信息立即从job.split读取InputSplit信息,从而运行一个新任务。
TaskSplistIndex类
JobTracker向TaskTracker分配新任务是,TaskSplitIndex用于指定新任务带处理数据位置信息在文件job.split中的索引,其结构:
/**
   * This represents the meta information about the task split that the
   * task gets
   */
  public static class TaskSplitIndex {
    private String splitLocation;
    private long startOffset;
            .....
}
其中,startOffset对应的是上图3-1中的FileOffset变量,表示InputSplit信息在job.split文件中的位置。
(4)总结
本文主要研究了一个作业从输入提交命令到JobTracker对作业进行初始化之前的各个过程。其中经过了大概3个阶段:
用户输入提交命令(主要在JobClient内部实现,其中包括对一些文件的解压和目录的创建工作)--->作业文件的上传过程(其中主要用到DistributedCache分发工具)-->产生InputSplit文件(包含具体用于描述InputSplit的各种数据结构,以及job.split和job.splitmetainfo文件的组织方式)。
---------------------------------------hadoop源码分析系列------------------------------------------------------------------------------------------------------------
hadoop作业分片处理以及任务本地性分析(源码分析第一篇)
hadoop作业提交过程分析(源码分析第二篇)
hadoop作业初始化过程详解(源码分析第三篇)
JobTracker之作业恢复与权限管理机制(源码分析第四篇)
JobTracker之辅助线程和对象映射模型分析(源码分析第五篇)
---------------------------------------------------------------------------------------------------------------------------------------------------------------------------------
参考文献:
[1]《Hadoop技术内幕:深入解析MapReduce架构设计与实现原理》
[2] http://hadoop.apache.org/


