1.基础概念
1.1持续集成 Continuous integration (CI)
持续集成是一种软件开发实践,即团队开发成员经常集成他们的工作,通常每个成员每天至少集成一次,也就意味着每天可能会发生多次集成。
每次集成都通过自动化的构建(包括编译,发布,自动化测试)来验证,从而尽快地发现集成错误。
许多团队发现这个过程可以大大减少集成的问题,让团队能够更快的开发内聚的软件。
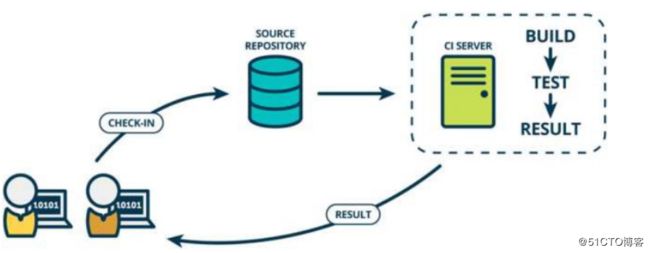
持续集成强调开发人员提交了新代码之后,立刻进行构建、(单元)测试。根据测试结果,我们可以确定新代码和原有代码能否正确地集成在一起。
持续集成的好处主要有两个:
快速发现错误,每完成一点更新,就集成到主干,可以快速发现错误,定位错误也比较容易。
防止分支大幅偏离主干,如果不是经常集成,主干又在不断更新,会导致以后集成的难度变大,甚至难以集成。
持续集成的目的,就是让产品可以快速迭代,同时还能保持高质量。它的核心措施是, 代码集成到主干之前,必须通过自动化测试。只要有一个测试用例失败,就不能集成。
持续集成并不能消除Bug,而是让它们非常容易的发现和改正。
1.2持续交付 Continuous delivery(CD)
持续交付(Continuous delivery)指的是,频繁地将软件的新版本,交付给质量团队或者用户,以供评审。
如果评审通过,代码就进入生产阶段。

1.3持续部署 continuous deployment(CD)
持续部署(continuous deployment)是持续交付的下一步,指的是代码通过评审以后, 自动部署到生产环境。
持续部署的目标是,代码在任何时刻都是可部署的,可以进入生产阶段。持续部署的前提是能自动化完成测试、构建、部署等步骤。
注:持续交付不等于持续集成,区别可以参考下图:

1.4持续集成的一般流程
根据持续集成的设计,代码从提交到生产,整个过程有以下几步:
提交
流程的第一步,是开发者向代码仓库提交代码。所有后面的步骤都始于本地代码的一次提交(commit)。
测试(第一轮)
代码仓库对commit 操作配置了钩子(hook),只要提交代码或者合并进主干,就会跑自动化测试。
构建
通过第一轮测试,代码就可以合并进主干,就算可以交付了。
交付后,就先进行构建(build),再进入第二轮测试。所谓构建,指的是将源码转换为可以运行的实际代码,比如安装依赖,配置各种资源(样式表、JS 脚本、图片)等等。
常用的构建工具如下。jeknins、Travis、codeship 等
测试(第二轮)
构建完成,就要进行第二轮测试。如果第一轮已经涵盖了所有测试内容,第二轮可以省略,当然,这时构建步骤也要移到第一轮测试前面。
第二轮是全面测试,单元测试和集成测试都会跑,有条件的话,也要做端对端测试。所有测试以自动化为主,少数无法自动化的测试用例,就要人工跑。
部署
通过了第二轮测试,当前代码就是一个可以直接部署的版本(artifact)。将这个版本的所有文件打包( tar filename.tar * )存档,发到生产服务器。
生产服务器将打包文件,解包成本地的一个目录,再将运行路径的符号链接(symlink) 指向这个目录,然后重新启动应用。这方面的部署工具有Ansible,Chef,Puppet 等。
回滚
一旦当前版本发生问题,就要回滚到上一个版本的构建结果。最简单的做法就是修改一下符号链接,指向上一个版本的目录。
2.devops
2.1DevOps 是什么
DevOps 一词的来自于 Development 和 Operations 的组合,突出重视软件开发人员和运维人员的沟通合作,通过自动化流程来使得软件构建、测试、发布更加快捷、频繁和可靠。
目前对 DevOps 有太多的说法和定义,不过它们都有一个共同的思想:“解决开发者与运维者之间曾经不可逾越的鸿沟,增强开发者与运维者之间的沟通和交流”。而我个人认为, DevOps 可以用一个公式表达:
文化观念的改变 + 自动化工具 = 不断适应快速变化的市场
强调:DevOps 是一个框架,是一种方法论,并不是一套工具,他包括一系列的基本原则和实践。
其核心价值在于以下两点:
更快速地交付, 响应市场的变化。
更多地关注业务的改进与提升。
2.2为什么需要DevOps?
1、产品迭代
在现实工作中,往往都是用户不知道自己想要什么,但是当我们设计完一个产品后,他后告诉我们他们不需要什么,这样我们的产品需要反复的迭代,而且过程可能是曲折的,那我们有什么好的办法快速的交付价值,灵活的响应变化呢?答案就是 DevOps。因为 DevOps 是面向业务目标,助力业务成功的最佳实践。
2、技术革新
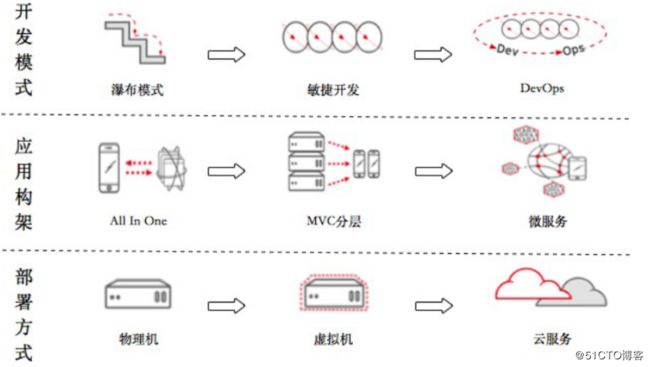
现在的IT 技术架构随着系统的复杂化不断的革新,从最期的所有服务在一个系统中, 发展到现在的微服务架构、从纯手动操作到全自动流程、从单台物理机到云平台
2.3DevOps 如何落地
落实 DevOps 的指导思想: 高效的协作和沟通、自动化流程和工具、迅速敏捷的开发、
持续交付和部署、不断学习和创新。
我们来看一张来自devops 经典著作《success with enterprise dev-ops -whitepaper》的介绍图:
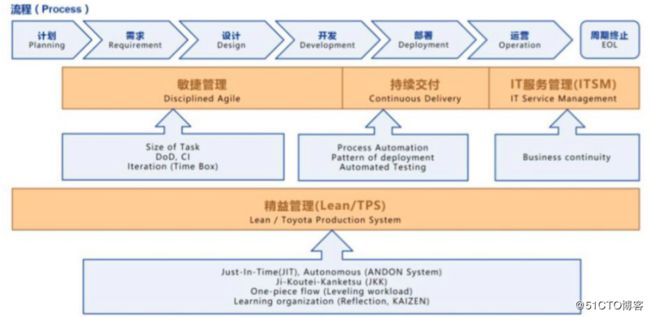
敏捷管理:一支训练有素的敏捷开发团队是成功实施DevOps 的关键。持续交付部署:实现应用程序的自动化构建、部署、测试和发布。
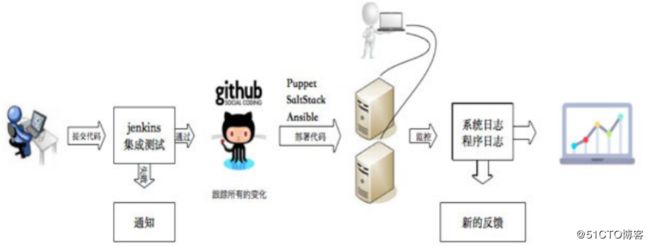
通过技术工具,把传统的手工操作转变为自动化流程,这不仅有利于提高产品开发、运维部署的效率,还将减少人为因素引起的失误和事故,提早发现问题并及时地解决问题,这样也保证了产品的质量。下图展示了DevOps 自动化的流程:
IT 服务管理:可持续的、高可用的 IT 服务是保障业务正常的关键要素,它与业务是一个整体。
IT 服务管理(ITSM),它是传统的“IT 管理”转向为“IT 服务”为主的一种模式,前者可能更关注具体服务器管理、网络管理和系统软件安装部署等工作;而后者更关注流程的规范化、标准化,明确定义各个流程的目标和范围、成本和效益、运营步骤、关键成功因素和绩效指标、有关人员的责权利,以及各个流程之间的关系等,比如建立线上事故解决流程、服务配置管理流程等;
精益管理:建立一个流水线式的 IT 服务链,打通开发与运维的鸿沟,实现开发运维一体化的敏捷模式。
精益生产主要来源于丰田生产方式 (TPS)的生产哲学,它以降低浪费、提升整体客户价值而闻名,它主要利用优化自动化流程来提高生产率、降低浪费。所以精益生产的精髓是即时制(JIT)和自动化(Jidoka)。
精益管理贯穿于整个 DevOps 阶段,它鼓励主动发现问题,不断的优化流程,从而达到持续交付、快速反馈、降低风险和保障质量的目的。
2.4实施DevOps 的具体方法
建立快速敏捷的团队
按照业务功能划分团队,建立沟通群组,设置产品负责人(一个策划人员)、Scrum Master
(我们一般选择测试人员担任,测试驱动开发模式)和开发者团队(前端工程师、后端工程师、测试各一名),形成如下的组织结构和系统架构:


提交:工程师将代码在本地测试后,提交到版本控制系统,如 Git 代码仓库中。
构建:持续整合系统(如 Jenkins CI),在检测到版本控制系统更新时,便自动从 Git代码仓库里拉取最新的代码,进行编译、构建。
单元测试:Jenkins 完成编译构建后,会自动执行指定的单元测试代码。
部署到测试环境:在完成单元测试后,Jenkins 可以将应用程序部署到与生产环境相近的测试环境中进行测试。
预生产环境测试:在预生产测试环境里,可以进行一些最后的自动化测试,例如使用Appium 自动化测试工具进行测试,以及与实际情况类似的一些测试可由开发人员或客户人员手动进行测试。
部署到生产环境:通过所有测试后,便可以使用灰度更新将最新的版本部署到实际生产环境里。
DepOps 在落地实施过程中经常会遇到的问题
人手紧缺
跨部门协作,前期沟通培训成本高
前期投入工作量大见效少
2.5DevOps 技术栈
敏捷管理工具
Trello Teambition Worktile Tower

产品&质量管理
confluence 禅道
Jira Bugzila
其中confluence 和禅道主要是产品的需求、定义、依赖和推广等的全面管理工具;而Jira 和 Bugzilla 是产品的质量管理和监控能力,包括测试用例、缺陷跟踪和质量监控等。目前我们使用Jira 和禅道较多。

代码仓库管理
Git Gitlab Github
Git 是一个开源的分布式版本控制系统;Gitlab 和 Github 是用于仓库管理系统的开源项目,它们使用 Git 作为代码管理工具,并在此基础上搭建起来的 web 服务。我们主要使用的是Git 和Gitlab。

自动化构建脚本
Gradle Maven SBT ANT

虚拟机与容器化
VMware VirtualBox Vagrant Docker

持续集成(CI)&持续部署(CD)
Jenkins
Hudson Travis CI CircleCI
Jenkins 是一个开源软件项目,是基于 Java 开发的一种持续集成工具,用于监控持续重复的工作,旨在提供一个开放易用的软件平台,使软件的持续集成变成可能,它的前身为Hudson。
Travis CI 是目前新兴的开源持续集成构建项目,它与 jenkins 很明显的区别在于采用yaml 格式,简洁清新独树一帜。
CircleCI 是一个为 web 应用开发者提供服务的持续集成平台,主要为开发团队提供测试,持续集成,以及代码部署等服务。

自动化测试
Appium
Appium 是一个移动端的自动化框架,可用于测试原生应用,移动网页应用和混合型应用,且是跨平台的。可用于 IOS 和 Android 以及 firefox 的操作系统。
Selenium
Selenium 测试直接在浏览器中运行,就像真实用户所做的一样。Selenium 测试可以在Windows、Linux 和 Macintosh 上的 Internet Explorer、Mozilla 和 Firefox 中运行。
Mock 测试
Mock 测试就是在测试过程中,对于某些不容易构造或者不容易获取的对象,用一个虚拟的对象来创建以便测试的测试方法。这个虚拟的对象就是 Mock 对象,Mock 对象就是真实对象在调试期间的代替品。Java 中的 Mock 框架常用的有 EasyMock 和 Mockito 等。
消费者驱动契约测试
契约测试是一种针对外部服务的接口进行的测试,它能够验证服务是否满足消费方期待的契约。当一些消费方通过接口使用某个组件的提供的行为时,它们之间就产生了契约。这个契约包含了对输入和输出的数据结构的期望,性能以及并发性。而 PACT 是目前比较流的消费者驱动契约测试框架。

自动化运维工具
Ansible Puppet Chef SaltStack

监控管理工具
Zabbix
Zabbix 是一个基于 WEB 界面的提供分布式系统监视以及网络监视功能的企业级开源解决方案。

ELK Stack 日志分析系统
ELK Stack 是开源日志处理平台解决方案,背后的商业公司是 Elastic。它由日志采集解析工具 Logstash、基于 Lucene 的全文搜索引擎 Elasticsearch、分析可视化平台Kibana 三部分组成。
云监控(如Amazon CloudWatch)
Amazon CloudWatch 是一项针对 AWS 云资源和在 AWS 上运行的应用程序进行监控的服务。您可以使用 Amazon CloudWatch 收集和跟踪各项指标、收集和监控日志文件、设置警报以及自动应对 AWS 资源的更改
3.版本控制概要
3.1什么是版本控制
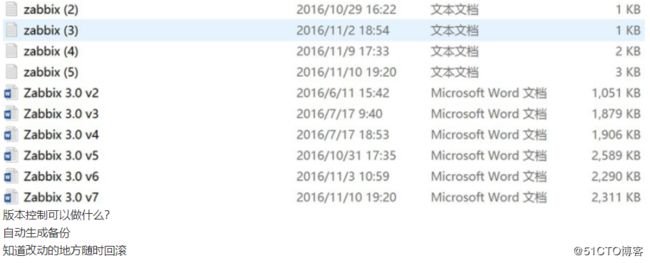
版本控制(Revision control)是一种在开发的过程中用于管理我们对文件、目录或工程等内容的修改历史,方便查看更改历史记录,备份以便恢复以前的版本的软件工程技术。
版本控制的目的
实现跨区域多人协同开发
追踪和记载一个或者多个文件的历史记录组织和保护你的源代码和文档
统计工作量
并行开发、提高开发效率
跟踪记录整个软件的开发过程
减轻开发人员的负担,节省时间,同时降低人为错误简单说就是用于管理多人协同开发项目的技术。
没有进行版本控制或者版本控制本身缺乏正确的流程管理,在软件开发过程中将会引入很多问题,如软件代码的一致性、软件内容的冗余、软件过程的事物性、软件开发过程中的并发性、软件源代码的安全性,以及软件的整合等问题。
3.2常见的版本控制器
主流的版本控制器有如下这些:
Git
SVN(Subversion) CVS(Concurrent Versions System)
VSS(Micorosoft Visual SourceSafe) TFS(Team Foundation Server) Visual Studio Online
版本控制产品非常的多(Perforce、Rational ClearCase、RCS(GNU Revision Control System)、Serena Dimention、SVK、BitKeeper、Monotone、Bazaar、Mercurial、SourceGear Vault),现在影响力最大且使用最广泛的是 Git 与SVN
3.3版本控制分类
本地版本控制
记录文件每次的更新,可以对每个版本做一个快照,或是记录补丁文件,适合个人用, 如RCS。

集中版本控制
所有的版本数据都保存在服务器上,协同开发者从服务器上同步更新或上传自己的修改所有的版本数据都存在服务器上,用户的本地只有自己以前所同步的版本,如果不连网
的话,用户就看不到历史版本,也无法切换版本验证问题,或在不同分支工作。而且,所有数据都保存在单一的服务器上,有很大的风险这个服务器会损坏,这样就会丢失所有的数据, 当然可以定期备份。代表产品:SVN、CVS、VSS

分布式版本控制
所有版本信息仓库全部同步到本地的每个用户,这样就可以在本地查看所有版本历史, 可以离线在本地提交,只需在连网时 push 到相应的服务器或其他用户那里。由于每个用户那里保存的都是所有的版本数据,只要有一个用户的设备没有问题就可以恢复所有的数据, 但这增加了本地存储空间的占用。

4.准备
4.1实验环境要求

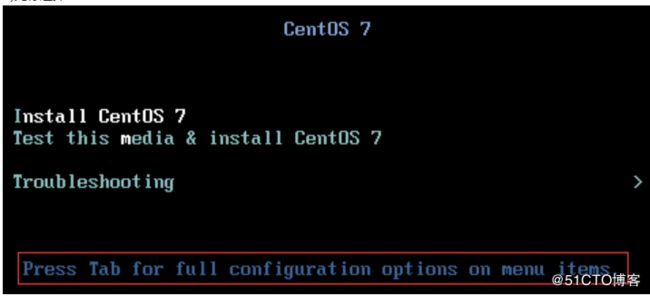
4.2操作系统安装

4.3系统初始化
1、设置主机名解析:
[root@node1 ~]# cat /etc/hosts
127.0.0.1   localhost localhost.localdomain localhost4 localhost4.localdomain4
::1 localhost localhost.localdomain localhost6 localhost6.localdomain6
10.0.0.11ci‐node1
10.0.0.12ci‐node2
10.0.0.13ci‐node2

2、安装EPEL 仓库和常用命令
[root@node1 ~]# rpm ‐ivh http://mirrors.aliyun.com/epel/epel‐release‐latest‐7.noarch.rpm

[root@node1 ~]# yum install ‐y net‐tools vim lrzsz tree screen lsof wget ntpdate

3、关闭NetworkManager 和防火墙
[root@node1 ~]# systemctl disable firewalld
[root@node1 ~]# systemctl stop NetworkManager

4、关闭SELinux
[root@node1 ~]# vim /etc/sysconfig/selinux SELINUX=disabled #修改为 disabled

5、设置时间:
[root@node1 ~]# crontab ‐l
*/5 * * * * /usr/sbin/ntpdate time1.aliyun.com

6、更改时区
ln ‐sf /usr/share/zoneinfo/Asia/Shanghai /etc/localtime
4.4其他要求
1、系统安装完成后做初始化快照
2、下载百度网盘文件。
链接:https://pan.baidu.com/s/16m5BVuhBSgtw1-_XTaJdmw 密码:pct9
3、使用提供的安装手册自行测试安装Git、Gitlab、Jenkins。
4、注册GitHub 帐户。
5.git
5.1介绍
Git 是一个开源的分布式版本控制系统,用于敏捷
高效地处理任何或小或大的项目。
Git 是 Linus Torvalds 为了帮助管理 Linux 内核开发而开发的一个开放源码的版本控制软件。
Git 与常用的版本控制工具 CVS, Subversion 等不同,它采用了分布式版本库的方式, 不必服务器端软件支持
5.2Git 的诞生
很多人都知道,Linus 在 1991 年创建了开源的 Linux,从此,Linux 系统不断发展,已经成为最大的服务器系统软件了。
Linus 虽然创建了 Linux,但 Linux 的壮大是靠全世界热心的志愿者参与的,这么多人在世界各地为Linux 编写代码,那Linux 的代码是如何管理的呢?
事实是,在 2002 年以前,世界各地的志愿者把源代码文件通过 diff 的方式发给 Linus, 然后由Linus 本人通过手工方式合并代码!
你也许会想,为什么 Linus 不把 Linux 代码放到版本控制系统里呢?不是有 CVS、SVN 这些免费的版本控制系统吗?因为Linus 坚定地反对 CVS 和 SVN,这些集中式的版本控制系统不但速度慢,而且必须联网才能使用。有一些商用的版本控制系统,虽然比 CVS、SVN 好用,但那是付费的,和Linux 的开源精神不符。
不过,到了 2002 年,Linux 系统已经发展了十年了,代码库之大让 Linus 很难继续通过手工方式管理了,社区的弟兄们也对这种方式表达了强烈不满,于是 Linus 选择了一个商业的版本控制系统 BitKeeper,BitKeeper 的东家 BitMover 公司出于人道主义精神,授权Linux 社区免费使用这个版本控制系统。
安定团结的大好局面在 2005 年就被打破了,原因是 Linux 社区牛人聚集,不免沾染了一些梁山好汉的江湖习气。开发 Samba 的 Andrew 试图破解 BitKeeper 的协议(这么干的其实也不只他一个),被 BitMover 公司发现了(监控工作做得不错!),于是 BitMover 公司怒了,要收回Linux 社区的免费使用权。
Linus 可以向 BitMover 公司道个歉,保证以后严格管教弟兄们,嗯,这是不可能的。实际情况是这样的:
Linus 花了两周时间自己用 C 写了一个分布式版本控制系统,这就是 Git!一个月之内, Linux 系统的源码已经由 Git 管理了!牛是怎么定义的呢?大家可以体会一下。
Git 迅速成为最流行的分布式版本控制系统,尤其是 2008 年,GitHub 网站上线了,它为开源项目免费提供 Git 存储,无数开源项目开始迁移至 GitHub,包括 jQuery,PHP,Ruby 等等。
历史就是这么偶然,如果不是当年 BitMover 公司威胁 Linux 社区,可能现在我们就没有免费而超级好用的Git 了。
5.3Git 与 SVN 的区别
1、GIT 是分布式的,SVN 不是:这是 GIT 和其它非分布式的版本控制系统,例如 SVN, CVS 等,最核心的区别。
2、GIT 把内容按元数据方式存储,而 SVN 是按文件:所有的资源控制系统都是把文件的元信息隐藏在一个类似.svn,.cvs 等的文件夹里。
3、GIT 分支和 SVN 的分支不同:分支在 SVN 中一点不特别,就是版本库中的另外的一个目录。
4、GIT 没有一个全局的版本号,而 SVN 有:目前为止这是跟 SVN 相比 GIT 缺少的最大的一个特征。
5、GIT 的内容完整性要优于 SVN:GIT 的内容存储使用的是SHA-1 哈希算法。这能确保代码内容的完整性,确保在遇到磁盘故障和网络问题时降低对版本库的破坏。
5.4Git 安装
Centos 下安装 Git,默认在CentOS 下,我们可以通过yum 的方式来安装Git
root@ci‐node1 ~]# yum install git –y
root@ci‐node1 ~]# git version
git version 1.8.3.1
使用yum 安装的 Git 的版本是 1.8,版本较低,我们还可以通过源码编译的方式来安装Git 的最新版本。
首先需要安装依赖的库:
root@ci‐node1 ~]# yum install curl‐devel expat‐devel gettext‐devel openssl‐devel zlib‐devel gc perl‐ExtUtils‐MakeMaker ‐y
下载最新的源码包
root@ci‐node1 src]# cd /usr/local/src/
root@ci‐node1 src]# wget https://www.kernel.org/pub/software/scm/git/git‐2.9.5.tar.gz
root@ci‐node1 src]# ll
total 5792 ‐rw‐r‐‐r‐‐ 1 root root 5928730 Aug 11 01:57 git‐2.9.5.tar.gz
解压安装:
root@ci‐node1 src]# tar xf git‐2.9.5.tar.gz
root@ci‐node1 src]# cd git‐2.9.5
root@ci‐node1 git‐2.9.5]# make prefix=/usr/local/git all
root@ci‐node1 git‐2.9.5]# make prefix=/usr/local/git install
root@ci‐node1 git‐2.9.5]# rm ‐rf /usr/bin/git
root@ci‐node1 git‐2.9.5]# ln ‐s /usr/local/git/bin/git /usr/bin/git
root@ci‐node1 git‐2.9.5]# git ‐‐version
git version 2.9.5
至此,我们已经完成了 Git 的编译安装,现在 Git 可以安装在 windows、MAC 操作系统上,具体请参考:
https://git‐scm.com/book/zh/v2/%E8%B5%B7%E6%AD%A5‐%E5%AE%89%E8%A3%85‐Git
5.5Git 的配置
Git 的配置从上到下分三层 system/global/local,使用三个不同参数进行设置,每个层次的配置存储在不同的位置,
1)./etc/gitconfig 文件:包含了适用于系统所有用户和所有库的值。如果你传递参数选项’--system’ 给 git config,它将明确的读和写这个文件。
2).~/.gitconfig 文件 :具体到你的用户。你可以通过传递--global 选项使 Git 读或写这个特定的文件。
3).位于 git 目录的 config 文件 (也就是 .git/config) :无论你当前在用的库是什么,特定指向该单一的库。每个级别重写前一个级别的值。因此,在.git/config 中的值覆盖了在/etc/gitconfig 中的同一个值。
// 设置本仓库的配置信息(用户名)

[root@ci‐node1 git_test]# git config --local user.name wending

[root@ci‐node1 git_test]# git config --local user.email [email protected]
//查看 local 层次的 config 配置信息

[root@ci‐node1 git_test]# git config --local --list
core.repositoryformatversion=0
core.filemode=true
core.bare=false
core.logallrefupdates=true
user.name=wendong
[email protected]
通常我们只配置global 级别。

[root@ci‐node1~]# git config --global user.name wendong866

[root@ci‐node1 ~]# git config --global user.email [email protected]

[root@ci‐node1 ~]# git config --list
user.name=wendong866 [email protected]
5.6Git 仓库初始化
5.6.1建仓库
第一步是创建一个空仓库,这是后续操作的前提。
// 使用bash 命令,切换到用户家目录下:

[root@ci-node1 ~]# cd
// 在指定目录下创建存放 repo 的文件夹,示例为 git_test

[root@ci-node1 ~]# mkdir git_test
// 切换到 git_test 目录下

[root@ci-node1 ~]# cd git_test/

[root@ci-node1 git_test]# pwd
/root/git_test
// 使用git init 命令创建一个空仓库

[root@ci-node1 git_test]# git init
Initialized empty Git repository in /root/git_test/.git/
// 空仓库创建完成后 gittest 文件夹下会生成一个.git 隐藏文件夹。仓库默认包含一个主支,即 master,默认操作都是在主分支 master 上进行的。

[root@ci-node1 git_test]# ll -a
total 0
drwxr-xr-x. 3 root root 18 Jul 20 08:47 .
dr-xr-x---. 4 root root 197 Jul 20 08:46 ..
drwxr-xr-x. 7 root root 119 Jul 20 08:47 .git
5.6.2.设置过滤文件
有了仓库,我们便可以在 git_test 文件夹下的工作区做文件增删修改工作了,但很多时候,我们只在意开发过程中的源文件,并不需要管理自动产生的其他临时文件。这时候我们便需要一个过滤文件,在这个文件中设置过滤规则,让 Git 能够自动过滤掉那些临时文件, 这个文件便是.gitignore 文件。
//在仓库目录下创建.gitignore 文件

[root@ci-node1 git_test]# touch .gitignore

[root@ci-node1 git_test]# vim .gitignore
[root@ci-node1 git_test]# cat .gitignore
test.txt    //过滤test.txt 文件
/test/  //过滤 test 目录
*.txt   //过滤所有以.txt 结尾的文件

常用的通配规则:
以斜杠“/”开头表示目录
以星号“*”通配多个字符
以问号“?”通配单个字符
以方括号“[]”包含单个字符的匹配列表
以叹号“!”表示不忽略(跟踪)匹配到的文件或目录
5.7Git 仓库基础操作
5.7.1Git 的四个区域

Workspace:工作区(他持有实际文件)
Index / Stage / Cached:暂存区(它像一个结存区域,临时保存你的改动)一般存放在 ".git 目录下" 下的 index 文件(.git/index)中,所以我们把暂存区有时也叫作索引(index)
Repository:本地仓库工作区有一个隐藏目录.git,这个不算工作区,而是 Git 的版本库。
Remote:远程仓库
5.7.2Git 的四种状态
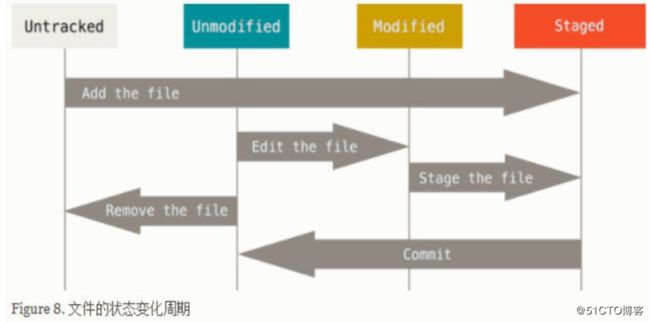
前面讲了Git 有四个区域,而单就文件改动状态层面而言,Git 区域内的文件也有 4 种状态(需要注意的是文件状态并不是与Git 区域一一对应的),这是 Git 第二个重要概念。
Untracked:新增的文件的状态,未受Git 管理,记录在工作区
Modified:受 Git 管理过的文件的改动状态(包括改动内容、删除文件),记录在工作区
Staged:将记录在工作区的文件变动状态通知了Git,记录在暂存区
Unmodified:受Git 管理中的文件状态(没有变动),记录在本地仓库/远程仓库
5.7.3查看 git 仓库文件改动状态
前面讲过 Git 仓库内文件改动有 4 种状态,除了 Unmodified 状态的文件因为并未改动默认没有状态不做显示之外,其他文件改动状态都可以通过 git status 来查看。让我们开始在工作区创建a、b、c 三个文件。
//创建文件 a、b、c

[root@ci-node1 git_test]# touch a

[root@ci-node1 git_test]# touch b

[root@ci-node1 git_test]# touch c

[root@ci-node1 git_test]# ll
total 0
-rw-r--r--. 1 root root 0 Jul 20 09:42 a
-rw-r--r--. 1 root root 0 Jul 20 09:42 b
-rw-r--r--. 1 root root 0 Jul 20 09:42 c
//我们来看看 Git 记录的状态,从下面结果可知,新增的 3 个文件在 Git 空间里都属于Untracked 文件,存放在工作区内

[root@ci-node1 git_test]# git status
# On branch master
#
# Initial commit
#
# Untracked files:
#   (use "git add ..." to include in what will be committed)
#
#   .gitignore
#   a
#   b
#   c
nothing added to commit but untracked files present (use "git add" to track)
[root@ci-node1 git_test]#
5.7.4将工作区文件改动添加到暂存区 git add
git add 是第一种通知 Git 命令,这个命令用于告诉Git 我们新增了文件改动,被git add 命令操作过的文件(改动)便会处于Git 暂存区。
// 添加单文件改动到暂存区

[root@ci-node1 git_test]# git add a

[root@ci-node1 git_test]# git add b

[root@ci-node1 git_test]# git add c
或
同时我们可以使用 git add . git add * 可以一次将多个文件改动添加到暂存区。
// 查看此时的文件状态,3 个文件都已在暂存区中了

[root@ci-node1 git_test]# git status
# On branch master
#
# Initial commit
#
# Changes to be committed:
#   (use "git rm --cached ..." to unstage)
#
#    new file:   a
#   new file:   b
#   new file: c
5.7.5将暂存区文件改动回退 git rm
Git rm 命令用于告诉 Git 我们想把之前用 git add 添加的文件改动从 Git 暂存区里拿出去,不需要 Git 记录了。
拿出去有两种拿法,一种是从暂存区退回到工作区,另一种是直接丢弃文件改动。
让我们试着将b 退回到工作区,c 直接丢弃。
//将b 的改动从暂存区工作区

[root@ci-node1 git_test]# git rm --cached b
rm 'b'
//查看b 是否已经移回工作区
[root@ci-node1 git_test]# git status
# On branch master
#
# Initial commit
#
# Changes to be committed:
#   (use "git rm --cached ..." to unstage)
#
#   new file:   a
#   new file:   c
#
# Untracked files:
#   (use "git add ..." to include in what will be committed)
#
#   .gitignore
#   b
//将c 文件直接从 git 空间里删除,也是就是从暂存区和工作区都删除。

[root@ci-node1 git_test]# git rm -f c
rm 'c'
//查看状态
[root@ci-node1 git_test]# git status
# On branch master
#
# Initial commit
#
# Changes to be committed:

#   (use "git rm --cached ..." to unstage)
#
#   new file:   a
#
# Untracked files:
#   (use "git add ..." to include in what will be committed)
#
#   .gitignore
#   b

//当前目录中已经没有文件 c

[root@ci-node1 git_test]# ll total 0
-rw-r--r--. 1 root root 0 Jul 20 09:42 a
-rw-r--r--. 1 root root 0 Jul 20 09:42 b
5.7.6将暂存区文件移动位置/重命名 git mv
Git mv 命令用于告诉 Git 我们想把之前用 git add 添加的文件直接在暂存区里重新命名或移动到新位置。
//将a 文件改名为 a.txt

[root@ci-node1 git_test]# git mv a a.txt
[root@ci-node1 git_test]# git status
# On branch master
#
# Initial commit
#
# Changes to be committed:
#   (use "git rm --cached ..." to unstage)
#
#   new file:   a.txt
#
# Untracked files:
#   (use "git add ..." to include in what will be committed)
#
#   .gitignore
#   b

[root@ci-node1 git_test]# ll total 0
-rw-r--r--. 1 root root 0 Jul 20 09:42 a.txt
-rw-r--r--. 1 root root 0 Jul 20 09:42 b

[root@ci-node1 git_test]#
5.7.7提交 git commit
当我们在仓库工作区下完成了文件增删改操作之后,并且使用 git add 将文件改动记录在暂存区之后,便可以开始将其提交到Git 本地仓库。
将暂存区内容提交git commit -m “”
//将暂存区内的文件 a.txt 提交到本地仓库

[root@ci-node1 git_test]# git commit -m "commit a"

[master (root-commit) 1f5fb04] commit a
1 file changed, 0 insertions(+), 0 deletions(-)
create mode 100644 a.txt

[root@ci-node1 git_test]# git status
# On branch master
# Untracked files:
#   (use "git add ..." to include in what will be committed)
#
#   .gitignore
#   b
nothing added to commit but untracked files present (use "git add" to track)
5.7.8查看 Git 区域文件的具体改动 git diff
git status 只能让我们知道文件在 Git 区域内的改动状态,但如果我们想查看某个文件内具体改了什么(也可以理解为在不同Git 区域中的差异),此时需要用 git diff 命令。
对于b 文件,由于是新增的文件,其只存在于工作区,且处于 Untracked 状态,Git 认为无论是哪两个Git 区域之间的比对都没有意义,得到的结果是没有区别。
而对于a.txt 文件,由于已经被提交到仓库了,处于 Git 管理中,所以这个文件同时存在于三个Git 空间(工作区,暂存区,仓库),我们在工作区内对其进行了文件改动,无论是比对工作区vs 暂存区或者工作区 vs 仓库,得到的结果应该都是 a.txt 文件里的具体变化内容。而如果比对暂存区vs 仓库,得到的结果也应该是没有区别。
查看文件当前变动(工作区 vs 暂存区)git diff
//查看b 文件得不到任何结果

[root@ci-node1 git_test]# git diff b

[root@ci-node1 git_test]#
//改动a.txt 文件后可看到文件的具体变化

[root@ci-node1 git_test]# echo "test" >>a.txt

[root@ci-node1 git_test]# git diff a.txt
diff --git a/a.txt b/a.txt
index e69de29..9daeafb 100644
--- a/a.txt
+++ b/a.txt
@@ -0,0 +1 @@
+test

查看文件当前变动(暂存区vs本地仓库-)git diff –cached
//将a.txt 文件的变动暂存后,查看变化

[root@ci-node1 git_test]# git add a.txt
//对比工作区与暂存区,无变化

[root@ci-node1 git_test]# git diff a.txt
//对比暂存区与本地仓库,可以看到具体变化。

[root@ci-node1 git_test]# git diff --cached a.txt
diff --git a/a.txt b/a.txt
index e69de29..9daeafb 100644
--- a/a.txt
+++ b/a.txt
@@ -0,0 +1 @@
+test
5.7.9、查看历史提交 git log
当我们在仓库里做了很多次提交之后,免不了需要回看提交记录,看看自己之前的改动。有两种Git 命令可以帮我们查看记录,
git log 是最直接的查看历史提交的命令,git log 可直接用也可带参数用,常用的有下面几种:

标准查看:git log
// 显示所有历史提交标准信息,每个提交信息包括 SHA 号,作者,时间以及标题

[root@ci-node1 git_test]# git log
commit 8982c79e30d7ad590aa9e728e875bfbbfe75d64e
Author: wendong [email protected]
Date:   Tue Jul 31 23:02:49 2018 +0800
commit b
commit 1f5fb041fe61e5cf57ee836177a3a961bf854cf1
Author: wendong [email protected]
Date:   Tue Jul 31 21:53:20 2018 +0800
commit a

精简查看git log --oneline
//显示所有历史提交精简信息,每个提交信息仅占一行,信息包括 SHA 号以及标题。

[root@ci-node1 git_test]# git log --oneline
8982c79 commit b 1f5fb04 commit

完整查看 git log –p
// 显示所有历史提交完整信息,比标准查看多了提交的具体文件改动信息。

[root@ci-node1 git_test]# git log -p
commit 8982c79e30d7ad590aa9e728e875bfbbfe75d64e
Author: wendong [email protected]
Date:   Tue Jul 31 23:02:49 2018 +0800
commit b
diff --git a/.gitignore b/.gitignore new file mode 100644
index 0000000..73cb75a
--- /dev/null
+++ b/.gitignore
@@ -0,0 +1,3 @@
+test.txt
+/test/
+*.txt
diff --git a/a.txt b/a.txt
index e69de29..9daeafb 100644
--- a/a.txt
+++ b/a.txt
@@ -0,0 +1 @
+test
diff --git a/b b/b
new file mode 100644 index 0000000..e69de29
5.7.10查看本地历史操作 git reflog
git log 仅能查看最终在仓库存在的提交信息,无法查看被删除的提交,以及在本地具体Git 命令操作记录,这时候你需要使用 git reflog。

[root@m02 git-command]# git reflog
b93bada HEAD@{0}: commit: modify a
37984a3 HEAD@{1}: commit (initial): a b c
5.7.11签出 git checkout
如果仓库中已经存在文件 a.txt,在工作区中对 a.txt 修改了,如果想撤销可以使用checkout,签出覆盖。检出命令 git checkout 是 git 最常用的命令之一,同时也是一个很危险的命令,因为这条命令会重写工作区。
git checkout -- filename
//用暂存区中filename 文件来覆盖工作区中的filename 文件。相当于取消自上次执行git add filename 以来(如果执行过)的本地修改。

[root@m02 git-command]# cat a.txt
www
123

[root@m02 git-command]# echo "111">>a.txt

[root@m02 git-command]# cat a.txt
www
123
111

[root@m02 git-command]# git checkout -- a.txt

[root@m02 git-command]# cat a.txt
www
123
***注意:git checkout . 这条命令最危险,相当于用暂存区的所有文件直接覆盖本地文件,不给用户任何确认的机会!
5.7.12撤销提交(commit)
原理就是放弃工作区和index 的改动,同时HEAD 指针指向前一个commit 对象。
//撤销上一次的提交
git reset –hard HEAD ^1
//要通过 git log 查看提交日志,也可直接指定提交编号或序号

[root@m02 git-command]# git log --oneline
b4ef654 rename
712f0fe “a”
c7569ea a
b93bada modify a
37984a3 a b c

[root@m02 git-command]# git reset --hard c7569ea
HEAD is now at c7569ea a

[root@m02 git-command]# git log --oneline
c7569ea a
b93bada modify a
37984a3 a b c

[root@m02 git-command]#
此时如果shell窗口关了,发现撤销错了,想回退到712f0fe,但这个时候,git log --oneline已经看不到这个ID了,可以用git

[root@m02 git-command]# git reflog
c7569ea HEAD@{0}: reset: moving to c7569ea
b4ef654 HEAD@{1}: commit: rename
712f0fe HEAD@{2}: commit: “a”
c7569ea HEAD@{3}: commit: a
b93bada HEAD@{4}: commit: modify a
37984a3 HEAD@{5}: commit (initial): a b c

[root@m02 git-command]# git reset --hard 712f0fe
HEAD is now at 712f0fe “a”

[root@m02 git-command]# git log --oneline
712f0fe “a”
c7569ea a
b93bada modify a
37984a3 a b c

[root@m02 git-command]#
5.8Git 分支
Git 中的分支,其实本质上仅仅是个指向 commit 对象的可变指针。Git 会使用 master 作为分支的默认名字。
在若干次提交后,你其实已经有了一个指向最后一次提交对象的master 分支,它在每次提交的时候都会自动向前移动

5.8.1创建新分支
我们可以使用git branch 命令创建一个新的分支指针

[root@ci-node1 git_test]# git branch testing

[root@ci-node1 git_test]# git branch

*master
Testing
这会在当前 commit 对象上新建一个分支指针
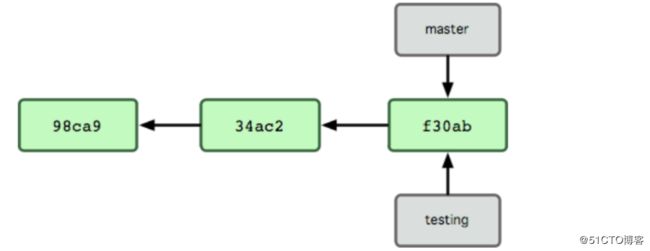
Git 保存着一个名为 HEAD 的特别指针。在 Git 中,它是一个指向你正在工作中的本地分支的指针(译注:将 HEAD 想象为当前分支的别名。)。
运行 git branch 命令,仅仅是建立了一个新的分支,但不会自动切换到这个分支中去,所以在这个例子中,我们依然还在master 分支里工作。

[root@m02 git-command]# git checkout testing
Switched to branch 'testing'

[root@m02 git-command]# git branch
master

*testing

5.8.3查看分支
列出所有本地分支git branch

[root@ci-node1 git_test]# git branch
master

*testing
5.8.4分支合并
我们在前面的基本上,在testing 分支创建新文件c,然后做一次 commit。

[root@m02 git-command]# touch c

[root@m02 git-command]# git add *

[root@m02 git-command]# git commit -m "new file c"

[testing fe0183f] new file c
1 file changed, 0 insertions(+), 0 deletions(-)
create mode 100644 c

[root@m02 git-command]#

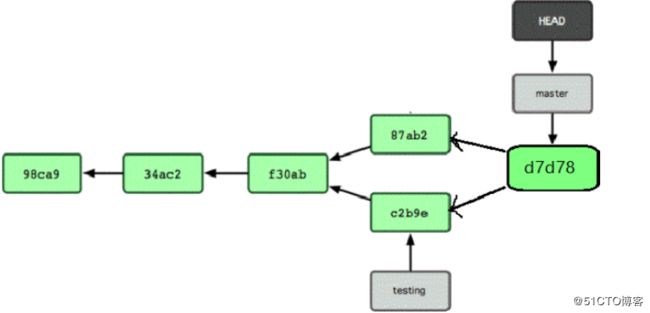
现在 testing 分支向前移动了一格,而 master 分支仍然指向原先 git checkout 时所在的 commit 对象。现在我们回到 master 分支看看:

[root@m02 git-command]# git checkout master
Switched to branch 'master'

[root@m02 git-command]# ll
total 4
-rw-r--r-- 1 root root 8 Mar 28 16:53 a.txt
-rw-r--r-- 1 root root 0 Mar 28 16:53 b.txt
-rw-r--r-- 1 root root 0 Mar 28 16:53 c.txt

[root@m02 git-command]# git branch

*master
testing
[root@m02 git-command]#

[root@m02 git-command]# git branch

*master
testing
[root@m02 git-command]# touch d

[root@m02 git-command]# git add *

[root@m02 git-command]# git commit -m "d"

[master 4f5143d] d
1 file changed, 0 insertions(+), 0 deletions(-)
create mode 100644 d

[root@m02 git-command]# ll
total 4
-rw-r--r-- 1 root root 8 Mar 28 16:53 a.txt
-rw-r--r-- 1 root root 0 Mar 28 16:53 b.txt
-rw-r--r-- 1 root root 0 Mar 28 16:53 c.txt
-rw-r--r-- 1 root root 0 Mar 28 16:56 d

现在我们的仓库提交历史产生了分叉,我们可以在不同分支之间来回切换,做修改相互不影响,也可以在适当的时机把他们合并到一起。现在我们把testing 分支的内容合并到master 分支上。

[root@m02 git-command]# git merge testing
Merge branch 'testing'

#Please enter a commit message to explain why this merge is necessary,
#especially if it merges an updated upstream into a topic branch.
#Lines starting with '#' will be ignored, and an empty message aborts
#the commit.
merge
".git/MERGE_MSG" 8L, 256C written
Merge made by the 'recursive' strategy.
c | 0
1 file changed, 0 insertions(+), 0 deletions(-)
create mode 100644 c
//我们看到 testing 分支的内容已经合并到 master 分支。//通过查看 commit 信息我们可以看到,testing 分支做的那次 commit 已经合并到了master 的commit 日志中了,而且合并后重新生成了一次 commit。

[root@m02 git-command]# git log --oneline
2bebecc Merge branch 'testing'
4f5143d d
fe0183f new file c
b4ef654 rename
712f0fe “a”
c7569ea a
b93bada modify a
37984a3 a b c

[root@m02 git-command]# ll
total 4
-rw-r--r-- 1 root root 8 Mar 28 16:53 a.txt
-rw-r--r-- 1 root root 0 Mar 28 16:53 b.txt
-rw-r--r-- 1 root root 0 Mar 28 16:57 c
-rw-r--r-- 1 root root 0 Mar 28 16:53 c.txt
-rw-r--r-- 1 root root 0 Mar 28 16:56 d

[root@m02 git-command]#
//通过查看 commit 信息我们可以看到,testing 分支做的那次 commit 已经合并到了master 的commit 日志中了,而且合并后重新生成了一次 commit。

[root@m02 git-command]# git log --oneline
2bebecc Merge branch 'testing'
4f5143d d
fe0183f new file c
b4ef654 rename
712f0fe “a”
c7569ea a
b93bada modify a
37984a3 a b c
[root@m02 git-command]# git branch

master
testing
[root@m02 git-command]# echo "111">a.txt

[root@m02 git-command]# git add *

[root@m02 git-command]# git commit -m "add to a.txt"

[master 7bc6c0d] add to a.txt
1 file changed, 1 insertion(+), 2 deletions(-)

[root@m02 git-command]# git checkout testing
Switched to branch 'testing'

[root@m02 git-command]# git branch
master

testing
[root@m02 git-command]# echo "222">a.txt

[root@m02 git-command]# git add *

[root@m02 git-command]# git commit -m "add222 to a.txt"

[testing 83f1805] add222 to a.txt
1 file changed, 1 insertion(+), 2 deletions(-)

[root@m02 git-command]# cat a.txt
222

[root@m02 git-command]# git checkout master
Switched to branch 'master'

[root@m02 git-command]# cat a.txt
<<<<<<< HEAD
111
=======
222
>>>>>>> testing
[root@m02 git-command]#
[root@m02 git-command]#
//修改合并后的冲突文件 a.txt,然后再做一次 commit,即完成了本次合并。

[root@m02 git-command]# cat a.txt
111
222

[root@m02 git-command]# git add a.txt

[root@m02 git-command]# git commit -m "resolv conflict"

[master 491995b] resolv conflict

[root@m02 git-command]# git log --oneline
491995b resolv conflict
83f1805 add222 to a.txt
7bc6c0d add to a.txt
2bebecc Merge branch 'testing'
4f5143d d
fe0183f new file c
b4ef654 rename
712f0fe “a”
c7569ea a
b93bada modify a
37984a3 a b c
5.8.5删除分支
分支合并完成后,即可以删除分支。

[root@m02 git-command]# git branch -d testing
Deleted branch testing (was 83f1805).

[root@m02 git-command]# git branch

*master
[root@m02 git-command]#
5.9Git 标签
标签也是版本库的一个快照。Git 的标签虽然是版本库的快照,但其实它就是指向某个commit 的指针
如果你达到一个重要的阶段,并希望永远记住那个特别的提交快照,你可以使用 git tag 给它打上标签。
比如说,我们想为我们的 项目发布一个"1.0"版本。 我们可以用 git tag -a v1.0 命令给最新一次提交打上(HEAD)"v1.0"的标签。-a 选项意为"创建一个带注解的标签"。
不用 -a 选项也可以执行的,但它不会记录这标签是啥时候打的,谁打的,也不会让你添加个标签的注解。 我推荐一直创建带注解的标签。
标签可在Jenkins打包的时候用,也可回退的时候使用
5.9.1创建标签
当你执行 git tag -a 命令时,Git 会打开你的编辑器,让你写一句标签注解,就像你给提交写注解一样。
现在,注意当我们执行 git tag 时,我们可以看到我们的标签了:

[root@m02 git-command]# git tag -a v1.0

#Write a tag message
#Lines starting with '#' will be ignored.
v1.0
".git/TAG_EDITMSG" 5L, 73C written

[root@m02 git-command]# git tag
v1.0

[root@m02 git-command]#
5.9.2查看标签
我们可以使用git show v1.0 来查看标签的内容
[root@m02 git-command]# git show v1.0
tag v1.0
Tagger: vita <[email protected]>
Date:   Thu Mar 28 17:07:31 2019 +0800

v1.0

commit 491995bab63edd6609ec507b493ac317520cd57d
Merge: 7bc6c0d 83f1805
Author: vita <[email protected]>
Date:   Thu Mar 28 17:04:58 2019 +0800

    resolv conflict

diff --cc a.txt
index 58c9bdf,c200906..a30a52a
--- a/a.txt
+++ b/a.txt
@@@ -1,1 -1,1 +1,2 @@@
 +111
+ 222
[root@m02 git-command]#
5.9.3删除标签
[root@m02 git-command]# git tag -d v1.0
Deleted tag 'v1.0' (was f166d5e)

[root@m02 git-command]# git tag
show

[root@m02 git-command]#
6.Git 远程仓库
Git 是分布式版本控制系统,同一个 Git 仓库,可以分布到不同的机器上,但开发参与者必须在同一个网络中,且必须有一个项目的原始版本,通常的办法是让一台电脑充当服务器的角色,每天 24 小时开机,其他每个人都从这个“服务器”仓库克隆一份到自己的电脑上,并且各自把各自的提交推送到服务器仓库里,也从服务器仓库中拉取别人的提交。完全可以自己搭建一台运行Git 的服务器但现在更适合的做法是使用免费的托管平台。
Git 代码托管平台,首先推荐的是GitHub,好多好的开源项目都来自GitHub,但是GitHub只能新建公开的 Git 仓库,私有仓库要收费,有时候访问比较卡,如果你做的是一个开源项目,可以首选 GitHub、coding。如果是公司自己内部使用的代码托管建议使用 Gitlab。
6.1Github 公有仓库使用
github 是一个基于 git 的代码托管平台,付费用户可以建私人仓库,我们一般的免费用户只能使用公共仓库,也就是代码要公开。
GitHub 的地址:https://github.com/,其首页如下图:


6.1.1创建空仓库


好了,到这里我们的第一个仓库就创建完成了,接下来我们要什么呢?
当然就是把远程的仓库和我们本地客户端的仓库连接起来,有两种情况:一是本地已经存在一个仓库,二是本地没有仓库。
6.1.2配置 Github
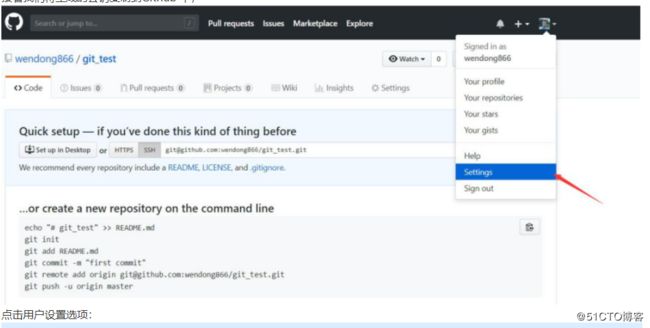
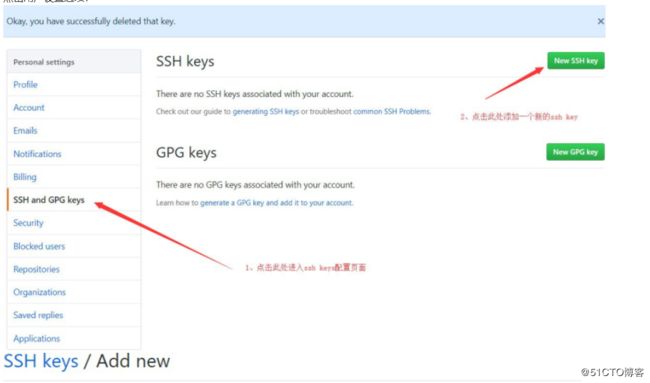
在完成上面提到的任务之前,我们配置对 Github 进行配置,实现我们的本地客户端和Github 无密码登录,我们需要配置 Github 的 SSH KEY。
首先我们在客户端生成 key,在 linux 和 windows 均可使用 ssh-keygen 命令生成,需要注意的是在windows 下只能生成rsa 加密方式的key。

[root@ci-node1 git_test]# ssh-keygen -t rsa
Generating public/private rsa key pair.
Enter file in which to save the key (/root/.ssh/id_rsa): Created directory '/root/.ssh'.
Enter passphrase (empty for no passphrase): Enter same passphrase again:
Your identification has been saved in /root/.ssh/id_rsa. Your public key has been saved in /root/.ssh/id_rsa.pub.

The key fingerprint is: SHA256:xC3xX4oQfPDlziNkh1+alXccJYggt/5QcOd9kaoJkaY root@ci-node1 The key's randomart image is:
+---[RSA 2048]  +
|   ..Boo.o..o+|
|   +.&o*.. =o|
|   O.X + B =|
|   E B B O o.|
|   S + %   |
|   o + .   |
|   .   |
|   |
|   |
+----[SHA256]   +

[root@ci-node1 git_test]# ll /root/.ssh/ total 8
-rw 1 root root 1675 Aug 1 23:10 id_rsa
-rw-r--r-- 1 root root  395 Aug 1 23:10 id_rsa.pub

接着我们将生成的公钥复制到Github 中,


6.1.3推送本地仓库到远程
前面我们已经打通了本地客户端和 Github 之间的连接,现在我们只需要把本地仓库和远程Github 的仓库对应起来,这样就可以把本地仓库推送到Github 上对应的仓库上。
第一步,为本地仓库添加远程仓库:
//为本地 git_test 仓库,添加名为 origin、仓库地址为: [email protected]:wendong866/git_test.git 的远程仓库

[root@m02 git-command]# git remote add origin [email protected]:wendong866/git_test.git

[root@m02 git-command]# git remote
origin
第二步,推送本地仓库到远程
//推送本地仓库的 master 分支到远程仓库

[root@ci-node1 git_test]# git push -u origin master
The authenticity of host github.com (13.250.177.223)' can't be established. RSA key fingerprint is SHA256:nThbg6kXUpJWGl7E1IGOCspRomTxdCARLviKw6E5SY8.
RSA key fingerprint is MD5:16:27:ac:a5:76:28:2d:36:63:1b:56:4d:eb:df:a6:48.
Are you sure you want to continue connecting (yes/no)? yes
Warning: Permanently added 'github.com,13.250.177.223' (RSA) to the list of known hosts.
Counting objects: 22, done.
Delta compression using up to 2 threads. Compressing objects: 100% (15/15), done.
Writing objects: 100% (22/22), 1.74 KiB | 0 bytes/s, done. Total 22 (delta 5), reused 0 (delta 0)
remote: Resolving deltas: 100% (5/5), done. To [email protected]:wendong866/git_test.git
*[new branch]   master -> master
Branch master set up to track remote branch master from origin.
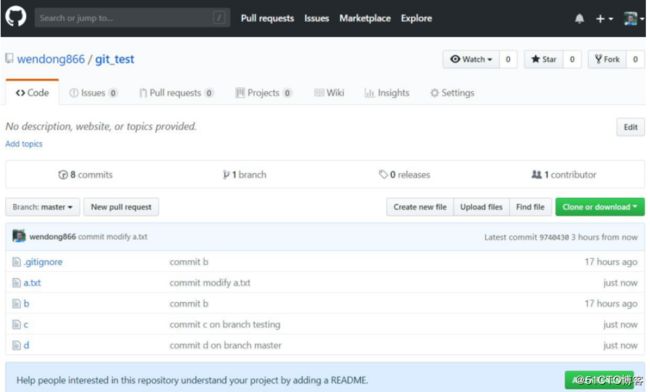
推送完成后,在 Github 的 git_test 远程仓库里已经可以看我们本地仓库的内容,如下
6.1.4克隆远程仓库到本地
如果我们需要在其他的客户端上使用上面的仓库,这时候我们将 Github 上的仓库克隆一份到对应的客户端上即,克隆之前首先需要打通客户端与 Github 之前的认证,具体可参见前面的相关内容,然后我们点击绿色按钮,

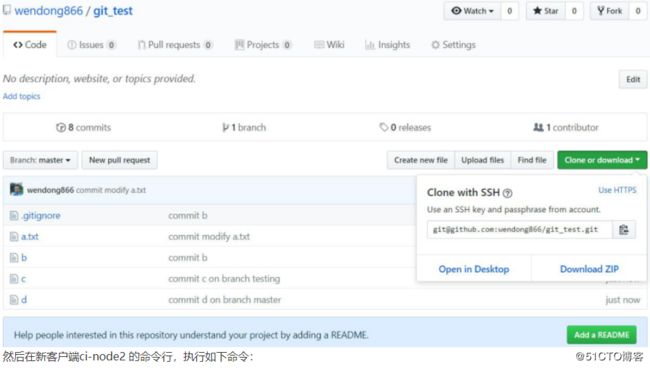
[root@ci-node2 opt]# git clone [email protected]:wendong866/git_test.git
Cloning into 'git_test'...
Warning: Permanently added the RSA host key for IP address '13.229.188.59' to the list of known hosts.
remote: Counting objects: 22, done.
remote: Compressing objects: 100% (10/10), done.
remote: Total 22 (delta 5), reused 22 (delta 5), pack-reused 0 Receiving objects: 100% (22/22), done.
Resolving deltas: 100% (5/5), done.

[root@ci-node1 opt]# ll -a git_test/
total 8
drwxr-xr-x 3 root root  76 Aug 1 23:54 .
drwxr-xr-x. 3 root root 22 Aug 1 23:53 ..
-rw-r--r-- 1 root root  13 Aug 1 23:54 a.txt
-rw-r--r-- 1 root root  0 Aug 1 23:54 b
-rw-r--r-- 1 root root  0 Aug 1 23:54 c
-rw-r--r-- 1 root root  0 Aug 1 23:54 d
drwxr-xr-x 8 root root 163 Aug 1 23:54 .git
-rw-r--r-- 1 root root  22 Aug 1 23:54 .gitignore

[root@ci-node2 opt]# cd git_test/

[root@ci-node2 git_test]# git remote Origin

同时,我们也看到在执行克隆操作的同时,为我们的本地仓库添加了一个默认的远程仓

库,这样我们直接就可以把本地仓库的内容推送到远程。
//我们在 ci-node2 上的仓库修改部分内容,并做一次 commit,然后推送到 Github 远程仓库:

[root@ci-node2 git_test]# touch e

[root@ci-node2 git_test]# git add .

[root@ci-node2 git_test]# git commit -m "commit e on other client"

[master 7f7671f] commit e on other client
1 file changed, 0 insertions(+), 0 deletions(-)
create mode 100644 e

[root@ci-node1 git_test]# git push -u origin master
Warning: Permanently added the RSA host key for IP address '52.74.223.119' to the list of known hosts.
Counting objects: 3, done.
Delta compression using up to 2 threads. Compressing objects: 100% (2/2), done.
Writing objects: 100% (2/2), 233 bytes | 0 bytes/s, done. Total 2 (delta 1), reused 0 (delta 0)
remote: Resolving deltas: 100% (1/1), completed with 1 local object. To [email protected]:wendong866/git_test.git
9740430..7f7671f    master -> master
Branch master set up to track remote branch master from origin.
完成后我们在Github 上可以看新创建的文件e。

6.1.5git fetch 使用
上面我们在 ci-node2 向 Github 上的远程仓库推送了新的内容,此时对于 ci-node1 上的git_test 仓库来说,它的远程仓库已经更新,所以需要将这些更新取回本地仓库,
这时就需要用到 git fetch 命令。git fetch更新后,在本地看不到更新的文件,需要merge后才能看到
//我们在 ci-node1 上执行 git fetch 命令

[root@ci-node1 git_test]# git fetch remote
: Counting objects: 2, done.
remote: Compressing objects: 100% (1/1), done.
remote: Total 2 (delta 1), reused 2 (delta 1), pack-reused 0 Unpacking objects: 100% (2/2), done.
From github.com:wendong866/git_test 9740430..7f7671f    master  -> origin/master
默认情况下,git fetch 取回所有分支(branch)的更新。如果只想取回特定分支的更新,可以指定分支名。比如取回远程 origin 仓库的 master 分支可以这样写 git fetch origin master。
所取回的更新,在本地主机上要用"远程主机名/分支名"的形式读取。比如 origin 主机的master,就要用 origin/master 读取。
git branch 命令的-r 选项,可以用来查看远程分支,-a 选项查看所有分支。

[root@ci-node1 git_test]# git branch -r
origin/master

[root@ci-node1 git_test]# git branch -a

master
remotes/origin/master
取回远程主机的更新以后,可以在它的基础上,使用 git checkout 命令创建一个新的分支。
[root@ci-node1 git_test]# git checkout -b remote-master origin/master
Branch remote-master set up to track remote branch master from origin. Switched to a new branch 'remote-master'

[root@ci-node1 git_test]# ll total 4
-rw-r--r-- 1 root root 13 Aug 1 18:42 a.txt
-rw-r--r-- 1 root root  0 Jul 31 22:05 b
-rw-r--r-- 1 root root  0 Aug 1 17:28 c
-rw-r--r-- 1 root root  0 Aug 1 18:40 d
-rw-r--r-- 1 root root  0 Aug 2 00:53 e
也可以使用 git merge 命令,在本地分支上合并远程分支,在本地目录才能看到远程仓库的内容

[root@ci-node1 git_test]# git merge origin/master
Updating 9740430..7f7671f
Fast-forward
e|0
1 file changed, 0 insertions(+), 0 deletions(-)
create mode 100644 e

[root@ci-node1 git_test]# ll total 4
-rw-r--r-- 1 root root 13 Aug 1 18:42 a.txt
-rw-r--r-- 1 root root  0 Jul 31 22:05 b
-rw-r--r-- 1 root root  0 Aug 1 17:28 c
-rw-r--r-- 1 root root  0 Aug 1 18:40 d
-rw-r--r-- 1 root root  0 Aug 2 00:54 e
6.1.6git pull
git pull可以吧远程仓库的内容更新到本地
多个分支,多个用户在使用的时候,需要先git pull,吧远端的新内容更新到本地,然后在commit,push
6.2GitLab 私有仓库使用
6.2.1GitLab 基本介绍
GitLab 是利用 Ruby on Rails 一个开源的版本管理系统,实现一个自托管的 Git 项目仓库,可通过Web 界面进行访问公开的或者私人项目。
与Github 类似,GitLab 能够浏览源代码,管理缺陷和注释。可以管理团队对仓库的访问,它非常易于浏览提交过的版本并提供一个文件历史库。团队成员可以利用内置的简单聊天程序(Wall)进行交流。
它还提供一个代码片段收集功能可以轻松实现代码复用,便于日后有需要的时候进行查找。
常用的网站:
官网:https://about.gitlab.com/
国内镜像:https://mirrors.tuna.tsinghua.edu.cn/gitlab-ce/yum/
6.2.2Gitlab 安装
1.安装环境准备:
操作系统:centos6/7
内存:实验环境至少 2G,生产建议 4G 以上
磁盘:至少 50G,根据生产实际仓库大小进行配置安全:关闭防火墙、selinux

2.安装依赖:

[root@ci-node1 git_test]# yum install curl policycoreutils openssh-server openssh-clients policycoreutils-python –y
获取安装包:
可以从网盘下载本次课程配套的安装包,也可以到清华镜像站下载安装包。

[root@ci-node1 git_test]# cd /usr/local/src/

[root@ci-node1  src]# wget https://mirrors.tuna.tsinghua.edu.cn/gitlab-ce/yum/el7/gitlab-ce-10.0.6-ce.0.el7.x86_64.rpm
--2018-08-02    22:14:16--
https://mirrors.tuna.tsinghua.edu.cn/gitlab-ce/yum/el7/gitlab-ce-10.0.6-ce.0. el7.x86_64.rpm
Resolving   mirrors.tuna.tsinghua.edu.cn    (mirrors.tuna.tsinghua.edu.cn)... 101.6.8.193, 2402:f000:1:408:8100::1
Connecting  to  mirrors.tuna.tsinghua.edu.cn (mirrors.tuna.tsinghua.edu.cn)|101.6.8.193|:443... connected.
HTTP request sent, awaiting response... 200 OK
Length: 359552899 (343M) [application/x-redhat-package-manager] Saving to: ‘gitlab-ce-10.0.6-ce.0.el7.x86_64.rpm’

100%359,552,899 3.75MB/s    in 76s

2018-08-02 22:15:32 (4.51 MB/s) - ‘gitlab-ce-10.0.6-ce.0.el7.x86_64.rpm’ saved [359552899/359552899]

3.安装 Gitlab
[root@ci-node1 src]# rpm -ivh  gitlab-ce-10.0.6-ce.0.el7.x86_64.rpm
warning:    gitlab-ce-10.0.6-ce.0.el7.x86_64.rpm:   Header  V4  RSA/SHA1 Signature, key ID f27eab47: NOKEY
Preparing... ################################# [100%]
Updating / installing...
1:gitlab-ce-10.0.6-ce.0.el7 ################################# [100%]
It looks like GitLab has not been configured yet; skipping the upgrade script.

*****   *****
.****** *******
********    ********
    ,,,,,,,,,***********,,,,,,,,,
    ,,,,,,,,,,,*********,,,,,,,,,,,
    .,,,,,,,,,,,*******,,,,,,,,,,,,
,,,,,,,,,*****,,,,,,,,,.
,,,,,,,****,,,,,,
.,,,***,,,,
,*,.

/   (_) /_/ /       _/ /_
    / / / / / / /   \`/ __\
    / /_/// /_/ /   / /_// /_//
\   /_/\    /   /\  ,_/_.   /

Thank you for installing GitLab!
GitLab was unable to detect a valid hostname for your instance.
Please configure a URL for your GitLab instance by setting `external_url` configuration in /etc/gitlab/gitlab.rb file.
Then, you can start your GitLab instance by running the following command:
    sudo gitlab-ctl reconfigure

For a comprehensive list of configuration options please see the Omnibus GitLab readme
https://gitlab.com/gitlab-org/omnibus-gitlab/blob/master/README.md
6.2.3配置 GitLab
GitLab 的默认配置文件为于:/etc/gitlab/gitlab.rb,修改下图所示的 external_url 为本机IP 地址或者一个可以访问到本机的域名

6.2.4启动 GitLab
重新配置执行成功后,我们就可以启动Gitlab,

[root@ci-node1 src]# gitlab-ctl restart
ok: run: gitaly: (pid 17752) 1s
ok: run: gitlab-monitor: (pid 17768) 0s ok: run: gitlab-workhorse: (pid 17771) 1s ok: run: logrotate: (pid 17815) 0s
ok: run: nginx: (pid 17821) 1s
ok: run: node-exporter: (pid 17828) 0s ok: run: postgres-exporter: (pid 17833) 0s ok: run: postgresql: (pid 17841) 1s
ok: run: prometheus: (pid 17850) 0s ok: run: redis: (pid 17858) 1s
ok: run: redis-exporter: (pid 17865) 0s ok: run: sidekiq: (pid 17871) 0s
ok: run: unicorn: (pid 17880) 0s

在浏览器地址里输入:http://10.0.0.11,出现如图所示页面:首次登录要求我们重新设置root 用户的密码:


6.2.5GitLab 服务构成
GitLab 由主要由以下服务构成,他们共同承担了 Gitlab 的运作需要
Nginx:静态web 服务器。
gitlab-shell:用于处理Git 命令和修改authorized keys 列表。
gitlab-workhorse: 轻量级的反向代理服务器。
logrotate:日志文件管理工具。
postgresql:数据库。
redis:缓存数据库。
sidekiq:用于在后台执行队列任务(异步执行)。

unicorn:An HTTP server for Rack applications,GitLab Rails 应用是托管在这个服务器上面的。
我们可以使用gitlab-ctl status 命令来查看各服务的状态

[root@ci-node1 src]# gitlab-ctl status
run: gitaly: (pid 17752) 652s;
run: log: (pid 8831) 5484s
run: gitlab-monitor: (pid 17768) 651s;
run: log: (pid 9000) 5458s
run: gitlab-workhorse: (pid 17771) 651s;
run: log: (pid 8898) 5478s
run: logrotate: (pid 17815) 650s;
run: log: (pid 8930) 5471s
run: nginx: (pid 17821) 650s;
run: log: (pid 8906) 5477s
run: node-exporter: (pid 17828) 649s;
run: log: (pid 8978) 5465s
run: postgres-exporter: (pid 17833) 649s;
run: log: (pid 9107) 5440s
run: postgresql: (pid 17841) 649s;
run: log: (pid 8649) 5533s
run: prometheus: (pid 17850) 648s;
run: log: (pid 9071) 5446s
run: redis: (pid 17858) 648s;
run: log: (pid 8589) 5545s
run: redis-exporter: (pid 17865) 647s;
run: log: (pid 9050) 5452s
run: sidekiq: (pid 17871) 646s;
run: log: (pid 8811) 5490s
run: unicorn: (pid 17895) 645s;
run: log: (pid 8772) 5496s
6.2.6GitLab 工作流程
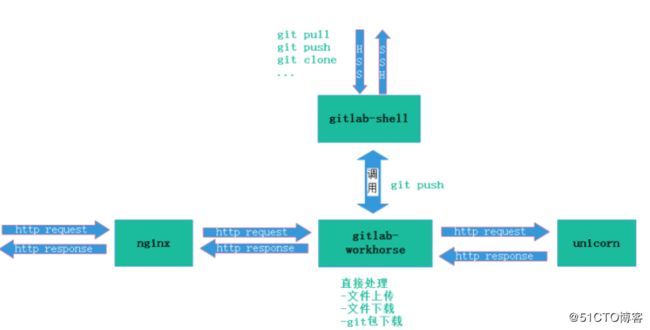
GitLab Shell
GitLab Shell 有两个作用:为 GitLab 处理 Git 命令、修改 authorized keys 列表。
当通过 SSH 访问GitLab Server 时,GitLab Shell 会:
限制执行预定义好的Git 命令(git push, git pull, git annex)
调用GitLab Rails API 检查权限
执行pre-receive 钩子(在GitLab 企业版中叫做Git 钩子)
执行你请求的动作 处理GitLab 的post-receive 动作
处理自定义的post-receive 动作
当通过http(s)访问 GitLab Server 时,工作流程取决于你是从 Git 仓库拉取(pull)代码还是向git 仓库推送(push)代码。
如果你是从 Git 仓库拉取(pull)代码,GitLab Rails 应用会全权负责处理用户鉴权和执行Git 命令的工作;
如果你是向 Git 仓库推送(push)代码,GitLab Rails 应用既不会进行用户鉴权也不会
执行Git 命令,它会把以下工作交由GitLab Shell 进行处理:
调用GitLab Rails API 检查权限
执行pre-receive 钩子(在GitLab 企业版中叫做Git 钩子)
执行你请求的动作
处理 GitLab 的post-receive 动作处理自定义的post-receive 动作

GitLab Workhorse
GitLab Workhorse 是一个敏捷的反向代理。它会处理一些大的HTTP 请求,比如文件上传、文件下载、Git push/pull 和 Git 包下载。其它请求会反向代理到 GitLab Rails 应用, 即反向代理给后端的unicorn。
6.2.7GitLab 常用命令
#启动所有 gitlab 组件: gitlab-ctl start
#停止所有 gitlab 组件: gitlab-ctl stop
#停止 postgresql 组件: gitlab-ctl stop postgresql
#停止相关数据连接服务: gitlab-ctl stop unicorn gitlab-ctl stop sidekiq
#重启所有 gitlab 组件: gitlab-ctl restart
#重 启 gitlab-workhorse 组 件 : gitlab-ctl restart  gitlab-workhorse
#查看服务状态: gitlab-ctl status
#如果更改了主配置文件 [gitlab.rb 文件],使配置文件生效 但是会初始化除了gitlab.rb 之外的所有文件
sudo gitlab-ctl reconfigure # 查看日志
sudo gitlab-ctl tail # 检查redis 的日志
sudo gitlab-ctl tail redis
6.2.8GitLab 主要目录
/var/opt/gitlab/git-data/repositories/:库默认存储目录
/opt/gitlab:    应用代码和相应的依赖程序
/var/opt/gitlab:gitlab-ctl reconfigure 命令编译后的应用数据和配置文件,不需要人为修改配置
/etc/gitlab:    配置文件目录
/var/log/gitlab:此目录下存放了gitlab 各个组件产生的日志
/var/opt/gitlab/backups/:备份文件生成的目录
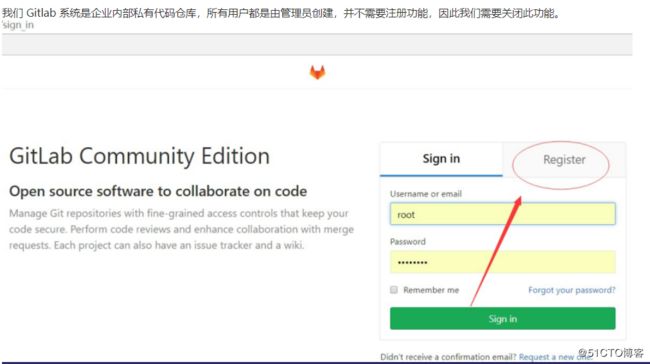

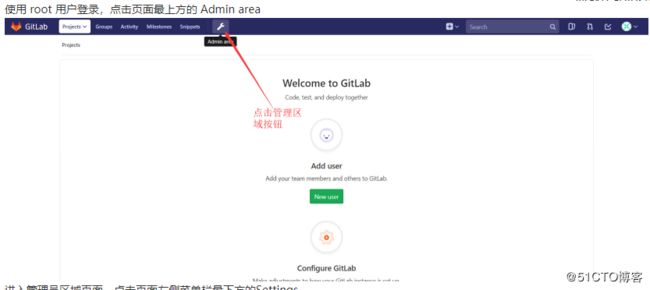
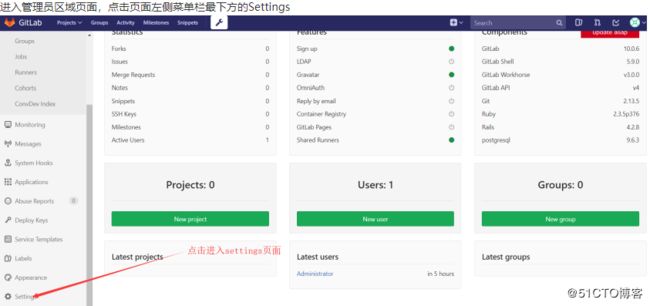


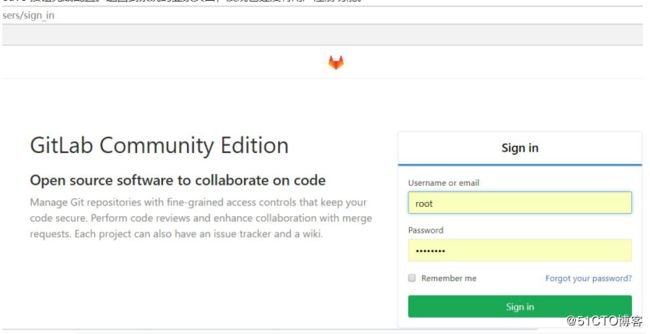


6.2.10Gitlab 仓库管理
GitLab 是通过组(group)的概念来统一管理仓库(project)和用户(user),通过创建组,在组下再创建仓库,再将用户加入到组,从而实现用户与仓库的权限管理。
6.2.10.1创建组 create group


6.2.10.2创建用户 create user
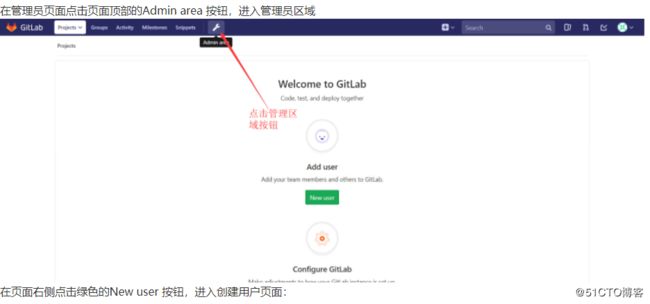
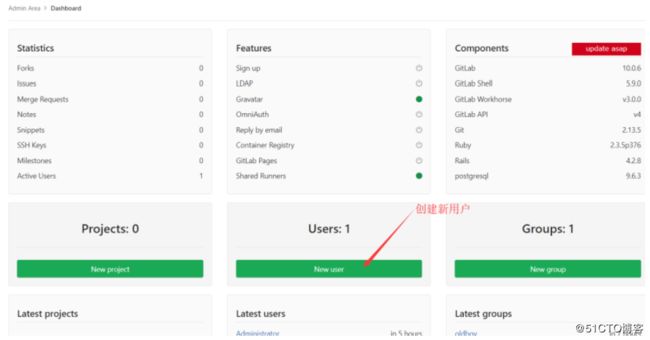
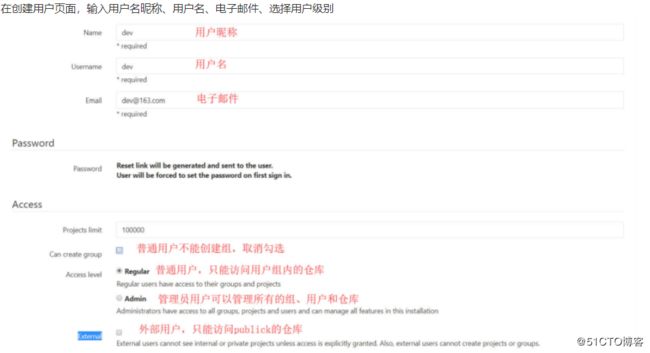
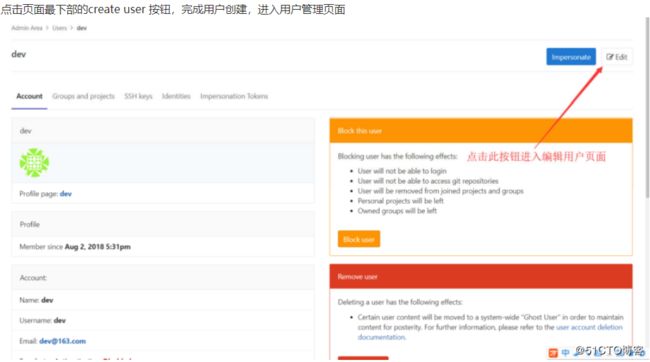

6.2.10.3用户授权(grant user)
用户创建完成后,我们就需要对用户进行授权,从而使用户可以管理仓库,有两种方式, 一是将用户加入到组,这样用户可以管理组内的仓库,二是直接授权用户管理仓库。
通常我们采用的方式是将用户加入相应的组,并赋予不同的角色。
GitLab 中用户的角色是系统定义好的,不能更改。这一点可能不符合我们正常的思维习惯。下面我们将刚创建的 dev 用户

添加到我们的oldboy 组,将赋予developer 权限, 在管理员区域,
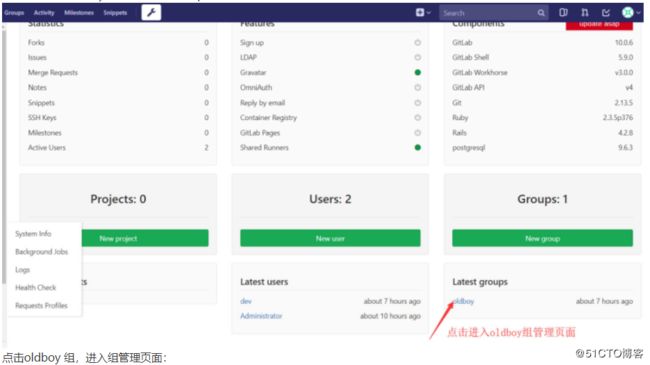


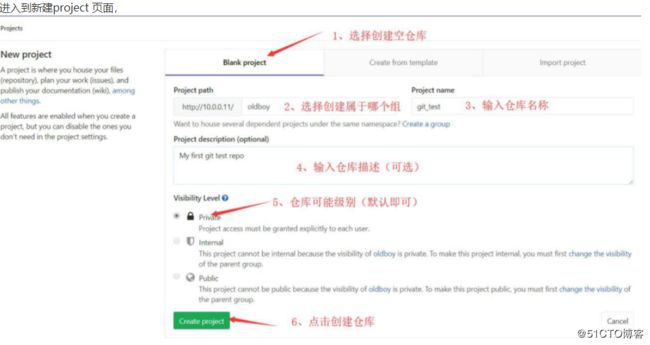
6.2.10.4创建仓库(create project)
在GitLab 中,你可以创建 project 用来存储你的程序代码、作为一个问题跟踪器、用于代码协作、用于持续集成中的构建、测试和部署等。
在管理员区域点击 New project 按钮,或者点击导航栏中的选择 New project 选项,



6.2.10.5配置 SSH KEY
前面我们已经在GitLab 创建了仓库,并且授权用户可以使用仓库,我们所有的操作都是在WEB 页面进行,下在我们介绍如何使用客户端来连接我们的仓库。
我们的仓库是私有的,只有授权的用户才可以访问到该仓库,那么只要将客户端的用户与我们GitLab 的用户绑定,客户端即可访问到 GitLab 上的仓库,我们建议使用 SSH 方式实现客户端与Gitlab 用户的绑定,具体配置如下:
在客户端生成ssh 密钥对(注windows 客户端下只能使用rsa 加密方式),

[root@ci-node1 git_test]# ssh-keygen -t rsa
Generating public/private rsa key pair.
Enter file in which to save the key (/root/.ssh/id_rsa): Created directory '/root/.ssh'.
Enter passphrase (empty for no passphrase):
Enter same passphrase again:
Your identification has been saved in /root/.ssh/id_rsa.
Your public key has been saved in /root/.ssh/id_rsa.pub. The key fingerprint is:
SHA256:xC3xX4oQfPDlziNkh1+alXccJYggt/5QcOd9kaoJkaY root@ci-node1 The key's randomart image is:
+---[RSA 2048]  +
|   ..Boo.o..o+|
|   +.&o*.. =o|
|   O.X + B =|
|   E B B O o.|
|   S + %   |
|   o + .   |
|   .   |
|   |
|   |
+----[SHA256]   +

[root@ci-node1 git_test]# ll /root/.ssh/
total 8
-rw 1 root root 1675 Aug 1 23:10 id_rsa
-rw-r--r-- 1 root root  395 Aug 1 23:10 id_rsa.pub

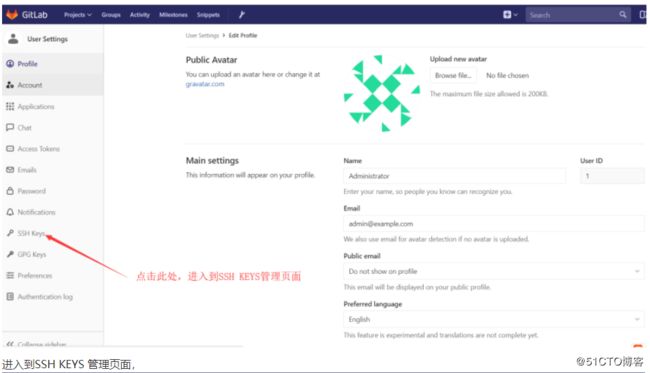
我们将该用户与 GitLab 的 root 用户绑定,复制用户的公钥,在 GitLab 主页面点击用户设置

6.2.10.6推送本地客户端仓库到 GitLab
首先我们要将GitLab 上的git_test 仓库配置为ci-node1 上git_test 仓库的远程仓库,

[root@ci-node1  git_test]#  git remote  add gitlab [email protected]:oldboy/git_test.git

[root@ci-node1 git_test]# git remote gitlab
其次,使用 git push 命令直接推送本地仓库的 master 分支到远程仓库。

[root@ci-node1 git_test]# git push -u gitlab master
The authenticity of host '10.0.0.11 (10.0.0.11)' can t be established.
ECDSA   key fingerprint is SHA256:/Mye5etA/3xRViWgkHVCoXGwWM/7UNYOnHDE3Dr82R4.
ECDSA   key fingerprint is MD5:83:8f:b2:af:39:0c:e0:31:f9:fc:30:23:cf:18:5f:ad.
Are you sure you want to continue connecting (yes/no)? yes
Warning: Permanently added '10.0.0.11' (ECDSA) to the list of known hosts. Counting objects: 24, done.
Delta compression using up to 2 threads. Compressing objects: 100% (17/17), done.
Writing objects: 100% (24/24), 1.91 KiB | 0 bytes/s, done. Total 24 (delta 6), reused 0 (delta 0)
To [email protected]:oldboy/git_test.git

[new branch]    master -> master
Branch master set up to track remote branch master from gitlab.
提示推送功能,我们在GitLab 上的git_test 仓库就可以看到我们推送上来的内容,

6.2.10.7克隆 GitLab 仓库到本地客户端

第二,使用git clone 命令克隆仓库到ci-node2 本地

[root@ci-node2 opt]# git clone [email protected]:oldboy/git_test.git
Cloning into 'git_test'...
The authenticity of host '10.0.0.11 (10.0.0.11)' can't be established.
ECDSA   key fingerprint is SHA256:/Mye5etA/3xRViWgkHVCoXGwWM/7UNYOnHDE3Dr82R4.
ECDSA   key fingerprint is MD5:83:8f:b2:af:39:0c:e0:31:f9:fc:30:23:cf:18:5f:ad.
Are you sure you want to continue connecting (yes/no)? yes
Warning: Permanently added '10.0.0.11' (ECDSA) to the list of known hosts. remote: Counting objects: 24, done.
remote: Compressing objects: 100% (17/17), done. remote: Total 24 (delta 6), reused 0 (delta 0) Receiving objects: 100% (24/24), done.
Resolving deltas: 100% (6/6), done.

[root@ci-node2 opt]# ll git_test/ total 4
-rw-r--r-- 1 root root 13 Aug 3 16:19 a.txt
-rw-r--r-- 1 root root  0 Aug 3 16:19 b
-rw-r--r-- 1 root root  0 Aug 3 16:19 c
-rw-r--r-- 1 root root  0 Aug 3 16:19 d
-rw-r--r-- 1 root root  0 Aug 3 16:19 e

[root@ci-node2 opt]# cd git_test/

[root@ci-node2 git_test]# git remote

origin

[root@ci-node2 git_test]#
我们可以看到已经将 GitLab 上的 git_test 仓库克隆到了 ci-node2
本地,同时为本地仓库添加了一个指向GitLab 上git_test 仓库的远程仓库。
我们ci-node2 的git_test 上创建一个dev 分支,并将dev 分支,推送到GitLab 上:

[root@ci-node2 git_test]# git checkout -b dev
Switched to a new branch 'dev'

[root@ci-node2 git_test]# git status
#On branch dev
nothing to commit, working directory clean
[root@ci-node2 git_test]# git push -u origin dev
Total 0 (delta 0), reused 0 (delta 0)
remote:
remote: To create a merge request for dev, visit:
remote: http://10.0.0.11/oldboy/git_test/merge_requests/new?merge_request%5Bso urce_branch%5D=dev
remote:
To [email protected]:oldboy/git_test.git
*[new branch]   dev -> dev
Branch dev set up to track remote branch dev from origin.
完成后,我们在GitLab 上可以看到我们刚推上来的dev 分支

6.2.10.8理解分支概念与fetch和pull

一端
[root@m02 clone]# git clone [email protected]:aawuliliaa/demo.git
Cloning into 'demo'...
remote: Enumerating objects: 75, done.
remote: Counting objects: 100% (75/75), done.
remote: Compressing objects: 100% (57/57), done.
remote: Total 90 (delta 28), reused 43 (delta 11), pack-reused 15
Receiving objects: 100% (90/90), 13.92 KiB | 0 bytes/s, done.
Resolving deltas: 100% (30/30), done.
[root@m02 clone]# ll
total 0
drwxr-xr-x 3 root root 59 Mar 28 18:54 demo
[root@m02 clone]# cd demo/-----根据内容查看,此时在master分支上
[root@m02 demo]# ll
total 4
-rw-r--r-- 1 root root 0 Mar 28 18:54 b.txt
-rw-r--r-- 1 root root 0 Mar 28 18:54 ooo
-rw-r--r-- 1 root root 6 Mar 28 18:54 README.md
[root@m02 demo]# git branch
* master
[root@m02 demo]# git branch -a
* master
  remotes/origin/HEAD -> origin/master
  remotes/origin/gh-dev
  remotes/origin/master
[root@m02 demo]#
[root@m02 demo]# git checkout gh-dev --切换到了gh-dev分支
**Branch gh-dev set up to track remote branch gh-dev from origin.**
Switched to a new branch 'gh-dev'
[root@m02 demo]# ll
total 8
-rw-r--r-- 1 root root 6 Mar 28 18:54 README.md
-rw-r--r-- 1 root root 5 Mar 28 18:57 wewe
-rw-r--r-- 1 root root 0 Mar 28 18:57 www
[root@m02 demo]# git branch
* gh-dev
  master
[root@m02 demo]# touch gh-dev   --在gh-dev分支上新建文件并提交
[root@m02 demo]# git add *

[root@m02 demo]# git commit -m "gh-dev"
[gh-dev a49c9bc] gh-dev
 1 file changed, 0 insertions(+), 0 deletions(-)
 create mode 100644 gh-dev
[root@m02 demo]# git push -u origin gh-dev
Counting objects: 3, done.
Compressing objects: 100% (2/2), done.
Writing objects: 100% (2/2), 218 bytes | 0 bytes/s, done.
Total 2 (delta 1), reused 0 (delta 0)
remote: Resolving deltas: 100% (1/1), completed with 1 local object.
To [email protected]:aawuliliaa/demo.git
   4f29167..a49c9bc  gh-dev -> gh-dev
Branch gh-dev set up to track remote branch gh-dev from origin.
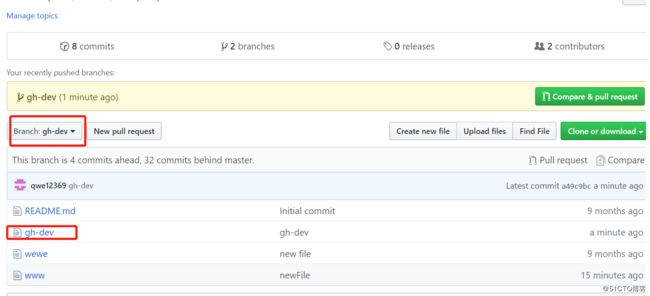
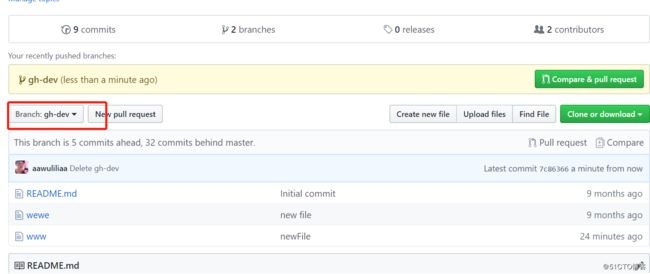
在平台上吧刚刚新建的文件删掉

[root@m02 demo]# git pull --pull之后,文件没有了
remote: Enumerating objects: 3, done.
remote: Counting objects: 100% (3/3), done.
remote: Compressing objects: 100% (2/2), done.
Unpacking objects: 100% (2/2), done.
remote: Total 2 (delta 1), reused 0 (delta 0), pack-reused 0
From github.com:aawuliliaa/demo
a49c9bc..7c86366 gh-dev -> origin/gh-dev
Updating a49c9bc..7c86366
Fast-forward
gh-dev | 0
1 file changed, 0 insertions(+), 0 deletions(-)
delete mode 100644 gh-dev

[root@m02 demo]# ll
total 8
-rw-r--r-- 1 root root 6 Mar 28 19:05 README.md
-rw-r--r-- 1 root root 5 Mar 28 19:05 wewe
-rw-r--r-- 1 root root 0 Mar 28 19:05 www

[root@m02 demo]#
下面验证下fetch

[root@m02 demo]# ll
total 8
-rw-r--r-- 1 root root 6 Mar 28 18:54 README.md
-rw-r--r-- 1 root root 5 Mar 28 18:57 wewe
-rw-r--r-- 1 root root 0 Mar 28 18:57 www

[root@m02 demo]# touch dev2 新建文件

[root@m02 demo]# git add *

[root@m02 demo]# git commit -m "fetch"

[gh-dev 1d9b799] fetch
1 file changed, 0 insertions(+), 0 deletions(-)
create mode 100644 dev2

[root@m02 demo]# git push -u origin gh-dev
Counting objects: 3, done.
Compressing objects: 100% (2/2), done.
Writing objects: 100% (2/2), 212 bytes | 0 bytes/s, done.
Total 2 (delta 1), reused 0 (delta 0)
remote: Resolving deltas: 100% (1/1), completed with 1 local object.
To [email protected]:aawuliliaa/demo.git
7c86366..1d9b799 gh-dev -> gh-dev
Branch gh-dev set up to track remote branch gh-dev from origin.
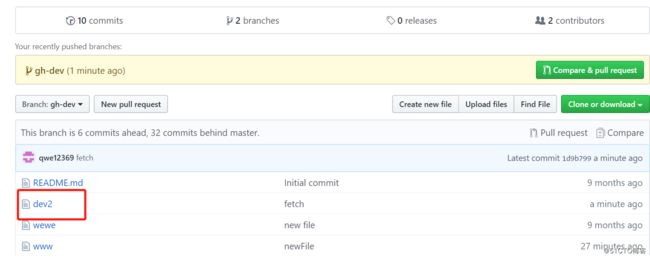
[root@m02 demo]# git branch

gh-dev
master
[root@m02 demo]#

[root@m02 demo]# ll
total 8
-rw-r--r-- 1 root root 6 Mar 28 19:05 README.md
-rw-r--r-- 1 root root 5 Mar 28 19:05 wewe
-rw-r--r-- 1 root root 0 Mar 28 19:05 www

[root@m02 demo]# git fetch --在另一端新建的文件在这边没看到
remote: Enumerating objects: 3, done.
remote: Counting objects: 100% (3/3), done.
remote: Compressing objects: 100% (1/1), done.
remote: Total 2 (delta 1), reused 2 (delta 1), pack-reused 0
Unpacking objects: 100% (2/2), done.
From github.com:aawuliliaa/demo
7c86366..1d9b799 gh-dev -> origin/gh-dev

[root@m02 demo]# ll
total 8
-rw-r--r-- 1 root root 6 Mar 28 19:05 README.md
-rw-r--r-- 1 root root 5 Mar 28 19:05 wewe
-rw-r--r-- 1 root root 0 Mar 28 19:05 www

[root@m02 demo]# git merge origin/gh-dev ---看到了dev2新文件
Updating 7c86366..1d9b799
Fast-forward
dev2 | 0
1 file changed, 0 insertions(+), 0 deletions(-)
create mode 100644 dev2

[root@m02 demo]# ll
total 8
-rw-r--r-- 1 root root 0 Mar 28 19:11 dev2
-rw-r--r-- 1 root root 6 Mar 28 19:05 README.md
-rw-r--r-- 1 root root 5 Mar 28 19:05 wewe
-rw-r--r-- 1 root root 0 Mar 28 19:05 www
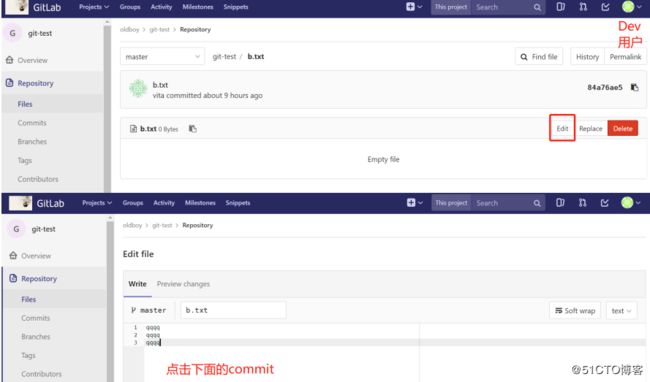
6.2.10.9创建合并请求


6.2.10.10设置保护分支
在实际使用过程中,我们通常会保持 master 分支稳定,用于生产环境的版本发布,只有授权的用户才可以向 master 合并代码。要实现此功能,我们需要将 master 设置为保护分支,并授权什么用户可以向master 用户推送代码。
使用root 用户点击git_test 仓库页面左下角的Settings

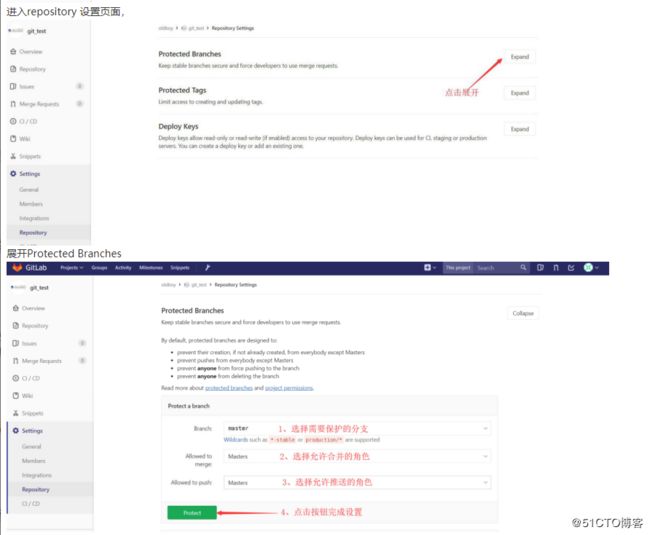
设置完成后,在仓库分支页面,可看到master 分支后面出现一个绿色的protected 标记。

此时我们再尝试在ci-node2 上推送master 分支到GitLab,

[root@ci-node2 git_test]# touch ci-node2

[root@ci-node2 git_test]# git status
#On branch master # Untracked files:
#(use "git add ..." to include in what will be committed) #
#ci-node2
nothing added to commit but untracked files present (use "git add" to track)

[root@ci-node2 git_test]# git add .

[root@ci-node2 git_test]# git commit -m "commit ci-node2 on ci-node2"

[master 291395b] commit ci-node2 on ci-node2
1 file changed, 0 insertions(+), 0 deletions(-)
create mode 100644 ci-node2

[root@ci-node2 git_test]# git push -u origin master
Counting objects: 3, done.
Delta compression using up to 2 threads. Compressing objects: 100% (2/2), done.
Writing objects: 100% (2/2), 232 bytes | 0 bytes/s, done. Total 2 (delta 1), reused 0 (delta 0)
remote: GitLab: You are not allowed to push code to protected branches on this project.
To [email protected]:oldboy/git_test.git
! [remote rejected] master -> master (pre-receive hook declined) error: failed to push some refs to '[email protected]:oldboy/git_test.git'
我们发现此时我们已经不能在 ci-node2 上向 GitLab 上推送 master 分支,因为我们ci-node2 绑定的是 dev 用户,dev 用户属于 developer 角色,master 分支不允许 developer 角色向其推送内容。
6.2.11GitLab 备份、恢复、升级
对gitlab 进行备份将会创建一个包含所有库和附件的归档文件。对备份的恢复只能恢复到与备份时的gitlab 相同的版本。
将 gitlab 迁移到另一台服务器上的最佳方法就是通过备份和还原。gitlab 提供了一个简单的命令行来备份整个 gitlab,并且能灵活的满足需求。
6.2.11.1备份配置
备份文件将 保存在配置文 件中定义的 backup_path 中,文 件名 为TIMESTAMP_gitlab_backup.tar,TIMESTAMP 为备份时的时间戳。TIMESTAMP 的格式为: EPOCH_YYYY_MM_DD_Gitlab-version。
默认的备份文件目录为:/var/opt/gitlab/backups,如果自定义备份目录需要赋予目录git 权限,具体操作如下:
配置文件中加入
gitlab_rails['backup_path'] = '/data/backup/gitlab'
gitlab_rails['backup_keep_time'] = 604800   #备份保留的时间(以秒为单位, 这个是七天默认值),
在命令行执行如下命令

[root@ci-node1 git_test] # mkdir /data/backup/gitlab -p

[root@ci-node1 git_test] # chown -R git.git /data/backup/gitlab

[root@ci-node1 git_test] # gitlab-ctl reconfigure
6.2.11.2手动备份
在命令执行:gitlab-rake gitlab:backup:create 生成一次备份。

[root@ci-node1 git_test]# gitlab-rake gitlab:backup:create
Dumping database ...
Dumping PostgreSQL database gitlabhq_production ... [DONE] done
Dumping repositories ...

oldboy/git_test ... [DONE]
oldboy/git_test.wiki ... [SKIPPED] done
Dumping uploads ... done
Dumping builds ... done
Dumping artifacts ... done
Dumping pages ... done
Dumping lfs objects ... done
Dumping container registry images ... [DISABLED]
Creating    backup  archive: 1533288168_2018_08_03_10.2.2_gitlab_backup.tar ... done
Uploading backup archive to remote storage ... skipped Deleting tmp directories ... done
done done
Deleting old backups ... done. (0 removed) [root@ci-node1 git_test]# ll /data/backup/gitlab/ total 80
-rw-------  1   git git 81920   Aug 3   17:22
1533288168_2018_08_03_10.2.2_gitlab_backup.tar
我们看到在设定的目录中生成了对应的备份文件。
6.2.11.3定时备份
通过在定时任务里添加:

0 2 * * * /opt/gitlab/bin/gitlab-rake gitlab:backup:create CRON=1

我们来实现定时备份,由于代码是一个企业非常重要的资产,所以我们要重视 GitLab 的备份工作。至少做到每天备份一次,平时要注意检查备份的完整性。
环境变量CRON=1 的作用是如果没有任何错误发生时, 抑制备份脚本的所有进度输出
6.2.11.4恢复实践
GitLab 的恢复只能还原到与备份文件相同的 gitlab 版本的系统中,恢复时,停止连接到数据库的进程(也就是停止数据写入服务),但是保持 GitLab 是运行的。

[root@ci-node1 git_test]# gitlab-ctl stop unicorn
ok: down: unicorn: 0s, normally up

[root@ci-node1 git_test]#   gitlab-ctl stop sideki

[root@ci-node1 git_test]# gitlab-ctl status
run: gitaly: (pid 46031) 25295s;
run: log: (pid 8831) 68406s
run: gitlab-monitor: (pid 46042) 25294s;
run: log: (pid 9000) 68380s
run: gitlab-workhorse: (pid 46051) 25294s;
run: log: (pid 8898) 68400s
run: logrotate: (pid 26776) 93s;
run: log: (pid 8930) 68393s
run: nginx: (pid 46068) 25293s;
run: log: (pid 8906) 68399s
run: node-exporter: (pid 46074) 25292s;
run: log: (pid 8978) 68387s
run: postgres-exporter: (pid 46079) 25292s;
run: log: (pid 9107) 68362s
run: postgresql: (pid 46126) 25291s;
run: log: (pid 8649) 68455s
run: prometheus: (pid 46134) 25291s;
run: log: (pid 9071) 68368s
run: redis: (pid 46142) 25291s;
run: log: (pid 8589) 68467s
run: redis-exporter: (pid 46146) 25290s;
run: log: (pid 9050) 68374s
run: sidekiq: (pid 25878) 524s;
run: log: (pid 8811) 68412s
down: unicorn: 33s, normally up;
run: log: (pid 8772) 68418s

接下来执行gitlab 恢复操作:

[root@ci-node1  git_test]#  gitlab-rake gitlab:backup:restore
BACKUP=1533288168_2018_08_03_10.2.2
整个恢复执行过程中,我们可以看到基本是在删除表,创建表
6.2.11.5升级
首先,下载新版本的RPM 包,可以通过官网或者清华镜像站获取。其次关闭部分gitlab 服务
gitlab-ctl stop unicorn
gitlab-ctl stop sidekiq
gitlab-ctl stop nginx

执行升级操作
rpm -Uvh gitlab-ce-10.0.4-ce.0.el7.x86_64.rpm
重新配置gitlab 重启gitlab 服务
注:升级操作不建议进行。如果确实需要,也可以采取在一台新的服务器上安装新版本的Gitlab,然后采用导入库的方式将旧系统的代码仓库导入到新 Gitlab 上。


