准备 Angular 2 环境
ng-bootstrap 是基于 Angular 2 的, 因此需要先准备 Angular 2 的环境。
使用 ng-bootstrap
下载 ng-bootstrap
ng-bootstrap 使用 bootstrap 4.0 alpha2 , 因此需要先下载 bootstrap , 推荐使用 npm 包的形式:
npm install [email protected] --save
接着下载 ng-bootstrap , 同样使用 npm 包的形式:
npm install @ng-bootstrap/ng-bootstrap --save
修改 systemjs.config.js
现在需要修改一下 systemjs.config.js 文件, 让 SystemJS 能够正确加载 ng-bootstrap :
// map tells the System loader where to look for things
var map = {
 'app':      'dist', // 'dist',
 '@angular':     'node_modules/@angular',
 'angular2-in-memory-web-api': 'node_modules/angular2-in-memory-web-api',
 'rxjs':      'node_modules/rxjs',
 // add ng-bootstrap location map
 '@ng-bootstrap':    'node_modules/@ng-bootstrap'
};
// packages tells the System loader how to load when no filename and/or no extension
var packages = {
 'app': { main: 'main.js', defaultExtension: 'js', format: 'amd' },
 'rxjs': { defaultExtension: 'js' },
 'angular2-in-memory-web-api': { main: 'index.js', defaultExtension: 'js' },
 // add ng-bootstrap package config
 '@ng-bootstrap/ng-bootstrap': { main: 'index.js', defaultExtension: 'js' }
};
修改 index.html
index.html 文件也要修改一下, 把 bootstrap 的样式表关联进来:
修改 app.component.ts
还需要修改一下 app.component.ts 文件, 导入 ng-bootstrap 的指令:
import { Component, OnInit } from '@angular/core';
import { HTTP_PROVIDERS } from '@angular/http';
import { provideRouter, ROUTER_DIRECTIVES } from '@angular/router';
// import ng-bootstrap directives
import { NGB_DIRECTIVES, NGB_PRECOMPILE } from '@ng-bootstrap/ng-bootstrap';

import { routes } from './app.routes';

@Component({
 //moduleId: module.id,
 selector: 'app',
 providers: [ HTTP_PROVIDERS ],
 templateUrl: 'dist/app.component.html',
 styleUrls: ['dist/app.component.css'],
 // ng-bootstrap required precompile directives
 precompile: [NGB_PRECOMPILE],
 // add ng-bootstrap directives to app
 directives: [
  ROUTER_DIRECTIVES, NGB_DIRECTIVES
 ],
 pipes: []
})
export class AppComponent implements OnInit {

 ngOnInit() {
 }

}
ng-bootstrap 以指令 (directive) 的形式提供组件, 方便在 html 视图中使用, 选择器 (selector) 使用同一的前缀 ngb , 类名则统一使用 Ngb 前缀。
接下来就可以使用 ng-bootstrap 的组件了, 接下来以 NgbAlert 为例说明 ng-bootstrap 的用法。
NgbAlert 的 selector 是 ngb-alert , 支持的 Input 有 dismissible 和 type , Output 有 close 。
接下来看一个 NgbAlert 的例子:
Warning! Better check yourself, you're not looking too good.
显示效果如下:
再来一个稍微复杂一点儿的, 在 app.component.ts 文件中添加下面的代码:
export class AppComponent implements OnInit {

 alert: IAlert[];

 ngOnInit() {
  this.alert = [
   {
    id: 1,
    type: 'success',
    message: 'This is an success alert',
   },
   {
    id: 2,
    type: 'info',
    message: 'This is an info alert',
   },
   {
    id: 3,
    type: 'warning',
    message: 'This is a warning alert',
   },
   {
    id: 4,
    type: 'danger',
    message: 'This is a danger alert',
   }
  ];
 }

 closeAlert(alert: IAlert) {
  const index: number = this.alerts.indexOf(alert);
  this.alerts.splice(index, 1);
 }
}

interface IAlert {
 id: number;
 type: string;
 message: string;
}
在对应的 html 文件中添加 *ngFor 指令, 绑定 alerts 数组:
\{\{ alert.message }}
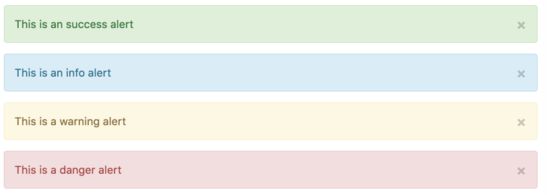
现在得到的效果如下图所示:
ng-bootstrap 还有更多的组件, 就不一一列举了。
总结
实现 ng-bootstrap 的人还是原来做 angular-ui 的那些人, 可以说配方还是原来的配方, 但是这味道么就跟原来有很大的不同了, 完全切换到了 Angular2 的风格。
不过总的来说, ng-bootstrap 的推出将会极大的推进 Angular 2 在实际项目中的应用, 而不只是停留在 demo 阶段, 因为 AngularJS 1.x 时期, 很多项目都是以 AngularJS + UI-Bootstrap 为基础的, 现在有了 Angular 2 的 ng-bootstrap , 相信已经由很多人蠢蠢欲动了吧!以上就是这篇文章的全部内容了,希望本文的内容对大家的学习或者工作能带来一定的帮助,如果有疑问大家可以留言交流。

