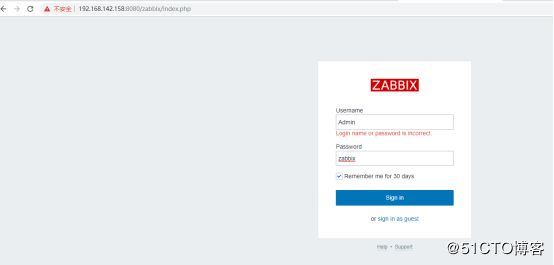
一、环境准备
| NAME | 宿主机 | Nginx1 | APP1 | APP2 | NFS | mysql-master | mysql-slave | Zabbix |
|---|---|---|---|---|---|---|---|---|
| IP | 192.168.142.158 | 172.19.0.11 | 172.19.0.111 | 172.19.0.112 | 172.19.0.1 | 172.19.0.201 | 172.19.0.202 | 172.19.0.254 |
其中宿主机是centos7.6系统,docker版本是1.13.1。
网站架构如下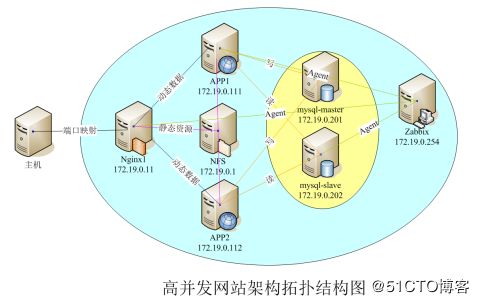
二、配置测试网络环境
1.配置centos7虚拟机环境,安装docker并配置本地仓库
1)设置网络为nat模式,编辑网卡配置文件,使得虚拟机能够访问互联网
2)检查安装docker,修改/etc/docker/daemon.json文件,配置本地仓库
{
  "insecure-registries": ["172.18.74.119"]
}
3)删除所有容器和镜像,删除docker创建的网络
#docker ps -a
#docker rm -f 容器id
#docker images
#docker rmi 镜像id
#docker network ls
#docker network rm 网络id
4)重新加载daemon配置,并重启docker
#systemctl daemon-reload
#systemctl restart docker
2.从ftp服务器下载启动centos7虚拟机,从本地仓库下载测试所需4个镜像(也可以从dockerhub的dockerliuxc/netlab镜像仓库中拉取)
#docker  pull 172.18.74.119/netlab/nginx
#docker  pull 172.18.74.119/netlab/php-apache
#docker  pull 172.18.74.119/netlab/mysql
#docker  pull 172.18.74.119/netlab/zabbix
3.创建docker网络,根据拓扑图要求,按指定IP启动6个容器(nginx1、APP1、APP2、mysql-master、mysql-slave、zabbix)
#docker network create --subnet=172.19.0.0/16 cluster
#docker run -d --privileged --net cluster --ip 172.19.0.11 -p 80:80 --name nginx1 172.18.74.119/netlab/nginx  /usr/sbin/init
#docker run -d --privileged --net cluster --ip 172.19.0.111 --name APP1 172.18.74.119/netlab/php-apache  /usr/sbin/init
#docker run -d --privileged --net cluster --ip 172.19.0.112 --name APP2 172.18.74.119/netlab/php-apache  /usr/sbin/init
#docker run -d --privileged --net cluster --ip 172.19.0.201 --name mysql-master 172.18.74.119/netlab/mysql  /usr/sbin/init
#docker run -d --privileged --net cluster --ip 172.19.0.202 --name mysql-slave 172.18.74.119/netlab/mysql  /usr/sbin/init
#docker run -d --privileged --net cluster --ip 172.19.0.254 -p 8080:80 --name zabbix 172.18.74.119/netlab/zabbix  /usr/sbin/init
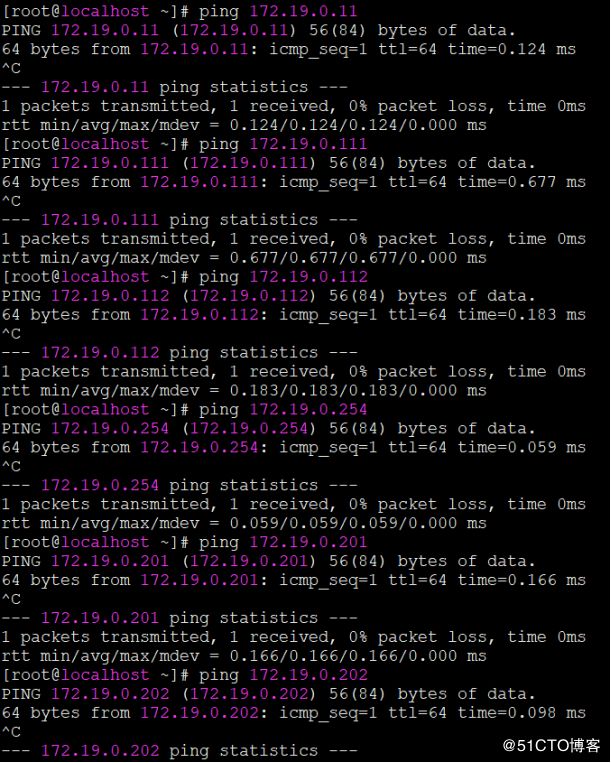
4.在linux宿主机能ping通nginx1、APP1、mysql-master、zabbix
三、配置nginx1和APP1、APP2实现负载均衡
- 编辑APP1和APP2的httpd.conf文件,配置web主目录为/var/www;
[root@localhost ~]# docker exec -it APP1 bash
[root@ece96d9f5f13 /]# vi /etc/httpd/conf/httpd.conf
[root@ece96d9f5f13 /]# cat  /etc/httpd/conf/httpd.conf |grep Documentroot
[root@ece96d9f5f13 /]# cat  /etc/httpd/conf/httpd.conf |grep DocumentRoot
#DocumentRoot: The directory out of which you will serve your
DocumentRoot "/var/www"
   #access content that does not live under the DocumentRoot.
APP2同上
2.在APP1和APP2的/var/www目录下编辑index.php文件;
APP1:
[root@ece96d9f5f13 www]# vi index.php
[root@ece96d9f5f13 www]# cat index.php
[email protected]
APP2:
[root@570244a8a296 www]# vi index.php
[root@570244a8a296 www]# cat index.php
[email protected]
3.在nginx1配置一般轮询负载均衡,后端服务器为APP1和APP2,nginx1配置文件
[root@localhost ~]# docker exec -it nginx1 bash
[root@b67c1232dc59 /]# vi /etc/nginx/conf.d/default.conf

server {
    listen       80;
    server_name  localhost;
    location / {
     proxy_pass http://APP;
    }

}
upstream APP {
   server 172.19.0.111;
   server 172.19.0.112;
}
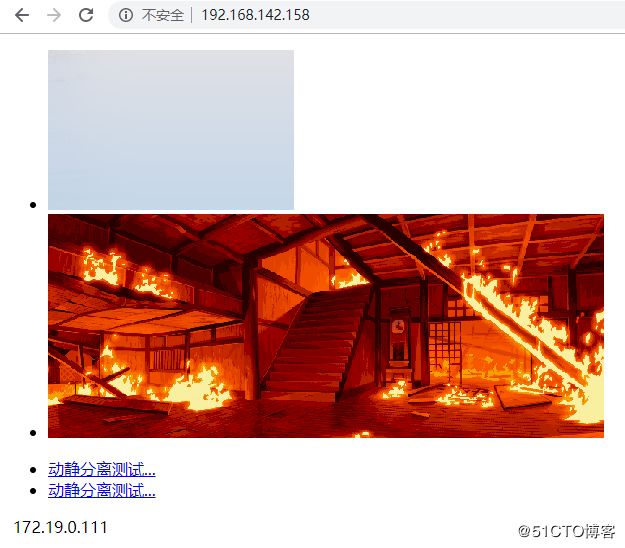
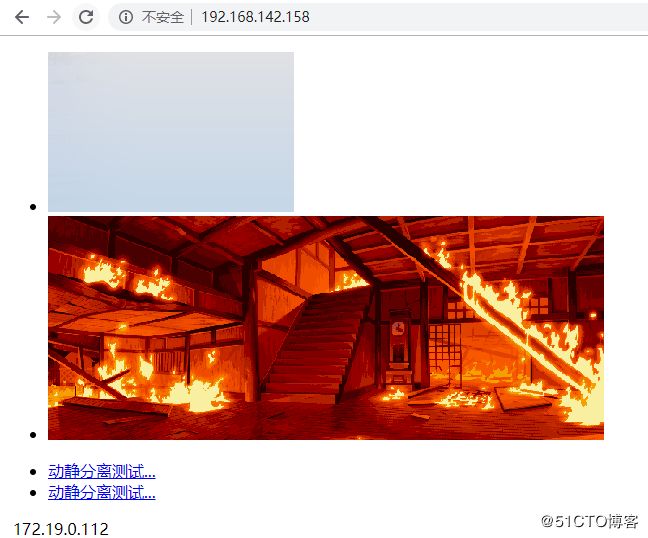
4.在主机浏览器访问“http://宿主机 ens32地址,可以分别看到“APP1@IP地址”和“APP2@IP地址”。
四、配置宿主机nfs实现文件共享和和动静分离
1.在宿主机安装nfs-utils,启动nfs服务,配置共享目录。上传自己的照片文件my.jpg到宿主机的共享目录中;
[root@localhost ~]# yum install nfs-utils -y
[root@localhost ~]# systemctl start nfs
[root@localhost ~]# vim /etc/sysconfig/nfs
[root@localhost ~]# systemctl start rpcbind
[root@localhost ~]# systemctl start nfs
[root@localhost www]# mkdir -p /var/www/share
[root@localhost www]# chmod 777 /var/www/share/
[root@localhost www]# vi /etc/exports
/var/www/share 172.19.0.*(rw,sync)注意//172.19开头的IP都可以访问share目录,星号后面没空格 ro只读,rw读写
上传图片到/var/www/share目录下

2.在APP1和APP2上安装nfs-utils,查看nfs上的共享目录,并挂载到本地/var/www/share
[root@570244a8a296 www]# yum install nfs-utils -y
[root@570244a8a296 www]# showmount -e 172.19.0.1
Export list for 172.19.0.1:
/var/www/share 172.19.0.*
[root@570244a8a296 www]# mkdir /var/www/share
[root@570244a8a296 www]# mount 172.19.0.1:/var/www/share /var/www/share
3.在APP1和APP2的/var/www目录下编辑index.php文件
动静分离测试
4.在nginx1配置动静分离,动态内容请求APP1和APP2,静态资源请求宿主机,nginx1配置文件
[root@b67c1232dc59 /]# vi /etc/nginx/conf.d/default.conf
server {
    listen       80;
    server_name  localhost;
    location / {
     proxy_pass http://APP;
    }
   location ~.(gif|jpg|jpeg|png|bmp|swf|css|js)$ {
          proxy_pass http://172.19.0.1:81;

}
}
upstream APP {
   server 172.19.0.111;
   server 172.19.0.112;
}
5.在主机浏览器访问http:// ens32地址时分别看到“APP1@IP地址”和“APP2@IP地址”,都能显示自己的照片。
五、配置mysql实现主从复制和读写分离
1.编辑/etc/my.cnf文件,配置mysql-master和mysql-slave的server-id,开启master的binlog日志,启动mysqld服务,在mysql-master上show master status;
[root@localhost ~]# docker exec -it mysql-master bash
[root@8475a892f7c4 /]# vi /etc/my.cnf
在[mysqld]下添加
server-id=1
log-bin=mysql-bin
binlog_format=mixed
[root@localhost ~]# docker exec -it mysql-slave bash
[root@7b656287a94b /]# vi /etc/my.cnf在[mysqld]下添加
server-id=2在master上:
[root@8475a892f7c4 /]# mysql -u root -p
Enter password:
Welcome to the MySQL monitor.  Commands end with ; or \g.
Your MySQL connection id is 9
Server version: 5.6.44-log MySQL Community Server (GPL)

Copyright (c) 2000, 2019, Oracle and/or its affiliates. All rights reserved.

Oracle is a registered trademark of Oracle Corporation and/or its
affiliates. Other names may be trademarks of their respective
owners.

Type 'help;' or '\h' for help. Type '\c' to clear the current input statement.

mysql> show master status;
+------------------+----------+--------------+------------------+-------------------+
| File             | Position | Binlog_Do_DB | Binlog_Ignore_DB | Executed_Gtid_Set |
+------------------+----------+--------------+------------------+-------------------+
| mysql-bin.000002 |      790 |              |                  |                   |
+------------------+----------+--------------+------------------+-------------------+
1 row in set (0.00 sec)

mysql>
2.在mysql-master上创建测试数据库、数据表并插入数据;在master上授权给复制用户;

mysql>grant replication slave on . to rep@'172.19.0.202' identified by '123';
3.导出master的数据库并导入到slave上,在slave上配置复制参数并开启复制,show slave status \G查看复制状态
[root@8475a892f7c4 /]# mysqldump -u root -p --all-databases | gzip > /root/database_`date '+%m-%d-%Y'`.sql.gz
[root@localhost ~]# docker cp 8475a892f7c4:/root/database_06-18-2019.sql.gz ./
[root@localhost ~]# docker cp ./database_06-18-2019.sql.gz 7b656287a94b:/root
[root@mysql-slave ~]# gzip -d database_06-18-2019.sql.gz
[root@mysql-slave ~]# mysql -u root -p  CHANGE MASTER TO MASTER_HOST='172.19.0.201', MASTER_USER='rep', MASTER_PASSWORD='123', MASTER_LOG_FILE='mysql-bin.000002', MASTER_LOG_POS=790;

mysql> show slave status\G;
*************************** 1. row ***************************
               Slave_IO_State: Waiting for master to send event
                  Master_Host: 172.19.0.201
                  Master_User: rep
                  Master_Port: 3306
                Connect_Retry: 60
              Master_Log_File: mysql-bin.000002
          Read_Master_Log_Pos: 790
               Relay_Log_File: mysqld-relay-bin.000002
                Relay_Log_Pos: 745
        Relay_Master_Log_File: mysql-bin.000002
             Slave_IO_Running: Yes
            Slave_SQL_Running: Yes
              Replicate_Do_DB:
          Replicate_Ignore_DB:
           Replicate_Do_Table:
       Replicate_Ignore_Table:
      Replicate_Wild_Do_Table:
  Replicate_Wild_Ignore_Table:
                   Last_Errno: 0
                   Last_Error:
                 Skip_Counter: 0
          Exec_Master_Log_Pos: 790
              Relay_Log_Space: 919
              Until_Condition: None
               Until_Log_File:
                Until_Log_Pos: 0
           Master_SSL_Allowed: No
           Master_SSL_CA_File:
           Master_SSL_CA_Path:
              Master_SSL_Cert:
            Master_SSL_Cipher:
               Master_SSL_Key:
        Seconds_Behind_Master: 0
Master_SSL_Verify_Server_Cert: No
                Last_IO_Errno: 0
                Last_IO_Error:
               Last_SQL_Errno: 0
               Last_SQL_Error:
  Replicate_Ignore_Server_Ids:
             Master_Server_Id: 1
                  Master_UUID: c9db6142-8bfd-11e9-b3b7-0242ac110002
             Master_Info_File: /var/lib/mysql/master.info
                    SQL_Delay: 0
          SQL_Remaining_Delay: NULL
      Slave_SQL_Running_State: Slave has read all relay log; waiting for the slave I/O thread to update it
           Master_Retry_Count: 86400
                  Master_Bind:
      Last_IO_Error_Timestamp:
     Last_SQL_Error_Timestamp:
               Master_SSL_Crl:
           Master_SSL_Crlpath:
           Retrieved_Gtid_Set:
            Executed_Gtid_Set:
                Auto_Position: 0
1 row in set (0.00 sec)

ERROR:
No query specified
4.在APP1上安装mysql-proxy并配置读写分离,编辑mysql-proxy.cnf配置文件
[root@ece96d9f5f13 www]# wget http://ftp.ntu.edu.tw/pub/MySQL/Downloads/MySQL-Proxy/mysql-proxy-0.8.5-linux-glibc2.3-x86-64bit.tar.gz

[root@ece96d9f5f13 www]# tar -zxvf mysql-proxy-0.8.5-linux-glibc2.3-x86-64bit.tar.gz
[root@ece96d9f5f13 www]# mv mysql-proxy-0.8.5-linux-glibc2.3-x86-64bit /usr/local/mysql-proxy
[root@ece96d9f5f13 www]# cd /usr/local/mysql-proxy
[root@ece96d9f5f13 mysql-proxy]# mkdir lua
[root@ece96d9f5f13 mysql-proxy]# mkdir logs
[root@ece96d9f5f13 mysql-proxy]# ls
bin  include  lib  libexec  licenses  logs  lua  lus  share
[root@ece96d9f5f13 mysql-proxy]# cp  share/doc/mysql-proxy/rw-splitting.lua ./lua
[root@ece96d9f5f13 mysql-proxy]# cp share/doc/mysql-proxy/admin-sql.lua ./lua
[root@ece96d9f5f13 mysql-proxy]# vi /etc/mysql-proxy.cnf
[mysql-proxy]
user=root
admin-username=myproxy
admin-password=123456
proxy-address=127.0.0.1:3306
proxy-read-only-backend-addresses=172.19.0.202
proxy-backend-addresses=172.19.0.201
proxy-lua-script=/usr/local/mysql-proxy/lua/rw-splitting.lua
admin-lua-script=/usr/local/mysql-proxy/lua/admin-sql.lua
log-file=/usr/local/mysql-proxy/logs/mysql-proxy.log
log-level=info
[root@ece96d9f5f13 mysql-proxy]# chmod 660 /etc/mysql-proxy.cnf
[root@ece96d9f5f13 mysql-proxy]# vi /usr/local/mysql-proxy/lua/rw-splitting.lua
if not proxy.global.config.rwsplit then
 proxy.global.config.rwsplit = {
  min_idle_connections = 1, #默认超过4个连接数时,才开始读写分离,改为1
  max_idle_connections = 1, #默认8,改为1
  is_debug = false
 }
end
[root@ece96d9f5f13 mysql-proxy]# /usr/local/mysql-proxy/bin/mysql-proxy --defaults-file=/etc/mysql-proxy.cnf --daemon
5.检查点1:在master上插入数据,slave上能够查询。
master:mysql> insert into users(user_name,user_passwd) values ("liu2",passwd("456"));
slave:
mysql> select * from ttt.users;
+-----------+-------------------------------------------+
| user_name | user_passwd                               |
+-----------+-------------------------------------------+
| liu       | *23AE809DDACAF96AF0FD78ED04B6A265E05AA257 |
| liu2      | *531E182E2F72080AB0740FE2F2D689DBE0146E04 |
+-----------+-------------------------------------------+
2 rows in set (0.00 sec)
6.在APP1上连接本机mysql-proxy,测试读写分离
[root@ece96d9f5f13 mysql-proxy]# mysql -umyproxy -h127.0.0.1 -p123456 -e "select * from ttt.users;"
Warning: Using a password on the command line interface can be insecure.
+-----------+-------------------------------------------+
| user_name | user_passwd                               |
+-----------+-------------------------------------------+
| liu       | *23AE809DDACAF96AF0FD78ED04B6A265E05AA257 |
| liu2      | *531E182E2F72080AB0740FE2F2D689DBE0146E04 |
+-----------+-------------------------------------------+
六、配置zabbix主机监控系统,监控nginx1、APP1、mysql-slave
zabbix镜像已经做好,具体步骤如下:
步骤1:启动容器安装apache和php环境
1)启动centos容器并进入docker run -d --privileged --net cluster --ip 172.18.0.254 -p 80:80 --name zabbix mysql /usr/sbin/init
2)安装启用中文语言包
yum install kde-l10n-Chinese
localedef -c -f UTF-8 -i zh_CN zh_CN.utf8
3)安装apache 和php
yum install httpd -y
yum install php-common php-gd php-mbstring php-xml php-bcmath php-mysql php-cli php-devel php-pear -y
4)编写info.php在主机用浏览器访问, 截图
步骤2:使用yum方式安装zabbix
官方文档https://www.zabbix.com/cn/download
1)安装zabbix的yum源
rpm -Uvh https://repo.zabbix.com/zabbix/4.2/rhel/7/x86_64/zabbix-release-4.2-1.el7.noarch.rpm
2)安装Zabbix server,Web前端,agentyum install zabbix-server-mysql zabbix-web-mysql zabbix-agent -y
4)编写info.php在主机用浏览器访问
步骤2:使用yum方式安装zabbix
官方文档https://www.zabbix.com/cn/download
1)安装zabbix的yum源rpm -Uvh https://repo.zabbix.com/zabbix/4.2/rhel/7/x86_64/zabbix-release-4.2-1.el7.noarch.rpm
2)安装Zabbix server,Web前端,agentyum install zabbix-server-mysql zabbix-web-mysql zabbix-agent
步骤3:配置容器提交为zabbix 镜像
1)设置mysqld、httpd为自启动
systemctl enable mysqld
systemctl enable httpd2)提交容器为镜像docker commit 容器ID zabbix
这里需要注意在容器里安装zabbix后
在/usr/share/doc/下面不会有zabbix-server-mysql zabbix-web-mysql zabbix-agent这三个文件,需要从主机安装一遍zabbix然后把文件拷贝到容器里再提交为镜像。过程比较繁琐,直接拉取镜像就好。
进入zabbix容器
进入数据库
mysql> create database zabbix character set utf8 collate utf8_bin;
mysql> grant all privileges on zabbix.* to zabbix@localhost identified by '123456';初始化数据库[root@43fbe3017c3e /]# zcat /usr/share/doc/zabbix-server-mysql-4.2.3/create.sql.gz | mysql -uzabbix -p123456 zabbix
等待一段时间
启动Zabbix Server进程
//在zabbix_server.conf中编辑数据库配置
[root@43fbe3017c3e /]# vi /etc/zabbix/zabbix_server.conf
DBHost=localhost
DBName=zabbix
DBUser=zabbix
DBPassword=123456
启动Zabbix Server进程[root@43fbe3017c3e /]# systemctl start zabbix-server
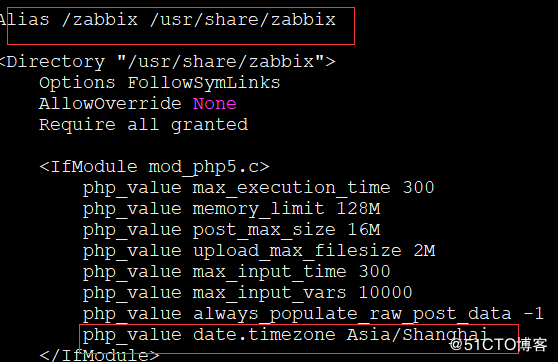
编辑Zabbix前端的PHP配置
[root@43fbe3017c3e /]# vi /etc/httpd/conf.d/zabbix.conf
php_value date.timezone Asia/Shanghai
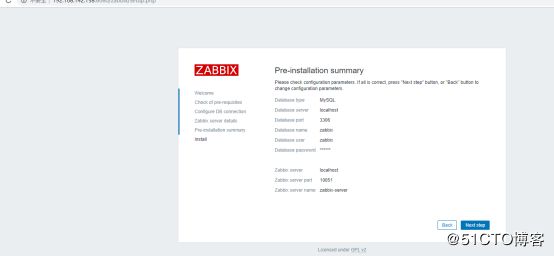
5)重启httpd服务,使用web界面完成zabbix安装
[root@43fbe3017c3e /]# systemctl restart httpd
在主机浏览器访问http://zabbix IP:8080/zabbix

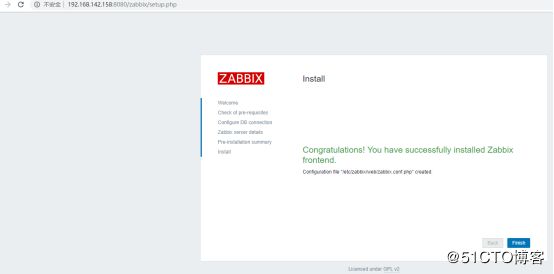
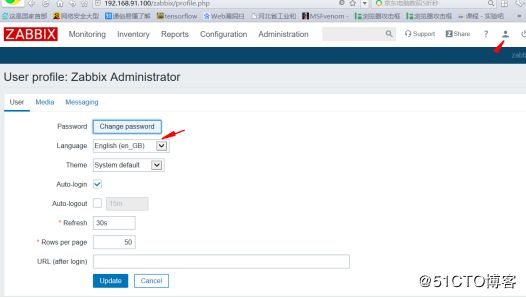
6)在web界面登录zabbix,用户名密码为Admin:zabbix,修改为中文界面
步骤1:在被监控主机安装启用zabbix agent
1)安装zabbix的yum源rpm -Uvh https://repo.zabbix.com/zabbix/4.2/rhel/7/x86_64/zabbix-release-4.2-1.el7.noarch.rpm
2)安装zabbix agentyum install zabbix-agent -y
3)编辑zabbix_agentd.confvi /etc/zabbix/zabbix_agentd.conf
//更改Server即可Server=172.18.0.254
4)启用zabbix agent服务systemctl start zabbix-agent
步骤2:在监控主机操作zabbix
1)、添加主机
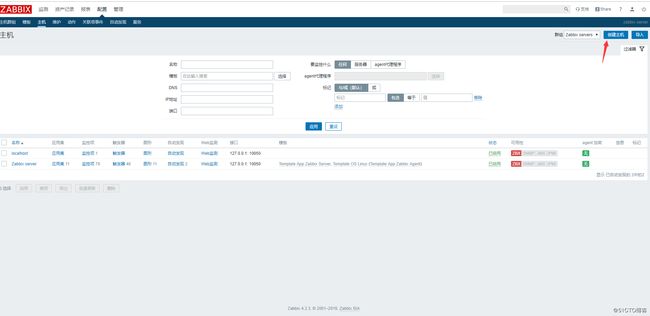


2)、添加监控项


3)、创建图形
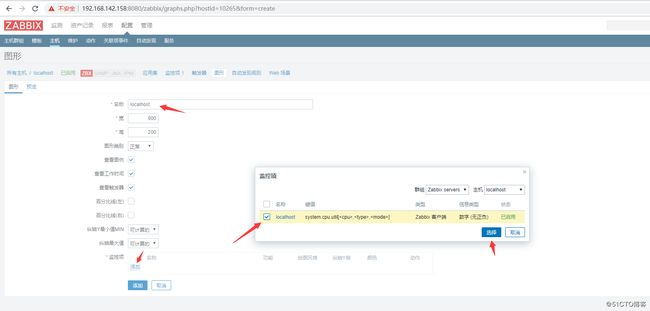
4)监测图形,查看监测图形显示主机cpu使用状态
5)监测聚合图形
最后两步不能正常显示仍在完善。
