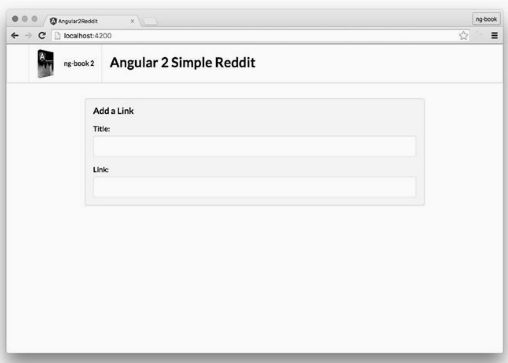
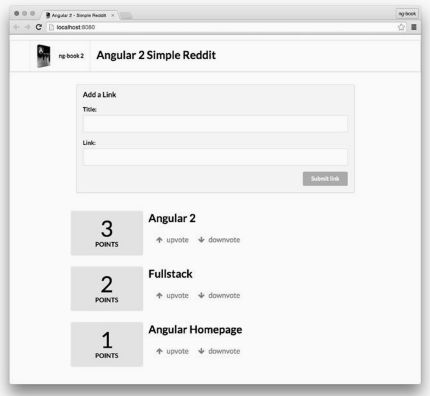
仿制Reddit网站
读完本章之后, 你将掌握如何构建基本的Angular应用。
- 简单的应用将涵盖Angular中的大部分基本要素
- 构建自定义组件;
- 从表单中接收用户输入
- 把对象列表渲染到视图中
- 拦截用户的点击操作, 并据此作出反应
起步
TypeScript[1]
- 使用TypeScript, 首先需要安装Node.js
我必须用TypeScript吗? 并非如此! 要使用 Angular,TypeScript 并不是必需的, 但它可能是最好的选择。 Angular也有一套 ES5 API, 但Angular本身就是用 TypeScript 写成的, 所以人们一般也会选用它。 本书也将使用TypeScript, 因为它确实很棒, 能让 Angular 写起来更简单。 当然, 并不是非它不可
- 使用NPM[2]安装TypeScript
$ npm install -g typescript
angular-cli
Angular提供了一个命令行工具angular-cli, 它能让用户通过命令行创建和管理项目。在本章中, 我们就用它来创建第一个应用
- 安装angular-cli
   //安装完毕之后, 你就可以在命令行中用ng命令运行它了
   $ npm install -g [email protected]
   //不带参数运行ng命令时, 它就会执行默认的help命令。 help命令会解释如何使用本工具
$ ng
Could not start watchman; falling back to NodeWatcher for file system events.
Visit http://ember-cli.com/user-guide/#watchman for more info.
Usage: ng
-
OS X 用户
* 安装Homebrew工具 通过 Homebrew 工具来安装 watchman
* 安装 watchman 的工具,帮助 angular-cli 监听文件系统的变化```javascript // 安装Homebrew工具后 可使用此命令 $ brew install watchman ``` Linux 用户:学习如何安装watchman
Windows 用户:不必安装任何东西, angular-cli将使用原生的 Node.js 文件监视器
示例项目
- 运行ng new命令(最新版好像不能使用‘_’和‘angular’关键字,会提示警告)
$ ng new angular2_hello_world //练习时命名 helloWorld 可以通过
//运行之后输出:
installing ng 2
create .editorconfig
create README.md
create srcappapp.component.css
create srcappapp.component.html
create srcappapp.component.spec.ts
create srcappapp.component.ts
create srcappapp.module.ts
create srcappindex.ts
create srcappshared/index.ts
create src/assets/.gitkeep
create src/assets/.npmignore
create src/environments/environment.dev.ts
create src/environments/environment.prod.ts
create src/environments/environment.ts
create src/favicon.ico
create src/index.html
create src/main.ts
create src/polyfills.ts
create src/styles.css
create src/test.ts
create src/tsconfig.jsoncreate src/typings.d.ts
create angular-cli.json
create e2e/app.e2e-spec.ts
create e2e/app.po.ts
create e2e/tsconfig.json
create .gitignore
create karma.conf.js
create package.json
create protractor.conf.js
create tslint.json
Successfully initialized git.
( Installing packages for tooling via npm
```
* **npm依赖的安装** (会自动安装)
```bash
//提示这行代码表示安装依赖完成
Installed packages for tooling via npm.
```
* **进入angular2_hello_world目录**
```java
$ cd angular2_hello_world
$ tree -F -L 1
.
├──README.md // an useful README
├──angular-cli.json // angular-cli configuration file
├──e2e/ // end to end tests
├──karma.conf.js // unit test configuration
├──node_modules/ // installed dependencies
├──package.json // npm configuration
├──protractor.conf.js // e2e test configuration
├──src/ // application source
└──tslint.json // linter config file
3 directories, 6 files
```
* **进入 src 目录 查看应用代码**
```bash
$ cd src
$ tree -F
.|-- app/
| |-- app.component.css
| |-- app.component.html
| |-- app.component.spec.ts
| |-- app.component.ts
| |-- app.module.ts
| |-- index.ts
| `-- shared/
| `-- index.ts
|-- assets/
|-- environments/
| |-- environment.dev.ts
| |-- environment.prod.ts
| `-- environment.ts
|-- favicon.ico
|-- index.html
|-- main.ts
|-- polyfills.ts
|-- styles.css
|-- test.ts
|-- tsconfig.json
`-- typings.d.ts
4 directories, 18 files
```
* **编辑器打开index.html**
```html
//声明了页面的字符集(charset) 、 标题(title) 和基础URL(base href)
Angular2HelloWorld
Loading...
运行应用
//angular-cli有一个内建的HTTP服务器,根目录运行命令
$ ng serve
** NG Live Development Server is running on http://localhost:4200. **
// a bunch of debug messages
Build successful - 1342ms.
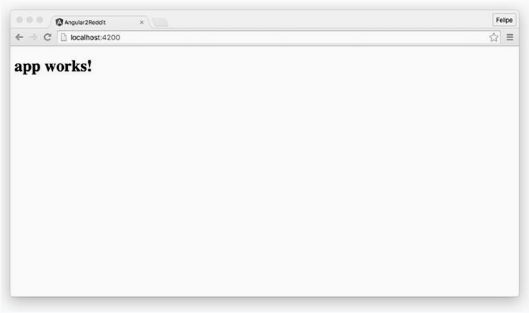
我们的应用正在localhost的4200端口上运行。 打开浏览器并访问 http://localhost:4200
制作Component(组件)
Angular背后的指导思想之一就是组件化。
、和都是由浏览器的开发者预先定义好的,我们要教浏览器认识一些拥有自定义功能的新标签
-
使用angular-cli 的 generate 指令创建新组建
 $ ng generate component hello-world
 installing component
 create srcapphello-world/hello-world.component.css
 create srcapphello-world/hello-world.component.html
 create srcapphello-world/hello-world.component.spec.ts
 create srcapphello-world/hello-world.component.ts
定义新组建
Component注解
组件定义类
打开第一个TypeScript文件:srcapphello-world/hello-world.component.ts,接下来就会一步步讲解它。
import { Component, OnInit } from '@angular/core';
@Component({
selector: 'app-hello-world',
templateUrl: './hello-world.component.html',
styleUrls: ['./hello-world.component.css']
})
export class HelloWorldComponent implements OnInit {
constructor() { }
ngOnInit() {
}
}
TypeScript文件的后缀是.ts而不是.js。 问题在于浏览器
并不知道该如何解释TypeScript文件。 为了解决这个问题, ng
serve命令会自动把.ts文件编译为.js文件
导入依赖
import语句定义了依赖的模块@angular/core部分告诉程序到哪里查找所需的这些依赖-
import语句的结构://从另一个模块中拉取这些依赖,并且让这些依赖在当前文件中可用 import { things } from wherever
Component注解
导入依赖后, 声明该组件
//注解其实是让编译器为代码添加功能的途径之一
//可以把注解看作添加到代码上的元数据。
//当在HelloWorld类上使用@Component时,
//就把HelloWorld“装饰”(decorate) 成了一个Component。
@Component({
//selector属性用来指出该组件将使用哪个DOM元素
selector: 'app-hello-world',
})
用templateUrl添加模板
@Component({
//Angular加载该组件时,就会读取此文件的内容作为组件的模板
templateUrl: './hello-world.component.html',
})
添加template
@Component({
selector: 'app-hello-world',
//传入template选项来为@Component添加一个模板
template: `

hello-world works inline!

`
})
- ` ... `反引号定义多行字符串,ES6中的一个新特性
templateUrl 和 template 选择哪种写法?
视情况而定,把代码和模板分开。对一些开发团队来说更容易,不过某些项目会增加成本,因为不得不在一大堆文件之间切换
如果模板行数短于一页,更倾向于把模板和代码放在一起(也就是.ts文件中)。同时看到逻辑和视图部分,便于理解它们的互动。
内联写法缺点:编辑器不支持对内部HTML字符串进行语法高亮
用styleUrls添加CSS样式
Angular使用一项叫作样式封装(styleencapsulation) 的技术,它意味着在特定组件中指定的样式只会应用于该组件本身。
@Component({
//引入 CSS 作为该组件的样式
同一个组件可以加载多个样式表
styleUrls: ['./hello-world.component.css']
})
加载组件
把该组件的标签添加到一个将要渲染的模板中
//标签添加到app.component.html中

{{title}}
把数据添加到组件中
- 创建新组建
   //显示用户的名字
   ng generate component user-item
```html
 //app-user-item标签添加到app.component.html中

      {{title}}


```
UserItemComponent显示一个指定用户的名字
-
name属性
- 我们往 UserItemComponent 类添加了一个 name 属性
- name指定类型是TypeScript中的特性,用来确保它的值必须是string
-
构造函数
- 这个函数会在创建这个类的实例时自动调用
- 可以用模板语法[3]({{ }})在模板中显示该变量的值
export class UserItemComponent implements OnInit { //name是我们想设置的属性名,而string是该属性的类型 name: string; // <-- added name property constructor() { // 组件被创建时, 把name设置为'Felipe' this.name = 'Felipe'; // set the name } ngOnInit() { } } //useritem.component.html 中Hello {{ name }}
使用数组
- 创建一个会渲染用户列表的新组件
ng generate component user-list
- 修改 app.component.html
{{title}}
- 修改 user-list.component.ts
export class UserListComponent implements OnInit {
    //语法表示names的类型是string构成的数组
    //另一种写法是Array。
    names: string[];
    constructor() {
        this.names = ['Ari', 'Carlos', 'Felipe', 'Nate'];
    }
    ngOnInit() {
    }
}
- 修改 user-list.component.html
//循环处理 names 中的每一个元素并将其逐个赋值给一个名叫 name 的局部变量
//( name 是一个局部变量 可以更换 如foobar )
- Hello {{ name }}
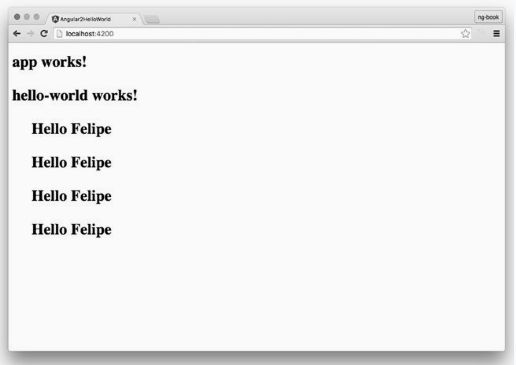
NgFor指令将为数组 names 中的每一个条目都渲染出一个 li 标签,并声明一个本地变量 name 来持有当前迭代的条目。然后这个新变量将被插值到 Hello {{ name }}代码片段里
如果你想进一步探索,可以直接阅读Angular源代码来学习Angular核心团队是如何编写组件的
使用UserItemComponent组件
用UserItemComponent作为子组件,为列表中的每个条目指定模板
- 配置 UserListComponent 来渲染 UserItemComponent
- 配置 UserItemComponent 来接收 name 变量作为输入
- 配置 UserListComponent 的模板来把用户名传给
UserItemComponent
渲染UserItemComponent
//把li标签替换为app-user-item
标签
接收输入
 //修改 UserItemComponent
 // 引入 Input
 import {
     Component,
     OnInit,
     Input // <--- added this } from '@angular/core';
@Component({
    selector: 'app-user-item',
    templateUrl: './user-item.component.html',
    styleUrls: ['./user-item.component.css']
})
export class UserItemComponent implements OnInit {
    //添加 @Input 注解
    @Input() name: string; // <-- added Input annotation
    constructor() {
      // 不希望有默认值
     // removed setting name
    } ngOnInit() {

    }
}
传入Input值
**为了把一个值传入组件,就要在模板中使用方括号[]语法。 **
// 修改 userlist.component.html
添加一个带方括号的属性(比如[foo])意味着把一个值传给该组件上同名的输入属性(比如 foo)
// name 右侧的值来自 ngFor 中的 let name ...语句
[name]部分指定的是 UserItemComponent 上的 Input。注意,我们正在传入的并不是字符串字面量"individualUserName", 而是individualUserName 变量的值, 也就是 names 中的每个元素。
执行过程
- 在 names 中迭代
- 为 names 中的每个元素创建一个新的 UserItemComponent
- 把当前名字的值传给 UserItemComponent 上名叫 name 的 Input属性
启动速成班
Angular应用是如何启动的?
每个应用都有一个主入口点。该应用是由 angular-cli 构建的,而
angular-cli 则是基于一个名叫 webpack 的工具。 你不必理解webpack 就能使用 Angular, 但理解应用的启动流程是很有帮助的。
// 通过运行下列命令来启动
// ng会查阅angular-cli.json文件来找出该应用的入口点
    ng serve
大体流程
- angular-cli.json指定一个"main"文件, 这里是main.ts;
- main.ts 是应用的入口点, 并且会引导(bootstrap) 我们的应用;
- 引导过程会引导一个Angular模块——我们尚未讨论过模块, 不过很快就会谈到;
- 我们使用 AppModule 来引导该应用, 它是在srcappapp.module.ts中指定的;
- AppModule 指定了将哪个组件用作顶层组件, 这里是 AppComponent;
- AppComponent 的模板中有一个
标签, 它会渲染出我们的用户列表
Angular有一个强大的概念: 模块。当引导一个 Angular 应用时,并不是直接引导一个组件, 而是创建了一个 NgModule,它指向了你要加载的组件。
// 为 AppModule 类添加了元数据
@NgModule({
    declarations: [
        AppComponent,
        HelloWorldComponent,
        UserItemComponent,
        UserListComponent
    ],
    imports: [
        BrowserModule,
        FormsModule,
        HttpModule
    ],
    providers: [],
    bootstrap: [AppComponent]
    })
export class AppModule { }
@NgModule注解有三个属性
- declarations(声明):指定了在该模块中定义的组件。要想在模板中使用一个组件,你必须首先在NgModule中声明它
- imports :描述了该模块有哪些依赖。我们正在创建一个浏览器应用,因此要导入BrowserModule
- bootstrap 告诉Angular, 当使用该模块引导应用时, 我们要把AppComponent加载为顶层组件
扩展你的应用
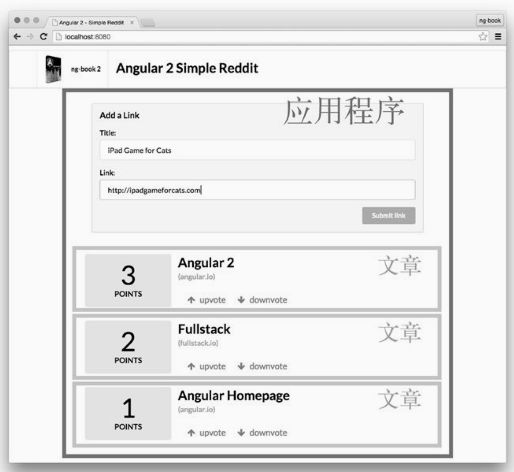
构造两个组件
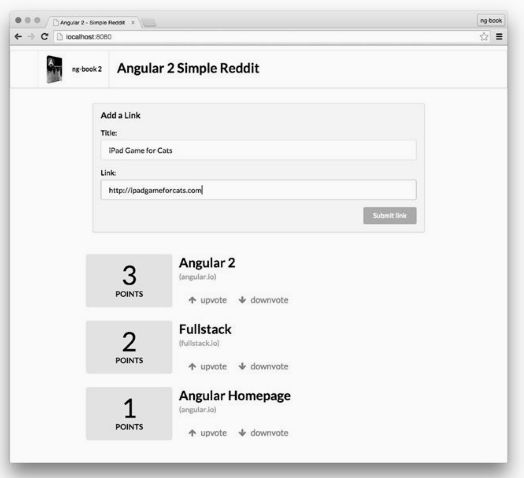
- 整体应用程序,包含一个用来提交新文章的表单
- 每个文章
// 创建一个新的应用
ng new xxx( 应用名字 )
添加CSS
在本项目中,我们将使用 Semantic-UI 来帮助添加样式。Semantic-UI 是一个CSS框架, 类似于Zurb Foundation 或 TwitterBootstrap 。
完成版示例代码中复制以下文件到你的应用目录下:
- src/index.html
- src/styles.css
- srcappvendor
- src/assets/images
应用程序组件
构建一个新的组件
- 存储我们的当前文章列表
- 包含一个表单, 用来提交新的文章。
// 修改 app.component.html
添加互动
-
添加一个提交按钮
//把事件的名字包裹在圆括号()中就可以告诉Angular: 我们要响应这个事件 -
定义一个函数
// 修改 app.component.ts export class AppComponent { addArticle(title: HTMLInputElement, link: HTMLInputElement): boolean { console.log(`Adding article title: ${title.value} and link:${link.value}`); return false; } } -
修改模板
四项修改
- 在模版中创建了一个 button 标签, 向用户表明应该点击哪里
- 新建了一个名叫 addArticle 的函数, 来定义按钮被点击时要做的事情
- 在 button 上添加了一个(click)属性, 意思是“只要点击了这个按钮, 就运行 addArticle 函数”
- 在两个
标签上分别添加了#newtitle 和 #newlink 属性
-
绑定input的值
// 注意, 第一个输入标签是这样的:Angular把这个
绑定到变量 newtitle 上。 #newtitle 语法被称作一个解析(resolve),其效果是让变量 newtitle 可用于该视图的所有表达式中 。newtitle 现在是一个对象, 它代表了这个inputDOM元素(更确切地说,它的类型是 HTMLInputElement )。由于newtitle是一个对象,我们可以通过newtitle.value表达式来获取这个输入框的值 -
把事件绑定到动作
- addArticle是组件定义类AppComponent里的一个函数。
(2) newtitle来自名叫title的标签上的解析
(#newtitle) 。
(3) newlink来自名叫link的标签上的解析
(#newlink)
- addArticle是组件定义类AppComponent里的一个函数。
- 定义操作逻辑
- title和link 都是 HTMLInputElement 类型的对象
- 从 input 中获取值, 就得调用title.value
//${title.value}放在了字符串中, 它最终会被
替换成title.value的值
addArticle(title: HTMLInputElement, link: HTMLInputElement):
boolean {
console.log(`Adding article title: ${title.value} and link: ${link.value}`);
return false;
}
添加文章组件
生成一个新组件
- 在模板中定义了 ArticleComponent 的视图
- 通过为类加上 @Component 注解定义了 ArticleComponent 组件的元数据
- 定义了一个组件定义类(ArticleComponent) , 其中是组件本身的逻辑
ng generate component article
- 创建 ArticleComponent 的 template
// 修改 article.component.html
// 左侧是投票的数量
// four wide column 和 twelve wide column 这两个 CSS 类
//来指定这两列。它们来自 Semantic UI 的 CSS 库
{{ votes }}
Points
// 右侧是文章的信息
a 标签的 href 属性中:href="{{ link }}"。在这种情况下,href 的值会根据组件类的 link 属性的值进行动态插值计算得出
- 创建ArticleComponent
// 修改 article.component.ts
@Component({
    selector: 'apparticle',
    templateUrl: './article.component.html',
    styleUrls: ['./article.component.css'],
    host: {
        //apparticle都独占一行 Semantic UI 用来表示行的CSS类
        class: 'row'
    }
})
- 创建组件定义类ArticleComponent
// 创建了以下三个属性
// 1. votes: 一个数字,用来表示所有“赞”减去所有“踩”的数量之和。
// 2. title: 一个字符串, 用来存放文章的标题。
// 3. link: 一个字符串, 用来存放文章的URL
export class ArticleComponent implements OnInit {
    votes: number;
    title: string;
    link: string;
    constructor() {
        this.title = 'Angular 2';
        this.link = 'http://angular.io';
        this.votes = 10;
    }
    voteUp() {
        this.votes += 1;
    }
    voteDown() {
        this.votes -= 1;
    }
    ngOnInit() {
    }
}
- 使用apparticle组件
// AppComponent的模板中
在 AngularJS 中,指令的匹配是全局的;而Angular中,你需要明确指定要使用哪个组件,意味着我们不必被迫在全局命名空间中共享这些指令选择器。
// app.module.ts
import { AppComponent } from './app.component';
import { ArticleComponent } from './article/article.component.ts';
@NgModule({
    declarations: [
    AppComponent,
    ArticleComponent // <-- added this
],
默认情况下, JavaScript会把click事件冒泡到所有父级组件中。因为click事件被冒泡到了父级,浏览器就会尝试导航到这个空白链接,于是浏览器就重新刷新了。
解决:我们得让click的事件处理器返回false。这能确保浏览器不会尝试刷新页面。
voteDown(): boolean {
    this.votes -= 1;
    return false;
}
// and similarly with `voteUp()`
渲染多行
创建Article类
// 此目录下创建文件 article/article.model.ts
// 在MVC模式中, 它被称为模型(model)
export class Article {
    title: string;
    link: string;
    votes: number;
    constructor(title: string, link: string, votes?: number) {
        this.title = title;
        this.link = link;
        this.votes = votes || 0;
    }
}
// article.component.ts
import { Article } from './article.model';
export class ArticleComponent implements OnInit {
    article: Article;
    constructor() {
        this.article = new Article(
        'Angular 2',
        'http://angular.io',
        10);
    }
    voteUp(): boolean {
        this.article.votes += 1;
        return false;
    }
    voteDown(): boolean {
        this.article.votes -= 1
        return false;
    }
    ngOnInit() {
    }
}
// 视图模型 article.component.html
{{ article.votes }}
Points
当前的voteUp和voteDown违反了迪米特法则。迪米特法则是指:一个对象对其他对象的结构或属性所作的假设应该越少越好。问题在于ArticleComponent组件了解太多Article类的内部知识了
// article.model.ts
export class Article {
    title: string;
    link: string;
    votes: number;
    constructor(title: string, link: string, votes?: number) {
        this.title = title;
        this.link = link;
        this.votes = votes || 0;
    }
    voteUp(): void {
        this.votes += 1;
    }
    voteDown(): void {
        this.votes -= 1;
    }
    domain(): string {
    try {
        const link: string = this.link.split('//')[1];
        return link.split('/')[0];
    } catch (err) {
        return null;
    }
    }
}
// article.component.ts
export class ArticleComponent implements OnInit {
    article: Article;
    constructor() {
        this.article = new Article(
        'Angular',
        'http://angular.io',
        10);
    }
    voteUp(): boolean {
        this.article.voteUp();
        return false;
    }
    voteDown(): boolean {
        this.article.voteDown();
        return false;
    }
    ngOnInit() {
    }
}
为什么模型和组件中都有一个voteUp函数?
这两个函数所做的事情略有不同。ArticleComponent 上的 voteUp() 函数是与组件的视图有关的,而 Article 模型上的 voteUp() 定义了模型上的变化。
我们把大量逻辑移出组件,放进了模型中。与此对应的MVC指南应该是胖模型,皮包骨的控制器;其核心思想是,我们要把大部分领域逻辑移到模型中,以便让组件只做尽可能少的工作。
存储多篇文章
// 让 AppComponent 拥有一份文章集合
// 引入模型
import { Article } from './article/article.model';

export class AppComponent {
//articles 是 Article 的数组。另一种写法是 Array
// Array 是一个集合,它只能存放 Article 类型的对象
    articles: Article[];
    constructor() {
    this.articles = [
        new Article('Angular 2', 'http://angular.io', 3),
        new Article('Fullstack', 'http://fullstack.io', 2),
        new Article('Angular Homepage', 'http://angular.io', 1),
    ];
    }
    addArticle(title: HTMLInputElement,link: HTMLInputElement): boolean{
        console.log(`Adding article title: ${title.value} and link: ${link.value}`);
        this.articles.push(new Article(title.value, link.value, 0));
        title.value = '';
        link.value = '';
        return false;
    }
}
使用inputs配置ArticleComponent
有了一个Article模型的列表, 该怎么把它们传给ArticleComponent组件呢?
这里我们又用到了 Input。以前 ArticleComponent 类的定义是下面这样的
// article.component.ts
export class ArticleComponent implements OnInit {
    article: Article;
    constructor() {
        //构造函数中硬编码了一个特定的Article; 而制作组件时, 不但要能封装, 还要能复用
        this.article = new Article(
        'Angular 2',
        'http://angular.io',
        10);
}
// 修改 article.component.ts
export class ArticleComponent implements OnInit {
    @Input() article: Article;
        voteUp(): boolean {this.article.voteUp();
        return false;
    }
    voteDown(): boolean {
        this.article.voteDown();
        return false;
    }
    ngOnInit() {
    }
}
渲染文章列表
// 修改 AppComponent 模板
// 1. articles是一个Article的数组, 由AppComponent组件定义
// 2. foobar是一个articles数组中的单个元素(一个Article对象)由NgFor定义
// 3. article是一个字段名, 由ArticleComponent中的inputs属性定义。
Submit link
添加新文章
// 修改按钮 思路:
// 1. 创建一个具有所提交标题和URL的Article新实例
// 2. 把它加入Article数组;
// 3. 清除input字段的值
addArticle(title: HTMLInputElement, link: HTMLInputElement): boolean {
    console.log(`Adding article title: ${title.value} and link: ${link.value}`);
    this.articles.push(new Article(title.value, link.value, 0));
    //修改value属性时, 页面中的input标签也会跟着
    改变
    title.value = '';
    link.value = '';
    return false;
}
最后的修整
显示文章所属的域名
// article.model.ts
domain(): string {
try {
// 注意:URL必须包含http://
const link: string = this.link.split('//')[1];
return link.split('/')[0];
} catch (err) {
return null;
}
}
// ArticleComponent的模板

