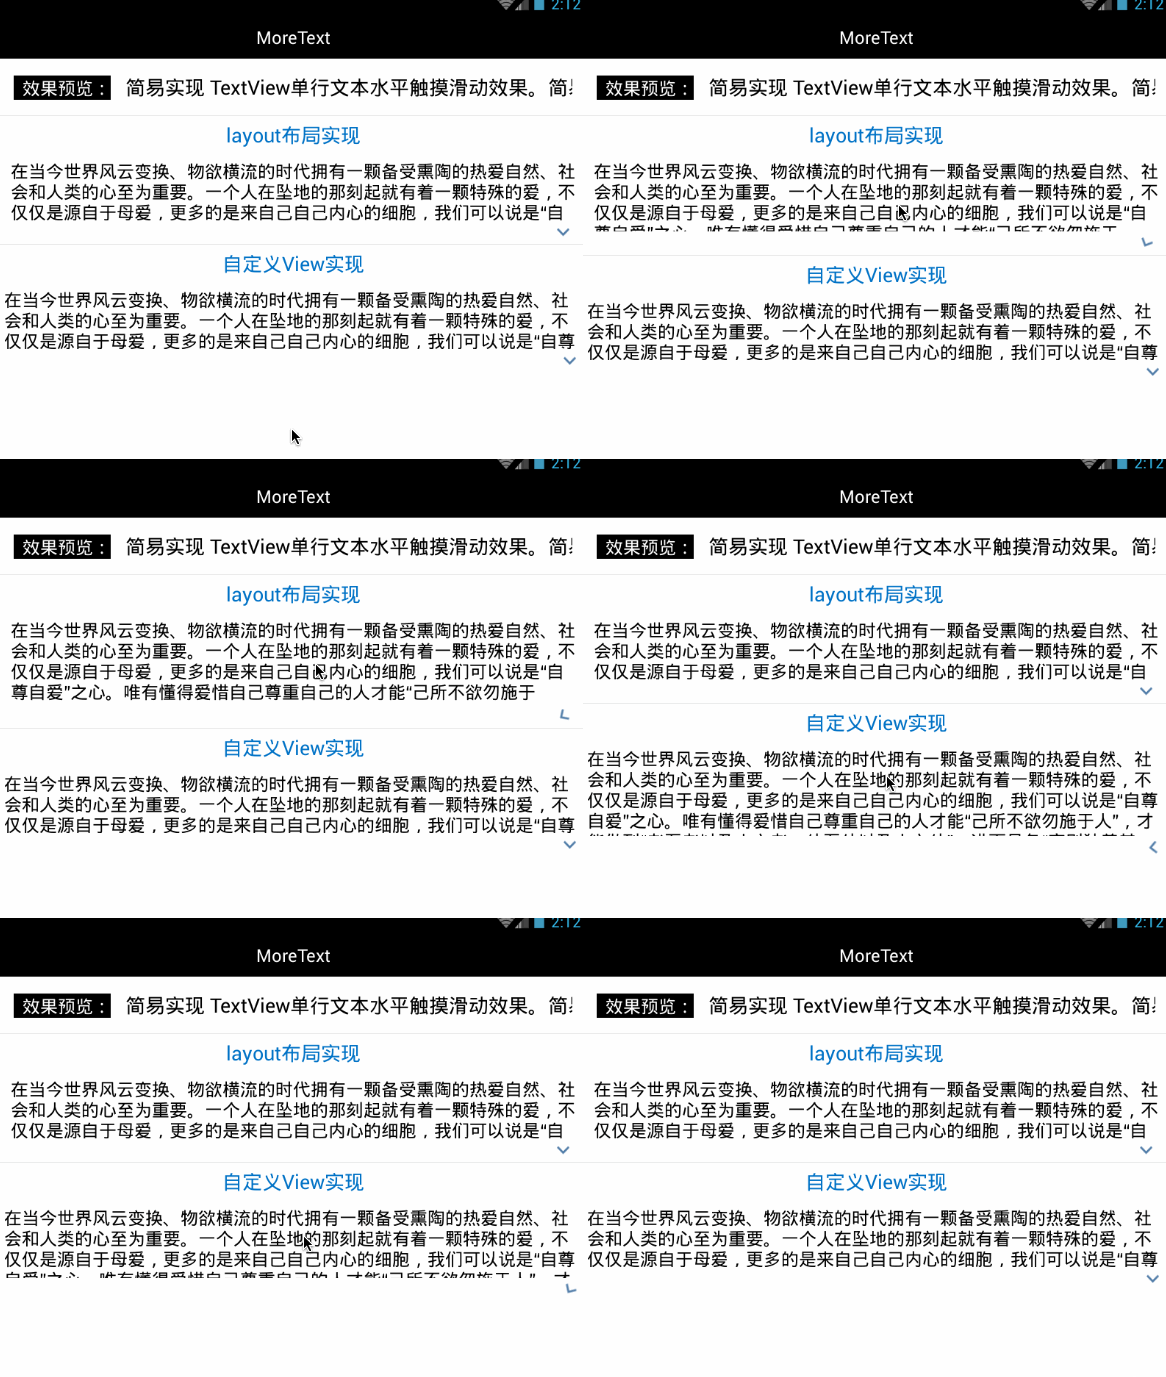
上文介绍了单行文本水平触摸滑动效果,通过EditText实现TextView单行长文本水平滑动效果。
本文继续介绍了多行文本折叠展开,自定义布局View实现多行文本折叠和展开
1.概述
经常在APP中能看到有引用文章或大段博文的内容,他们的展示样式也有点儿意思,默认是折叠的,当你点击文章之后它会自动展开。再次点击他又会缩回去。
网上有找到部分效果,感觉不是很满意。最后自己尝试用 自定义布局layout 写了个demo。比较简陋,不过可以用了。有这方面需求的朋友可以稍加改造下。如有更好的创意,也不妨分享一下。
效果图:
2.具体实现
但从实现效果方面来看,只用简单定义必要view即可,后变为了方便扩展使用和挪用,又对整个布局进行封装,方便直接使用。
2.1 通过多个布局组合实现
第一想法当然是用多个View组合来实现。那么久定义一个LinearLayout布局分别嵌套TextView和ImageView来做。
大概步骤:
- 定义布局,垂直的线性LinearLayout布局、TextView和ImageView。 在layout中定义基本组件。
- 设置TextView的高度为指定行数*行高。 不使用maxLine的原因是maxLine会控制显示文本的行数,不方便后边使用动画展开全部内容。因此这里TextView的高度也因该为wrap_content。
- 给整个布局添加点击事件,绑定动画。 点击时,若TextView未展开则展开至其实际高度,imageView 旋转;否则回缩至 指定行数*行高 , imageView 旋转缩回。
开始编写代码:
1.在xml中定义布局:
2.首先在activity中定义并初始化这些view:
public class MainActivity extends Activity {
 TextView descriptionView;
 View layoutView ,expandView; //LinearLayout布局和ImageView
 int maxDescripLine = 3; //TextView默认最大展示行数

 //在OnCreate中初始化
 {
 layoutView = findViewById(R.id.description_layout);
 descriptionView = (TextView)findViewById(R.id.description_view);
 expandView = findViewById(R.id.expand_view);
 }
}
3.然后设置textview显示文本,再根据默认展示行数设置其高度,并根据其是否已完全显示(当前展示行数是否大于等于实际行数)来判断需不需要点击更多按钮。
 //设置文本
 descriptionView.setText(getText(R.string.content));

 //descriptionView设置默认显示高度
 descriptionView.setHeight(descriptionView.getLineHeight() * maxDescripLine);
 //根据高度来判断是否需要再点击展开
 descriptionView.post(new Runnable() {

 @Override
 public void run() {
 expandView.setVisibility(descriptionView.getLineCount() > maxDescripLine ? View.VISIBLE : View.GONE);
 }
 });
因为textView设置的是wrap_content,所以会显示实际高度和行数,这里根据maxDescripLine来设置其高度。
看了最后一行代码可能有人会问?ImageView (点击展开更多)是否应该显示 的判断逻辑为什么要放在post方法里边呢? 这是由于在OnCreate方法中定义设置的textView不会马上渲染并显示,所以textview的getLineCount()获取到的值一般都为零,因此使用post会在其绘制完成后来对ImageView进行显示控制。
ps: 感觉我描述不清的朋友可以看下stackoverflow 上的讲解 how to use getlinecount() in textview android.
4.给layoutView设置点击事件。
给ImageView定义一个RotateAnimation的旋转动画,在旋转过程中根据旋转百分比进度控制textView高度,进而达到我们想要的效果。
 layoutView.setOnClickListener(new View.OnClickListener() {
 boolean isExpand;//是否已展开的状态

 @Override
 public void onClick(View v) {
 isExpand = !isExpand;
 descriptionView.clearAnimation();//清楚动画效果
 final int deltaValue;//默认高度,即前边由maxLine确定的高度
 final int startValue = descriptionView.getHeight();//起始高度
 int durationMillis = 350;//动画持续时间
 if (isExpand) {
  /**
  * 折叠动画
  * 从实际高度缩回起始高度
  */
  deltaValue = descriptionView.getLineHeight() * descriptionView.getLineCount() - startValue;
  RotateAnimation animation = new RotateAnimation(0, 180, Animation.RELATIVE_TO_SELF, 0.5f, Animation.RELATIVE_TO_SELF, 0.5f);
  animation.setDuration(durationMillis);
  animation.setFillAfter(true);
  expandView.startAnimation(animation);
 } else {
  /**
  * 展开动画
  * 从起始高度增长至实际高度
  */
  deltaValue = descriptionView.getLineHeight() * maxDescripLine - startValue;
  RotateAnimation animation = new RotateAnimation(180, 0, Animation.RELATIVE_TO_SELF, 0.5f, Animation.RELATIVE_TO_SELF, 0.5f);
  animation.setDuration(durationMillis);
  animation.setFillAfter(true);
  expandView.startAnimation(animation);
 }
 Animation animation = new Animation() {
  protected void applyTransformation(float interpolatedTime, Transformation t) { //根据ImageView旋转动画的百分比来显示textview高度,达到动画效果
  descriptionView.setHeight((int) (startValue + deltaValue * interpolatedTime));
  }
 };
 animation.setDuration(durationMillis);
 descriptionView.startAnimation(animation);
 }
 });
至此,通过布局已经实现了我们想要的效果。具体代码参见代码示例 的第一部分。
当然,我们可以这样使用,但是每次都这么重写未免显得有些麻烦。因此有必要把他写成一个单独控件,方便我们以后的开袋即食。废话不多说,上菜。
2.2 通过自定义View组合封装
这个view的布局结构并不打算使用xml来定义layout,直接定义一个继承LinearLayout的MoreTextView类.这个类里边添加TextView和ImageView。
1.使用styleable自定义View属性
为了后边能够方便的在xml布局中使用MoreTextView这个自定义View,类似通过
android:text = “XXX”
android:textSize = “XXX”
这样快捷的绑定文本内容和设置字体大小等属性,我们可以通过 declare-styleable在values文件下的xml中自定义我们想要的属性,并在View中获取和使用。详细使用declare-styleable的内容会在后边补充,这里简要说下。
比如,MoreTextView应该有的基本属性,像 文本字体大小(textSize)、颜色(textColor)和文本内容(text),还有默认显示行数(maxLine)等几种属性。我们要想像TextView一样直接在xml中设置绑定,可以这样做。
首先在values目录下新建个attrs.xml(名字随意),并定义MoreTextView这些属性。
2.自定义MoreTextView并获取这些属性的值
上边定义了这些属性,就等于允许我们在xml中使用
more:text = “XXX”
more:textSize = “XXX”
more : textColor = “XXX”
more : maxLine = “XXX”
(注: more这个关键字可以随意)
这样直接设置属性值。那么具体怎么取值,我们稍后来讲。
(1)定义MoreTextView的属性:
public class MoreTextView extends LinearLayout{
 protected TextView contentView; //文本正文
 protected ImageView expandView; //展开按钮

 //对应styleable中的属性
 protected int textColor;
 protected float textSize;
 protected int maxLine;
 protected String text;

 //默认属性值
 public int defaultTextColor = Color.BLACK;
 public int defaultTextSize = 12;
 public int defaultLine = 3;

 //....实现部分略
}
(2)MoreTextView的构造方法:
 public MoreTextView(Context context, AttributeSet attrs) {
 super(context, attrs);
 initalize();
 initWithAttrs(context, attrs);
 bindListener();
 }
这三个方法简单说明下:
initalize()初始化并添加View。初始化TextView和ImageView,并添加到MoretextView中去。
initWithAttrs(context, attrs)取值并设置。利用attrs从xml布局中取我们配置好的text/textSize/textColor/maxLine等属性的属性值,并设置到View上去。
bindListener()绑定点击事件并设置动画。 给当前MoreTextView设置点击事件,实现点击折叠和展开。
各个方法的具体实现:
//初始化并添加View
protected void initalize() {
 setOrientation(VERTICAL); //设置垂直布局
 setGravity(Gravity.RIGHT); //右对齐
 //初始化textView并添加
 contentView = new TextView(getContext());
 addView(contentView, LinearLayout.LayoutParams.MATCH_PARENT, LinearLayout.LayoutParams.WRAP_CONTENT);
 //初始化ImageView并添加
 expandView = new ImageView(getContext());
 int padding = dip2px(getContext(), 5);
 expandView.setPadding(padding, padding, padding, padding);
 expandView.setImageResource(R.drawable.text_ic_expand);
 LinearLayout.LayoutParams llp = new LinearLayout.LayoutParams(LinearLayout.LayoutParams.WRAP_CONTENT, LinearLayout.LayoutParams.WRAP_CONTENT);
 addView(expandView, llp);
取值并设置这部分有必要将一下。我们利用TypedArray从定义的styleable中取出属性值,赋给我们定义好的类的属性变量。记得取完之后调用recycle()回收释放。
 protected void initWithAttrs(Context context, AttributeSet attrs) {
 TypedArray a = context.obtainStyledAttributes(attrs,
 R.styleable.MoreTextStyle);
 int textColor = a.getColor(R.styleable.MoreTextStyle_textColor,
 defaultTextColor); //取颜色值,默认defaultTextColor
 textSize = a.getDimensionPixelSize(R.styleable.MoreTextStyle_textSize, defaultTextSize);//取颜字体大小,默认defaultTextSize
 maxLine = a.getInt(R.styleable.MoreTextStyle_maxLine, defaultLine);//取颜显示行数,默认defaultLine
 text = a.getString(R.styleable.MoreTextStyle_text);//取文本内容

 //绑定到textView bindTextView(textColor,textSize,maxLine,text);

 a.recycle();//回收释放
 }

 //绑定到textView
 protected void bindTextView(int color,float size,final int line,String text){
 contentView.setTextColor(color);
 contentView.setTextSize(TypedValue.COMPLEX_UNIT_PX,size);
 contentView.setText(text);
 contentView.setHeight(contentView.getLineHeight() * line);
 post(new Runnable() {//前面已讲,不再赘述

 @Override
 public void run() {
 expandView.setVisibility(contentView.getLineCount() > line ? View.VISIBLE : View.GONE);

 }
 });
 }
最后设置点击事件。
 //点击展开与折叠,不再赘述
 protected void bindListener(){
 setOnClickListener(new View.OnClickListener() {
 boolean isExpand;

 @Override
 public void onClick(View v) {
 isExpand = !isExpand;
 contentView.clearAnimation();
 final int deltaValue;
 final int startValue = contentView.getHeight();
 int durationMillis = 350;
 if (isExpand) {
  deltaValue = contentView.getLineHeight() * contentView.getLineCount() - startValue;
  RotateAnimation animation = new RotateAnimation(0, 180, Animation.RELATIVE_TO_SELF, 0.5f, Animation.RELATIVE_TO_SELF, 0.5f);
  animation.setDuration(durationMillis);
  animation.setFillAfter(true);
  expandView.startAnimation(animation);
 } else {
  deltaValue = contentView.getLineHeight() * maxLine - startValue;
  RotateAnimation animation = new RotateAnimation(180, 0, Animation.RELATIVE_TO_SELF, 0.5f, Animation.RELATIVE_TO_SELF, 0.5f);
  animation.setDuration(durationMillis);
  animation.setFillAfter(true);
  expandView.startAnimation(animation);
 }
 Animation animation = new Animation() {
  protected void applyTransformation(float interpolatedTime, Transformation t) {
  contentView.setHeight((int) (startValue + deltaValue * interpolatedTime));
  }

 };
 animation.setDuration(durationMillis);
 contentView.startAnimation(animation);
 }
 });
 }
另外,定义几个方法方便外部调用(获取文本TextView,直接设置文本内容),同时还定义了一个dip转像素的静态方法。
 public TextView getTextView(){
 return contentView;
 }

 public void setText(CharSequence charSequence){
 contentView.setText(charSequence);
 }

 public static int dip2px(Context context, float dipValue){
 final float scale = context.getResources().getDisplayMetrics().density;
 return (int)(dipValue * scale + 0.5f);
 }
其实到这里,我们的自定义多文本折叠展开MoreTextView已经完成了。如何使用呢?
在layout/xx.xml中使用
要想方便的使用我们刚刚的自定义属性来定义值,记得在xml namespace中定义应用:
自动引用命名空间res-auto
xmlns:more=”http://schemas.android.com/apk/res-auto”
或者 直接定义包名
xmlns:more=”http://schemas.android.com/apk/res/com.qiao.moretext”
命名空间后边跟的 more即下边你要使用自定义属性的开头部分。
比如我们的activity_main.xml
在java中直接定义使用
由于上边定义MoreTextView只定义了一种构造方法 MoreTextView(Context context, AttributeSet attrs) ,所以使用时,也只能:
 MoreTextView content = new MoreTextView(MainActivity.this, null);
 content.setText(getText(R.string.content));
 //然后addview到你要添加的地方

  当然,聪明如你,可肯定知道怎么定义另外的构造方法来简单实用啦。
  �C>
  MoreTextView(Context context){
    //使用默认值直接初始化
    bindTextView();
  }
3.综述
综上呢,我们已经完成了所要实现的功能,作为UI呢,他可能会有些简陋,但作为一个demo起到示范作用已经够了。后边我们可能会考虑把它作为微博的一个listitem做成列表一样,并加入点赞等功能。有兴趣不妨做一下咯。。
源码示例下载地址:http://xiazai.jb51.net/201610/yuanma/Androidtouchmove(jb51.net).rar
以上就是本文的全部内容,希望对大家的学习有所帮助,也希望大家多多支持脚本之家。
