总结Cocos2d-x 3.0 中新字体标签Label
来源网址:http://cn.cocos2d-x.org/tutorial/show?id=1624
在3.x中,废弃了2.x里的LabelTTF、LabelAtlas、LabelBMFont三个字体类,取而代之的是全新的字体标签Label。
实际上Label是将三个字体类进行了融合,进行统一的管理与渲染,这使得创建字体标签Label的方式更加统一,更加方便。
本节来学习一下3.x中新的标签类Label,如果对2.x中的三个字体类不了解的话,建议先去看看那三个类的用法,再来学习本节内容,能够更好的理解。
(2.x中的旧标签类,请查看这里)
【本节内容】
在3.x中,Label支持四种方式的标签创建。并新增了阴影Shadow、轮廓Outline、发光Glow效果的支持。还支持文字内容的行间距、文字间距、自动换行的设置。
-
创建系统原生字体API:createWithSystemFont
-
创建TTF:createWithTTF(原LabelTTF)
-
创建CharMap:createWithCharMap(原LabelAtlas)
-
创建BMFont:createWithBMFont(原LabelBMFont)
-
Label的属性与方法
-
文字效果渲染:Shadow、Outline、Glow
-
对齐方式:TextHAlignment、TextVAlignment
-
Label的尺寸大小
-
自动换行
-
行间距、文字间距
-
单独设置某个字符
PS:关于图片资源,请在Cocos2dx给出的官方样例cpp-tests中寻找。
【createWithSystemFont】
创建系统原生字体的API。
创建方式如下:
//
    static Label* createWithSystemFont(
        const std::string& text,                          //字符串内容
        const std::string& font,                          //字体(字体名称、或字体文件)
        float fontSize,                                   //字号
        const Size& dimensions = Size::ZERO,              //label的尺寸大小,默认不设置尺寸
        TextHAlignment hAlignment = TextHAlignment::LEFT, //水平对齐方式,默认左对齐::LEFT
        TextVAlignment vAlignment = TextVAlignment::TOP   //垂直对齐方式,默认顶部  ::TOP
    );
////
//使用系统的字体名称 "Arial" 来创建
Label* lb1 = Label::createWithSystemFont("123abc", "Arial", 24);
//【createWithTTF】
创建TTF的方式有以下两种:
-
方式一:与2.x中LabelTTF的创建类似,不过使用的fontFile必须为字体文件。
-
方式二:通过TTF的配置信息数据结构TTFConfig来创建。
1、方式一:与SystemFont创建类似
注:区别在于fontFile必须为字体文件(如"*.ttf"),即不支持使用系统字体名称来创建。
2、方式二:通过TTFConfig配置来创建
2.1、TTFConfig配置
//
    typedef struct _ttfConfig
    {
        std::string fontFilePath;  //字体文件路径,如 "fonts/Arial.ttf"
        int fontSize;              //字体大小,默认"12"
        GlyphCollection glyphs;    //使用的字符集,默认"DYNAMIC"
        const char *customGlyphs;
        bool distanceFieldEnabled; //是否让字体紧凑,默认false
        int outlineSize;           //字体轮廓大小,默认"0"

        //构造函数
        _ttfConfig(
            const char* filePath = "",
            int size = 12,
            const GlyphCollection& glyphCollection = GlyphCollection::DYNAMIC,
            const char *customGlyphCollection = nullptr,
            bool useDistanceField = false,
            int outline = 0
        );
    }TTFConfig;
////
static Label* createWithTTF(
const TTFConfig& ttfConfig, //TTFConfig配置
const std::string& text, //字符串内容
TextHAlignment alignment = TextHAlignment::LEFT,
int maxLineWidth = 0 //最大文本行宽,0表示不设置。可用于自动换行只用
);
////
TTFConfig ttfConfig;
ttfConfig.fontFilePath = "fonts/Marker Felt.ttf"; //必须配置
ttfConfig.fontSize = 12;
ttfConfig.distanceFieldEnabled = false;
ttfConfig.outlineSize = 0;
ttfConfig.glyphs = GlyphCollection::DYNAMIC;
ttfConfig.customGlyphs = nullptr;
//使用TTFConfig配置,来创建TTF
Label* lb3 = Label::createWithTTF(ttfConfig, "123abc");
//
【createWithCharMap】
CharMap的用法与2.x中的LabelAtlas是一样的,一般用来显示数字。不过它也可以用来显示其他字符,如英文字符。
字体文件资源一般来自一张.png图片,或.plist文件。
注:图片中每个字符的大小必须是固定的,若要改变字体大小,只能通过setScale放缩来实现。
创建CharMap有三种方式:
-
使用.png图片创建
-
使用纹理Texture2D创建
-
使用.plist创建
从图片中从左到右,一块一块截取。从字符startCharMap开始一一对应。
第一块小图片对应字符startCharMap;第二块小图片对应字符startCharMap+1;第三块对应startCharMap+2……以此类推。
注:startCharMap为ASCII码,即:数字'0'为48。
//
    //charMapFile  : 字符资源图片png
    //itemWidth    : 每个字符的宽
    //itemHeight   : 每个字符的高
    //startCharMap : 图片第一个是什么字符
    static Label* createWithCharMap(const std::string& charMapFile, int itemWidth, int itemHeight, int startCharMap);
    static Label* createWithCharMap(Texture2D* texture, int itemWidth, int itemHeight, int startCharMap);
    static Label* createWithCharMap(const std::string& plistFile);
//
0、字符图片资源
digit.png:200*20(每个数字20*20)。
1、使用.png创建
//
    //create 字符图片.png,每个字符宽,高,起始字符
    Label* lb4 = Label::createWithCharMap("fonts/digit.png", 20, 20, '0');
    lb4->setString("123456"); //设置字符串内容
//
2、使用Texture2D创建
使用方法实际上与.png是类似的。
//
    //创建图片纹理Texture2D
    Texture2D* texture = TextureCache::getInstance()->addImage("fonts/digit.png");

    Label* lb5 = Label::createWithCharMap(texture, 20, 20, '0');
    lb5->setString("123456"); //设置字符串内容
//
3、使用.plist创建
在digit.plist里需要配置:用到的字符图片资源.png,每个字符的宽、高,起始字符。
如下所示:
//


        version
        1
        textureFilename
        digit.png
        itemWidth
        20
        itemHeight
        20
        firstChar
        48


////
//plist的配置信息,如上所示
Label* lb6 = Label::createWithCharMap("fonts/digit.plist");
lb6->setString("123456");
//【createWithBMFont】
BMFont的用法与2.x中的LabelBMFont是一样的。
这个类使用之前,需要添加好字体文件,包括一个图片文件(*.png)和一个字体坐标文件(*.fnt),这两个文件名称必须一样。可以下载一个fnt编辑工具来自定义字体。
值得注意的是:
-
在2.x中,可以使用getChildByTag(i)来获取第i个字符,对其单独设置属性、动作等。
-
在3.x中,则是使用getLetter(i),而不再是getChildByTag(i)。
这个类也没办法指定字体的字号大小,需要用setScale来缩放调整大小。
//
    static Label* createWithBMFont(
        const std::string& bmfontFilePath, //字体文件.font
        const std::string& text,           //内容
        const TextHAlignment& alignment = TextHAlignment::LEFT,
        int maxLineWidth = 0,
        const Vec2& imageOffset = Vec2::ZERO       //字符图片的起始左上角坐标。一般不要设置这个参数,因为坐标的配置均已在.font里完成
    );
////
Label* lb7 = Label::createWithBMFont("bitmapFontTest.fnt", "123abc", TextHAlignment::LEFT);
//【Label的属性与方法】
Label继承于:
-
SpriteBatchNode:用于加快字体的渲染速度。
-
LabelProtocol:用于设置Label的字符串内容。
主要函数如下:
//
class CC_DLL Label : public SpriteBatchNode, public LabelProtocol
{
/**
 * 字体设置
 *     - setSystemFontName : 字体(字体名字、字体文件)
 *     - setSystemFontSize : 字体大小
 *     - setString         : 字符串内容
 *     - setTextColor      : 文字内容颜色
 **/
    //设置System Font类型的字体(字体名字、字体文件)
    //设置System Font类型的字体大小
    //请不要用于其他Label类型!(TTF、CharMap、BMFont)
    virtual void setSystemFontName(const std::string& systemFont);
    virtual void setSystemFontSize(float fontSize);
    virtual const std::string& getSystemFontName() const { return _systemFont;}
    virtual float getSystemFontSize() const { return _systemFontSize;}


    //改变字符串内容并重新渲染
    //注:如果你没有为Label设置TTF/BMFont/CharMap,会产生很大的开销
    virtual void setString(const std::string& text) override;
    virtual const std::string& getString() const override {  return _originalUTF8String; }


    //设置文字颜色,仅支持TTF和System Font
    //注:区别 Node节点的颜色
    //      Node ::setColor     : Color3B
    //      Label::setTextColor : Color4B
    virtual void setTextColor(const Color4B &color);
    const Color4B& getTextColor() const { return _textColor; }


/**
 * 获取Label的某个字符
 *     - getLetter
 *     - 不支持System Font
 **/
    //不支持System Font
    virtual Sprite* getLetter(int lettetIndex);


/**
 * 文字渲染效果
 *     - Shadow  : 阴影
 *     - Outline : 轮廓,仅支持TTF
 *     - Glow    : 发光,仅支持TTF
 **/
    //阴影Shadow(阴影颜色,相对Label的偏移,模糊度)
    //注: 其中blurRadius在3.2中并未实现
    virtual void enableShadow(const Color4B& shadowColor = Color4B::BLACK,const Size &offset = Size(2,-2), int blurRadius = 0);

    //轮廓Outline,仅支持TTF(轮廓颜色,轮廓粗细)
    virtual void enableOutline(const Color4B& outlineColor,int outlineSize = -1);

    //发光Glow,仅支持TTF
    virtual void enableGlow(const Color4B& glowColor);

    //取消阴影/轮廓/发光渲染效果
    virtual void disableEffect();


/**
 * 对齐方式
 *    > TextHAlignment : 水平对齐方式
 *        - TextHAlignment:LEFT    : 左对齐
 *        - TextHAlignment:CENTER  : 居中对齐,默认
 *        - TextHAlignment:RIGHT   : 右对齐
 *    > TextVAlignment : 垂直对齐方式
 *        - TextVAlignment::TOP    : 顶部,默认
 *        - TextVAlignment::CENTER : 中心
 *        - TextVAlignment::BOTTOM : 底部
 **/
    //设置对齐方式
    void setAlignment(TextHAlignment hAlignment) { setAlignment(hAlignment,_vAlignment);}
    void setAlignment(TextHAlignment hAlignment,TextVAlignment vAlignment);
    TextHAlignment getTextAlignment() const { return _hAlignment;}

    //设置水平对齐方式
    void setHorizontalAlignment(TextHAlignment hAlignment) { setAlignment(hAlignment,_vAlignment); }
    TextHAlignment getHorizontalAlignment() const { return _hAlignment; }

    //设置垂直对齐方式
    void setVerticalAlignment(TextVAlignment vAlignment) { setAlignment(_hAlignment,vAlignment); }
    TextVAlignment getVerticalAlignment() const { return _vAlignment; }


/**
 * Label尺寸大小
 *     - setLineBreakWithoutSpace : 开启自动换行功能
 *     - setMaxLineWidth          : 文字内容的最大行宽
 *     - setWidth                 : Label尺寸大小,宽
 *     - setHeight                : Label尺寸大小,高
 *     - setDimensions            : Label尺寸大小
 **/
    //是否开启自动换行功能
    void setLineBreakWithoutSpace(bool breakWithoutSpace);


    //最大行宽,内容超过MaxLineWidth,就会自动换行
    //前提条件: 仅在width==0时,起作用。
    //  > width == 0;
    //  > setMaxLineWidth(lineWidth);
    //  > setLineBreakWithoutSpace(true);
    //它的效果与下面是类似的.
    //  > setWidth(lineWidth);
    //  > setLineBreakWithoutSpace(true);
    //只是width==0时,就无法设置文本的对齐方式了.
    void setMaxLineWidth(unsigned int maxLineWidth);
    unsigned int getMaxLineWidth() { return _maxLineWidth;}


    //设置Label的尺寸大小
    //可以理解为Label的文本框大小
    //当setLineBreakWithoutSpace(true)时,内容超过width,会自动换行
    //并且内容支持文本的对齐方式
    //注:设置尺寸大小,使用的是setDimensions,而不是setContentSize !
    void setWidth(unsigned int width) { setDimensions(width,_labelHeight); }
    void setHeight(unsigned int height){ setDimensions(_labelWidth,height); }
    void setDimensions(unsigned int width,unsigned int height);
    unsigned int getWidth() const { return _labelWidth; }
    unsigned int getHeight() const { return _labelHeight; }
    const Size& getDimensions() const{ return _labelDimensions; }


/**
 * v3.2 新增
 *     - setLineHeight        : 设置行间距
 *     - setAdditionalKerning : 设置文字间距
 *     - getStringLength      : 字符串内容长度
 */
    //设置行间距,不支持system font
    void setLineHeight(float height);
    float getLineHeight() const;

    //设置文字间距,不支持system font
    void setAdditionalKerning(float space);
    float getAdditionalKerning() const;

    //获取Label的字符串内容长度
    int getStringLength() const;


/**
 * 重写Node父类的方法
 *     - setBlendFunc   : 混合模式
 *     - setScale       : 放缩字体大小
 *     - addChild       : 添加子节点
 *     - getDescription : 显示Label的描述
 **/
    //设置颜色混合模式
    virtual void setBlendFunc(const BlendFunc &blendFunc) override;

    //放缩字体大小(一般用于CharMap、BMFont)
    virtual void setScale(float scale) override;
    virtual void setScaleX(float scaleX) override;
    virtual void setScaleY(float scaleY) override;
    virtual float getScaleX() const override;
    virtual float getScaleY() const override;

    //添加子节点
    virtual void addChild(Node * child, int zOrder=0, int tag=0) override;
    virtual void sortAllChildren() override;

    //Label描述
    virtual std::string getDescription() const override;
};
//
【文字渲染效果】
支持三种渲染效果:
-
Shadow:阴影
-
Outline:轮廓,仅支持TTF
-
Glow:发光,仅支持TTF
注:其中Outline与Glow两个效果,只会作用一个。即无法一起使用。
使用举例:
//
    Label* lb = Label::createWithTTF("123abc", "fonts/Marker Felt.ttf", 50);
    lb->setPosition(visibleSize / 2);
    this->addChild(lb);

    lb->enableShadow(Color4B::GREEN, Size(10, 10)); //阴影
    lb->enableOutline(Color4B::RED, 3);             //轮廓
    //lb->enableGlow(Color4B::GREEN);                 //发光

    //取消阴影、轮廓、发光效果
    //lb->disableEffect();
//
如图所示:


【对齐方式】
-
TextHAlignment:水平对齐方式
* TextHAlignment:LEFT:左对齐
* TextHAlignment:CENTER:居中对齐,默认
* TextHAlignment:RIGHT:右对齐
-
TextVAlignment:垂直对齐方式
* TextVAlignment::TOP:顶部,默认
* TextVAlignment::CENTER:中心
* TextVAlignment::BOTTOM:底部
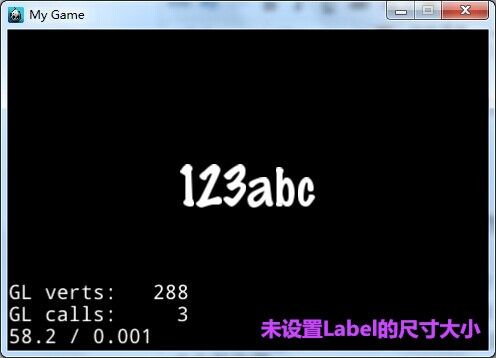
仅在设置了Label的尺寸大小setDimensions(width,height),大于显示的字符串内容的尺寸大小,才会起作用。
对齐方式举例,如下几张图片所示:
对齐方式为:
-
TextHAlignment:LEFT
-
TextVAlignment::TOP


【自动换行】
在3.x中,自动换行有两种方式。(当然你也可以使用C++里的转移字符'\n'进行手动换行)
-
利用lb->setLineBreakWithoutSpace(true),来支持自动换行功能。
-
利用setMaxLineWidth(maxLineWidth),来控制自动换行。
-
利用setDimensions(width,height),来控制自动换行。
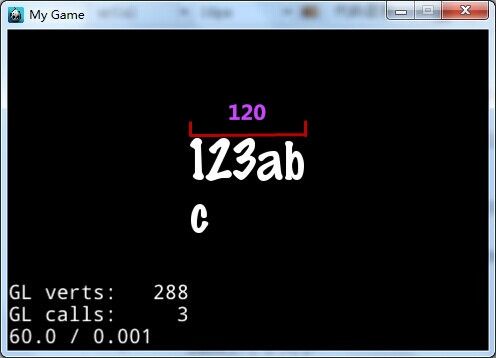
1、利用setMaxLineWidth
设置每行显示文字的最大宽度。
注:这种方法仅在Labelwidth==0的情况下,才会有效。
使用方法:
//
    lb->setLineBreakWithoutSpace(true);
    lb->setMaxLineWidth(120); //最大宽度120
//
2、利用setDimensions
使用方法:
//
    lb->setLineBreakWithoutSpace(true);
    lb->setWidth(80);         //设置Label尺寸宽80
    lb->setMaxLineWidth(120); //设置了Label width,这个就无效了
//
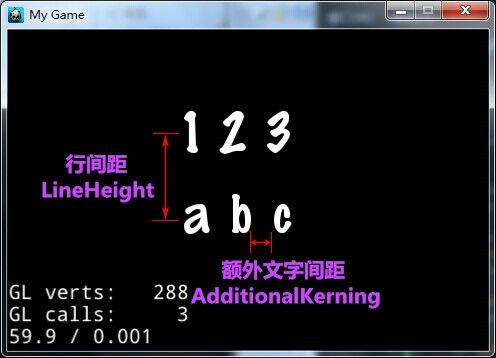
【文字间距】
间距的调整,是在v3.2之后才出现的。可以设置文本内容的行间距与文字间距。
注:不支持SystemFont。
-
setLineHeight:设置行间距
-
setAdditionalKerning:设置额外文字间距
使用举例:
//
    lb->setLineHeight(80);
    lb->setAdditionalKerning(10);
//
【单独设置某个字符】
学过2.x中的LabelBMFont的同学,应该知道这个是怎么回事吧?
在3.x中,使用TTF、CharMap、BMFont创建的文字标签,其字符串内容的每个字符都是一个Sprite精灵图片,可以对其进行单独的设置。如精灵放缩、执行动作等。
注:不支持SystemFont。
-
lb->getStringLength():获取字符串内容的总长度
-
lb->getLetter(i):获取第i个位置上的字符
使用举例:
//
    Label* lb = Label::createWithTTF("123abc", "fonts/Marker Felt.ttf", 50);
    lb->setPosition(visibleSize / 2);
    this->addChild(lb);

    //获取字符串总长度,length = 6
    CCLOG("%d", lb->getStringLength());

    //获取第1个字符
    Sprite* letter1 = lb->getLetter(1);
    letter1->setColor(Color3B::GREEN); //设置颜色
    letter1->setScale(2.0f);           //放缩

    //获取第4个字符
    Sprite* letter4 = lb->getLetter(4);
    letter4->setColor(Color3B::RED);  //设置颜色
    letter4->runAction(RepeatForever::create(RotateBy::create(1.0f, 90))); //执行旋转动作
//
参考阅读:
http://cn.cocos2d-x.org/tutorial/show?id=1446
http://www.cocoachina.com/bbs/read.php?tid=197179
来源网址:http://blog.csdn.net/u010105970/article/details/39754123