springboot + vue + iview 2.利用iview画个简单好看的页面 mac版
上一篇文章中, 已经搭建了一个简易的vue项目, 但是页面很单调, 这次就研究一下怎么利用iview让页面充实起来。
(本篇文章只属于个人研究, 如果有不规范, 你打我啊, 谁让我只是个后端)
定制主题
1.因为vue项目是webpack编译的,所以利用iview官网中的第一种方法。 需要引用less文件,先下载两个东西。
cnpm install less --save
cnpm install less-loader --save
2.创建一个目录,我的名字起为theme,里面创建一个文件,index.less,里面内容如下
@import '~iview/src/styles/index.less';

// Here are the variables to cover, such as:
@primary-color: #8c0776;
3.在main.js中引入
import './theme/index.less';
4.这时会报错
需要更改utils中return里和less相关的内容改成
less: generateLoaders('less',{ javascriptEnabled: true })
5.重启运行
npm run dev
通用设置
1.在index.less中,我把主题改成了粉色,所以整体的字体我也要适应一个粉色的字,更改一下App.vue中的style,没用的被我去掉了,加了下字体颜色
#app {
  font-family: 'Avenir', Helvetica, Arial, sans-serif;
  -webkit-font-smoothing: antialiased;
  -moz-osx-font-smoothing: grayscale;
  text-align: center;
  color: #93939c;
}
2.整体的控件, 我使用了iview大控件的模式, 在main.js中更改下Vue.use(iView),改成下面,可以参照官方文档
Vue.use(iView, {
  transfer: true,
  size: 'large'
});
编辑页面
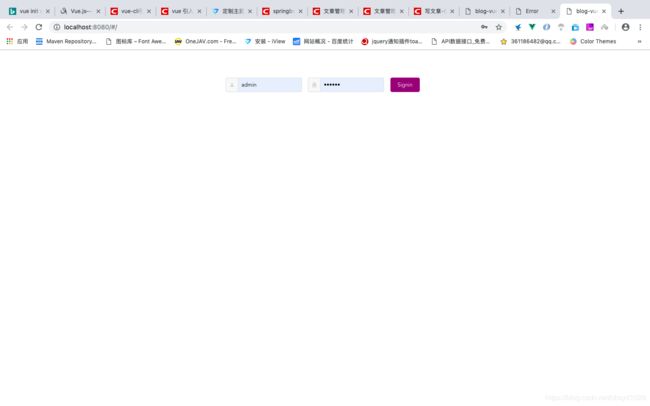
1.更改Login.vue的代码,写成一个简单的登陆页面,使用的是iview的响应式布局,可以参照官方文档,简单应用有一个回答
登录
效果图
2.编辑管理端的页面,我利用iview中案例中的布局,稍微改动,因为管理端中有通用的部分,所以需要创建一个独立的Layout.vue,作为通用部分,在content中加入其它的component
index.js中的路由添加
{
      path: '/manage',
      component: Layout
}
访问路径http://localhost:8080/#/manage 样式展示
在这一段代码中也利用了
3.首先创建3个vue,Page1.vue、Page2.vue、Page3.vue,引入index.js,创建子路由,在index.js中更改manage的路由,整体代码如下
import Vue from 'vue'
import Router from 'vue-router'
import HelloWorld from '@/components/HelloWorld'
import Login from '@/components/Login'
import Layout from '@/components/common/Layout'
import Page1 from '@/components/Page1'
import Page2 from '@/components/Page2'
import Page3 from '@/components/Page3'


Vue.use(Router)

export default new Router({
  routes: [
    {
      path: '/',
      name: 'login',
      component: Login
    },
    {
      path: '/hello',
      component: HelloWorld
    },
    {
      path: '/manage',
      component: Layout,
      children: [
        {
          path: '/manage/page1',
          name: 'page1',
          component: Page1
        },
        {
          path: '/manage/page2',
          name: 'page2',
          component: Page2
        },
        {
          path: '/manage/page3',
          name: 'page3',
          component: Page3
        }
      ]
    }
  ]
})
这3个页面中,我只写了Page1的代码,只是利用了iview官网的一些案例,只是静态页面,如下
用户管理
访问http://localhost:8080/#/manage/page1,预览样式
4.更改样式,我发现有一些通用的样式和我的小粉主题很不搭,就改了一些配色和样式,因为是通用的,所以我建了一个css文件夹,里面创建了一个common.css文件
button span a{
  color: darkgray;
}

/*table表头颜色*/
.ivu-table-header th{
  color:white;
  font-weight: bold;
  background-color: #f4b1df;
  /*border: none;*/
}

/*浮在某行颜色*/
.ivu-table-row-hover td {
  background-color: #fff0f8!important;
}

/*表格去掉边框*/
div.ivu-table-wrapper {
  border: none;
}
.ivu-table:before{content:'';width:100%;height:0px;position:absolute;left:0;bottom:0;z-index:1}
.ivu-table:after{content:'';width:0px;height:100%;position:absolute;top:0;right:0;z-index:3}
把这个css引入到main.js中,在main.js中加入
import './css/common.css'重新刷新查看样式
大概就这个样子了,其他的页面也大概是这个逻辑去画,只要有页面,编辑路由就可以了,我就不一一去画了,等到下一篇文章我只利用springboot写一个简单的查询逻辑,配合一下,这样小demo就搞定了(crud都是很简单了,多了就不写了)
项目结构
注:
我这个小项目中的所有图片我都没有解释,都放在了assets文件夹下,没有图片的话可能会报错哦,等整体都写完之后,会把代码放到github上供参考


