Android-aidl初窥
AIDL怎么用,也许由于是工作性质的原因,很多人都没有使用过aidl.
网上教程又是很懵逼,然后只好自己实践一下,做一下实践记录.
作为一名合格Android开发人员,Service肯定是听过的,Service是Android四大组件之一,它是不依赖于用户界面的,就是因为Service不依赖与用户界面,所以我们常常用于进行一些耗时的操作.
比如:下载数据等;进行读写文件等等.我们也常常用到了intentservice
有些朋友可能是从事开发工作的时间不是特别的长,所以觉得Service相对与另外两个组件activity、broadcast receiver来说,使用可能并不是特别的多,所以对Service来说,
正题
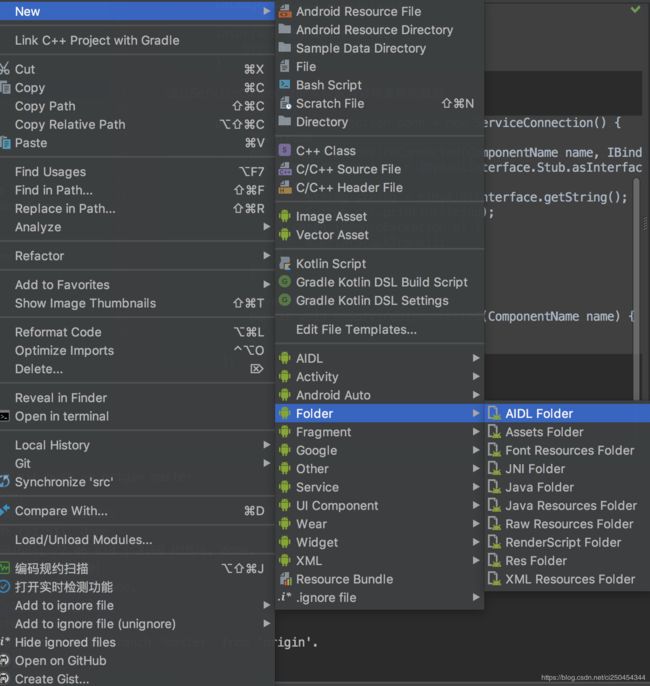
首先第一步,创建aidl文件夹,很简单,android studio提供了这个快捷的方式,我们到src目录,直接右键,创建aidl目录即可,非常方便.
第二步
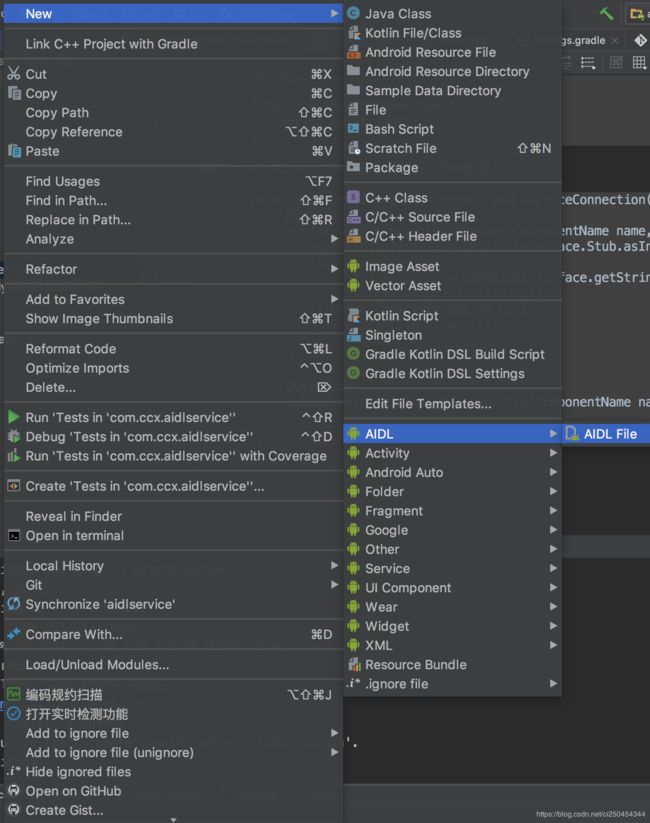
我们创建一个aidl文件
鼠标移到我们第一步创建的aidl目录里面,然后右键,创建一个aidlfile.很简单,直接生成了
如果创建成功,内容则是
// IMyAidlInterface.aidl
package com.ccx.aidlservice;

// Declare any non-default types here with import statements

interface IMyAidlInterface {
    /**
     * Demonstrates some basic types that you can use as parameters
     * and return values in AIDL.
     */
    void basicTypes(int anInt, long aLong, boolean aBoolean, float aFloat,
            double aDouble, String aString);
}
由于只是做下案例,所以,我们就只是单纯的写一个方案来对外提供一个字符串,修改一下,就只是普通的接口而已,非常方便
package com.ccx.aidlservice;

interface IMyAidlInterface {
    String getString();
}
接着我们就是创建一个服务,将onBind方法中返回的Ibinder,我们返回一个自己的.需要继承我们刚刚生成的aidl的接口,并且实现他的方法,我们这里返回了一个字符串.当然,四大组件都是要注册的,这个也不例外.我们需要在清单文件中,注册一下
很简单,如果这个接口找不到,我们得编译一下,编译成功会在build->generated->source->aidl->debug中生成一个路径,里面会有编译后的aidl文件
public class MyService extends Service {
    public MyService() {
    }

    @Override
    public IBinder onBind(Intent intent) {
        return new MyBind();
    }

    public class MyBind extends IMyAidlInterface.Stub {

        @Override
        public String getString() throws RemoteException {
            return "aadskjfi";
        }
    }
}
这个进程就是这样创建完成了.我们将其安装到手机上,这是第一个进程.
创建二号进程
我们需要创建第二个进程来调用这个进程的服务返回这个字符串.通过aidl
我们创建第二个module.
生成activity,并且在其中写入了一个button.绑定点击事件
public class MainActivity extends AppCompatActivity {

    @Override
    protected void onCreate(Bundle savedInstanceState) {
        super.onCreate(savedInstanceState);
        setContentView(R.layout.activity_main);
    }

    public void start(View view) {

    }
}
这里需要一个aidl,我们将上面那个aidl复制过来,目录也要一样,什么都不能变.同样需要编译一下
而后我们启动这个服务.通过bindservice的方式.这里面这个BIND_AUTO_CREATE是Context自带的的key.结果是1
    public void start(View view) {
        Intent intent = new Intent("com.ccx.aidlservice.MyService");
        intent.setPackage("com.ccx.aidlservice");
        bindService(intent, conn, BIND_AUTO_CREATE);
    }
这里的intent中需要一个action.似乎我们没有过滤action.重新到第一个进程中的清单文件里面,加入一个action修改为,然后安装一下
回到第二个进程中.重新介绍参数 conn则是我们的ServiceConnection.我们生成一个成员的ServiceConnection
  private ServiceConnection conn = new ServiceConnection() {
        @Override
        public void onServiceConnected(ComponentName name, IBinder service) {
            IMyAidlInterface IMyAidlInterface = com.ccx.aidlservice.IMyAidlInterface.Stub.asInterface(service);
            try {
                String string = IMyAidlInterface.getString();
                System.out.println(string);
            } catch (RemoteException e) {
                e.printStackTrace();
            }
        }

        @Override
        public void onServiceDisconnected(ComponentName name) {

        }
    };
这里面conn中的getString就是我们返回的值
安装第二个进程,我们启动点击按钮
成功打印.非常完美
![]()
同样这个是一个跨进程的通信,可以通过这个方式,去通知其他app做事情
点击查看源码
就介绍到这里~~~

