自定义流式布局
流式布局的使用已盛行it界许久了,可谓随处可见,随时可见,再不了解一下它,那就太out了。今天就让我们来看看 类似热门标签的流式布局吧~
1.流式布局的应用场景
慕课网有用到:

淘宝有用到:

其他学习网站等都有用到:
以上都是从实际的应用中截取到的图片,事实证明流式布局真的很潮~
2.流式布局分析
说到流式布局我们要先了解一下测量模式
①测量模式:
测量模式分三种即:
MeasureSpec.EXACTLY:精确模式, eg:100dp,match_parent.
(注:为什么match_parent属于精确模式呢?这是因为我们手机屏幕的大小是确定的,即使你已经先制定了一个控件比如TextView的高为50dp,下面又设置了一个View的高为match_parent,那实际上
该View的高=屏幕的高(确定的)-TextView的高(也是确定的)
确定的值 减去 确定的值 结果还是确定的
)
MeasureSpec.AT_MOST: 至多模式, view最多可以获得的宽高值,它需要计算所有包含的子view的宽高,最后计算出来的宽高总和值,eg:wrap_content.UNSPECIFIED:未指定模式,想设置多宽多高,就给你多宽多高,一般的控件不会指定这种模式,但也存在,eg:scrollview的宽高测量,就是使用的此种模式
②那么在我们的流式布局内,应该怎么设置布局的宽高呢? onMeasure():
1:如果布局指定的宽是match_parent或者精确的宽度值,那么直接就可以从父控件传入的测量规格中直接获取布局宽度,高度同理.
2:如果布局指定的宽高不是EXACTLY,而是AT_MOST,那么这时候,就需要计算每一个子view的宽高,来决定布局的宽高了。
宽度:摆放的所有子view占据宽度最多的一行,作为布局宽度。
高度:摆放的所有子view总共占据几行的高度总和。
③实现子View的布局方式: onLayout()
使用onLayout():设置ViewGroup内包含的所有子view的位置;
获取到每一行的每一个子view,计算出它的left,top,right,bottom,调用layout方法设置其在流式布局当中的位置。
宽度=子view最多的那行的宽度=那一行每一个子view的宽度+leftMargin+rightMargin;
高度=所有行的高度 = 每一行的高度+topMargin+bottomMargin;
使用 setMeasureDimension()—>设置流式布局的宽高。
那么下面我就按照分析的步骤来实现如下效果的流式布局
实现效果:
该流式布局特点:在布局内,随意摆放任意个view,每行所摆放的view个数,根据实施计算出来的宽度,一旦当前要摆放的view宽度和之前摆放的所有view宽度加在一起,超过了布局的宽度,那么就把该view换行摆放。且每个子view的背景颜色随机,点击时会变为白色。
3.流式布局的具体实现
①.自定义JMFlowLayout类继承ViewGroup类
public class JMFlowLayout extends ViewGroup {
    //构造器
    public JMFlowLayout(Context context) {
        this(context, null);
    }

    public JMFlowLayout(Context context, AttributeSet attrs) {
        this(context, attrs, 0);
    }

    public JMFlowLayout(Context context, AttributeSet attrs, int defStyleAttr) {
        super(context, attrs, defStyleAttr);
    }

    //需重写的onLayout()方法
    @Override
    protected void onLayout(boolean b, int i, int i1, int i2, int i3) {

    }

}
②在布局中使用我们自己定义的FlowLayout
<LinearLayout xmlns:android="http://schemas.android.com/apk/res/android"
xmlns:tools="http://schemas.android.com/tools"
android:layout_width="match_parent"
android:layout_height="match_parent"
android:orientation="vertical"
tools:context="com.example.chenjunmei.jmflowlayout.MainActivity">
<com.example.chenjunmei.jmflowlayout.JMFlowLayout
android:background="@android:color/holo_blue_light"
android:layout_width="wrap_content"
android:layout_height="wrap_content">
<TextView
android:layout_width="wrap_content"
android:layout_height="wrap_content"
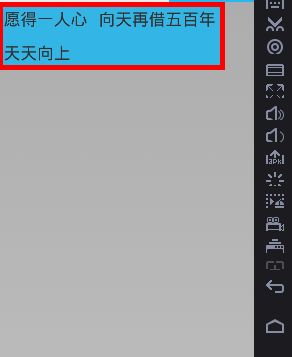
android:text="愿得一人心"
android:layout_margin="10dp"
android:textSize="30sp"
/>
<TextView
android:layout_width="wrap_content"
android:layout_height="wrap_content"
android:text="向天再借五百年"
android:layout_margin="10dp"
android:textSize="30sp"
/>
<TextView
android:layout_width="wrap_content"
android:layout_height="wrap_content"
android:text="蓝瘦香菇"
android:layout_margin="10dp"
android:textSize="30sp"
/>
com.example.chenjunmei.jmflowlayout.JMFlowLayout>
LinearLayout>
③测量,重写onMeasure()方法
代码中都已经详细说明:
  @Override
    protected void onMeasure(int widthMeasureSpec, int heightMeasureSpec) {
        //1获取宽度和高度的数值
        int widthSize = MeasureSpec.getSize(widthMeasureSpec);
        int heightSize = MeasureSpec.getSize(heightMeasureSpec);

        //2获取各自的设置模式
        int withMode = MeasureSpec.getMode(widthMeasureSpec);
        int heightMode = MeasureSpec.getMode(heightMeasureSpec);

        //声明相关变量
        //声明当前视图的高宽
        int width=0;
        int height=0;

        //声明每行的宽高
        int lineWidth=0;
        int lineHeight=0;

        //3.1 获取子视图的总个数
        int childCount=getChildCount();

        //3.2 得到至多模式时的宽高
        for (int i=0;i//注意!需要调用如下的方法之后,才可以获取子视图的宽高
            measureChild(childView,widthMeasureSpec,heightMeasureSpec);

            //3.2.1获取子视图测量的宽高
            int childWidth = childView.getMeasuredWidth();
            int childHeight = childView.getMeasuredHeight();

            //注意!要想获取边距,必须重写当前类的方法generateLayoutParams()
            //3.2.2获取子视图测量的margin值
            MarginLayoutParams mp = (MarginLayoutParams) childView.getLayoutParams();

            //3.2.3 具体的测量和计算过程
            if (lineWidth+childWidth+mp.leftMargin+mp.rightMargin<=widthSize){
                //说明不换行
                //行宽要增加
                lineWidth+=childWidth+mp.leftMargin+mp.rightMargin;
                //比较后确定当前行高
                lineHeight=Math.max(lineHeight,childHeight+mp.topMargin+mp.bottomMargin);
            }else{
             //说明要换行了
                //比较一下,取较大值作为布局的宽
                width=Math.max(lineWidth,width);
                //布局的高要增加
                height+=lineHeight;

                //再重新赋值 :行宽和行高
                lineWidth=childWidth+mp.leftMargin+mp.rightMargin;
                lineHeight=childHeight+mp.topMargin+mp.bottomMargin;
            }

            //如果是最后一个元素,要特别注意一下,保证最后一个元素的正确性
            if (i==childCount-1){
                width=Math.max(lineWidth,width);
                height+=lineHeight;
            }
        }

        //打印查看各个值
        //即当前布局的宽高
        Log.e("TAG", "width = " + width + ",height = " + height);
        //其实就是屏幕的宽高
        Log.e("TAG", "widthSize = " + widthSize + ",heightSize = " + heightSize);

        //3.0 相当于设值当前布局的宽高
        setMeasuredDimension(withMode == MeasureSpec.EXACTLY ? widthSize : width, heightMode == MeasureSpec.EXACTLY ? heightSize:height);
    }

    //注意!要想获取边距,必须重写当前类的方法generateLayoutParams()
    @Override
    public LayoutParams generateLayoutParams(AttributeSet attrs) {
        MarginLayoutParams mp = new MarginLayoutParams(getContext(), attrs);
        return mp;
    }
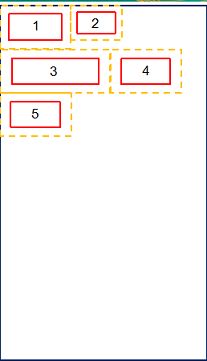
此时可获得布局的宽高范围:如蓝色区域所示

④绘制,重写onLayout()方法
先提供两个集合
    //第一个-->集合元素:存放的是每一行的高度
    private List<Integer> allHeights=new ArrayList<>();
    //第二个是集合的集合,外层集合元素为:存放的是每一行的childView的集合
    private List<List<View>> allViews=new ArrayList<>();
下面给每一个子view布局,childView.layout(l,t,r,b)
 @Override
    protected void onLayout(boolean changed, int l, int t, int r, int b) {
        //得到父视图的宽度
        int width=this.getWidth();

        //设置每行的行高,行宽
        int lineWidth=0;
        int lineHeight=0;

        //创建每一行的子视图的集合
        List lineList=new ArrayList<>();

        //获取子视图的总个数
        int childCount= getChildCount();

        //装配集合数据
        for (int i=0;i//获取子视图
            View childView=getChildAt(i);

            //获取子视图的宽高
            int childWidth=childView.getMeasuredWidth();
            int childHeight=childView.getMeasuredHeight();

            //获取子视图的边距
            MarginLayoutParams mp=(MarginLayoutParams)childView.getLayoutParams();

            //注意:!!!这里还要加上lineWidth
            if (childWidth+mp.leftMargin+mp.rightMargin+lineWidth<=width){
                //不换行,则把当前的子view加到 "行的集合中"
                lineList.add(childView);
                lineWidth+=childWidth+mp.leftMargin+mp.rightMargin;
                lineHeight=Math.max(lineHeight,childHeight+mp.topMargin+mp.bottomMargin);
            }else{
                //换行,则把 "每行的子view的集合" 添加到所有的集合中,把行高加到行高的集合中
                allViews.add(lineList);
                allHeights.add(lineHeight);

                //换行以后需要执行的操作
                //重新new一个行的集合
                lineList=new ArrayList<>();
                //把新的一行的子view加到行的集合中
                lineList.add(childView);
                lineWidth=childWidth+mp.leftMargin+mp.rightMargin;
                lineHeight=childHeight+mp.topMargin+mp.bottomMargin;
            }

            if (i==childCount-1){ //最后一个元素
                allViews.add(lineList);
                allHeights.add(lineHeight);
            }
        }
        //都表示行数,所以两者应该相等
        Log.e("TAG", "allViews.size = " + allViews.size() + ",allHeights.size = " + allHeights.size());

        //遍历集合元素,调用每一个view的layout方法
        //提供需要累加的两个人变量
        int x=0;
        int y=0;
        //第一层得到的是每一行的数据
        for (int i=0;i lineViews=allViews.get(i);

            //第二层得到的是每一个子view
            for (int j=0;jget(j);
                //得到边距
                MarginLayoutParams mp= (MarginLayoutParams) childView.getLayoutParams();
                //到l,t,r,b
                int left=x+mp.leftMargin;
                int top=y+mp.topMargin;
                int right=left+childView.getMeasuredWidth();
                int bottom=top+childView.getMeasuredHeight();

                childView.layout(left,top,right,bottom);

                //重新覆下一个子视图的左上顶点
                x+=childView.getMeasuredWidth()+mp.leftMargin+mp.rightMargin;
            }

            //该层循环出来则表示 换行 了
            //换行后,x要复位为0,y要重新赋值
            x=0;
            y+=allHeights.get(i);
        }

    }
–>到此,开始设置的3个TextView开始显示出来,并实现了自动换行:
效果如下图:
④再Mactivity中使用,并再做先关处理
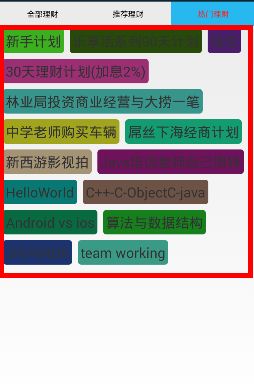
a.用集合数据替换xml中的textView
private String[] datas = new String[]{
"新手计划", "乐享活系列90天计划", "钱包",
"30天理财计划(加息2%)",
"林业局投资商业经营与大捞一笔",
"中学老师购买车辆", "屌丝下海经商计划",
"新西游影视拍", "Java培训老师自己周转", "HelloWorld", "C++-C-ObjectC-java", "Android vs ios", "算法与数据结构", "JNI与NDK", "team working"};
b.动态加载数据到flowLayout中
  for (int i=0;i
            final TextView tv=new TextView(getContext());
            tv.setText(datas[i]);

//            相当于布局文件中的:
//            android:layout_width="wrap_content"
//            android:layout_height="wrap_content"
//            必须要写
            ViewGroup.MarginLayoutParams mp= new ViewGroup.MarginLayoutParams(ViewGroup.LayoutParams.WRAP_CONTENT, ViewGroup.LayoutParams.WRAP_CONTENT);
            tv.setLayoutParams(mp);

            //  -->太挤了,且字体太小

            //设置边距
            mp.leftMargin= JMUiUtils.dp2px(5);
            mp.rightMargin=JMUiUtils.dp2px(5);
            mp.topMargin=JMUiUtils.dp2px(5);
            mp.bottomMargin=JMUiUtils.dp2px(5);

            tv.setTextSize(JMUiUtils.dp2px(16));


                                                        }
c.设置文本背景(有两种方式:代码中已经表明)
及点击时背景变白效果
 Random random=new Random();
            //设置背景颜色
            int red=random.nextInt(180);
            int green=random.nextInt(180);
            int blue=random.nextInt(180);
//方式一:使用GradentDrawable类,相当于 <=> shape 中的 标签
//            //指定颜色和圆角半径
//            tv.setBackground(JMDrawableUtils.getDrawable(Color.rgb(red,green,blue),JMUiUtils.dp2px(5)));

//方式二:使用StateListDrawable类,相当于 <=> 我们经常使用的selector 标签
 //给当前的颜色选择器添加选中图片指向状态,未选中图片指向状态
            tv.setBackground(JMDrawableUtils.getSelector(JMDrawableUtils.getDrawable(Color.rgb(red, green, blue), JMUiUtils.dp2px(5)), JMDrawableUtils.getDrawable(Color.WHITE, JMUiUtils.dp2px(5))));

            //使用方式二背景颜色可以改变,但是发现点击时,背景没有变为白色
            //这是因为 TextView 默认是不可点的
            //解决 TextView默认不可点的方法有如下两种:
            //①设置为可点击的
//            tv.setClickable(true);

            //②当设置点击事件时,textview就默认为可点的啦
            tv.setOnClickListener(new View.OnClickListener() {
                @Override
                public void onClick(View v) {
                    Toast.makeText(getContext(), tv.getText(), Toast.LENGTH_SHORT).show();
                }
            });


            //背景框把字体包的太紧了
            //提供内边距
            int padding=JMUiUtils.dp2px(5);
            tv.setPadding(padding,padding,padding,padding);

            //添加视图到我们的自定义JMFlowLayout中
            flowLayout.addView(tv);
涉及到的工具类JMDrawableUtils :
public class JMDrawableUtils {
    //提供一个指定颜色和圆角半径的Drawable对象
    public static GradientDrawable getDrawable(int rgb, float radius) {
        GradientDrawable gradientDrawable = new GradientDrawable();
        gradientDrawable.setColor(rgb);  //填充颜色
        gradientDrawable.setGradientType(GradientDrawable.RECTANGLE); //shape矩形
        gradientDrawable.setCornerRadius(radius);  //四周圆角半径
        gradientDrawable.setStroke(JMUiUtils.dp2px(1), rgb); //边框厚度与颜色
        return gradientDrawable;
    }

    public static StateListDrawable getSelector(Drawable normalDrawable, Drawable pressDrawable) {
        StateListDrawable stateListDrawable = new StateListDrawable();
        //给当前的颜色选择器添加选中图片指向状态,未选中图片指向状态
        stateListDrawable.addState(new int[]{android.R.attr.state_enabled, android.R.attr.state_pressed}, pressDrawable);
        stateListDrawable.addState(new int[]{android.R.attr.state_enabled}, normalDrawable);
        //设置默认状态
        stateListDrawable.addState(new int[]{}, normalDrawable);
        return stateListDrawable;
    }
}
最终效果如图: