Nginx进阶教程
目录
安装
基本介绍和配置文件语法
反向代理
gzip 压缩提升网站性能
在线升级
监控工具 ngxtop
编译第三方模块
auth_basic 模块使用
日志分析工具
用 nginx 搭建谷歌镜像网站
自制启动脚本
日志切割
作为负载均衡器
开启 debug 模式
gzip static 模块探索
使用 acme.sh 安装 Let’ s Encrypt 提供的免费 SSL 证书
给 GitLab 应用加上 https
安装
1. 使用命令行安装
如果是在ubuntu系统下,可以直接使用命令行一键安装,安装完后也会自动启动nginx服务。
$ sudo apt-get install nginx
如果是在mac下,可以使用brew安装。
$ brew install nginx
2. 源码编译安装
在生产环境下,我们可能需要下载源码编译安装,因为用命令行安装的方式,第一,自定义性不强,第二,可能安装包比较老。
登录到主机环境,这里以ubuntu系统安装目前的nginx稳定版本1.8.0为例。
在编译nginx之前先安装一些依赖的包。
$ sudo apt-get install build-essential libc6 libpcre3 libpcre3-dev libpcrecpp0 libssl0.9.8 libssl-dev zlib1g zlib1g-dev lsb-base openssl libssl-dev libgeoip1 libgeoip-dev google-perftools libgoogle-perftools-dev libperl-dev libgd2-xpm-dev libatomic-ops-dev libxml2-dev libxslt1-dev python-dev
接下来到官方网站下载nginx的源码包。
# 下载源码包
$ wget http://nginx.org/download/nginx-1.8.0.tar.gz

# 解压
$ tar xvf nginx-1.8.0.tar.gz

# 进入目录并生成Makefile文件
$ cd nginx-1.8.0
$ ./configure \
--prefix=/etc/nginx                   \
--sbin-path=/usr/sbin/nginx           \
--conf-path=/etc/nginx/nginx.conf     \
--pid-path=/var/run/nginx.pid         \
--lock-path=/var/run/nginx.lock       \
--error-log-path=/var/log/nginx/error.log \
--http-log-path=/var/log/nginx/access.log \
--with-http_gzip_static_module        \
--with-http_stub_status_module        \
--with-http_ssl_module                \
--with-pcre                           \
--with-file-aio                       \
--with-http_realip_module             \
--without-http_scgi_module            \
--without-http_uwsgi_module           \
--without-http_fastcgi_module         \
上面的./configure命令我是按照自己的需要来定制安装,如果要简单点的话,直接运行./configure就好了。
关于上面的参数可以使用nginx -V来查看。
接下来编译并安装。
$ make
$ sudo make install
这样就算安装成功。
要启动nginx,可以这样:
$ sudo nginx
如果要停止服务,可以这样:
$ sudo nginx -s quit
如果修改了配置文件,要重新生效,可以这样:
$ sudo nginx -s reload
复制
完结。
基本介绍和配置文件语法
1. 介绍
nginx [engine x] is an HTTP and reverse proxy server, a mail proxy server, and a generic TCP proxy server, originally written by Igor Sysoev.
按照官方的定义,nginx是一个HTTP服务器,也是一个反向代理服务器。apache应该为大家所熟知,而nginx就是类似apache的提供静态网页的web服务器,相比于apache的多进程多线程的并发模型,而nginx是基于事件的异步IO的并发模型,性能更好,而且nginx是一个轻量级的服务器。
2. 安装
如果是ubuntu系统要安装nginx,只需要一条命令。
sudo apt-get install nginx
如果要编译安装,那也简单,也是按照三步曲来。
./configure
make
sudo make install
其中关于configure是可以按照自己的需求来配置安装的参数的。比如:
./configure \
--user=nginx                          \
--group=nginx                         \
--prefix=/etc/nginx                   \
--sbin-path=/usr/sbin/nginx           \
--conf-path=/etc/nginx/nginx.conf     \
--pid-path=/var/run/nginx.pid         \
--lock-path=/var/run/nginx.lock       \
--error-log-path=/var/log/nginx/error.log \
--http-log-path=/var/log/nginx/access.log \
--with-http_gzip_static_module        \
--with-http_stub_status_module        \
--with-http_ssl_module                \
--with-pcre                           \
--with-file-aio                       \
--with-http_realip_module             \
--without-http_scgi_module            \
--without-http_uwsgi_module           \
--without-http_fastcgi_module
具体的编译安装的方法可以参考官方的这篇文章configure。
3. 命令行语法
要启动(start)、重启(restart),停止(stop)nginx服务也很简单。
可以这样。
sudo /etc/init.d/nginx restart # or start, stop
或者这样。
sudo service nginx restart # or start, stop
有时候我们改了配置文件只是要让配置生效,这个时候不必重启,只要重新加载配置文件即可。
sudo nginx -s reload
更多的命令可以看这篇文章beginners_guide。
4. 配置文件语法
nginx是模块化的系统,整个系统是分成一个个模块的。每个模块负责不同的功能。比如http_gzip_static_module就是负责压缩的,http_ssl_module就是负责加密的,如果不用某个模块的话,也可以去掉,可以让整个nginx变得小巧,更适合自己。在上面的configure指令中带了很多参数,就是在这里编译之前可以加入某些模块或去掉某些模块的。
要用的模块已经被编译进nginx了,成为nginx的一部分了,那要怎么用这些模块呢?那就得通过配置文件,这跟传统的linux服务差不多,都是通过配置文件来改变功能。nginx的模块是通过一个叫指令(directive)的东西来用的。整个配置文件都是由指令来控制的。nginx也有自己内置的指令,比如events, http, server, 和 location等,下面会提到的。
如果是ubuntu系统,安装后,配置文件存放在/etc/nginx/nginx.conf。
把注释的内容去掉。
user www-data;
worker_processes 1;
pid /run/nginx.pid;

events {
  worker_connections 768;
}

http {

  sendfile on;
  tcp_nopush on;
  tcp_nodelay on;
  keepalive_timeout 65;
  types_hash_max_size 2048;

  include /etc/nginx/mime.types;
  default_type application/octet-stream;

  access_log /var/log/nginx/access.log;
  error_log /var/log/nginx/error.log;

  gzip on;
  gzip_disable "msie6";

  include /etc/nginx/conf.d/*.conf;
  include /etc/nginx/sites-enabled/*;
}
在这个文件中,先不管上面三行,就是由两个block(块)组成的。
events {
}

http {
}

mail {
}
块和块之间还可以嵌套的。例如http下面可以放server。
http {
 server {
 }
}
这个是主配置文件。有时候仅仅一个配置文件是不够的,由其是当配置文件很大时,总不能全部逻辑塞一个文件里,所以配置文件也是需要来管理的。看最后两行include,也就是说会自动包含目录/etc/nginx/conf.d/的以conf结尾的文件,还有目录/etc/nginx/sites-enabled/下的所有文件。
在/etc/nginx/conf.d/下有个配置文件叫rails.conf,它的内容大体是这样的。
upstream rails365 {
    # Path to Unicorn SOCK file, as defined previously
    server unix:///home/yinsigan/rails365/shared/tmp/sockets/unicorn.sock fail_timeout=0;
}
server {
    listen 80 default_server;
    listen [::]:80 default_server ipv6only=on;
    server_name www.rails365.net;
    root         /home/yinsigan/rails365/current/public;
    keepalive_timeout 70;

  ...

    # redirect server error pages to the static page /50x.html
    error_page   500 502 503 504  /50x.html;
    location = /50x.html {
        root   html;
    }

  ...
}

server {
  listen 80;
  server_name rails365.net;

  return 301 $scheme://www.rails365.net$request_uri;
}
最后整个配置文件的结构大体是这样子的。
# 这里是一些配置
...
http {
  # 这里是一些配置
  ...
  # 这部分可能存在于/etc/nginx/conf.d/目录下
  upstream {

  }
  server {
    listen 8080;
    root /data/up1;

    location / {
    }
  }
  server {
    listen 80;
    root /data/up2;

    location / {
    }
  }
  这里是一些配置
  ...
}

mail {
}
为了篇幅,有些内容则省略了。
指令和指令之间是有层级和继承关系的。比如http内的指令会影响到server的。
http那部分除非必要,我们不动它,假如你现在要部署一个web服务,那就在/etc/nginx/conf.d/目录下新增一个文件就好了。
http和events还有mail是同级的。http就是跟web有关的。
server,顾名思义就是一个服务,比如你现在有一个域名,要部署一个网站,那就得创建一个server块。
就假设你有一个域名叫foo.bar.com,要在浏览器输入这个域名时就能访问,那可能得这样。
server {
  listen 80;
  root /home/yinsigan/foo;
  server_name foo.bar.com;
  location / {

  }
}
具体的意思是这样的。listen是监听的端口。如果没有特殊指定,一般网站用的都是80端口。
root是网站的源代码静态文件的根目录。一般来说会在root指定的目录下放置网站最新访问的那个html文件,比如index.html等。
server_name指定的是域名。
有了这些,在浏览器下输入http://foo.bar.com就能访问到目录/home/yinsigan/foo下的index.html文件的内容。但是有时候我们得访问http://foo.bar.com/articles呢?那得用location。像这样。
server {
  ...
  server_name foo.bar.com;
  location /articles {

  }
}
除了http://foo.bar.com/articles,还有http://foo.bar.com/groups,/menus/1等很多,是不是每个都要创建一个location啊,肯定不可能。我们有动态的方法来处理的。
下面来看一个例子。
server {
    listen      80;
    server_name example.org www.example.org;
    root        /data/www;

    location / {
        index   index.html index.php;
    }

    location ~* \.(gif|jpg|png)$ {
        expires 30d;
    }

    location ~ \.php$ {
        fastcgi_pass  localhost:9000;
        fastcgi_param SCRIPT_FILENAME
                      $document_root$fastcgi_script_name;
        include       fastcgi_params;
    }
}
当用户访问http://example.org时就会去读取/var/root/index.html,如果找不到就会读取index.php,就会转发到fastcgi_pass里面的逻辑。当用户访问http://example.org/about.html就会去读取/var/root/about.html文件,同样道理,当用户访问http://example.org/about.gif就会读取/var/root/about.gif文件,并会在30天后过期,也就是缓存30天。
反向代理
1. 什么叫反向代理服务器?
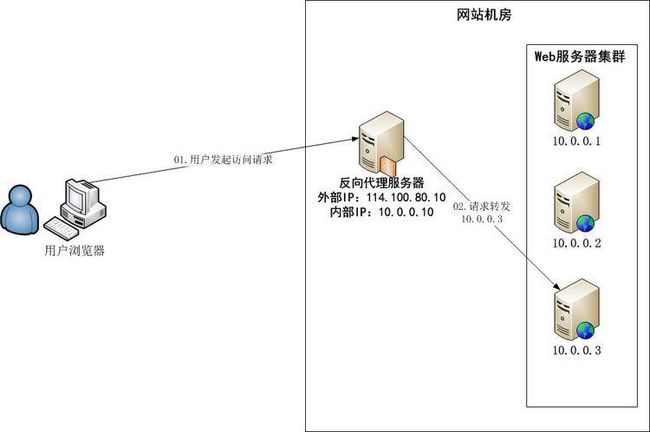
要说反向代理服务器,先来说一般的代理服务器。代理就是受委托去做一些事。假如用户A委托B去做一些事,做完之后B告诉A结果。在代理服务器中也是一样的道理,用户A通过代理服务器B访问网站C(www.example.com),请求先到代理服务器B,B再转发请求到网站C,代理服务器B是真正访问网站C的,访问之后再把网站C的应答结果发给用户A。这样给用户A的感觉是C直接提供服务的一样,因为看不到B的整个处理过程。代理服务器是一个中间者,是充当转发请求的角色。这种代理也叫正向代理。
使用正向代理是要在客户端进行设置,比如浏览器设置代理服务器的域名或IP,还有端口等。
正向代理的作用有很多,例如,能访问本无法访问的,加速,cache,隐藏访问者的行踪等,具体的不再详述了。
反向代理(reverse proxy)正好与正向代理相反,对于客户端而言代理服务器就像是原始服务器,并且客户端不需要进行任何特别的设置。假如用户A访问网站B,这个时候网站B充当了web服务器,也充当了反向代理服务器,它充当的代理服务器的角色是这样,假如用户A要得到网站C的内容,而用户A又不能直接访问到(例如网络原因),而服务器B可以访问到网站C,那服务器可以得到网站C的内容再存起来发给用户A,这整个过程用户A是直接和代理服务器B交互的,用户A不知道网站C的存在,这个web服务器B就是一台反向代理服务器,这个网站C就是上游服务器(upstream servers)。
反向代理的作用是,隐藏和保护原始服务器,就像刚才的例子,用户A根本不知道服务器C的存在,但服务器C确实提供了服务。还有,就是负载均衡。当反向代理服务器不止一个的时候,就可以做成一个集群,当用户A访问网站B时,用户A又需要网站C的内容,而网站C有好多服务器,这些服务器就形成了集群,而网站B在请求网站C,就可以有多种方式(轮循,hash等),把请求均匀地分配给集群中的服务器,这个就是负载均衡。
2. 示例
我们先来看最一个最简单的例子。
2.1 最简单的反向代理
nginx的反向代理是依赖于ngx_http_proxy_module这个module来实现的。
反向代理服务器能代理的请求的协议包括http(s),FastCGI,SCGI,uwsgi,memcached等。我们这里主要集中在http(s)协议。
我有一个网站,用的是https协议来访问的。用这个协议访问的网站在chrome等浏览器的地址栏是可以看到一个绿色的代表安全的标志的。你请求的所有资源都要是https的,它才会出现。假如你请求了一张外部的图片,而这张图片是以http协议请求的,那这个时候那个安全的标志就不存在的。
所以我要把这个https协议的图片请求反向代理到http协议的真实图片上。https协议的这张图片是不存在,而它有一个地址实际指向的内容是http协议中的图片。
# https
server {
  server_name www.example.com;
  listen       443;
  location /newchart/hollow/small/nsh000001.gif {
    proxy_pass http://image.sinajs.cn/newchart/hollow/small/nsh000001.gif;
  }

  location /newchart/hollow/small/nsz399001.gif {
    proxy_pass http://image.sinajs.cn/newchart/hollow/small/nsz399001.gif;
  }
假如我的网站是www.example.com这样就能使用https://www.example.com/newchart/hollow/small/nsh000001.gif,它指向是http://image.sinajs.cn/newchart/hollow/small/nsh000001.gif。
2.2 动态转发
我们的网站不止是展示用的,我们还要处理动态请求,例如表单等。所以nginx也要和php,java,ruby等语言配合。
下面的例子是nginx和unicorn(ruby的应用服务器)的一个例子。
upstream rails365 {
    # Path to Unicorn SOCK file, as defined previously
    server unix:///home/yinsigan/rails365/shared/tmp/sockets/unicorn.sock fail_timeout=0;
}
server {
        listen 80 default_server;
        listen [::]:80 default_server ipv6only=on;
        server_name www.rails365.net;
        root         /home/yinsigan/rails365/current/public;

        try_files $uri/index.html $uri @rails365;
        location @rails365 {
                proxy_set_header X-Forwarded-For $proxy_add_x_forwarded_for;
                proxy_set_header Host $http_host;
                proxy_redirect off;
                proxy_pass http://rails365;
        }
}
先从try_files $uri/index.html $uri @rails365;这句说起,它先找根目录/home/yinsigan/rails365/current/public下的index.html,假如是www.rails365.net/about.html还是会找根目录下的about.html,如果都找不到,才会执行@rails365的部分,也就是location @rails365。
前面两行是设置请求的头部,第三行是设置不转地址,这些先不管。来看第三行proxy_pass http://rails365;。这行会反向代理到upstream rails365指定的内容。upstream里面指定了一个服务器,这个服务器和nginx是同一台机器的,用的是unix socket来连接,连接的是一个unicorn进程。
总结起来是这样的。假如用户要访问https://www.rails365.net/articles/,这个请求不能只靠nginx,因为又不是以.html结尾,所以转发给了upstream所指向的服务器,转发请求的方式是unix socket,到了unicorn进程,unicorn处理后交给nginx,nginx才最终发给客户。在这里,nginx还起到一个cache和保护的作用,unicorn就是上游服务器。
2.3 websocket
关于webcoket的概念,这里不再详细,可以参照这篇文章。
upstream ws {
  server unix:///home/eason/tt_deploy/shared/tmp/sockets/puma.sock fail_timeout=0;
}
server {
  location /ws/ {
    proxy_pass http://ws;
    proxy_http_version 1.1;
    proxy_set_header Upgrade $http_upgrade;
    proxy_set_header Connection "upgrade";
  }
}
先由http协议升级为ws协议,然后通过unix socket连接到puma进程,一个支持ws协议的进程。原理跟上面的unicorn差不多。
注意:nginx要支持websocket协议,必须是 1.3.13或以上版本。
要测试是否成功,有两种比较简单的方法。
第一种是在chrome浏览器上console那里直接访问。
比如new WebSocket('ws://www.example.com/wx');
第二种就是在chrome的开发者工具,network那里看有没有101协议的请求。
比如。
gzip 压缩提升网站性能
1. 介绍
网站开发到一定程度,可能css文件或js文件会越来越大,因为有可能加载了很多的插件。这个时候如果能把这些文件压缩一下就好了。
nginx就支持这种功能,它可以把静态文件压缩好之后再传给浏览器。浏览器也要支持这种功能,只要浏览器的请求头带上Accept-Encoding: gzip就可以了。假如有一个文件叫application.css,那nginx就会使用gzip模块把这个文件压缩,然后传给浏览器,浏览器再解压缩成原来的css文件,就能读取了。
所有的这一切都需要nginx已经有编译过ngx_http_gzip_module这个模块。这个模块能对需要的静态文件压缩大小,比如图片,css,javascript,html等。压缩是需要消耗CPU,但能提高传缩的速度,因为传缩量少了许多,从而节省带宽。
2. 使用
使用之前先来查看一下是否编译了ngx_http_gzip_module这个模块。
sudo nginx -V
如果输出--with-ngx_http_gzip_module,说明已经编译了。没有的话,可以参考这篇文章升级centos系统上的nginx来编译。
要配置nginx的gzip也很简单。
http {
        gzip on;
        gzip_disable "msie6";

        gzip_vary on;
        gzip_proxied any;
        gzip_comp_level 6;
        gzip_buffers 16 8k;
        gzip_http_version 1.1;
        gzip_types text/plain text/css application/json application/x-javascript text/xml application/xml application/xml+rss text/javascript;
        server {
                location ~ ^/assets/ {
                   gzip_static on;
                   expires max;
                   add_header Cache-Control public;
                }
        }
}
上面最重要的是http中gzip on;还有gzip_types这两行,是一定要写的。其他的gzip_vary等都是一些配置,可以不写。
然后在需要压缩的静态资源那里加上下面三行。
gzip_static on;
expires max;
add_header Cache-Control public;
改了配置用sudo nginx -s reload重新加载生效。
3. 测试
要测试可以使用浏览器,比如chrome。
只要用开发者的network功能查看两次资源的大小就好了。比如:
在压缩前:
压缩后:
或者使用curl工具也可以。
~/codes/rails365 (master) $ curl -I -H "Accept-Encoding: gzip" http://www.rails365.net/assets/application-7166fb1597da14300423c6a60c281a45f24573b249eafe0fd84b5c261db1d3a5.js
HTTP/1.1 200 OK
Server: nginx/1.8.0
Date: Tue, 20 Oct 2015 10:44:52 GMT
Content-Type: application/x-javascript
Last-Modified: Tue, 20 Oct 2015 09:36:44 GMT
Connection: keep-alive
Vary: Accept-Encoding
ETag: W/"56260b2c-22b41"
Expires: Thu, 31 Dec 2037 23:55:55 GMT
Cache-Control: max-age=315360000
Cache-Control: public
Content-Encoding: gzip
只要返回Content-Encoding: gzip说明成功的。
在线升级
1. 缘由
公司有一个项目,需要用到websocket,所谓websocket是基于tcp/ip的协议,它跟http协议是同等级的。它解决的问题是长轮循的资源消耗问题。也就是用它做类似长轮循的应用时,因为本身协议的支持,资源消耗是较低的。类似的应用可以是聊天室,通知系统,股票实时更新等。具体的我们不再细说。由于我们项目是部署在nginx上的,用的ruby on rails开发的,使用的gem是actioncable。rails程序是用unicorn部署的,websocket是用puma来部署,也是actioncable默认建议的。也就是两个程序,一个是web的,一个是websocket的。两个都是挂在nginx下。nginx作为反向代理服务器,代理请求到unicorn或puma,unciron或puma处理后,交给nginx,nginx再转发给客户端。nginx作为高性能的服务器,起到缓冲作用,主要的压力也是集中在nginx上,这也是一般rails程序的部署情况。
之前unicorn是部署好的。这个时候要加上puma。仿照unicorn在nginx的配置,puma在nginx也是一样的。都是用proxy_pass加上upstream就可以搞定。关于nginx的具体配置问题可以查看本站nginx相关的文章。这里不再详述。
配置好了。刚开始第一次发出请求可以成功的,因为我监控了puma的日志,能够产生正确的请求日志,但发出第二次就不行了,总是超时。最后我查到了原因,原来是nginx在1.4以上才支持websocket。我发现线上centos用yum安装的nginx版本才是1.0,真是醉了。关于如果如何查看websocket请求的问题可以查看本站websocket相关的文章。
我想给nginx来个升级,但最好是无破坏的升级。假如你在线上还有程序在跑,你可不能破坏掉。不然由此造成的业务损失,可得怪你。
2. 升级过程
在安装前先执行下面的命令,这是我安装过程中遇到的问题。先安装就能避免了。
sudo yum -y install pcre-devel openssl openssl-devel
在官网上找到了nginx的最新稳定版本,下载下来,然后解压缩。
cd nginx

./configure \
--prefix=/etc/nginx                   \
--sbin-path=/usr/sbin/nginx           \
--conf-path=/etc/nginx/nginx.conf     \
--pid-path=/var/run/nginx.pid         \
--lock-path=/var/run/nginx.lock       \
--error-log-path=/var/log/nginx/error.log \
--http-log-path=/var/log/nginx/access.log \
--with-http_gzip_static_module        \
--with-http_stub_status_module        \
--with-http_ssl_module                \
--with-pcre                           \
--with-file-aio                       \
--with-http_realip_module             \
--without-http_scgi_module            \
--without-http_uwsgi_module           \
--without-http_fastcgi_module

make
sudo make install
关于这里面的参数,可以使用nginx -V查看。
这个时候已经安装完毕了,但是你还没有用新nginx来启动,还有,老的nginx还在用着呢,如何无缝启动呢。
Makefile提供了一个命令
sudo make upgrade
就好了。这样可以杀死旧的nginx进程,用新的来代替。详细的你可以查看Makefile文件。
监控工具 ngxtop
1. ngxtop
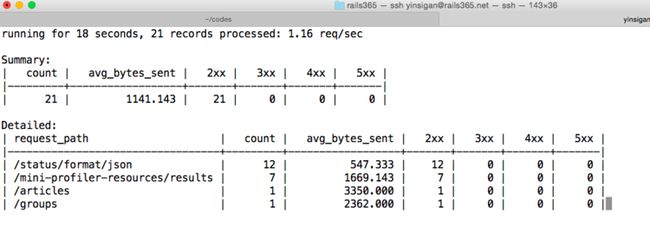
ngxtop是一款用python编写的类top的监控nginx信息的工具。它就像top一样,可以实时地监控nginx的访问信息。
2. 安装
在ubuntu下是这样安装的。
sudo pip install ngxtop
如果没有装pip,可以用下面的命令安装。
sudo apt-get install python-pip
3. 用法
直接输入命令就可以了。
ngxtop
效果是这样。
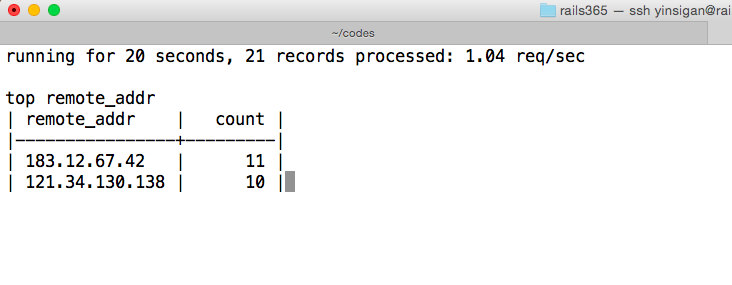
还可以监控远程的来源IP。
sudo ngxtop top remote_addr
编译第三方模块
1. 介绍
nginx是分成一个个模块的,比如core模块,gzip模块(ngx_http_gzip_static_module),proxy模块(ngx_http_proxy_module),每个模块负责不同的功能,例如ngx_http_gzip_static_module负责压缩,ngx_http_proxy_module负责反向代理的请求,除了基本的模块,有些模块可以选择编译或不编译进nginx。官网文档中的Modules reference部分列出了nginx源码包的所有模块。我们可以按照自己的需要定制出一个最适合自己的nginx服务器。假如需要gzip模块,那在编译的时候,可以这样指定。
./configure --with-http_gzip_static_module
假如不需要fastcgi这个模块,可以这样:
./configure --without-http_fastcgi_module
2. 安装
除了源码包提供了各种模块,nginx还有各种各样的第三方模块。官方文档NGINX 3rd Party Modules列出了nginx的很多第三方模块,除此之外,很多很有用的模块也能在github等网站上找到。
这些模块提供着各种各样意想不到的功能,有时候我们在语言层面办不好或不好办的事,交给nginx的第三方模块,可能会有惊喜。
我们以这个模块nginx-module-vts作为例子,来演示一下如果来安装第三方模块和简单的使用。
先把模块的源码下载下来。
$ git clone git://github.com/vozlt/nginx-module-vts.git
配置各种参数,最主要是--add-module那一行。
./configure \
--user=nginx                          \
--group=nginx                         \
--prefix=/etc/nginx                   \
--sbin-path=/usr/sbin/nginx           \
--conf-path=/etc/nginx/nginx.conf     \
--pid-path=/var/run/nginx.pid         \
--lock-path=/var/run/nginx.lock       \
--error-log-path=/var/log/nginx/error.log \
--http-log-path=/var/log/nginx/access.log \
--with-http_gzip_static_module        \
--with-http_stub_status_module        \
--with-http_ssl_module                \
--with-pcre                           \
--with-file-aio                       \
--with-http_realip_module             \
--without-http_scgi_module            \
--without-http_uwsgi_module           \
--without-http_fastcgi_module         \
--add-module=/home/yinsigan/nginx-module-vts
--add-module是接刚才下载的模块的绝对路径。
编译安装。
$ make
$ sudo make install
# 升级可执行文件nginx和重启服务
$ sudo make upgrade
要检测是否成功安装的话,使用nginx -V命令即可。
$ nginx -V
nginx version: nginx/1.8.0
built by gcc 4.8.2 (Ubuntu 4.8.2-19ubuntu1)
built with OpenSSL 1.0.1f 6 Jan 2014
TLS SNI support enabled
configure arguments: --user=nginx --group=nginx --prefix=/etc/nginx --sbin-path=/usr/sbin/nginx --conf-path=/etc/nginx/nginx.conf --pid-path=/var/run/nginx.pid --lock-path=/var/run/nginx.lock --error-log-path=/var/log/nginx/error.log --http-log-path=/var/log/nginx/access.log --with-http_gzip_static_module --with-http_stub_status_module --with-http_ssl_module --with-pcre --with-file-aio --with-http_realip_module --without-http_scgi_module --without-http_uwsgi_module --without-http_fastcgi_module --add-module=/home/yinsigan/codes/nginx-module-vts --add-module=/home/yinsigan/codes/nginx-module-url
出现了nginx-module-vts,说明安装成功了。
这是添加一种module的情况,假如需要添加很多个module呢,那就再增加一个--add-module就好了。
3. 使用
语法很简单,分别在http和server部分添加几行指令。
http {
    vhost_traffic_status_zone;

    ...

    server {

        ...

        location /status {
            vhost_traffic_status_display;
            vhost_traffic_status_display_format html;
        }
    }
}
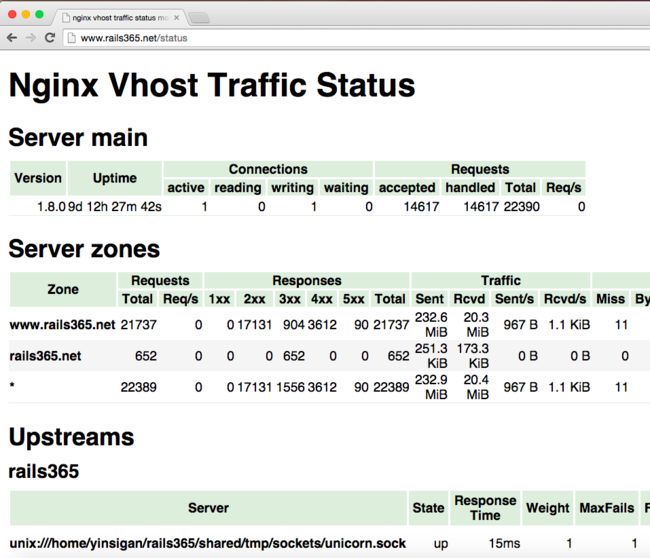
运行sudo nginx -s reload让配置生效。之后通过浏览器访问http://127.0.0.1/status就可以看到效果了。
可以看到,这个模块是用来监控nginx的运行情况的,比如反向代理的服务器,cache等情况。
本篇的重点不在于该模块的使用,具体地可以查看官方readme文档,后绪会推出其他模块介绍与使用的文章。
auth_basic 模块使用
1. 介绍
在这一篇文章nginx之编译第三方模块(六)中介绍了如何编译模块,而我们演示了如何编译nginx-module-vts这个监控nginx服务器运行情况的模块。只要用户在浏览器输入http://your_ip/status,就可以访问监控页面。这样很不安全,因为任何人都可以访问这个页面。如果有一个方法能让访问这个页面的时候输入用户名和密码,那就好了。而nginx的源码提供了ngx_http_auth_basic_module这个模块,它可以来解决这个问题。
ngx_http_auth_basic_module它提供了最基本的http认证,这是http协议支持的,它会弹出一个框让你输入用户名和密码,只有用户名和密码输入正确了才能访问,这样就能防止/status被任何人访问了。
2. 使用
这个模块是默认就编译进nginx的,所以可以直接拿来使用。
首先我们得有一个机制是来存放用户名和密码,ngx_http_auth_basic_module是使用文件作为存储介质的,用户名是明文存储,而密码是加密之后再存储,这样在认证框输入的用户名和密码必须和文件的信息匹配才能认证成功。
我们用htpasswd这个命令来生成存放用户名和密码的文件,所以需要先安装它。
$ sudo apt-get install apache2-utils
我们先添加第一个用户hfpp2012。
$ sudo htpasswd -c /etc/nginx/.htpasswd hfpp2012
New password:
Re-type new password:
Adding password for user hfpp2012
键入两遍相同的密码就可以了。
-c参数表示会创建/etc/nginx/.htpasswd这个文件,以后再添加用户就不用指定这个参数了,比如添加yinsigan用户。
$ sudo htpasswd /etc/nginx/.htpasswd yinsigan
现在我们需要在配置文件中打开http basic auth认证。
server {
        ...
        location /status {
            auth_basic "Restricted";
            auth_basic_user_file /etc/nginx/.htpasswd;
            vhost_traffic_status_display;
            vhost_traffic_status_display_format html;
        }
}
这样就可以了,看下效果图。
日志分析工具
1. 介绍
本篇会介绍三个关于分析nginx日志信息的工具。
2. nginx_log_analysis
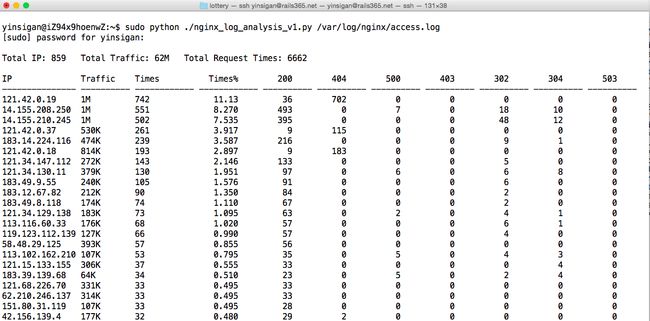
这个工具是由一位叫LEO的网友提供的,它的博客是http://linux5588.blog.51cto.com/,它是用python语言写的,只是用来分析nginx日志,它的输出比较简单,以IP为主,可以查看每个IP的访问的流量,次数,占比等信息。
先获取这个python文件。
# 下载
$ wget http://aliyun.rails365.net/nginx_log_analysis_v1.zip
# 解压缩
$ unzip nginx_log_analysis_v1.zip
要使用的话,只要接一个日志文件作为参数就可以了。
$ sudo python ./nginx_log_analysis_v1.py /var/log/nginx/access.log
效果图如下:
3. request-log-analyzer
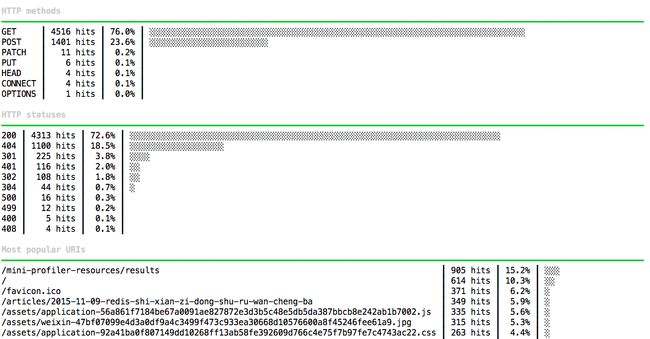
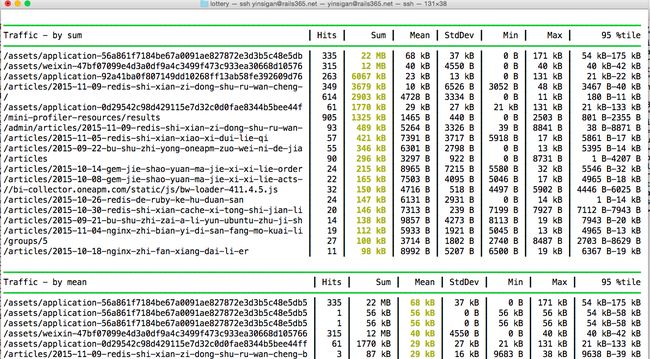
request-log-analyzer这个工具是一个用ruby写的gem包,它不仅能分析rails项目的访问日志,还能分析nginx,apache,MySQL,PostgreSQL的日志,它能统计每个页面的访问次数,一天访问的情况,还有来源分析等。
先来安装。
$ gem install request-log-analyzer
使用也很简单,用日志文件作为参数。
$ request-log-analyzer access.log
效果图如下:
4. goaccess
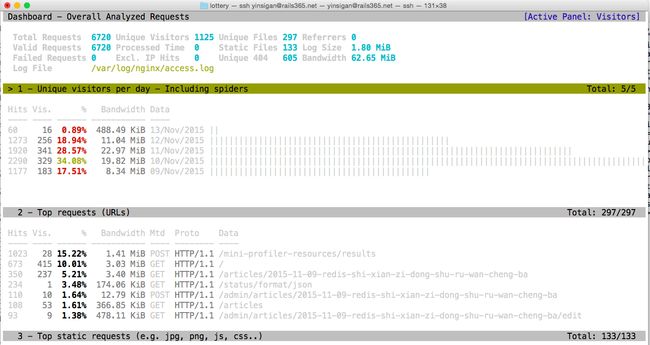
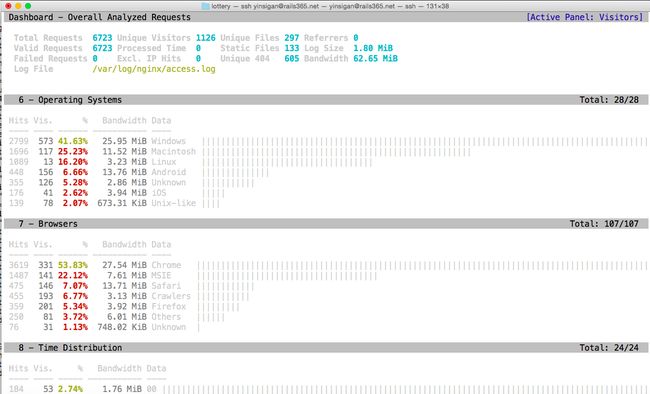
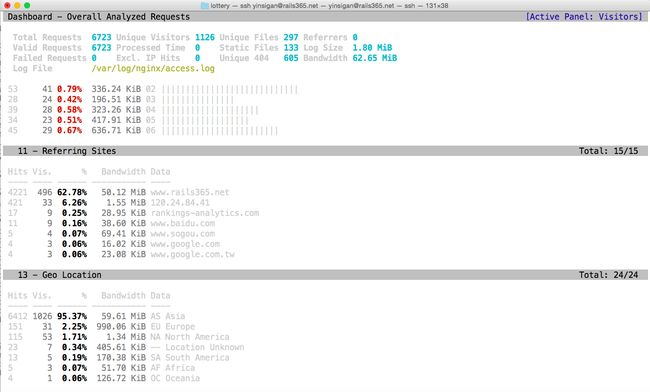
goaccess是一个专业的实时日志分析工具,是用c语言写的,功能强大,能分析nginx,apache等日志。它能够分析访问的来源,访问所有的浏览器,操作系统,它的统计信息不输于一个专业的浏览量统计网站,而且它还能导出成csv、html等格式。
安装。
$ sudo apt-get install libncursesw5-dev libgeoip-dev libtokyocabinet-dev
$ wget http://tar.goaccess.io/goaccess-0.9.6.tar.gz
$ tar -xzvf goaccess-0.9.6.tar.gz
$ cd goaccess-0.9.6/
$ ./configure --enable-geoip --enable-utf8
$ make
# make install
使用。
$ sudo goaccess -f /var/log/nginx/access.log
效果图如下:
用 nginx 搭建谷歌镜像网站
1. 介绍
搭建类似http://tokillgoogle.com/这样的网站,只是能让我们访问google.com。用的工具是ngx_http_google_filter_module,是一个nginx的插件,用的原理是nginx的反向代理。
2. 编译安装
首先要有一台能访问google.com的vps或云主机,并且确保之前编译安装过nginx。
这个插件依赖于ngx_http_substitutions_filter_module这个库。
$ git clone https://github.com/cuber/ngx_http_google_filter_module
$ git clone https://github.com/yaoweibin/ngx_http_substitutions_filter_module
$ cd nginx
$ ./configure \
--user=nginx                          \
--group=nginx                         \
--prefix=/etc/nginx                   \
--sbin-path=/usr/sbin/nginx           \
--conf-path=/etc/nginx/nginx.conf     \
--pid-path=/var/run/nginx.pid         \
--lock-path=/var/run/nginx.lock       \
--error-log-path=/var/log/nginx/error.log \
--http-log-path=/var/log/nginx/access.log \
--with-http_gzip_static_module        \
--with-http_stub_status_module        \
--with-http_ssl_module                \
--with-pcre                           \
--with-file-aio                       \
--with-http_realip_module             \
--without-http_scgi_module            \
--without-http_uwsgi_module           \
--without-http_fastcgi_module         \
--add-module=/home/ubuntu/softs/ngx_http_google_filter_module \
--add-module=/home/ubuntu/softs/ngx_http_substitutions_filter_module \
具体的编译参数可以通过nginx -V查到。
--add-module指定插件的保存位置。
接下来编译安装。
$ make
$ sudo make install
重启服务。
$ sudo make upgrade
还可以用nginx -V查看是否编译成功。
3. 配置使用
打开配置文件/etc/nginx/nginx.conf。
server {
  # ... part of server configuration
  resolver 8.8.8.8;
  location / {
    google on;
  }
  # ...
}
找到server部分,添加resolver和location两个指令,总共四行。
让配置文件生效。
$ sudo nginx -s reload
成功,看到效果。
自制启动脚本
编译安装完nginx后,默认情况下,你是不能像用命令行apt-get那样生成启动脚本的,也就是放在/etc/init.d上的脚本,要自己创建。
1. 复制一个启动脚本
创建一个文件/etc/init.d/nginx。
内容如下:
#!/bin/sh

### BEGIN INIT INFO
# Provides:      nginx
# Required-Start:    $local_fs $remote_fs $network $syslog $named
# Required-Stop:     $local_fs $remote_fs $network $syslog $named
# Default-Start:     2 3 4 5
# Default-Stop:      0 1 6
# Short-Description: starts the nginx web server
# Description:       starts nginx using start-stop-daemon
### END INIT INFO

PATH=/usr/local/sbin:/usr/local/bin:/sbin:/bin:/usr/sbin:/usr/bin
DAEMON=/usr/sbin/nginx
NAME=nginx
DESC=nginx

# Include nginx defaults if available
if [ -r /etc/default/nginx ]; then
    . /etc/default/nginx
fi

test -x $DAEMON || exit 0

. /lib/init/vars.sh
. /lib/lsb/init-functions

# Try to extract nginx pidfile
PID=$(cat /etc/nginx/nginx.conf | grep -Ev '^\s*#' | awk 'BEGIN { RS="[;{}]" } { if ($1 == "pid") print $2 }' | head -n1)
if [ -z "$PID" ]
then
    PID=/run/nginx.pid
fi

# Check if the ULIMIT is set in /etc/default/nginx
if [ -n "$ULIMIT" ]; then
    # Set the ulimits
    ulimit $ULIMIT
fi

#
# Function that starts the daemon/service
#
do_start()
{
    # Return
    #   0 if daemon has been started
    #   1 if daemon was already running
    #   2 if daemon could not be started
    start-stop-daemon --start --quiet --pidfile $PID --exec $DAEMON --test > /dev/null \
        || return 1
    start-stop-daemon --start --quiet --pidfile $PID --exec $DAEMON -- \
        $DAEMON_OPTS 2>/dev/null \
        || return 2
}

test_nginx_config() {
    $DAEMON -t $DAEMON_OPTS >/dev/null 2>&1
}

#
# Function that stops the daemon/service
#
do_stop()
{
    # Return
    #   0 if daemon has been stopped
    #   1 if daemon was already stopped
    #   2 if daemon could not be stopped
    #   other if a failure occurred
    start-stop-daemon --stop --quiet --retry=TERM/30/KILL/5 --pidfile $PID --name $NAME
    RETVAL="$?"

    sleep 1
    return "$RETVAL"
}

#
# Function that sends a SIGHUP to the daemon/service
#
do_reload() {
    start-stop-daemon --stop --signal HUP --quiet --pidfile $PID --name $NAME
    return 0
}

#
# Rotate log files
#
do_rotate() {
    start-stop-daemon --stop --signal USR1 --quiet --pidfile $PID --name $NAME
    return 0
}

#
# Online upgrade nginx executable
#
# "Upgrading Executable on the Fly"
# http://nginx.org/en/docs/control.html
#
do_upgrade() {
    # Return
    #   0 if nginx has been successfully upgraded
    #   1 if nginx is not running
    #   2 if the pid files were not created on time
    #   3 if the old master could not be killed
    if start-stop-daemon --stop --signal USR2 --quiet --pidfile $PID --name $NAME; then
        # Wait for both old and new master to write their pid file
        while [ ! -s "${PID}.oldbin" ] || [ ! -s "${PID}" ]; do
            cnt=`expr $cnt + 1`
            if [ $cnt -gt 10 ]; then
                return 2
            fi
            sleep 1
        done
        # Everything is ready, gracefully stop the old master
        if start-stop-daemon --stop --signal QUIT --quiet --pidfile "${PID}.oldbin" --name $NAME; then
            return 0
        else
            return 3
        fi
    else
        return 1
    fi
}

case "$1" in
    start)
        [ "$VERBOSE" != no ] && log_daemon_msg "Starting $DESC" "$NAME"
        do_start
        case "$?" in
            0|1) [ "$VERBOSE" != no ] && log_end_msg 0 ;;
            2) [ "$VERBOSE" != no ] && log_end_msg 1 ;;
        esac
        ;;
    stop)
        [ "$VERBOSE" != no ] && log_daemon_msg "Stopping $DESC" "$NAME"
        do_stop
        case "$?" in
            0|1) [ "$VERBOSE" != no ] && log_end_msg 0 ;;
            2) [ "$VERBOSE" != no ] && log_end_msg 1 ;;
        esac
        ;;
    restart)
        log_daemon_msg "Restarting $DESC" "$NAME"

        # Check configuration before stopping nginx
        if ! test_nginx_config; then
            log_end_msg 1 # Configuration error
            exit 0
        fi

        do_stop
        case "$?" in
            0|1)
                do_start
                case "$?" in
                    0) log_end_msg 0 ;;
                    1) log_end_msg 1 ;; # Old process is still running
                    *) log_end_msg 1 ;; # Failed to start
                esac
                ;;
            *)
                # Failed to stop
                log_end_msg 1
                ;;
        esac
        ;;
    reload|force-reload)
        log_daemon_msg "Reloading $DESC configuration" "$NAME"

        # Check configuration before reload nginx
        #
        # This is not entirely correct since the on-disk nginx binary
        # may differ from the in-memory one, but that's not common.
        # We prefer to check the configuration and return an error
        # to the administrator.
        if ! test_nginx_config; then
            log_end_msg 1 # Configuration error
            exit 0
        fi

        do_reload
        log_end_msg $?
        ;;
    configtest|testconfig)
        log_daemon_msg "Testing $DESC configuration"
        test_nginx_config
        log_end_msg $?
        ;;
    status)
        status_of_proc -p $PID "$DAEMON" "$NAME" && exit 0 || exit $?
        ;;
    upgrade)
        log_daemon_msg "Upgrading binary" "$NAME"
        do_upgrade
        log_end_msg 0
        ;;
    rotate)
        log_daemon_msg "Re-opening $DESC log files" "$NAME"
        do_rotate
        log_end_msg $?
        ;;
    *)
        echo "Usage: $NAME {start|stop|restart|reload|force-reload|status|configtest|rotate|upgrade}" >&2
        exit 3
        ;;
esac

:
如果有发现路径不一样的地方改过来就好了。
然后执行下面的指令。
$ sudo chmod +x /etc/init.d/nginx
可以按照下面的方法使用这个脚本。
$ sudo /etc/init.d/nginx start
$ sudo /etc/init.d/nginx stop
$ sudo /etc/init.d/nginx restart
$ sudo /etc/init.d/nginx reload
or
$ sudo service nginx start
$ sudo service nginx stop
$ sudo service nginx restart
$ sudo service nginx reload
2. nginx-init-ubuntu
nginx-init-ubuntu这个库提供了nginx的启动脚本。
$ sudo wget https://raw.githubusercontent.com/JasonGiedymin/nginx-init-ubuntu/master/nginx -O /etc/init.d/nginx
$ sudo chmod +x /etc/init.d/nginx
同样道理,根据编译的参数,可以自行更改变量。
NGINXPATH=${NGINXPATH:-/usr}      # root path where installed
DAEMON=${DAEMON:-$NGINXPATH/sbin/nginx}       # path to daemon binary
NGINX_CONF_FILE=${NGINX_CONF_FILE:-/etc/nginx/nginx.conf} # config file path

PIDNAME=${PIDNAME:-"nginx"}                   # lets you do $PS-slave
PIDFILE=${PIDFILE:-$PIDNAME.pid}              # pid file
PIDSPATH=${PIDSPATH:-/var/run}
3. 设置开机启动
如果是ubuntu系统,使用sysv-rc-conf这个工具来配置开机启动,这个工具类似于chkconfig。
安装。
$ sudo apt-get install sysv-rc-conf
配置nginx在开机的时候启动。
sudo sysv-rc-conf nginx on
查看nginx的运行等级的情况。
$ sudo sysv-rc-conf --list nginx
日志切割
切割日志使用logrotate这个服务即可。
编辑/etc/logrotate.d/nginx这个文件,内容如下:
/var/log/nginx/*.log {
    weekly
    missingok
    rotate 52
    compress
    delaycompress
    notifempty
    create 0640 www-data adm
    sharedscripts
    prerotate
        if [ -d /etc/logrotate.d/httpd-prerotate ]; then \
            run-parts /etc/logrotate.d/httpd-prerotate; \
        fi \
    endscript
    postrotate
        [ -s /run/nginx.pid ] && kill -USR1 `cat /run/nginx.pid`
    endscript
}
这个会每周切割一次日志。
kill -USR1 cat /run/nginx.pid是给nginx发送信号,让其重新打开日志文件(Reopening the log file)。至于pid文件的路径,要根据实际情况而定,可以通过nginx -V查到。
下面是日志切割后的效果。
yinsigan@iZ94x9hoenwZ:~$ sudo ls /var/log/nginx
access.log      access.log.13.gz  access.log.18.gz  access.log.5.gz  error.log    error.log.13.gz  error.log.18.gz  error.log.5.gz
access.log.1      access.log.14.gz  access.log.19.gz  access.log.6.gz  error.log.1    error.log.14.gz  error.log.19.gz  error.log.6.gz
...
作为负载均衡器
1. 介绍
众所周知,nginx是以高并发和内存占用少出名,它是一个http服务器,也是反向代理服务器,它更是负载均衡器。作为负载均衡器,在版本1.9之前,它只能作为http的负载均衡,也就是在网络模型的第七层发挥作用,1.9之后,它可以对tcp进行负载均衡,比如redis,mysql等。
nginx的负载均衡是出了名的简单,它跟反向代理的功能是紧密结合在一起的。比如下面是我网站上的一段配置:
upstream rails365 {
    # Path to Unicorn SOCK file, as defined previously
    server unix:///home/yinsigan/rails365/shared/tmp/sockets/unicorn.sock fail_timeout=0;
}

server {
    listen 80 default_server;
    # listen [::]:80 default_server ipv6only=on;
    server_name www.rails365.net;
    root         /home/yinsigan/rails365/current/public;
    keepalive_timeout 70;

    location ~ ^/assets/ {
       gzip_static on;
       expires max;
       add_header Cache-Control public;

       # add_header ETag "";
       # break;
    }

        try_files $uri/index.html $uri @rails365;
    location @rails365 {
          proxy_set_header X-Forwarded-For $proxy_add_x_forwarded_for;
          proxy_set_header Host $http_host;
          proxy_redirect off;
          proxy_pass http://rails365;
    }
    # redirect server error pages to the static page /50x.html
    error_page   500 502 503 504  /50x.html;
    location = /50x.html {
        root   html;
    }
}
我在服务器上部署的是ruby on rails项目,用unicorn来跑ruby的代码,它是监听在一个unix socket上的,也就是unix:///home/yinsigan/rails365/shared/tmp/sockets/unicorn.sock这个文件,proxy_pass http://rails365;是反向代理到上游服务器,也就是unicorn的部分,upstream这里指的就是上游服务器的部分。
2. 使用
要实现负载均衡很简单,我在部署多一个unicorn进程,监听在另外的unix socket上,就等于多了一台服务器,只需这样做:
upstream rails365 {
    # Path to Unicorn SOCK file, as defined previously
    server unix:///home/yinsigan/rails365/shared/tmp/sockets/unicorn.sock;
    server unix:///home/yinsigan/rails365_cap/shared/tmp/sockets/unicorn.sock;
}
很简单,只要用server指令添加多一行服务器就可以了。
现在有两个上游服务器了,以前是一个,那么是如何以什么样的方式访问这两个上游服务器的呢。
默认情况下,如果不指定方式,就是随机轮循(round-robin)。两个socket被不能地随机访问,这点可以通过监控日志看到的。
3. 参数讲解
接下来,我们来讲一下nginx负载均衡在使用和配置上的一些参数。
上面有说过一个参数叫round-robin的,除了它之外,还有其他的几个。
3.1 least_conn
它是优先发送给那些接受请求少的,目的是为了让请求分发得更平衡些。
upstream rails365 {
    least_conn;
    server unix:///home/yinsigan/rails365/shared/tmp/sockets/unicorn.sock;
    server unix:///home/yinsigan/rails365_cap/shared/tmp/sockets/unicorn.sock;
}
3.2 ip_hash
ip_hash可以记录请求来源的ip,如果是同一个ip,下次访问的时候还是会到相同的主机,这个可以略微解决那种带cookie,session的请求的一致性问题。
upstream rails365 {
    ip_hash;
    server unix:///home/yinsigan/rails365/shared/tmp/sockets/unicorn.sock;
    server unix:///home/yinsigan/rails365_cap/shared/tmp/sockets/unicorn.sock;
}
3.3 hash
上面ip_hash参数所设置的是根据相同的ip访问相同的主机,这种是根据ip地址,还有一种粒度更小的控制,可以通过任何变量来控制。
比如下面的例子就是通过请求地址($request_uri)来控制。
upstream backend {
     hash $request_uri consistent;

     server unix:///home/yinsigan/rails365/shared/tmp/sockets/unicorn.sock;
     server unix:///home/yinsigan/rails365_cap/shared/tmp/sockets/unicorn.sock;
}
3.4 down
假如有一台主机是出了故障,或者下线了,要暂时移出,那可以把它标为down,表示请求是会略过这台主机的。
upstream rails365 {
    server unix:///home/yinsigan/rails365/shared/tmp/sockets/unicorn.sock;
    server unix:///home/yinsigan/rails365_cap/shared/tmp/sockets/unicorn.sock down;
}
3.5 backup
backup是指备份的机器,相对于备份的机器来说,其他的机器就相当于主要服务器,只要当主要服务器不可用的时候,才会用到备用服务器。
upstream rails365 {
    server unix:///home/yinsigan/rails365/shared/tmp/sockets/unicorn.sock;
    server unix:///home/yinsigan/rails365_cap/shared/tmp/sockets/unicorn.sock backup;
}
3.6 weight
weight指的是权重,默认情况下,每台主机的权重都是1,也就是说,接收请求的次数的比例是一样的。但我们可以根据主机的配置或其他情况自行调节,比如,对于配置高的主机,可以把weight值调大。
 upstream myapp1 {
        server srv1.example.com weight=3;
        server srv2.example.com;
        server srv3.example.com;
 }
假如有五个请求,srv1可能会得到三个,其他的两台服务器,可能分别得到1个。
3.7 max_fails和fail_timeout
默认情况下,max_fails的值为1,表示的是请求失败的次数,请求1次失败就换到下台主机。
另外还有一个参数是fail_timeout,表示的是请求失败的超时时间,在设定的时间内没有成功,那作为失败处理。
upstream rails365 {
    server unix:///home/yinsigan/rails365/shared/tmp/sockets/unicorn.sock max_fails=2;
    server unix:///home/yinsigan/rails365_cap/shared/tmp/sockets/unicorn.sock backup;
}
那什么情况才叫请求失败呢?有可能是服务器内部错误,超时,无效的头部,或返回500以上的状态码的时候。
开启 debug 模式
1. 介绍
给nginx开启debug调试模式,可以让我们更方便的理解nginx的工作原理,在日志中也能看到更多的信息。
2. 使用
开启debug模式,需要重新编译nginx。
只要在编译的时候给nginx加一个选项就够了。
$ ./configure --with-debug
具体的编译参数可以用nginx -V查到。
调试的详细日志我们还是放到error_log中,例如:
error_log /usr/local/var/log/nginx/error.log debug;
使用sudo nginx -s reload重启nginx,让设置生效。
现在可以查看error.log的日志了。
$ tail -f /usr/local/var/log/nginx/error.log
效果图如下:
gzip static 模块探索
nginx中ngx_http_gzip_module这个模块的使用,这个模块主要是用来压缩静态资源或者任何响应内容的。而这篇文章主要介绍的是ngx_http_gzip_static_module这个模块的使用。
它是这样使用的:
location ~ ^/assets/ {
   gzip_static on;
}
assets目录下有很多静态资源,比如js,css等文件。
我们使用strace工具来追踪nginx worker进程的系统调用。
首先,查看一下nginx的进程号。
$ ps -ef | grep nginx
www-data 17187 24035  0 Jan26 ?        00:00:04 nginx: worker process
root     24035     1  0 Jan02 ?        00:00:00 nginx: master process /usr/sbin/nginx
可以看到nginx的worker进程的pid是17187。
使用strace追踪相关的gz的信息。
sudo strace -p 17187 2>&1 | grep gz
我们使用curl工具尝试访问assets目录下的静态资源。
$ curl -I http://www.rails365.net/assets/application-66a0c9fef334cb918dbbe88caf095db309cb3806af50808f7216a500434b96ec.js
可以看到strace出现了一行信息。
$ sudo strace -p 17187 2>&1 | grep gz

open("/home/yinsigan/rails365/current/public/assets/application-66a0c9fef334cb918dbbe88caf095db309cb3806af50808f7216a500434b96ec.js.gz", O_RDONLY|O_NONBLOCK) = -1 ENOENT (No such file or directory)
它会尝试打开找刚才那个js的静态文件,不过后面加了gz作为后缀,也就是压缩过的文件。这个模块的作用就是首先会去找gz文件,找到的话就直接返回给客户端,没有找到,才用ngx_http_gzip_module这个模块压缩之后再返回。毕竟压缩,再怎样还是要消耗内存,消耗CPU的,如果原本就有gz文件,那肯定是会缩短处理时间的,这也正是这个模块存在的意义。
来看一下assets目录下的文件。
~/rails365/current/public/assets$ ls
application-66a0c9fef334cb918dbbe88caf095db309cb3806af50808f7216a500434b96ec.js
可以发现,果然是没有任何gz文件存在的。
现在我们来生成gz文件,看看strace是如何输出的。
我的应用是使用rails开发的,下面是一段自动生成gz文件脚本,从网上摘录的。
# lib/tasks/assets.rake
namespace :assets do
  desc "Create .gz versions of assets"
  task :gzip => :environment do
    zip_types = /\.(?:css|html|js|otf|svg|txt|xml)$/

    public_assets = File.join(
      Rails.root,
      "public",
      Rails.application.config.assets.prefix)

    Dir["#{public_assets}/**/*"].each do |f|
      next unless f =~ zip_types

      mtime = File.mtime(f)
      gz_file = "#{f}.gz"
      next if File.exist?(gz_file) && File.mtime(gz_file) >= mtime

      File.open(gz_file, "wb") do |dest|
        gz = Zlib::GzipWriter.new(dest, Zlib::BEST_COMPRESSION)
        gz.mtime = mtime.to_i
        IO.copy_stream(open(f), gz)
        gz.close
      end

      File.utime(mtime, mtime, gz_file)
    end
  end

  # Hook into existing assets:precompile task
  Rake::Task["assets:precompile"].enhance do
    Rake::Task["assets:gzip"].invoke
  end
end
生成gz文件:
$ mina "rake[assets:gzip]"
~/rails365/current/public/assets$ ls
application-66a0c9fef334cb918dbbe88caf095db309cb3806af50808f7216a500434b96ec.js
application-66a0c9fef334cb918dbbe88caf095db309cb3806af50808f7216a500434b96ec.js.gz
需要注意的事,别对二进制文件,比如图片做gz压缩,因为没有任何意义。
再次用curl工具访问,可以看到strace的输出:
$ sudo strace -p 17187 2>&1 | grep gz
open("/home/yinsigan/rails365/current/public/assets/application-66a0c9fef334cb918dbbe88caf095db309cb3806af50808f7216a500434b96ec.js.gz", O_RDONLY|O_NONBLOCK) = 9
可见,已经不会提示文件找不到了。
使用 acme.sh 安装 Let’ s Encrypt 提供的免费 SSL 证书
1. 介绍
Let’ s Encrypt已有免费的证书可用,以后的网站估计都要上https的吧,所以把我的网站上的证书换了一下,这节主要是参考使用 acme.sh 给 Nginx 安装 Let’ s Encrypt 提供的免费 SSL 证书这篇文章,并结合自己的情况,把我的经验记录下来。
2. 安装
我们使用acme.sh来申请和管理证书,它很简单用,还能够利用crontab自动更新证书,而且是默认就有的功能。
首先安装。
$ wget -O - https://get.acme.sh | sh
安装完之后,可以退出登录,再重新登录,或者执行一下source ~/.bashrc。
之后就可以使用acme.sh命令了。
3. 申请证书
首先申请和下载证书。
$ acme.sh --issue -d boat.rails365.net -w /home/hfpp2012/boat_manager/current/public
我要使用的域名是boat.rails365.net,我有一个项目是用rails写的,根目录为/home/hfpp2012/boat_manager/current/public,一定要保证这个目录是可写,可访问的,因为acme.sh会去检测它,其实就是为了验证,这个网站是不是你的。
这样申请成功之后,证书也会被保存下来,比如保存在下面这个位置:
/home/hfpp2012/.acme.sh/boat.rails365.net
你可以进去看看的,接下来我们要把证书安装到你的应用中。
$ acme.sh --installcert -d boat.rails365.net \
               --keypath       /home/hfpp2012/boat_manager/ssl/boat.rails365.net.key  \
               --fullchainpath /home/hfpp2012/boat_manager/ssl/boat.rails365.net.key.pem \
               --reloadcmd     "sudo nginx -s reload"
值得注意的是:
- 会复制一些文件到
--keypath和--fullchainpath参数所指定的地方,所以要保证目录是通的,是可写的,一般放到网站根目录相关的地方,如果你的/home/hfpp2012/boat_manager目录,没有ssl这个目录,要先新建一个。 - 证书更新之后,会让nginx也更新的,因为这些证书是要由nginx使用的,所以要更新,那
acme.sh会自动去触发那个更新的命令,所以你得告诉acme.sh如何去更新nginx的配置。所以这也是--reloadcmd发挥的作用,里面的值,得根据你的系统而定,只要能更新到nginx的配置就好了。 - 更新nginx配置时,有可以会使用sudo,所以最好你的用户是可以免密码使用sudo的。
接下来,还需要再生成一个文件,具体我也不知道有什么用,很多ssl的配置都需要它。
$ openssl dhparam -out /home/hfpp2012/boat_manager/ssl/dhparam.pem 2048
4. nginx配置
最后,把上面所有生成的文件跟nginx结合起来,再把配置写到nginx的配置文件中。
比如,我是这样的:
upstream boat_manager {
    server unix:///home/hfpp2012/boat_manager/shared/tmp/sockets/puma.sock fail_timeout=0;
}

server {
        listen 443 ssl;
    server_name boat.rails365.net;
        ssl_certificate         /home/hfpp2012/boat_manager/ssl/boat.rails365.net.key.pem;
        ssl_certificate_key     /home/hfpp2012/boat_manager/ssl/boat.rails365.net.key;
        # ssl_dhparam
        ssl_dhparam             /home/hfpp2012/boat_manager/ssl/dhparam.pem;
    root /home/hfpp2012/boat_manager/current/public;
    keepalive_timeout 70;

    location ~ ^/assets/ {
       gzip_static on;
       expires max;
       add_header Cache-Control public;
    }

        try_files $uri/index.html $uri @boat_manager;
    location @boat_manager {
          proxy_set_header X-Forwarded-For $proxy_add_x_forwarded_for;
          proxy_set_header Host $http_host;
          proxy_redirect off;
          proxy_pass http://boat_manager;

          #proxy_http_version 1.1;
          #proxy_set_header Upgrade $http_upgrade;
          #proxy_set_header Connection "upgrade";
    }
    error_page   500 502 503 504  /50x.html;
    location = /50x.html {
        root   html;
    }
}

server {
    listen 80;
    server_name boat.rails365.net;
    return 301 https://boat.rails365.net$request_uri;
}
顶层的http指令那里,也需要加上这两行:
http {
    ssl_protocols TLSv1 TLSv1.1 TLSv1.2;
    ssl_prefer_server_ciphers on;
}
最后,你把nginx重启一下,再试试效果。
给 GitLab 应用加上 https
1. 介绍
在以前的一篇文章我们介绍过如何用docker来部署gitlab应用:使用 compose 部署 GitLab 应用 (八)
还有一篇文章是介绍用acme.sh给网站加上https的:使用 acme.sh 安装 Let’ s Encrypt 提供的免费 SSL 证书
现在这篇文章来结合之前的两篇文章的内容,给gitlab网站加上https应用的。
2. 申请证书
第一步是申请证书:
$ acme.sh --issue -d gitlab.rails365.net -w /srv/docker/gitlab/gitlab
/srv/docker/gitlab/gitlab是gitlab这个docker所使用的数据卷的目录。
执行这行命令,你会发现输出是这样的:
[Sun Mar 12 11:06:15 CST 2017] Single domain='gitlab.rails365.net'
[Sun Mar 12 11:06:15 CST 2017] Getting domain auth token for each domain
[Sun Mar 12 11:06:15 CST 2017] Getting webroot for domain='gitlab.rails365.net'
[Sun Mar 12 11:06:15 CST 2017] Getting new-authz for domain='gitlab.rails365.net'
[Sun Mar 12 11:06:20 CST 2017] The new-authz request is ok.
[Sun Mar 12 11:06:20 CST 2017] Verifying:gitlab.rails365.net
[Sun Mar 12 11:06:25 CST 2017] gitlab.rails365.net:Verify error:Invalid response from http://gitlab.rails365.net/.well-known/acme-challenge/M383V-Nx8XeuYkzt5gUYIufSbiOuMB5ox3OZyKXz21M:
[Sun Mar 12 11:06:25 CST 2017] Please add '--debug' or '--log' to check more details.
[Sun Mar 12 11:06:25 CST 2017] See: https://github.com/Neilpang/acme.sh/wiki/How-to-debug-acme.sh
主要报错的这一行是这里:
gitlab.rails365.net:Verify error:Invalid response from http://gitlab.rails365.net/.well-known/acme-challenge/M383V-Nx8XeuYkzt5gUYIufSbiOuMB5ox3OZyKXz21M
其实acme.sh要验证一下这个网站的所有权,也就是说只要你能证明这个网站或域名你是能控制的,就可以了,它是通过向网站写些数据,或读些数据来验证的,比如,在你的网站根目录下新建一个目录.well-known,再往里面写些东西。
所以我们只要用nginx把这个处理一下就好了:
比如:
location /.well-known/ {
    root /srv/docker/gitlab/gitlab;
  }
下面会给出完整的配置的。
然后再执行之前的命令就会成功的。
接着把证书安装到gitlab那里。
$ mkdir /srv/docker/gitlab/gitlab/ssl
$ acme.sh --installcert -d gitlab.rails365.net \
               --keypath       /srv/docker/gitlab/gitlab/ssl/gitlab.rails365.net.key  \
               --fullchainpath /srv/docker/gitlab/gitlab/ssl/gitlab.rails365.net.key.pem \
               --reloadcmd     "sudo nginx -s reload"
$ openssl dhparam -out /srv/docker/gitlab/gitlab/ssl/dhparam.pem 2048
最后nginx里加上配置:
upstream gitlab {
  server                    127.0.0.1:10080;
}
server {
  listen                    443 ssl;
  server_name               gitlab.rails365.net;
  ssl_certificate           /srv/docker/gitlab/gitlab/ssl/gitlab.rails365.net.key.pem;
  ssl_certificate_key       /srv/docker/gitlab/gitlab/ssl/gitlab.rails365.net.key;
  # ssl_dhparam
  ssl_dhparam               /srv/docker/gitlab/gitlab/ssl/dhparam.pem;
  server_tokens             off;
  root                      /dev/null;

  # 配合acme.sh使用ssl, 验证网站
  location /.well-known/ {
    root /srv/docker/gitlab/gitlab;
  }

  location / {
    proxy_read_timeout      300;
    proxy_connect_timeout   300;
    proxy_redirect          off;
    proxy_set_header        X-Forwarded-Proto $scheme;
    proxy_set_header        Host              $http_host;
    proxy_set_header        X-Real-IP         $remote_addr;
    proxy_set_header        X-Forwarded-For   $proxy_add_x_forwarded_for;
    proxy_set_header        X-Frame-Options   SAMEORIGIN;
    proxy_pass              http://gitlab;
  }
}

server {
    listen 80;
    server_name gitlab.rails365.net;
    return 301 https://gitlab.rails365.net$request_uri;
}
3. 改造gitlab
经过前面的处理,也是能正常访问的,不过好像有些问题,因为gitlab网站里面还是在使用http协议作为代码的访问协议,而不是https。
这里要把gitlab改造一下。
打开docker-compose.yml文件,主要更改以下几个地方:
- GITLAB_HTTPS=true
- GITLAB_PORT=443

gitlab:
    restart: always
    image: sameersbn/gitlab:8.15.2
    depends_on:
    - redis
    - postgresql
    ports:
    - "10080:80"
    - "10022:22"
    - "10443:443"

    ...

    - GITLAB_HTTPS=true
    - SSL_SELF_SIGNED=false

    - GITLAB_HOST=gitlab.rails365.net
    - GITLAB_PORT=443
    - GITLAB_SSH_PORT=10022
开启了gitlab的https服务,把https的服务的端口改为了443,并且暴露了10443端口。
然后nginx里也改变一下:
upstream gitlab {
  server                    127.0.0.1:10443;
}

location / {
    ...
    proxy_pass              https://gitlab;
  }
端口变了,变成了10443,还有http://gitlab变成了https://gitlab。
4. 复制证书
你要把证书复制到gitlab下。
mkdir -p /srv/docker/gitlab/gitlab/certs
cp /srv/docker/gitlab/gitlab/ssl/gitlab.rails365.net.key.pem /srv/docker/gitlab/gitlab/certs/gitlab.crt
cp /srv/docker/gitlab/gitlab/ssl/gitlab.rails365.net.key /srv/docker/gitlab/gitlab/certs/gitlab.key
cp /srv/docker/gitlab/gitlab/ssl/dhparam.pem /srv/docker/gitlab/gitlab/certs/dhparam.pem
chmod 400 /srv/docker/gitlab/gitlab/certs/gitlab.key
现在可以正常以https访问gitlab了。
