android butterknife框架的简单使用
记得很早之前有个xutils框架,就有这个功能,但是它是通过反射和代理发生在运行时期,所以效率肯定没butterknife框架效率高,今天就简单入门,如何使用:github:https://github.com/JakeWharton/butterknife
使用三方框架看下它提供的步骤就行,然后按照说的步骤一步步来一般就ok,
第一步:
dependencies {
  compile 'com.jakewharton:butterknife:8.8.1'
  annotationProcessor 'com.jakewharton:butterknife-compiler:8.8.1'
}
添加这二个,这是目前最新的
第二步:
To use Butter Knife in a library, add the plugin to your buildscript:
buildscript {
  repositories {
    mavenCentral()
   }
  dependencies {
    classpath 'com.jakewharton:butterknife-gradle-plugin:8.8.1'
  }
}
看下我的配置:
// Top-level build file where you can add configuration options common to all sub-projects/modules.

buildscript {
    repositories {
        mavenCentral()
        jcenter()
    }
    dependencies {
        classpath 'com.android.tools.build:gradle:2.3.3'
        classpath 'com.jakewharton:butterknife-gradle-plugin:8.8.1'

        // NOTE: Do not place your application dependencies here; they belong
        // in the individual module build.gradle files
    }
}

allprojects {
    repositories {
        jcenter()
    }
}

task clean(type: Delete) {
    delete rootProject.buildDir
}
第三步:
and then apply it in your module:
apply plugin: 'com.android.library'
apply plugin: 'com.jakewharton.butterknife'
其实在第三步,我也是遇到了问题,看下我的配置
发现我注释了一行:
我studio是2.3.3,遇到了这些问题:
android Error:Could not download guava.jar (com.google.guava:guava:19.0): No cached version availabl
解决方法:
找到File - Other settings - Default settings Build Tools - Gradle ,去掉"offline work"选项勾,点击 "Ok"
去到 "Build" - "clean Project"
这是好了.这个问题
第二个问题:
解决方案:
//apply plugin: 'com.android.library'这个不能要
butterknife使用一般就是二种,一是findViewById 二是设置View的监听
这是我的布局:
xml version="1.0" encoding="utf-8"?>
xmlns:android="http://schemas.android.com/apk/res/android"
xmlns:tools="http://schemas.android.com/tools"
android:layout_width="match_parent"
android:layout_height="match_parent"
tools:context="com.simple.MainActivity"
android:orientation="vertical"
>
android:id="@+id/et_username"
android:layout_width="match_parent"
android:layout_height="wrap_content"
android:hint="输入用户名"
/>
android:id="@+id/et_password"
android:layout_width="match_parent"
android:layout_height="wrap_content"
android:hint="输入用户密码"
/>
使用:
package com.simple;
import android.support.v7.app.AppCompatActivity;
import android.os.Bundle;
import android.text.TextUtils;
import android.widget.EditText;
import android.widget.Toast;
import butterknife.BindView;
import butterknife.ButterKnife;
import butterknife.OnClick;
public class MainActivity extends AppCompatActivity {
    @BindView(R.id.et_username)
    EditText et_username;
    @BindView(R.id.et_password)
    EditText et_password;
    @OnClick(R.id.btn_login) void login() {
        String username = et_username.getText().toString();
        String password = et_password.getText().toString();
        if(!TextUtils.isEmpty(username)&&!TextUtils.isEmpty(password)){
            Toast.makeText(this,"用户"+username+"登录了",Toast.LENGTH_LONG).show();
        }
    }
    @Override
    protected void onCreate(Bundle savedInstanceState) {
        super.onCreate(savedInstanceState);
        setContentView(R.layout.activity_main);
        ButterKnife.bind(this);
    }
}
@BindView就是帮助我们把findViewById()操作实现了
@onClick就是帮助我们setOnClickListener()
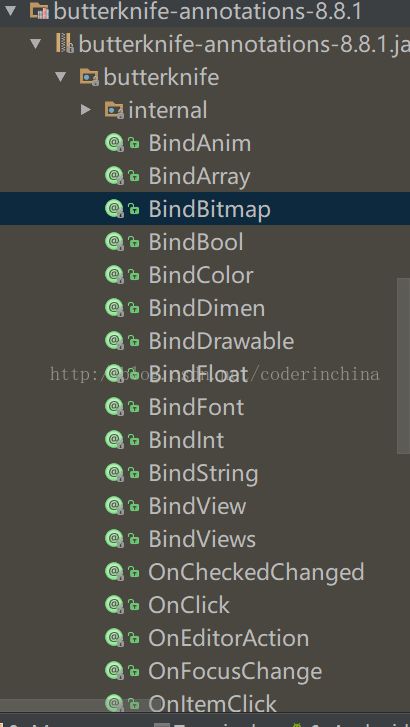
上面都是通过注解的形式,如果想要知道还有其他什么注解使用呢?找到他的jar
其中On...什么的都是View的监听方法
Bind..都是什么绑定id或者资源相关的.


