迁移有两种类型的迁移:
- 离线迁移
- 活动或在线迁移
迁移需要注意的事项:
- 尽量用共享存储,就算没有共享存储你也得把存储沲的名字和路径尽量一致吧。
- 假如使用了比如FC,ISCSI,LVM等等。那么在要迁移的两台主机上都应该有相同的存储。
- 两台hypervisor主机应该有相同的网络。
- 网桥,配置两台主机通信的,也应该在两台hypervisior上有效。
- 假如两台libvirt或qemu-kvm的主版本不一致,可能会迁移失败。但是如果你从一个低版本的主机上面往高版本的主机上面迁移,应该是没有问题的。
- 两台的时间要同步
- 两台的主机名要能够互相解析。
VM迁移带来的好处:
最重要的好处可能就是增强了运行时间和减少了当机时间,第二个好处可能就是节约能源和更环保。第三个可能就是软件和硬件的升级更容易了。
Shared storage
首先在存储服务器上执行如下操作。$ sudo echo '/testvms *(rw,sync,no_root_squash)' >> /etc/export
2. 在防火墙中放行nfs连接。
$ sudo  firewall-cmd --get-active-zones
FedoraServer
  interfaces: eth0
$ sudo firewall-cmd --zone=FedoraServer --add-service=nfs
$ sudo firewall-cmd --zone=FedoraServer --list-al3. 启动NFS服务
$ sudo systemctl start rpcbind nfs-server
$ sudo  systemctl enable rpcbind nfs-server
$ sudo showmount -e
4.从f22-01.example.local和f22-02.example.local两个服务器上访问确认一下。
$ sudo mount 192.168.122.1:/testvms /mnt
5. 假如上面访问失败,NFS服务器上移除挂载的,重新挂载一下。关闭防火墙,然后在KVM服务器上重新尝试一下。
$ sudo umount /mnt
6. 在两台服务器上创建存储沲,名字为testvms
$ sudo mkdir -p /var/lib/libvirt/images/testvms/
$ sudo virsh pool-define-as \
--name testvms \
--type netfs \
--source-host 192.168.122.1 \
--source-path /testvms \
--target /var/lib/libvirt/images/testvms/
$ sudo virsh pool-start testvms
$ sudo virsh pool-autostart testvm
以上命令是创建了存储沲,并开启了存储沲的使用。
迁移的时候建议使用隔离的专用网络,不建议和别的网络混用。
f22-01 -- eth0 (192.168.0.5) ←<--switch------> eth0 (192.168.0.6) -- f22-02
eth1 -> br1 <-----switch------> eth1 -> br1
离线迁移:
在这个迁移案例中,libvirt只是复制VM'S XML配置文件,从源到目的。首先需要关闭SELINUX。
然后让两个KVM之间通过证书认证,连接时不再需要用户名和密码。
$ sudo  ssh-keygen
$ sudo  ssh-copy-id [email protected]
$ sudo  ssh-keygen
$ sudo ssh-copy-id [email protected]
迁移命令格式 :
virsh migrate migration-type options name-of-the-vm destination-uri
[root@localkvm-1 ~]# virsh migrate --offline --verbose --persistent centos110 qemu+ssh://localkvm-2.xiodi.cn/system --unsafe
Migration: [100 %]然后在localkvm-2上面查看虚拟机,并尝试启动验证效果。
[root@localkvm-2 mnt]# virsh list --all
 Id    Name                           State
----------------------------------------------------
 -     centos110                      shut off

[root@localkvm-2 mnt]# virsh start centos110
Domain centos110 started

[root@localkvm-2 mnt]# virsh list
 Id    Name                           State
----------------------------------------------------
 1     centos110                      running
注意:在迁移时,如果发生事故,可能导致文件系统错误,所以引入了锁的机制。锁的类型有两种。
- lockd: lockd使用了POSIX fcntl()锁能力机制。它有一个virtlockd进程 。
- sanlock: 针对维护一个持久的更新和施放,使用了a disk paxos 算法。
针对libvirt的环境中,建议使用lockd而不是sanlock。sanlock最好在oVirt中使用。
开启锁步骤:(以下步骤均需在两台hypervisior上面执行)
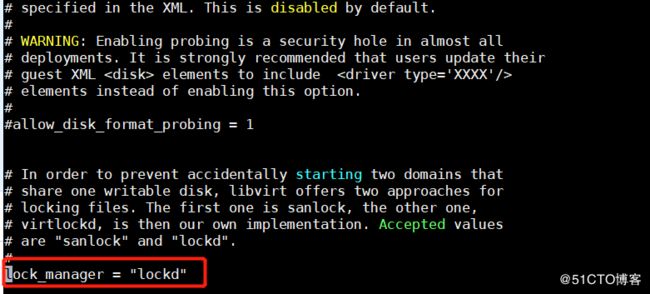
1. # vi /etc/libvirt/qumu.conf
[root@localkvm-2 mnt]# systemctl enable virtlockd;systemctl start virtlockd
[root@localkvm-2 mnt]# systemctl restart libvirtd
[root@localkvm-2 mnt]# systemctl status virtlockd
● virtlockd.service - Virtual machine lock manager
   Loaded: loaded (/usr/lib/systemd/system/virtlockd.service; indirect; vendor preset: disabled)
   Active: active (running) since Mon 2018-04-30 10:02:26 CST; 14s ago
     Docs: man:virtlockd(8)
           http://libvirt.org
 Main PID: 2770 (virtlockd)
   CGroup: /system.slice/virtlockd.service
           └─2770 /usr/sbin/virtlockd

Apr 30 10:02:26 localkvm-2.xiodi.cn systemd[1]: Started Virtual machine lock manager.
Apr 30 10:02:26 localkvm-2.xiodi.cn systemd[1]: Starting Virtual machine lock manager...
测试锁是否有用:


其它开启lockd方法是磁盘文件路径的hash. 通过NFS的导出,locks存储在一个共享目录中。当使用多路径的LUN时,这种方法比较有用。fcntl()在这样的案例中不能使用。推荐以下开启锁机制。
1. 在NFS服务器上
$ sudo  echo /flockd *(rw,no_root_squash) >> /etc/exports
$ sudo service nfs reload
$sudo  showmount -e
Export list for :
/flockd  *
/testvms *
2. 在两个hypervisors的/etc/fstab中添加如下
$ sudo echo "192.168.122.1:/flockd  /flockd  nfs  rsize=8192,wsize=8192,timeo=14,intr,sync" >> /etc/fstab
$ sudo mkdir -p /var/lib/libvirt/lockd/flockd
$ sudo  mount -a
$ sudo echo 'file_lockspace_dir = "/var/lib/libvirt/lockd/flockd"' >> /etc/libvirt/qemu-lockd.conf
$ sudo reboot both hypervisors
3. 重新启动完成后,校验下libvirtd和virtlockd是否在两台hypervisors主机上启动。
[root@f22-01 ~]# virsh start vm1
Domain vm1 started
[root@f22-02 flockd]# ls
36b8377a5b0cc272a5b4e50929623191c027543c4facb1c6f3c35bacaa7455ef  51e3ed692fdf92ad54c6f234f742bb00d4787912a8a674fb5550b1b826343dd6
[root@f22-02 ~]# virsh start vm1
error: Failed to start domain vm1
error: resource busy: Lockspace resource '51e3ed692fdf92ad54c6f234f742bb00d4787912a8a674fb5550b1b826343dd6' is locked使用LVM的方式实现锁:
When using LVM volumes that can be visible across multiple host systems, it is desirable to do the locking based on the unique UUID associated with each volume, instead of their paths. Setting this path causes libvirt to do UUID based locking for LVM.
lvm_lockspace_dir = "/var/lib/libvirt/lockd/lvmvolumes"
使用SCSI卷的方式实现锁:
When using SCSI volumes that can be visible across multiple host systems, it is desirable to do locking based on the unique UUID associated with each volume, instead of their paths. Setting this path causes libvirt to do UUID-based locking for SCSI.
scsi_lockspace_dir = "/var/lib/libvirt/lockd/scsivolumes"

Like file_lockspace_dir, the preceding directories should also be shared with the hypervisors.
迁移步骤:(时间和DNS解析一定要做好)
1. 开启端口
$ sudo firewall-cmd --zone=public --add-port=49152-49216/tcp --permanent
2.执行迁移
$ sudo  virsh migrate --live vm1 qemu+ssh://f22-02.example.local/system --verbose --persistent
Migration: [100 %]
3. 假如迁移中遇见如下错误的解决方法。
$ sudo  virsh migrate --live vm1 qemu+ssh://f22-02.example.local/system --verbose
error: Unsafe migration: Migration may lead to data corruption if disks use cache != none
$ sudo virt-xml vm1 --edit --disk target=vda,cache=none
在执行迁移时,可以考虑使用以下几个选项,在这里简单的介绍 一下。
- --unndefinesource: 在源主机上撤销定义,就是通过virsh list --all也看不到该主机存在了。
- --suspend: 在目标主机上,让VM进行挂起。
- --compressed: 在迁移时候,迁移内存页时执行压缩。
- --abort-on-error: 假如在迁移时候,如果有错误的话,就停止迁移。
- --unsafe: 当libvirt怀疑可能导致数据错误时,强制迁移。
其它类型的迁移就是没有共享磁盘的情况:
root@f22-02 ~]# ls /var/lib/libvirt/images/testvm.qcow2
ls: cannot access /var/lib/libvirt/images/testvm.qcow2: No such file or directory
[root@f22-01 ~]# virsh migrate --live --persistent --verbose --copy-storage-all testvm qemu+ssh://f22-02.example.local/system
Migration: [100 %][root@f22-02 ~]# ls /var/lib/libvirt/images/testvm.qcow2
/var/lib/libvirt/images/testvm.qcow2--copy-storage-inc will only transfer the changes:
[root@f22-01 ~]# virsh migrate --live --verbose --copy-storage-inc testvm qemu+ssh://f22-02.example.local/system
Migration: [100 %]