安装篇
Zabbix安装篇一:服务端安装教程
Zabbix安装篇二:Linux批量安装客户端Zabbix-agent
Zabbix安装篇三:windows批量安装客户端Zabbix-agent
Zabbix安装篇四:钉钉机器人报警
监控篇
Zabbix监控篇一:监控SQL Server数据库
Zabbix监控篇二:监控Mariadb数据库
Zabbix监控篇三:监控Exchange Server
Zabbix监控篇四:监控路由器
zabbix默认自带对Mysql数据库监控模板,由于模板太过简单,基本不用,所以需要做更详细的监控,percona就有这个详细监控的模版以及脚本,正好拿过来用。下面的模板支持mariadb 版本,顺便把数据库升级下,
一、升级数据库Mariadb5.5.8升级到Mariadb10.2
1. 备份原数据库
由于是对测试环境的数据库进行升级,只有zabbix数据库,有多个数据库请备份
mysqldump -uroot -p --database zabbix >zabbix.sql
2. 卸载mariadb
卸载mariadb:
yum remove mariadb
删除配置文件:
rm -f /etc/my.cnf
删除数据目录:
rm -rf /var/lib/mysql/
3、指定下载最新的10.2版本,编辑安装包路径下载路径:
[root@centos78 ~]# vim /etc/yum.repos.d/base.repo (下载很慢,建议迅雷下载)
[mariadb]
name = MariaDB
baseurl = http://yum.mariadb.org/10.2/centos7-amd64
gpgkey = https://yum.mariadb.org/RPM-GPG-KEY-MariaDB
gpgcheck = 1
4、安装10.2的mariadb
yum install mariadb-server
5、设置mariadb
[root@centos78 ~]# systemctl start mariadb 启动
[root@centos78 ~]# systemctl enable mariadb 设置开机启动
[root@centos78 ~]# systemctl status mariadb 查看启动状态
6、mariadb的初始化
/usr/bin/mysql_secure_installation
一般建议按以下进行配置:
Enter current password for root (enter for none): Just press the Enter button
Set root password? [Y/n]: YNew password: your-MariaDB-root-passwordRe-enter new password: your-MariaDB-root-passwordRemove anonymous users? [Y/n]: Y
Disallow root login remotely? [Y/n]: n
Remove test database and access to it? [Y/n]: Y
Reload privilege tables now? [Y/n]: Y
7、导入数据到新版本mariadb
mysql -uroot -p < /data/zabbix.sql
二、导入模板
1、安装必要的插件
下载安装包   wget https://www.percona.com/downloads/percona-monitoring-plugins/percona-monitoring-plugins-1.1.7/binary/redhat/6/x86_64/percona-zabbix-templates-1.1.7-2.noarch.rpm
安装文件     rpm -ivh percona-zabbix-templates-1.1.7-2.noarch.rpm
安装必要插件 yum install percona-zabbix-templates php php-mysql
2、查看文件存放路径
[root@centos78 ~]#  rpm -ql percona-zabbix-templates
/var/lib/zabbix/percona
/var/lib/zabbix/percona/scripts
/var/lib/zabbix/percona/scripts/get_mysql_stats_wrapper.sh
/var/lib/zabbix/percona/scripts/ss_get_mysql_stats.php
/var/lib/zabbix/percona/templates
/var/lib/zabbix/percona/templates/userparameter_percona_mysql.conf
/var/lib/zabbix/percona/templates/zabbix_agent_template_percona_mysql_server_ht_2.0.9-sver1.1.7.xml
3、将配置文件拷贝到/etc/zabbix/zabbix_agentd.d/目录
cp /var/lib/zabbix/percona/templates/userparameter_percona_mysql.conf /etc/zabbix/zabbix_agentd.d/
4、修改配置文件
[root@centos78 ~]# vim /var/lib/zabbix/percona/scripts/ss_get_mysql_stats.php
$mysql_user = 'zabbix';用户
$mysql_pass = 'zabbix';密码
5、重启服务
[root@centos78 ~]# systemctl restart zabbix-agent
6、进行测试会返回测试结果
[root@centos78 ~]# cd /var/lib/zabbix/percona/scripts/
[root@centos78 scripts]# ./get_mysql_stats_wrapper.sh gm
0
[root@centos78 scripts]# ./get_mysql_stats_wrapper.sh gw
1010130
[root@centos78 scripts]#  zabbix_get -s 192.168.1.78 -k "MySQL.max-connections"
如果获取不到数据,删除下面文件,然后自动生成
[root@centos78 scripts]# rm -f /tmp/localhost-mysql_cacti_stats.txt
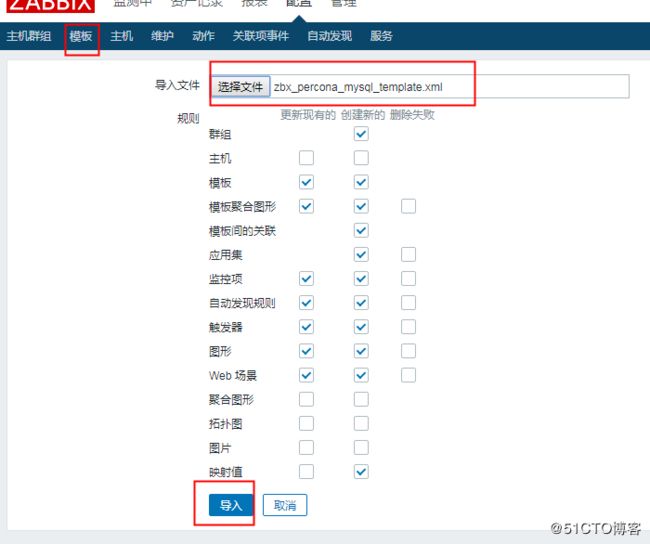
7、自带的模板有问题,导入模板:zbx_percona_mysql_template.xml
新模板下载地址:http://down.51cto.com/data/2453198
8、查看监控信息:


