Android Retrofit 2.0(二)使用教程OkHttp3 + Gson + RxJava
系列文章推荐:
Android 必须知道的网络请求框架库,你不可错过的框架介绍篇
Android Retrofit 2.0(一)初次见面请多多关照
Android Retrofit 2.0(三)从源码分析原理
相关资料
-
Github:https://github.com/square/retrofit
-
官网文档:http://square.github.io/retrofit/
添加依赖
compile 'com.squareup.okhttp3:okhttp:3.3.1'
compile 'com.squareup.retrofit2:retrofit:2.1.0'
别忘在Manifest里添加权限
定义接口
- http://gank.io/api/data/Android/10/1
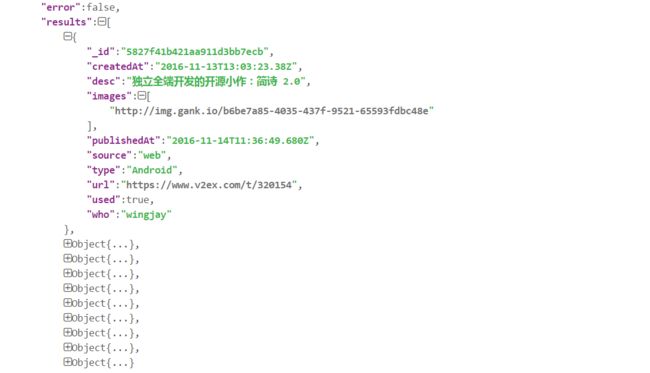
- 这是Gank的接口,下面是我们的Json数据。
我们来定义一下我们的接口类 GnakApi:
import okhttp3.ResponseBody;
import retrofit2.Call;
import retrofit2.http.GET;

public interface GnakApi {

    @GET("api/data/Android/10/1")
    Call getAndroidInfo();
}
其实,这个接口我们可用这样去拆分:
我现在不需要返回值,所以我直接传了一个ResponseBody。上面我用GET请求,直接请求了api/data/Android/10/1,这样就能和我们的baseUrl拼接了,而后面的参数如果我们要改变的话,那接口方法就要传参了。
先看下文档上的接口定义:
public interface GitHubService {
  @GET("users/{user}/repos")
  Call> listRepos(@Path("user") String user);
}
可用发现同样的是GET请求,只不过他的返回值是一个List,类型是repo,repo就是他的实体类,传了一个path是一个参数,user的参数。
简单请求
接口定义好,开始请求了。
写一个button 响应事件,textview显示返回结果:
实例化Retrofit对象
Retrofit retrofit = new Retrofit.Builder()
                .baseUrl("http://gank.io/")
                .build();
GnakApi api = retrofit.create(GnakApi.class);上面是返回一个GnakApi。通过源码我们知道,这里的create实际上是通过代理的方式拿到的,可以看下:
public  T create(final Class service) {
    Utils.validateServiceInterface(service);
    if (validateEagerly) {
      eagerlyValidateMethods(service);
    }
    return (T) Proxy.newProxyInstance(service.getClassLoader(), new Class[] { service },
        new InvocationHandler() {
          private final Platform platform = Platform.get();

          @Override public Object invoke(Object proxy, Method method, Object... args)
              throws Throwable {
            // If the method is a method from Object then defer to normal invocation.
            if (method.getDeclaringClass() == Object.class) {
              return method.invoke(this, args);
            }
            if (platform.isDefaultMethod(method)) {
              return platform.invokeDefaultMethod(method, service, proxy, args);
            }
            ServiceMethod serviceMethod = loadServiceMethod(method);
            OkHttpCall okHttpCall = new OkHttpCall<>(serviceMethod, args);
            return serviceMethod.callAdapter.adapt(okHttpCall);
          }
        });
  }
接下来,直接去调用接口方法,返回一个Call:
Call call = api.getAndroidInfo(); 到这里,会奇怪:怎么和okHttp这么像啊,如果单纯从简单请求来看,确实有一点像,但是别急,Retrofit可没这么简单,我们有了call之后就直接请求了,一般我们都是异步请求:
call.enqueue(new Callback() {
    @Override
    public void onResponse(Call call, Response response) {
        try {
              String result = response.body().string();
              Log.i(TAG, result);
              tv_result.setText(result);
            } catch (IOException e) {
              e.printStackTrace();
        }
    }
              @Override
              public void onFailure(Call call, Throwable t) {

              }
          });
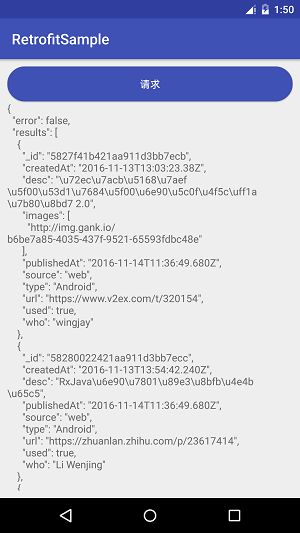
点击运行,查看结果:
可以看到,已经成功的请求到了结果了,这就是Retrofit的无参简单请求了。
Retrofit+Gson
听说 Retrofit + OkHttp + Gson 更配哦。接下来我们添加Gson的Jar之后我们写一个实体类,也就上面案例请求接口的javaBean,这里我使用的解析插件是Gsonformat。
GankBean:
import java.util.List;

public class GankBean {

    private boolean error;
    private List results;

    public boolean isError() {
        return error;
    }

    public void setError(boolean error) {
        this.error = error;
    }

    public List getResults() {
        return results;
    }

    public void setResults(List results) {
        this.results = results;
    }

    public static class ResultsBean {
        /**
         * _id : 5827f41b421aa911d3bb7ecb
         * createdAt : 2016-11-13T13:03:23.38Z
         * desc : 独立全端开发的开源小作:简诗 2.0
         * images : ["http://img.gank.io/b6be7a85-4035-437f-9521-65593fdbc48e"]
         * publishedAt : 2016-11-14T11:36:49.680Z
         * source : web
         * type : Android
         * url : https://www.v2ex.com/t/320154
         * used : true
         * who : wingjay
         */

        private String _id;
        private String createdAt;
        private String desc;
        private String publishedAt;
        private String source;
        private String type;
        private String url;
        private boolean used;
        private String who;
        private List images;

        public String get_id() {
            return _id;
        }

        public void set_id(String _id) {
            this._id = _id;
        }

        public String getCreatedAt() {
            return createdAt;
        }

        public void setCreatedAt(String createdAt) {
            this.createdAt = createdAt;
        }

        public String getDesc() {
            return desc;
        }

        public void setDesc(String desc) {
            this.desc = desc;
        }

        public String getPublishedAt() {
            return publishedAt;
        }

        public void setPublishedAt(String publishedAt) {
            this.publishedAt = publishedAt;
        }

        public String getSource() {
            return source;
        }

        public void setSource(String source) {
            this.source = source;
        }

        public String getType() {
            return type;
        }

        public void setType(String type) {
            this.type = type;
        }

        public String getUrl() {
            return url;
        }

        public void setUrl(String url) {
            this.url = url;
        }

        public boolean isUsed() {
            return used;
        }

        public void setUsed(boolean used) {
            this.used = used;
        }

        public String getWho() {
            return who;
        }

        public void setWho(String who) {
            this.who = who;
        }

        public List getImages() {
            return images;
        }

        public void setImages(List images) {
            this.images = images;
        }
    }
}
用Gson是一键生成实体类,还是很方便的。
正常请求
现在实体类GankBean已经有了,那我们重新修改一下接口,让返回这个实体类:
import retrofit2.Call;
import retrofit2.http.GET;

public interface GnakApi {

    @GET("api/data/Android/10/1")
    Call getAndroidInfo();
}
调用泛型上添加返回的实体类:
Call call = api.getAndroidInfo(); 异步请求:
//异步
call.enqueue(new Callback() {
    @Override
    public void onResponse(Call call, Response response) {
        GankBean.ResultsBean bean = response.body().getResults().get(0);
        tv_result.setText(
                "_id:" + bean.get_id() + "\n"
                        + "createdAt:" + bean.getCreatedAt() + "\n"
                        + "desc:" + bean.getDesc() + "\n"
                        + "images:" + bean.getImages() + "\n"
                        + "publishedAt:" + bean.getPublishedAt() + "\n"
                        + "source" + bean.getSource() + "\n"
                        + "type:" + bean.getType() + "\n"
                        + "url: " + bean.getUrl() + "\n"
                        + "who:" + bean.getWho());
    }

    @Override
    public void onFailure(Call call, Throwable t) {

    }
});
这里就可以直接get出我们想要的值了吗?答案是否定的。
我们运行之后会报出错误日志:
IllegalArgumentException: Unable to create converter for class com.liuguilin.retrofitsample.GankBeanCould not locate ResponseBody converter for class com.liuguilin.retrofitsample.GankBean错误日志说明不能创建一个转换器。我们需要去配置一个Gson,并不是我们的google.gson,我们添加源:
compile 'com.squareup.retrofit2:converter-gson:2.1.0'配置完后,我们开始使用:
Retrofit retrofit = new Retrofit.Builder()
                .baseUrl("http://gank.io/")
                .addConverterFactory(GsonConverterFactory.create())
                .build();
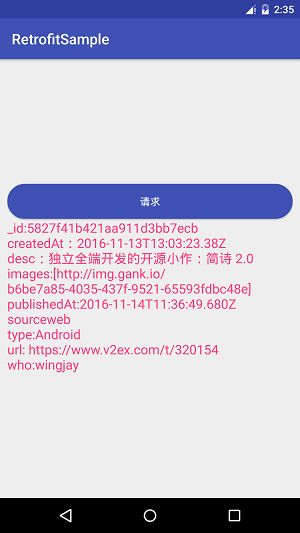
运行结果:
到这里,基本请求就已经讲完了。只要配置好Retrofit,根据api定义好接口,使用起来比较简单。然后配合Gson,就可以直接拿值了。如果再能加上比较火的Dagger2注解,代码会变得更加的简洁、高效。
Get请求参数
官网文档:https://www.juhe.cn/docs/api/id/73
官网案例:http://op.juhe.cn/onebox/weather/query?cityname=深圳&key=您申请的KEY
根据以上案例,我们实现一个简单练习。
默认cityname是深圳,动态设置参数key,先写一个WeatherApi接口:
import retrofit2.Call;
import retrofit2.http.GET;
import retrofit2.http.Query;

public interface WeatherApi {

    @GET("onebox/weather/query?cityname=深圳")
    Call getWeather(@Query("key") String key);
}
上面接口API 动态设置一个参数 key,所以加上 Query 。(如果是两个动态参数,如 cityname ,就要多加一个参数。)
Retrofit retrofit = new Retrofit.Builder()
                .baseUrl("http://op.juhe.cn/")
                .addConverterFactory(GsonConverterFactory.create())
                .build();
        api = retrofit.create(WeatherApi.class);
实例化Retrofit 配置,然后拿到接口API进行调用:
Call call = api.getWeather("4ea58de8a7573377cec0046f5e2469d5");
//异步
call.enqueue(new Callback() {
    @Override
    public void onResponse(Call call, Response response) {
        String info = response.body().getResult().getData().getRealtime().getWeather().getInfo();
        tv_result.setText("深圳天气:" + info);
    }

    @Override
    public void onFailure(Call call, Throwable t) {

    }
});
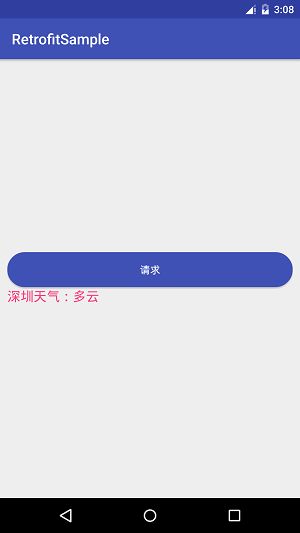
返回的WeatherDataBean 数据太多了,就没有全显示出来,这里就显示一个数据了,来看运行之后的结果:
上面是Get请求是一般少量参数的接口,但对于特殊参数请求,是有问题的。
比如我们最上面的这个接口:http://gank.io/api/data/Android/10/1 。在最后面有三个参数:
- Android :可接受参数( Android、 iOS 、 休息视频 、 福利 、 前端 、 App )
- count :最大 50
- page :是页数
它并不像 cityname 或者 key 的拼接参数,而是直接传参数:
import retrofit2.Call;
import retrofit2.http.GET;
import retrofit2.http.Path;

public interface GnakApi {

    @GET("api/data/Android/10/{page}")
    Call getAndroidInfo(@Path("page") int page);
}
如上所示,参数用大括号做占位符,再用 path 做关键字 。下面继续请求:
Retrofit retrofit = new Retrofit.Builder()
        .baseUrl("http://gank.io/")
        .addConverterFactory(GsonConverterFactory.create())
        .build();
api = retrofit.create(GankApi.class);
这样拿到我们的接口对象后直接请求:
    api.getAndroidInfo(1).enqueue(new Callback() {
    @Override
    public void onResponse(Call call, Response response) {
        tv_result.setText(response.body().getResults().get(0).getDesc());
    }

    @Override
    public void onFailure(Call call, Throwable t) {

    }
});
运行结果:
我们知道少量参数可以使用@Query 。另外,如果需要多个参数,我们通常是传入字典集合 @QueryMap。
仍以天气接口为案例,cityname、key 作为两个参数:
import java.util.Map;
import retrofit2.Call;
import retrofit2.http.GET;
import retrofit2.http.QueryMap;
public interface WeatherApi {
    @GET("onebox/weather/query?")
    Call getWeather(@QueryMap Map params);
}
实例化Retrofit 对象,拿到请求接口。
Retrofit retrofit = new Retrofit.Builder()
                .baseUrl("http://op.juhe.cn/")
                .addConverterFactory(GsonConverterFactory.create())
                .build();
api = retrofit.create(WeatherApi.class);
传入参数,发起请求:
Map params = new HashMap<>();
params.put("cityname", "深圳");
params.put("key", "4ea58de8a7573377cec0046f5e2469d5");
api.getWeather(params).enqueue(new Callback() {
    @Override
    public void onResponse(Call call, Response response) {

    }

    @Override
    public void onFailure(Call call, Throwable t) {

    }
});
Post请求参数
以简单的Post提交用户id、name 接口为例:
import retrofit2.Call;
import retrofit2.http.Body;
import retrofit2.http.POST;

public interface PostApi {

    @POST("user/new")
    Call postUser(@Body User user);
}
请求实体类User。
public class User {

    private int id;
    private String name;

    public int getId() {
        return id;
    }

    public void setId(int id) {
        this.id = id;
    }

    public String getName() {
        return name;
    }

    public void setName(String name) {
        this.name = name;
    }
}
响应结果类Result。
public class Result {

    private int yes;
    private int no;

    public int getYes() {
        return yes;
    }

    public void setYes(int yes) {
        this.yes = yes;
    }

    public int getNo() {
        return no;
    }

    public void setNo(int no) {
        this.no = no;
    }
}
接口调用:
User user = new User();
    user.setId(1);
    user.setName("lgl");
    api.postUser(user).enqueue(new Callback() {
        @Override
        public void onResponse(Call call, Response response) {
            if (response.body().getYes() == 0) {
                //成功
            }
        }

        @Override
        public void onFailure(Call call, Throwable t) {
               //错误
        }
}); Post提交表单
官网例子,修改用户接口提交表单:
@POST("user/edit")
Call editUser(@Field("id") int id, @Field("name") String name);
可见关键字是@Field,接口这样去调用:
api.editUser(1, "liuguilin").enqueue(new Callback() {
        @Override
        public void onResponse(Call call, Response response) {
            if (response.body().getYes() == 0) {
                Toast.makeText(MainActivity.this, "成功", Toast.LENGTH_SHORT).show();
            }
        }

        @Override
        public void onFailure(Call call, Throwable t) {

        }
    });
这样就把表单提交了。最后,有一个PUT,他是多种文件类型上传,比如文件,图片,另外还有修改我们的Headers,这个很简单,看例子
@Headers("Cache-Control: max-age=640000")
@GET("widget/list")
Call> widgetList();
这是官网的例子,但是你只需要添加 Headers, 参数就可以传了,而且参数是一个数组,可以传多个。
Retrofit2.0+RxJava
GitHub地址
- RxJava:https://github.com/ReactiveX/RxJava
- RxAndroid:https://github.com/ReactiveX/RxAndroid
添加依赖
    //适配器
    compile 'com.squareup.retrofit2:adapter-rxjava:2.1.0'
    //RxJava
    compile 'io.reactivex:rxjava:1.1.6'
    //RxAndroid
    compile 'io.reactivex:rxandroid:1.2.1'
练习案例。
登录后获取 user_id,请求用户信息 ,共两个请求:一个是登录,传参用户名和密码,另一个,用id去查找用户信息。
    @POST("user/login")
    Call login(@Field("username") String user, @Field("password") String password);

    @GET("user/info")
    Call getUser(@Query("id") String id);
实例化构建Retrofit对象,拿到请求接口:增加了addCallAdapterFactory
Retrofit retrofit = new Retrofit.Builder()
                .baseUrl("baseUrl")
                .addConverterFactory(GsonConverterFactory.create())
                .addCallAdapterFactory(RxJavaCallAdapterFactory.create())
                .build();
 api = retrofit.create(PostApi.class);
然后进行两次调用:
api.login("liuguilin", "748778890").enqueue(new Callback() {
    @Override
    public void onResponse(Call call, Response response) {
        if (response.isSuccessful()) {
            String id = response.body().getUser_id();
            api.getUser(id).enqueue(new Callback() {
                @Override
                public void onResponse(Call call, Response response) {

                    Toast.makeText(MainActivity.this, "id:" +
                                    response.body().getId()
                                    + "name:" + response.body().getName(),
                            Toast.LENGTH_SHORT).show();
                }

                @Override
                public void onFailure(Call call, Throwable t) {

                }
            });
        }
    }

    @Override
    public void onFailure(Call call, Throwable t) {

    }
});
上面是Retrofit的写法,这样看着有点臃肿。
下面是RxJava的写法,需要重新定义两个接口:
   @POST("user/login")
    rx.Observable loginForRX(@Body User user);

    @GET("user/info")
    rx.Observable getUserForRX(@Query("id") String id);
使用调用:
api.loginForRX(new User("liuguilin", "748778890")).flatMap(new Func1>() {
    @Override
    public Observable call(User user) {
        return api.getUser(user.getUser_id());
    }
}).subscribe(new Action1() {
    @Override
    public void call(User user) {
        Toast.makeText(MainActivity.this, "name:" + user.getName(), Toast.LENGTH_SHORT).show();
    }
});
小结 :这就是比较简洁的写法了,RxJava作为链式的表达式,响应式的操作还是很不错的。
结束。


