caffe 网络模型文件中的参数含义(top bottom lr_mult decay_mult)与模型编写以及模型自定义
文章目录
- 基本概念
- 数据层
- Convolution Layer
- Deconvolution 反卷积层
- Batch Normalization 层
- Polling Layer
- crop层 裁剪
- 全连接层 fc 、以及最后一级全连接后的结构
- 自定义层
__net.prototxt
(网络模型在线可视化工具)[http://ethereon.github.io/netscope/#/editor]
基本概念
layer{
name: ""
  type: "Data、Scale、Convolution、ReLU、Pooling、  Eltwise
、InnerProduct、Accuracy、Softmax、Python"
  bottom: "data"
  top: "sub_mean"
}
基本参数说明 这些参数基本每一层都有
name 根据网络总的位置可自定义一个相关的名字
type Convolution caffe内置的卷积层
bottle 前一层的输入
top 这一层的输出
param 设置通用参数
lr_mult 学习率系数, 最终学习率是lr_multsolver.prototxt配置文件中的base_lr
decay_mult 权值衰减 最终权值衰减decay_multsolver.prototxt的weight_dacay
所以权值更新wi = wi -(base_lr * lr_mult) *dwi - (weight_dacay * decay_mult) * wi(dwi是误差关于wi的偏导数)
如果有两个lr_mult, 则第一个表示权值的学习率,第二个表示偏置项的学习率。
lr_mult、decay_mult仅在有参数的层出现,比如卷积层、全连接层
数据层
Convolution Layer
- 基本结构
layer {
  name: "conv1"
  type: "Convolution"
  bottom: "sub_mean"
  top: "conv1"
  param {
    lr_mult: 1.0
    decay_mult: 1.0
  }
  param {
    lr_mult: 1.0
    decay_mult: 0.0
  }
  convolution_param {
    num_output: 64
    bias_term: true
    kernel_size: 7
    stride: 2
    weight_filler {
      type: "xavier"
    }

  }
}
参数说明
name 根据网络总的位置可自定义一个相关的名字
type Convolution caffe内置的卷积层
bottle 前一层的输入
top 这一层的输出
param 设置通用参数
lr_mult 学习率系数, 最终学习率是lr_multsolver.prototxt配置文件中的base_lr
decay_mult 权值衰减 最终权值衰减decay_multsolver.prototxt的weight_dacay
所以权值更新wi = wi -(base_lr * lr_mult) *dwi - (weight_dacay * decay_mult) * wi(dwi是误差关于wi的偏导数)
如果有两个lr_mult, 则第一个表示权值的学习率,第二个表示偏置项的学习率。
convolution_param 设置卷集层特有参数
num_output 卷积核的个数 【生成特征图的个数】
kernel_size 卷积核的大小
stride 卷积核的步长,默认为1
pad 扩充边缘,默认为0,不扩充 (比如卷积核的大小为55,那么pad设置为2,则四个边缘都扩充2个像素,即宽度和高度都扩充了4个像素,如果步长为1的话,这样卷积运算之后的特征图就不会变小)
bias_term: true 是否开启偏置项,默认为true, 开启
bias_filler: 偏置项的初始化。一般设置为"constant",值全为0。
weight_filler 权值初始化的算法方式 默认为“constant",值全为0,很多时候我们用"xavier"算法来进行初始化,也可以设置为”gaussian"
例如
输入:n×C0×w0×h0
输出:n×C1×w1×h1
其中,c1就是参数中的num_output,生成的特征图个数
w1=(w0+2pad-kernel_size)/stride+1;
h1=(h0+2*pad-kernel_size)/stride+1;
如果设置stride为1,前后两次卷积部分存在重叠。如果设置pad=(kernel_size-1)/2,则运算后,宽度和高度不变
Deconvolution 反卷积层
layer {
type: "Deconvolution"
name: 'upsample_8'
bottom: 'score-dsn4'
top: 'score-dsn4-up'
  param { lr_mult: 0 decay_mult: 1 }
  param { lr_mult: 0 decay_mult: 0}
  convolution_param { kernel_size: 16 stride: 8 num_output: 1 } }
卷积和反卷积的参数结构完全一样,就是计算输出的方式不太一样
convolution: output = (input + 2 * pads - kernal_size) / stride + 1;
deconvolution: output = (input - 1) * stride + kernal_size - 2 * pads
Batch Normalization 层
作用: 提出采用 Batch Normalization 来对 ICS( Internal Covariate Shift) 进行消除,加速网络训练. 其主要是采用 normalization 处理来固定网络层输入的均值和方差(means and variances).
- 减少了网络的梯度计算对于参数 scale 和初始值的依赖
- 允许使用更大的 learning rates,而不出现发散
- 具有对模型的正则作用
- 能减少对 Dropout 的使用
- 能避免网络进入饱和状态进而利用网络的饱和非线性
在哪用
caffe 实现
src/caffe /layer/batch_norm_layer.cpp
src/caffe /layer/batch_norm_layer.cu
src/caffe /layer/scale_layer.cpp
src/caffe /layer/scale_layer.cu
Batch Normalization主要做两部分:
- 对输入进行归一化 —— 对应 Caffe BatchNorm 层
- 归一化再 平移缩放 y=γ⋅xnorm+β —— 对应 Caffe Scale 层
## 以 resnet中的基本结构为例
layer {
  name: "first_conv"
  type: "Convolution"
  bottom: "data"
  top: "first_conv"
  param {
    lr_mult: 1
    decay_mult: 1
  }
  convolution_param {
    num_output: 16
    pad: 1
    kernel_size: 3
    stride: 1
    weight_filler {
      type: "msra"
    }
  }
}
layer {
  name: "first_conv_bn"
  type: "BatchNorm"
  bottom: "first_conv"
  top: "first_conv"
  param {
    lr_mult: 0
    decay_mult: 0
  }
  param {
    lr_mult: 0
    decay_mult: 0
  }
  param {
    lr_mult: 0
    decay_mult: 0
  }
}
layer {
  name: "first_conv_scale"
  type: "Scale"
  bottom: "first_conv"
  top: "first_conv"
  scale_param {
    bias_term: true
  }
}
layer {
  name: "first_conv_relu"
  type: "ReLU"
  bottom: "first_conv"
  top: "first_conv"
}
Polling Layer
layer {
  name: "pool1"
  type: "Pooling"
  bottom: "conv1"
  top: "pool1"
  pooling_param {
    pool: MAX
    kernel_size: 3
    stride: 2
  }
}
池化层 为了减少运算量和数据维度的层
pooling_param参数设置
pool 池化方法 默认MAX 还有 AVE、STOCHASTIC
kernel_size 池化的核大小
stride 池化的步长,默认为1,一般设置为2
pad 边缘扩充,默认为0
pooling层的运算方法基本是和卷积层是一样的。输入:ncw0h0
输出:ncw1h1
和卷积层的区别就是其中的c保持不变
w1=(w0+2pad-kernel_size)/stride+1;
h1=(h0+2pad-kernel_size)/stride+1;
如果设置stride为2,前后两次卷积部分不重叠。100100的特征图池化后,变成5050.
crop层 裁剪
layer {
 type: "Crop"
 name: 'crop'
 bottom: 'score-dsn4-up'
 bottom: 'data'
 top: 'upscore-dsn4'
 }
Caffe中的数据是以 blobs形式存在的,blob是四维数据,即 (Batch size, number of Chennels, Height, Width)=(N, C, H, W) —(0,1,2,3)
Crop 的输入层 bottom blobs有两个,输出层有一个 top bottom
- 前一个是要进行裁剪的bottom
- 后一个是参考输入
- 输出层与第二个输入结构相同
crop_param
{
	axis:  default = 2
	offset :
}
全连接层 fc 、以及最后一级全连接后的结构
layer {
  name: "fc3"
  type: "InnerProduct"
  bottom: "pool_avg"
  top: "fc3"
  param {
    lr_mult: 1.0
    decay_mult: 1.0
  }
  param {
    lr_mult: 1.0
    decay_mult: 0.0
  }
  inner_product_param {
    num_output: 3
    weight_filler {
      type: "xavier"
    }
    bias_filler {
      type: "constant"
      value: 0.0
    }
  }
}
inner_product_param 全连接层参数设置
num_output 全连接神经元数目
weight_filler 权值初始化方式
bias_filler 偏置项初始化方式
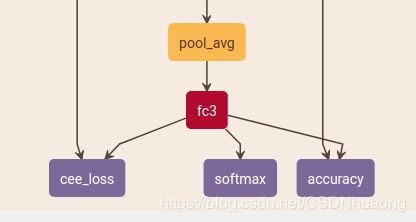
在caffe中,最后一级全连接后面会跟有如下三种情况
- loss function 做优化学习,用于反向传播(train-data)
- Accuracy Layer 验证当前模型参数的准确率(validation-data)
- softmax function 做部署推理用(输出类别的概率)

但是有几点需要说明:
1、caffe在计算Accuravy时,利用的是最后一个全链接层的输出(而不带有acitvation function)?
因为计算accuracy应该使用计算得到的labels与数据集真正的labels去做计算,为什么caffe的accuracy要将fc3接入Accuray层呢?
原来,在AccuracyLayer内部,实现了“利用fc8的输出得到数据集的预测labels”(数值最大的那个值得idnex就是样本的类别),那么,再与输入的数据集真实lebels作对比,就实现了accuray的计算.
所以,如果仅仅是做预测,利用f3的输出就够了(输出值最大的那个位置即为输入的label),该输出表示了输入的样本属于每一类的可能性大小,但并不是概率值;
如果为了使输出具有统计意义,需要加入softmax function,它只是使前面的全连接层的输出(fc3)具有了概率意义,并不改变这些输出之前的大小关系,因为softmax function本身就是增函数;
为了利用误差反向传播,还需要构造loss function
在caffe 根据训练和部署的不同,最后一层全连接层通常
layer {
  name: "cee_loss"
  type: "Python"
  bottom: "fc3"
  bottom: "label"
  top: "cee_loss"
  python_param {
    module: "digits_python_layers"
    layer: "CrossEntropySoftmaxWithEntropyLossLayer"
    param_str: "{ 'entScale': 0.01, 'pScale': 0.0001, 'label_eps': 0.01 }"
  }
  loss_weight: 1
  exclude {
    stage: "deploy"
  }
}

layer {
  name: "softmax"
  type: "Softmax"
  bottom: "fc3"
  top: "softmax"
  include {
    stage: "deploy"
  }
}

layer {
  name: "accuracy"
  type: "Accuracy"
  bottom: "fc3"
  bottom: "label"
  top: "accuracy"
  include {
    stage: "val"
  }
}
