Contents
1 Abstract
2 Naming Standards
3 Uploading and installing the SSL Certificate, Key, and Chain.
3.1 GUI
3.2 CLI
3.3 Invalid Private Key Error with Fix
4 Binding the Certificates and Profiles
4.1 GUI
4.2 CLI
5 Updating SSL Ciphers with an SSL profile
5.1 GUI
5.2 CLI
6 Reference Links
Abstract
All virtual servers are to be configured as content switching virtual servers. As a result, SSL termination is configured on a content switching virtual server of the SSL protocol type. SSL Termination requires that the certificate, key, and chain be uploaded, installed, and linked together . Then the trio are bound to a virtual server. SSL ciphers are selected using an SSL profile which can be bound to the virtual server. By default the NetScaler binds ns_default_ssl_profile_frontend which the kick limits to only a few select strong ciphers.
Naming Standards
For naming standards see the NetScaler Standards Page
Uploading and installing the SSL Certificate, Key, and Chain.
GUI
There are multiple places to upload these files in the GUI depending on where you are in the virtual server creation process. This wiki outlines two places regardless of whether you are in the process of creating a new virtual server or not.
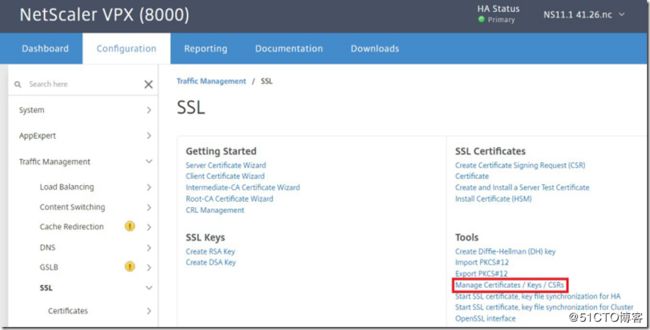
First select "Manage Certificates/Keys/CSRs" from the SSL menu under configuration.
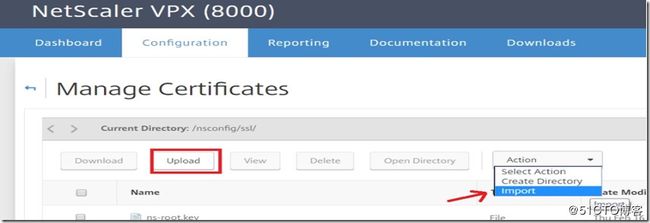
At this point you can select upload and proceed to upload the files from your local box or go to action >> import and paste in a PEM of each.
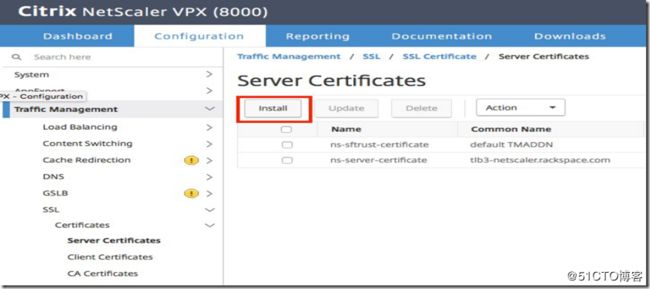
After the SSL certificate, key, and chain have been uploaded you have to install them. To start with navigate to Configuration >> Traffic
Management >> SSL >> Certificates >> Server Certificates and select "Install"
Select your certificate and key in the new window that opens. If you uploaded the certificate and key in the way described above, select "appliance" in the drop down menu from "choose file". Alternatively, you can upload the certificate and key from your local box by selecting "local" instead.
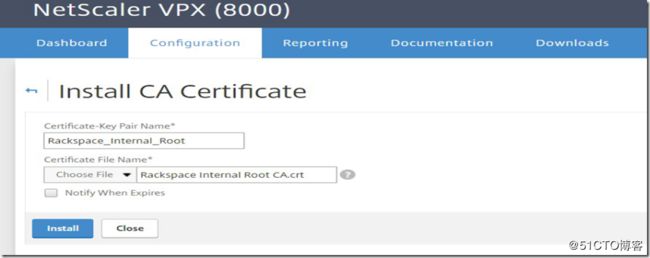
Repeat the same process for the CA Certificate under Install CA Certificate.
Finally, you need to link the server cert with the CA cert by navigating to the server certificate section, selecting the server certificate and then selecting "link" from the action menu.
Select the CA certificate from the drop down menu in the next window.
CLI
You can SCP the certificate, key, and chain directly to the NetScaler and then bind them via the CLI. Upload the files in PEM format to the NetScaler in the /flash/nsconfig/ssl directory. The files will sync to the secondary device when the configuration is saved. Alternatively, you can use a text editor (or simply "cat >") to paste in the files directly into your terminal.
SCP from your local box
scp
- sample -
scp nglab.example.corp.key gu=username@[email protected]@support.dfw1.gateway.example.com:/flash/nsconfig/ssl
/nglab.example.corp.key
After the files are on the device, run the following to bind them into a certKey configuration object and link the chain.
Create binding on Netscaler
add ssl certKey
add ssl certKey
link ssl certKey
- sample -
add ssl certKey wild.nglab.example.corp -cert nglab.example.corp.crt -key nglab.example.corp.key -expiryMonitor DISABLED
add ssl certKey Example_Internal_Root_CA -cert Example_Internal_Root_CA.crt -bundle YES -expiryMonitor DISABLED
link ssl certKey wild.nglab.example.corp Example_Internal_Root_CA
Invalid Private Key Error with Fix
An error seen recently while installing the certificate key pair was quickly resolved using CTX134233.
![]()
![]() Error: When installing the cert key pair, either via GUI or CLI, you receive the following message: Invalid private key, or PEM pass phrase required for this private key
Error: When installing the cert key pair, either via GUI or CLI, you receive the following message: Invalid private key, or PEM pass phrase required for this private key
![]() The issue is due to hidden space control characters within the key
The issue is due to hidden space control characters within the key
![]()
![]()
![]() It is an easy fix using the steps below: Log in to NetScaler via SSH Switch to Shell
It is an easy fix using the steps below: Log in to NetScaler via SSH Switch to Shell
![]() Go to the /nsconfig/ssl directory
Go to the /nsconfig/ssl directory
![]()
![]() Run the following openssl command to remove the hidden characters openssl rsa -in current_keyfilename -out NEW_keyfilename
Run the following openssl command to remove the hidden characters openssl rsa -in current_keyfilename -out NEW_keyfilename
![]() Install the new certificate key pair
Install the new certificate key pair
Binding the Certificates and Profiles
GUI
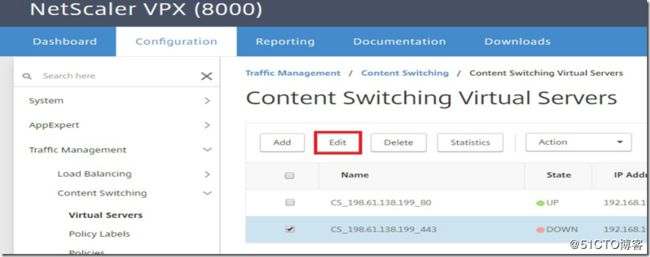
Select the Content Switching Virtual Server that you want to bind the SSL certificate to by going to Configuration >> Traffic Management >> Content Switching >> Virtual Servers and then selecting the virtual server and clicking on "edit".
On the far right under "Advanced Settings" in the new window click on "Certificates" to add the menu option to the pane on the left. Then select "Server Certificate" and add your certificate. Click bind and then continue.
CLI
Binding the SSL certificate is a one line command in the CLI.
Bind the certKey to the VIP
bind ssl vserver
- sample -
bind ssl vserver CS_198.61.138.199_443 -certkeyName wild.nglab.example.corp
Updating SSL Ciphers with an SSL profile
SECURE SSL profile
Starting with release 12.1, Citrix has included an SSL profile named "ns_default_ssl_profile_secure_frontend" that is designed to get an A+ rating on SSL labs. This can be used in lieu of the more permissive SSLPROF_RAX_DEFAULT profile if the customer requires the additional security or the A+ rating.
SECURE SSL Profile Profile
LB-NETSCALER-Primary> show ssl profile ns_default_ssl_profile_secure_frontend
1) Name: ns_default_ssl_profile_secure_frontend (Front-
End)
SSLv3: DISABLED TLSv1.0: DISABLED TLSv1.1: DISABLED TLSv1.2: ENABLED TLSv1.3: DISABLED
Client Auth: DISABLED
Use only bound CA certificates: DISABLED Strict CA checks: NO
Session Reuse: ENABLED Timeout: 120 seconds
DH: DISABLED
DH Private-Key Exponent Size Limit: DISABLED Ephemeral
RSA: ENABLED Refresh Count: 0
Deny SSL Renegotiation NONSECURE Non FIPS Ciphers: DISABLED
Cipher Redirect: DISABLED SSL Redirect: DISABLED Send Close-Notify: YES
Strict Sig-Digest Check: DISABLED Zero RTT Early Data: DISABLED
DHE Key Exchange With PSK: NO
Tickets Per Authentication Context: 1
Push Encryption Trigger: Always
PUSH encryption trigger timeout: 1 ms
SNI: DISABLED
OCSP Stapling: DISABLED
Strict Host Header check for SNI enabled SSL
sessions: NO
Push flag: 0x0 (Auto)
SSL quantum size: 8 kB Encryption trigger timeout 100 mS Encryption trigger packet count: 45
Subject/Issuer Name Insertion Format: Unicode
SSL Interception: DISABLED
SSL Interception OCSP Check: ENABLED
SSL Interception End to End Renegotiation: ENABLED
SSL Interception Maximum Reuse Sessions per Server: 10
Session Ticket: DISABLED HSTS: ENABLED
HSTS IncludeSubDomains: YES HSTS Max-Age: 15552000
ECC Curve: P_256, P_384, P_224, P_521
1) Cipher Name: SECURE Priority :2
Description: Predefined Cipher Alias
Done
GUI
First you need to create an SSL profile with the desired cipher list. Navigate to Configuration >> System >> Profiles >> SSL Profile and click
"Add"
In the new window add your desired name and select any options that you want. SSL protocols and SNI settings are toward the
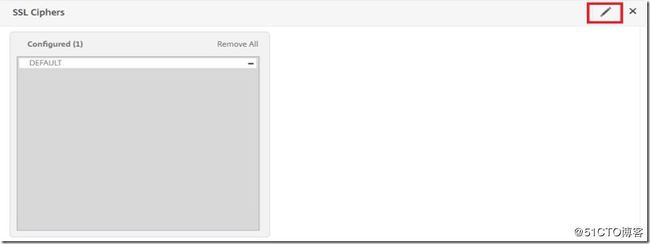
bottom. Then click "OK" at the bottom. Halfway down the next window you will see SSL ciphers. Click on the pencil "edit" button on the right.
Click on the "add" button with the green cross that pops up and you will be presented with a window that will allow you to add whatever
ciphers you need. You can add an entire group or just a few specific ciphers. The Example kick will come with a group for recommended defaults. Add your ciphers to the configured list on the right and remove any you do not want. Then click "OK".
Apply the SSL profile by going to Configuration >> Traffic Management >> Content Switching >> Virtual Servers and then selecting your virtual server and clicking "edit".
On the edit screen click the pencil "edit" button to the right of the SSL profile section and then select your new profile via the drop down box. Click "OK" and then "Done".
CLI
Creating SSL profiles via the CLI may not be feasible in all situations as you will need to know exactly which cipher strings or groups you want to add as well as any other options that you want to enable or disable.
Create SSL Profile
add ssl profile
bind ssl profile
- sample -
add ssl profile SSL_TEST_PROFILE -se***euse ENABLED -sessTimeout 120 bind ssl profile SSL_TEST_PROFILE -cipherName HIGH -cipherPriority 1
bind ssl profile SSL_TEST_PROFILE -cipherName TLS1-AES-256-CBC-SHA -cipherPriority 2
bind ssl profile SSL_TEST_PROFILE -cipherName TLS1.2-AES-256-SHA256 -cipherPriority 3
Adding the SSL profile to the VIP is a one line command.
Bind the SSL profile to the Virtual Server
set ssl vserver
- sample -
set ssl vserver CS_198.61.138.199_443 -sslProfile SSL_TEST_PROFILE
Reference Links
ssl certKey:
https://developer-docs.citrix.com/projects/netscaler-command-reference/en/12.0/ssl/ssl-certkey/ssl-certkey/
Secure Profile:
https://docs.citrix.com/en-us/netscaler/12-1/ssl/ssl-profiles/secure-front-end-profile.html
Invalid Private Key Error:
https://support.citrix.com/article/CTX134233
