Java基础---图形用户界面GUI(二)
常用AWT组件
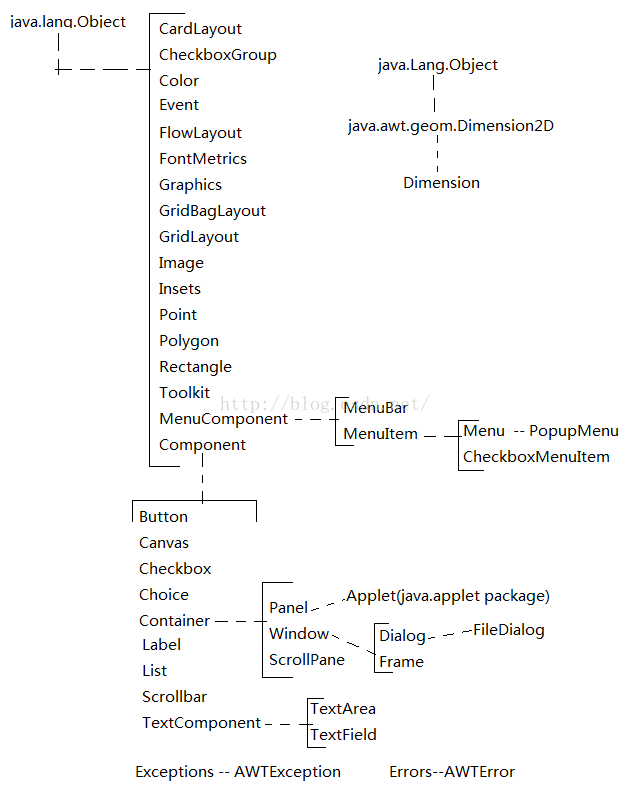
AWT中的组件类层次关系图
Component类
Java的图形用户界面的最基本组成部分是组件,组件式一个可以以图形化的方式显示在屏幕上并能与用户进行交互的对象,如一个按钮,一个标签等。抽象类Component是所有GUI组件的共同父类。Componet类规定了所有GUI组件的基本特征性。
Cavas
Canvas代表屏幕上的一块空白的矩形区域,程序能够在这个部件表面绘图,也能捕获用户操作,产生相应的事件。Canvas可以说是具有最基本的和最简单的GUI功能的部件。当我们设计一种自己定制具有GUI功能的部件类,这个类就可以继承Canvas,这样,这个部件就已经完成了GUI的基本功能,我们只需要在这个基础上增加子类部件所专有的外观和功能的相关代码就行了,我们想要绘制子类部件的外观,我们就必须覆盖Cavas的paint方法。
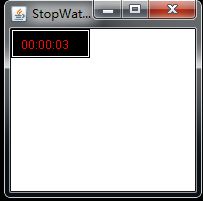
我们设计一个计时器部件,鼠标在部件上按下时,计时器开始计时,并在部件上显示计时时间,鼠标释放时,计时器停止计时。下面代码
import java.awt.*;
import java.awt.event.*;
import java.util.*;
import java.text.SimpleDateFormat;
class StopWatch extends Canvas implements Runnable
{
	private long startTime = 0;
	private long endTime = 0;
	private boolean bStart = false;
	public StopWatch()
	{
		enableEvents(AWTEvent.MOUSE_EVENT_MASK);
		setSize(80,30);
	}
	protected void processMouseEvent(MouseEvent e)
	{
		if(e.getID()==MouseEvent.MOUSE_PRESSED)
		{
			//鼠标按下时,启动计时线程,并让起始时间变量和终止时间变量都等于当前时间
			bStart = true;
			startTime = endTime = System.currentTimeMillis();
			repaint();
			new Thread(this).start();
		}
		else if(e.getID()==MouseEvent.MOUSE_RELEASED)
		{
			//鼠标释放时,终止计时线程,并重绘窗口表面上的内容
			bStart = false;
			repaint();
		}
		super.processMouseEvent(e);
	}
	public void paint(Graphics g)
	{
		//时间的小时、分、秒都用两位数字显示,不足两位前面加0
		SimpleDateFormat sdf = new SimpleDateFormat("HH:mm:ss");
		Date elapsedTime = null;
		try
		{
			elapsedTime = sdf.parse("00:00:00");
		}
		catch (Exception e)
		{
		}
		elapsedTime.setTime(endTime-startTime+elapsedTime.getTime());
		String display = sdf.format(elapsedTime);
		g.drawRect(0,0,78,28);
		g.fill3DRect(2,2,75,25,true);
		g.setColor(Color.RED);
		g.drawString(display,10,20);
	}
	public void run()
	{
		while(bStart)
		{
			try
			{
				Thread.sleep(500);
			}
			catch (Exception e)
			{
				e.printStackTrace();
			}
			endTime = System.currentTimeMillis();
			repaint();
		}
	}
}

public class TestStopWatch
{
	public static void main(String[] args)
	{
		Frame f =  new Frame("StopWatch");
		f.add(new StopWatch());
		f.setSize(200,200);
		f.setVisible(true);
		f.addWindowListener(new WindowAdapter(){
			public void windowClosing(WindowEvent e)
			{
				System.exit(0);
			}
		});
	}
}
Checkbox
java提供的这个Checkbox类来建立单选按钮和多选按钮
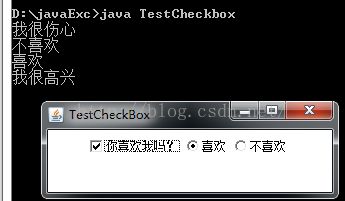
对一般的程序来说,需要处理单选按钮和多选按钮的ItemEvent事件,从而获取用户选择的结果。处理ItemEvent事件的监听器接口为ItemListener,其中只有一个itemStateChanged方法,显然,ItemEvent是一种语义事件。 下面代码
import java.awt.*;
import java.awt.event.*;
public class TestCheckbox
{
	Checkbox cb1 = new Checkbox("你喜欢我吗?",true);
	CheckboxGroup cbg = new CheckboxGroup();
	Checkbox cb2 = new Checkbox("喜欢",cbg,true);
	Checkbox cb3 = new Checkbox("不喜欢",cbg,false);

	public void init()
	{
		Frame f = new Frame("TestCheckBox");
		FlowLayout fl = new FlowLayout();
		f.setLayout(fl);
		f.add(cb1);
		f.add(cb2);
		f.add(cb3);
		cb1.addItemListener(new CbItemListener());
		cb2.addItemListener(new CbItemListener());
		cb3.addItemListener(new CbItemListener());
		f.setBounds(0,0,300,100);
		f.setVisible(true);
		f.addWindowListener(new WindowAdapter(){
			public void windowClosing(WindowEvent e)
			{
				System.exit(0);
			}
		});
	}

	class CbItemListener implements ItemListener
	{
		public void itemStateChanged(ItemEvent e)
		{
			Checkbox cb = (Checkbox)e.getItemSelectable();
			if(cb.getLabel().equals("你喜欢我吗?"))
			{
				if(cb.getState()==true)
					System.out.println("我很高兴");
				else
					System.out.println("我很伤心");
			}
			/*else if(cb.getLabel().equals("喜欢"))
			{
				if(e.getStateChange()==ItemEvent.SELECTED)
					System.out.println("我也喜欢你");
				else
					System.out.println("我也不喜欢你");
			}*/
			else
			{
				Checkbox cbx = cbg.getSelectedCheckbox();
				if(cbx!=null)
					System.out.println(cbx.getLabel());
			}
		}
	}
	public static void main(String[] args)
	{
		new TestCheckbox().init();
	}
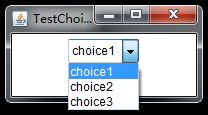
}Choice类用来制作用于单选的下拉列表。
import java.awt.*;
import java.awt.event.*;
public class TestChoice
{
	Choice ch = new Choice();//创建Choice对象
	TestChoice()
	{
		ch.add("choice1");
		ch.add("choice2");
		ch.add("choice3");
		FlowLayout fl = new FlowLayout();
		Frame f = new Frame("TestChoice");
		f.setLayout(fl);
		f.add(ch);
		f.setBounds(0,0,200,100);
		f.setVisible(true);
		f.addWindowListener(new WindowAdapter(){
			public void windowClosing(WindowEvent e)
			{
				System.exit(0);
			}
		});
	}

	public static void main(String[] args)
	{
		new TestChoice();
	}
}
菜单
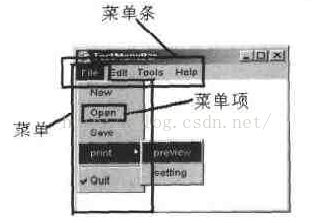
一个完整的菜单系统由菜单条、菜单和菜单项组成。
在图中,File、Edit、Tools、Help各项叫做菜单,这些顶层菜单共同组合成菜单条,在File项下拉菜单中New、Open等各项叫做菜单项。
Java中与菜单相关的类主要有3个MenuBar(菜单条)、Menu(菜单)、MenuItem(菜单项)。
import java.awt.*;
import java.awt.event.*;
public class TestMenuBar
{
	MenuBar menubar = new MenuBar();//创建菜单条对象
	Menu fileM = new Menu("File");//创建各菜单
	Menu editM = new Menu("Edit");//创建各菜单
	Menu toolsM = new Menu("Tools");//创建各菜单
	Menu helpM = new Menu("Help");//创建各菜单

	MenuItem fileMI1 = new MenuItem("New");//创建各菜单项
	MenuItem fileMI2 = new MenuItem("Open");//创建各菜单项
	MenuItem fileMI3 = new MenuItem("Save");//创建各菜单项
	CheckboxMenuItem fileMI5 = new CheckboxMenuItem("Quit",true);//创建各菜单项

	Menu filePrint = new Menu("print");//创建子菜单
	MenuItem printM1 = new MenuItem("preview");
	MenuItem printM2 = new MenuItem("preview");

	public TestMenuBar()
	{
		FlowLayout fl = new FlowLayout();
		Frame f = new Frame("TestMenuBar");
		f.setLayout(fl);

		menubar.add(fileM);//将菜单加入菜单条
		menubar.add(editM);
		menubar.add(toolsM);
		menubar.add(helpM);

		fileM.add(fileMI1);//将菜单项加入file菜单中
		fileM.add(fileMI2);
		fileM.add(fileMI3);

		filePrint.add(printM1);//将菜单项加入print菜单中
		filePrint.add(printM2);
		fileM.add(filePrint);

		//将print菜单作为一个菜单项加入File菜单中
		fileM.addSeparator();//将一条分割线加入菜单中
		fileM.add(fileMI5);//将菜单项加入菜单中
		f.setMenuBar(menubar);//把整个菜单系统显示在窗口中
		f.setBounds(0,0,250,200);
		f.setVisible(true);
		f.addWindowListener(new WindowAdapter(){
			public void windowClosing(WindowEvent e)
			{
				System.exit(0);
			}
		});
	}
	public static void main(String[] args)
	{
		new TestMenuBar();
	}
}
程序不用处理菜单条和菜单事件,但需要对菜单项的运动进行响应,单击一个菜单项,会发ActionEvent事件。下面只给出部分代码
Menu filePrint = new Menu("print");//创建子菜单
MenuItem printM1 = new MenuItem("preview");
MenuItem printM2 = new MenuItem("setting");
MenuListener1 m1 = new MenuListener1();
printM1.addActionListener(m1);
printM2.addActionListener(m1);
class MenuListener1 implements ActionListener
{
public void actionPerformed(ActionEvent e)
{
if(e.getActionCommand().equals("preview"))
System.out.println("doing preview");
else if(e.getActionCommand().equals("setting"))
System.out.println("doing setting");
}
}
对于发出ActionEvent事件的组件,我们可以调用MenuItem.setActionCommand方法为其关联一个字符串,用于指示这个动作想执行的命令。如果没有setActionComamnd方法为组件关联一个命令字符串,则其命令字符串为组件的标题文本。
Container类
组件不能独立显示出来,必须将组件放在容器中才可以显示出来。Container是所有容器的父类,容器(Container)实际上是Component的子类,因此容器类对象本身也是一个组件,具有组件的所有性质,另外还具有容纳其他组件和容器的功能。容器类对象可以使用方法add()添加组件。
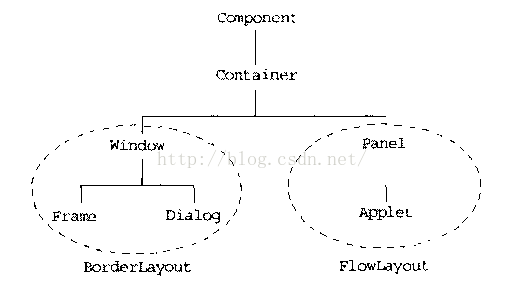
容器的类层次关系
Container有几个主要的子类:Window类,Panel类,ScrollPane类。
Window类
Window类是可自由停泊的顶级窗口,它没有边框和菜单条,我们很少直接使用Window类,而是使用它的两个子类:Frame类和Dialog类。Frame对象显示效果是一个“窗口”,带有标题和尺寸重置角标,默认初始化为不可见的,可以使用setVisible(true)方法使之变为可见。
Dialog类
Dialog(对话框)一般是一个临时的窗口,用于显示提示信息或接收用户输入。在对话框中一般不需要菜单,也不需要改变窗口大小。有两种模式的对话框,模态对话框和非模态对话框。模态对话框显示,用户不能操作其它窗口,直到这个对话框关闭。非模态对话框显示时,用户还可以操作其它窗口。
Dialog类有两种常用的构造函数
public Dialog(Frame owner,String title);
public Dialog(Frame owner,String titile,boolean modal);
对话框不能独立存在,它必须有一个上级窗口,这个上级窗口就是对话框的拥有者。这两个构造函数的第一个参数代表对话框的拥有者,第二个参数是对话框的标题,打三个参数设置对话框的模式,如果true,则为模态对话框,false为非模态对话框。
import java.awt.*;
import java.awt.event.*;
class  TestDialog
{
	TextField tf = new TextField(10);
	Button b1 = new Button("模态显示");
	Button b2 = new Button("非模态显示");
	Frame f = new Frame("TestDialog");

	Button b3 = new Button("确定");
	Dialog dlg = new Dialog(f,"Dialog Title",true);
	FlowLayout fl = new FlowLayout();
	public TestDialog()
	{
		f.setLayout(fl);
		f.add(tf);
		f.add(b1);
		f.add(b2);
		b1.addActionListener(new ActionListener(){
			public void actionPerformed(ActionEvent e)
			{
				dlg.setModal(true);
				dlg.setVisible(true);
				tf.setText("www.baidu.com");
			}
		});
		b2.addActionListener(new ActionListener(){
			public void actionPerformed(ActionEvent e)
			{
				dlg.setModal(false);
				dlg.setVisible(true);
				tf.setText("www.baidu.com");
			}
		});
		f.setBounds(0,0,400,200);
		f.setVisible(true);
		f.addWindowListener(new WindowAdapter()
		{
			public void windowClosing(WindowEvent e)
			{
				System.exit(0);
			}
		});
		dlg.setLayout(fl);
		dlg.add(b3);
		b3.addActionListener(new ActionListener(){
			public void actionPerformed(ActionEvent e)
			{
				dlg.dispose();
			}
		});
		dlg.setBounds(0,0,200,250);

	}
	public static void main(String[] args)
	{
		new TestDialog();
	}
}
我们发现,当我们用模态窗体显示对话框后,我们不能操作主框架窗口,程序中的tf.setText("www.baidu.com");语句并没有执行,这条语句在当对话框关闭后才被执行。当我们使用非模态方式显示对话框后,程序tf.setText("www.baidu.com");语句立即被执行,我们也能操作主框架窗口。
FileDialog类
Dialog类下面有一种用于文件存取的对话框的子类,这就是FileDialog类,FileDialog类能够产生标准的文件于文件存取对话框。
它具有Dialog的一切特征。由于安全性限制,它不能在Applet中使用,只有在Application中才能使用。它的典型构造方法如下:
public FileDialog(Frame parent,Stirng title,int mode);
这种方法中,前两个参数的作用和Dialog一样,第三个参数有两个值,分别是FileDialog.LOAD或FileDialog.SAVE,这个参数用来确定产生的是读文件对话框还是写文件对话框。
Panel类
Panel可作为容器容纳其他组件,但不能独立存在,必须被添加到其它容器中(如Window或Applet)。Panel是一个空白容器类,提供容器组件的空间,通常用于集成其他的若干组件,这些组件形成一个有机的整体,再增加到别的容器上。
ScrollPane类
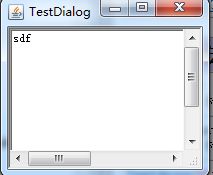
我们有时候需要在一个较小的容器窗口中,显示较大的子部件,这时就需要用到ScrollPane类。ScrollPane也是一种容器,不能单独使用,通过滚动窗口可以利用滚动条查看大面积区域。ScrollPane中只能放一个组件,无布局管理器。我们要将多个组件添加到ScrollPane上,只能先将多个组件嵌套在一个Panel容器中,然后将这个Panel作为一个组件放置ScrollPane上。下面是使用ScrollPane的一个例子程序。
import java.awt.*;
import java.awt.event.*;
public class TestPane
{
	TestPane()
	{
		Frame f = new Frame("TestDialog");
		ScrollPane sp = new ScrollPane();
		TextArea ta = new TextArea("",10,50,TextArea.SCROLLBARS_NONE);
		sp.add(ta);

		f.add(sp);
		f.setSize(200,200);
		f.setVisible(true);
		f.addWindowListener(new WindowAdapter(){
			public void windowClosing(WindowEvent e)
			{
				System.exit(0);
			}
		});
	}
	public static void main(String[] args)
	{
		new TestPane();
	}
}
布局管理器
在AWT中,每个组件在容器中都应该有一个具体的位置和大小,我们想在容器中排列若干组件时,会很难确定它们的大小和位置。为了简化编程者对容器上的组件的布局控制,一个容器内的所有组件的显示位置可以由一个“布局管理器”自动管理,我们可以为容器指定不同的布局管理器。在不同的布局管理器下,同一个组件将会有不同的显示效果,并且我们不能完全按自己的意念设置组件的大小和位置了。
为了使我们生成的图形界面具有良好的平台无关性,java语言中,提供了布局管理器这个工具来管理组件在容器中的布局,而不使用直接设置组件位置和大小的方式。每个容器都有一个布局管理器,当容器需要对某个组件进行定位或判断其大小尺寸时,就会调用其对应的布局管理器。
BorderLayout
BorderLayout将容器划分为东、南、西、北、中5个区域
import java.awt.*;
public class TestBorderLayout
{
	public static void main(String[] args)
	{
		Frame f = new Frame("布局管理器");
		f.add(new Button("North"),"North");
		f.add(new Button("West"),"West");
		f.add(new Button("East"),"East");
		f.add(new Button("South"),"South");
		f.add(new Button("aaa"));
		f.setSize(300,300);
		f.setVisible(true);
	}
}
注:如果我们在使用Container.add方法,没有指定位置参数时,AWT会用“Center”
我们将组件添加到容器时,需要指定组件放置的区域。当改变容器大小时,北方和南方的组件只改变宽度,东方和西方的组件只改变高度,而中间组件宽度和高度都会改变。
在BorderLayout布局管理下,这个管理器允许最多放置5个组件,如果我们想放置更多的组件,可以将若干组件添加到一个Panel上,让后将Panel作为一个组件放置到窗口上。当容器上放置的组件少于5个,没有放置组件的区域将会被相邻的区域占用。
对于Frame和Dialog来说,默认的布局管理器就是BorderLayout布局管理器。
FlowLayout
FlowLayout是一个简单的布局风格,组件从左到右,从上到下依次排列。如果一个组件在本行放不下,就自动换到下一行开始。
FlowLayout是Panel和applet的默认布局管理器。调用Container.setLayout方法,就可以改变容器的布局管理器。
import java.awt.*;
public class TestFlowLayout
{
	public static void main(String[] args)
	{
		Frame f = new Frame("布局管理器");
		f.setLayout(new FlowLayout());
		f.add(new Button("第一个按钮"),"North");
		f.add(new Button("第一个按钮"));
		f.add(new Button("第一个按钮"),"South");
		f.add(new Button("第一个按钮"));
		f.setSize(300,300);
		f.setVisible(true);
	}
}
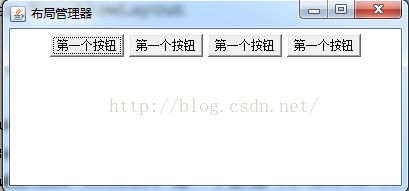
在FlowLayout布局中,Java将忽略我们在Container.add方法中指定位置参数。当容器窗口大小改变时,组件的位置可能会发生变化,但组件的尺寸不变。
GridLayout
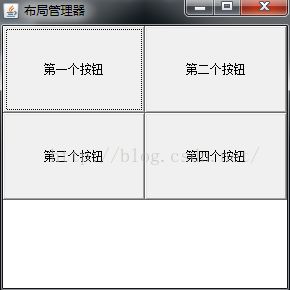
GridLayout将容器划分成若干行列的网格。在容器上添加组件时,他们会按照从左到右、从上到下的顺序在网格中排列。在GridLayout的构造方法里,我们需要指定希望将容器划分成的网格行、列数。GridLayout布局管理器总是忽略组件的最佳大小,所有单元的宽度是相同的,是根据单元数对可用宽度进行平分而定的。同样地,所有单元的高度是相同的,是根据行数对可用高度进行平分而定的。
import java.awt.*;
import java.awt.event.*;
public class TestGridLayout
{
	public static void main(String[] args)
	{
		Frame f = new Frame("布局管理器");
		f.setLayout(new GridLayout(3,2));
		f.add(new Button("第一个按钮"),"North");
		f.add(new Button("第二个按钮"));
		f.add(new Button("第三个按钮"),"South");
		f.add(new Button("第四个按钮"));
		f.setSize(300,300);
		f.setVisible(true);
		f.addWindowListener(new WindowAdapter(){
			public void windowClosing(WindowEvent e)
			{
				System.exit(0);
			}
		});
	}
}
CardLayout
Cardlayout布局管理器能够实现将多个组件放在同一容器域内交替显示。也可以按先后顺序依次显示,还可以直接定位到第一张或最后一张。
import java.awt.*;
import java.awt.event.*;
public class TestCardLayout
{
	CardLayout cl = new CardLayout();
	Panel plCenter = new Panel();
	public static void main(String[] args)
	{
		new TestCardLayout().init();
	}

	public void init()
	{
		Frame f = new Frame("布局管理器");
		Panel plWest = new Panel();
		f.add(plWest,"West");
		f.add(plCenter);

		plWest.setLayout(new GridLayout(3,1));
		Button btnPre = new Button("prev");
		plWest.add(btnPre);
		Button btnNext = new Button("next");
		plWest.add(btnNext);
		Button btnThree = new Button("three");
		plWest.add(btnThree);

		plCenter.setLayout(cl);
		plCenter.add(new Button("One"),"1");
		plCenter.add(new Button("two"),"2");
		plCenter.add(new Button("three"),"3");
		plCenter.add(new Button("four"),"4");
		plCenter.add(new Button("five"),"5");

		class MyActionListener implements ActionListener
		{
			public void actionPerformed(ActionEvent e)
			{
				if(e.getActionCommand().equals("prev"))
					cl.previous(plCenter);
				else if(e.getActionCommand().equals("next"))
					cl.next(plCenter);
				else if(e.getActionCommand().equals("three"))
					cl.show(plCenter,"3");
			}
		}
		MyActionListener ma = new MyActionListener();
		btnPre.addActionListener(ma);
		btnNext.addActionListener(ma);
		btnThree.addActionListener(ma);
		f.setSize(300,300);
		f.setVisible(true);

		f.addWindowListener(new WindowAdapter(){
			public void windowClosing(WindowEvent e)
			{
				System.exit(0);
			}
		});
	}
}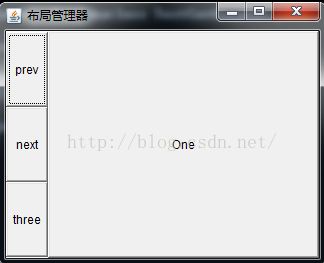
左边的Panel上使用GridLayout放置3个按钮,在右边的Panel上使用CardLayout来放置卡片,最后在窗口上使用BorderLayout放置了两个面板。按下prev按钮,依次向前显示,按下next依次向后显示,按下three按钮,显示第三张卡片。
GridBagLayout
前面的布局管理器的功能还是相当有限的,只能满足我们一些简单的需求。在复杂的布局要求下,我们需要使用GridBagLayout布局管理器。并且在Swing中我们可以有更简单的办法来实现GridBagLayout布局管理器的功能。如果真的要进行这种复杂的布局设计,建议使用JBuilder这样的集成开发环境来帮你完成。
取消布局管理器
我们也可以用绝对坐标的方式来指定位置和大小,在这种情况下,我们首先要调用Container.setLayout(null)方法取消布局管理器设置,然后调用Component.setBounds方法来设置每个组件的大小和位置。下面是不使用布局管理器的例子程序:
import java.awt.*;
import java.awt.event.*;
public class TestNullLayout extends WindowAdapter
{
	public void windowClosing(WindowEvent e)
	{
		System.exit(0);
	}
	TestNullLayout()
	{
		Button b1 = new Button("第一个按钮");
		Button b2 = new Button("第二个按钮");
		b1.setBounds(10,30,80,30);
		b2.setBounds(60,70,100,20);
		Frame f = new Frame("TestNullLayout");
		f.addWindowListener(this);
		f.setLayout(null);
		f.add(b1);
		f.add(b2);
		f.setBounds(0,0,200,200);
		f.setVisible(true);
	}
	public static void main(String[] args)
	{
		new TestNullLayout();
	}
}
不使用布局管理器的一个潜在的问题是,当容器大小改变,所有组件仍然保持原来的位置和大小。
我们可以通过编程手段决解这个问题,一是限定于用户改变容器的大小,二是容器大小改变时,容器上上所有的组件按同等比例改变自己的大小和位置。
在实际的GUI程序开发中,一般都是在 如JBuilder的集成开发环境中进行的。
Swing
Swing是第二代GUI开发工具集,Swing是构建在AWT上层的一组GUI组件的集合,和AWT相比,Swing提供了更完整的组件,引入了许多新的特性和能力。Swing提供更多的组件库,如JTable,JTree,JComboBox,Swing也增强了AWT中组件的功能,这写增强的组件在Swing中的名称通常都是AWT组件名前增加了一个“J”字母,如awt中的Button中是JButton。
我们只是在原来程序的基础上增加了import javax.swing.*;语句和在原来程序中的“Button”前面加了一个“J”字母,可见Swing在应用原理和方式与Awt并没有多大区别,我们学会了使用AWT,基本上也会了Swing,关键是要学会自己查JDK文档帮助。
JFram
import javax.swing.*;
class TestFram
{
	public static void main(String[] args)
	{
		JFrame f = new JFrame("图形界面");
		f.getContentPane().add(new JButton("ok"));
		f.setSize(300,300);
		f.setVisible(true);
	}
}JScrollPane
import javax.swing.*;
import java.awt.event.*;
class TestPane
{
	public static void main(String[] args)
	{
		new TestPane();
	}
	public TestPane()
	{
		JFrame f = new JFrame("图形界面");
		JScrollPane sp = new JScrollPane();
		JTextArea ta = new JTextArea(10,50);
		sp.getViewport().setView(ta);

		f.getContentPane().add(sp);
		f.setSize(300,300);
		f.setVisible(true);
		f.setDefaultCloseOperation(JFrame.EXIT_ON_CLOSE);
		/*f.addWindowListener(new WindowAdapter(){
			public void windowClosing(WindowEvent e)
			{
				System.exit(0);
			}
		});*/
	}
}在程序启动时,弹出一个对话框提示用户,在用户关闭窗口时,我们询问用户是否真的要结束程序。
import javax.swing.*;
import java.awt.event.*;
class TestJDialog
{
	public static void main(String[] args)
	{
		JOptionPane.showMessageDialog(null,"程序开始启动");
		final JFrame f = new JFrame("TestJDialog");//要被内置类访问,所以定义成final
		f.setDefaultCloseOperation(WindowConstants.DO_NOTHING_ON_CLOSE);
		f.addWindowListener(new WindowAdapter(){
			public void windowClosing(WindowEvent e)
			{
				int retval = JOptionPane.showConfirmDialog(f,"你真的要结束么",
					"结束程序",JOptionPane.YES_NO_OPTION);
				if(retval==JOptionPane.YES_OPTION)
					System.exit(0);
			}
		});
		f.setSize(200,200);
		f.setVisible(true);
	}
}JFileChooser类专门用来实现文件存取对话框。
JFileChooser chooser = new JFileChooser();
int returnVal = chooser.showOpenDialog(Parent);
if(returnVal==JFileChooser.APPROVE_OPTION);
{
	System.out.println("You chose to open this file:"+chooser.getSelectedFile().getName());
}
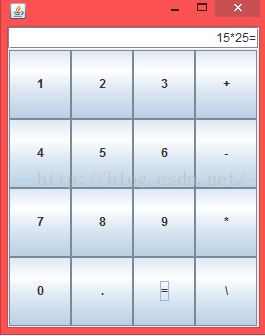
import java.awt.*;
import java.awt.event.*;
import javax.swing.*;
public class Calculator implements ActionListener {

	JFrame jf = new JFrame();
	JTextField tf = new JTextField();
	public void init()
	{
		Container c = jf.getContentPane();
		tf.setHorizontalAlignment(JTextField.RIGHT);
		c.add(tf, "North");

		JPanel pn1 = new JPanel();
		c.add(pn1,"Center");

		pn1.setLayout(new GridLayout(4,4));
		JButton b = new JButton("1");
		b.addActionListener(this);
		pn1.add(b);
		b = new JButton("2");
		b.addActionListener(this);
		pn1.add(b);
		b = new JButton("3");
		b.addActionListener(this);
		pn1.add(b);
		b = new JButton("+");
		b.addActionListener(this);
		pn1.add(b);
		b = new JButton("4");
		b.addActionListener(this);
		pn1.add(b);
		b = new JButton("5");
		b.addActionListener(this);
		pn1.add(b);
		b = new JButton("6");
		b.addActionListener(this);
		pn1.add(b);
		b = new JButton("-");
		b.addActionListener(this);
		pn1.add(b);
		b = new JButton("7");
		b.addActionListener(this);
		pn1.add(b);
		b = new JButton("8");
		b.addActionListener(this);
		pn1.add(b);
		b = new JButton("9");
		b.addActionListener(this);
		pn1.add(b);b = new JButton("*");
		b.addActionListener(this);
		pn1.add(b);
		b = new JButton("0");
		b.addActionListener(this);
		pn1.add(b);
		b = new JButton(".");
		b.addActionListener(this);
		pn1.add(b);
		b = new JButton("=");
		b.addActionListener(this);
		pn1.add(b);
		b = new JButton("\\");
		b.addActionListener(this);
		pn1.add(b);
		jf.setSize(200,300);
		jf.setVisible(true);


	}
	public void actionPerformed(ActionEvent e) {
		tf.setText(tf.getText()+e.getActionCommand());

	}
	public static void main(String[] args)
	{
		new Calculator().init();
	}
}BoxLayout布局管理器
BoxLayout是在Swing中新增加的一种布局管理器,它允许多个组件全部垂直摆放或全部水平摆放。嵌套组合多个使用BoxLayout布局管理器的Panel,可以帮我们实现类似GridBagLayout的功能,但却要比直接使用GridBagLayout简单很多。
