android studio module上传到jcenter
当用android studio开发时,肯定会compile 各种组件,这时候我们肯定也想自己创建个module丢到jcenter上面去,下面就教你们怎么玩。
这里推荐bintray:
1.首先https://bintray.com/ 注册账号,可以用github同步,别告诉我你没有github账号。
2:创建好自己要上传的module。
3:写好build.gradle脚本。
全局build.gradle clashpath添加如下:
        classpath 'com.jfrog.bintray.gradle:gradle-bintray-plugin:1.0'
        classpath 'com.github.dcendents:android-maven-gradle-plugin:1.3'
module build.gradle 脚本内容:
1.添加plugin:
apply plugin: 'com.github.dcendents.android-maven'
apply plugin: 'com.jfrog.bintray'
2.version版本号
version = "0.0.5"3.添加url 与 groupId
url一般用github地址
def siteUrl = 'https://github.com/dashentao1989/JcenterView'                        // #CONFIG# // project homepage
def gitUrl = 'https://github.com/dashentao1989/JcenterView.git'                     // #CONFIG# // project git
group = "com.quanjiaview"
4.pom中填入基本信息
install {
    repositories.mavenInstaller {
        // This generates POM.xml with proper parameters
        pom {
            project {
                packaging 'aar'
                name 'Less Code For Android'                                   // #CONFIG# // project title
                url siteUrl
                // Set your license
                licenses {
                    license {
                        name 'The Apache Software License, Version 2.0'
                        url 'http://www.apache.org/licenses/LICENSE-2.0.txt'
                    }
                }
                developers {
                    developer {
                        id 'dashentao'                                           // #CONFIG# // your user id (you can write your nickname)
                        name 'dashentao'                                       // #CONFIG# // your user name
                        email '[email protected]'                               // #CONFIG# // your email
                    }
                }
                scm {
                    connection gitUrl
                    developerConnection gitUrl
                    url siteUrl
                }
            }
        }
    }
}
6.生成javadocJar,sourcesJar
task sourcesJar(type: Jar) {
    from android.sourceSets.main.java.srcDirs
    classifier = 'sources'
}

task javadoc(type: Javadoc) {
    source = android.sourceSets.main.java.srcDirs
    classpath += project.files(android.getBootClasspath().join(File.pathSeparator))
}

task javadocJar(type: Jar, dependsOn: javadoc) {
    classifier = 'javadoc'
    from javadoc.destinationDir
}

artifacts {
    archives javadocJar
    archives sourcesJar
}
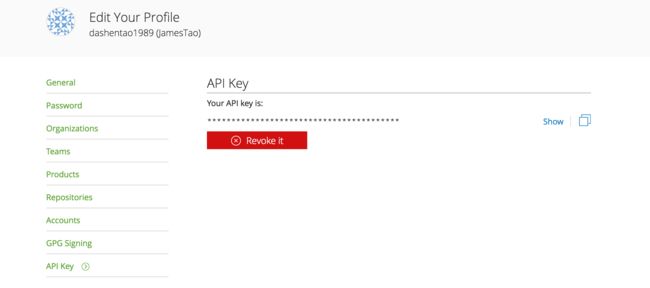
7.拿到api key
api key在bintray中拿到,如下图:

api key放在local.properties中:
bintray.apikey=82b67d9208d7dacb6b90e424b7fbd04c9bc76327同时还得输入user:
bintray.user=dashentao1989然后在build.gradle中通过脚本获取这两个值:
Properties properties = new Properties()
properties.load(project.rootProject.file('local.properties').newDataInputStream())
bintray {
    user = properties.getProperty("bintray.user")
    key = properties.getProperty("bintray.apikey")
    configurations = ['archives']
    pkg {
        repo = "maven"
        name = "quanjiaview"                                                 // #CONFIG# project name in jcenter
        websiteUrl = siteUrl
        vcsUrl = gitUrl
        licenses = ["Apache-2.0"]
        publish = true
    }
}
完成脚本之后,就可以upload了
在terminal中执行命令行
./gradlew bintrayUpload然后在Bintray中点击 add to jcenter。
再然后会出现一个申请页面,填写一些commit信息,点击Send发送按钮后等待Bintray后台审核,一般要半天左右,耐心等待。
等邮件收到的时候,就表明.arr可以complie下来了,具体邮件内容如下:
Bintray (bintray) has sent you a direct message from Bintray:

Your request to include your package /dashentao1989/maven/quanjiaview in Bintray's JCenter has been approved.
当收到邮件之后,可以输入网址https://jcenter.bintray.com/ + 你的groupId,例如:https://jcenter.bintray.com/com/quanjiaview/如果出现如下页面说明.arr可以用。

然后你就可以用compile进行下载了
compile 'com.quanjiaview:quanjiaview:0.0.5'祝:玩的开心。