用Jupyter Notebook集成Symphony大数据平台实践金融分析
简介
Jupyter Notebook是一种开源的基于Web的交互式笔记本,便于管理分享程序文档,支持实时代码,可视化,以及Markdown语法,目前支持40多种编程语言,是数据科学生态圈的开发利器,与Docker技术紧密结合,用jupyterhub中的Docker镜像可以快速创建一个jupyter环境。同时与github也有结合,可以将程序文件可视化的分享给别人。使用Jupyter notebook感觉就像在草纸上作画,可以将你的思维探索过程展示出来,和众多开源软件发生碰撞,任你想象和发挥。
Jupyter作为一种交互式笔记本,具有很好的扩展性和兼容性,在数值模拟,统计建模,机器学习等方面应用非常广泛,基本上都作为这些应用的入口与后端计算平台对接,相比于直接使用单一的语言和平台,Jupyter具有很好的集成度可以将这些语言和平台集成在一起,同时借助于Python语言的灵活性和便利性,给Jupyter Notebook带来非常丰富的交互体验。使用Jupyter工具就可以得到Python丰富的数学库,Spark的内存计算能力和Tensorflow的多层神经网络。
IBM Spectrum Symphony作为一套优秀的并行计算和应用网格管理系统软件,可以为众多企业提供理想的大数据分析解决方案,尤其在金融分析领域。因此,本文将着重为大家介绍如何使用Jupyter集成IBM Spectrum Symphony的高性能计算能力,将Symphony强大的计算能力集成到Jupyter Notebook中。
表1 Jupyter的主要特性
| 特性 | 简述 |
|---|---|
| Language of choice | Jupyter支持超过40中编程语言包括Python,R,Julia和Scala。 |
| Share notebooks | Notebook可以通过有哦见,Dropbox, Github和Jupyter Notebook Viewer进行非常方便的分享。 |
| Interactive output | 你的代码可以生成丰富的交互式输出:HTML,图像,视频,Latex和其它自定义类型。 |
| Big data integration | 利用Python、R,和Scala等工具,与Spark、pandas、scikit-learn、ggplot2、TensorFlow等集成。 |
Jupyter简介
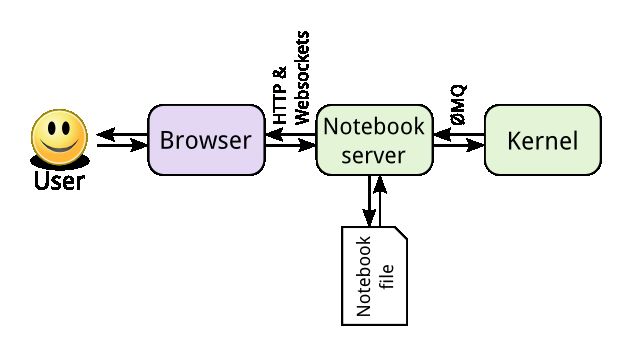
Jupyter基于开放标准,在Web前端使用HTML和CSS的交互式计算,在后端采用可扩展的kernel架构,内部使用WebSocket和ZeroMQ进行通信交互。核心是通过IPython实现,由IPython提供终端,IPython内核提供的计算和通信的前端界面。
- Notebook Document Format:基于JSON的开放文档格式,记录用户的会话(sessions)和代码、说明性的文本、方程以及富文本输出。
- Interactive Computing Protocol:该协议用于连接Notebook和内核,基于JSON数据、ZMQ以及WebSockets。
- Kernel:Jupyter的内核指的是后台计算的语言环境,是实际执行Notebook代码的地方,将输出返回给用户。
Symphony(IBM Spectrum Symphony)
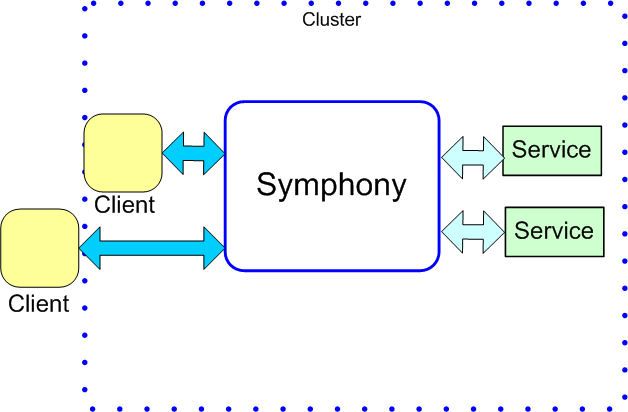
IBM Spectrum Symphony 作为可伸缩性极强的企业级运算服务管理软件,可用于在可扩展、共享、异构的网格中运行分布式应用服务。它充分利用可用的计算资源,提高并行应用的运行速度并快速得到计算结果,良好的满足数据密集型与计算密集型应用,全面提升系统性能。在全球,IBM Spectrum Symphony 正在为世界 75%的金融机构提供服务。在流计算,大数据处理和计算,公有云方面都走在前沿领域。
1. Monte Carlo (蒙特·卡罗模拟方法)
蒙特·卡罗是一种以概率统计理论为指导的一类非常重要的数值计算方法。是指使用随机数(或更常见的伪随机数)来解决很多计算问题的方法。与它对应的是确定性算法。蒙特·卡罗方法在金融工程学,宏观经济学,计算物理学(如粒子输运计算、量子热力学计算、空气动力学计算)等领域应用广泛。
最经典的就是用蒙特•卡罗方法计算圆周率,其思想就是在一个正方形的面积上随机撒点(总点数为M),假设有一个圆(面积为T)与正方形内切,随机点在圆内的数量N满足下面等式:
N/M=T/4,从而得出PI=4*M/N
Spark网站有关于PI的Python计算源码,非常简短:
def inside(p):
    x, y = random.random(), random.random()
    return x*x + y*y < 1

count = sc.parallelize(xrange(0, NUM_SAMPLES)) \
             .filter(inside).count()
print "Pi is roughly %f" % (4.0 * count / NUM_SAMPLES)
该方法常用于金融领域股票期权定价,以大规模短作业为主,考研集群的调度性能和计算能力,而Symphony则是该领域的利器,支持多种编程语言,其中就包括Python,在Symphony集群上用Python实现该算法同样非常方便。
部署Jupyter环境
本文以Linux RedHat7.3操作系统为例,来说明如何安装和部署Jupyter并集成到Symphony集群。
1. 安装Symphony集群,Master host为docker.eng.platformlab.ibm.com
[root@docker sym]# soamview app
APPLICATION                   STATUS    SSM HOST      SSM PID CONSUMER
symexec7.2                    disabled  -             -       /SymExec/SymExec72
symping7.2                    disabled  -             -       /SymTesting/Symping72
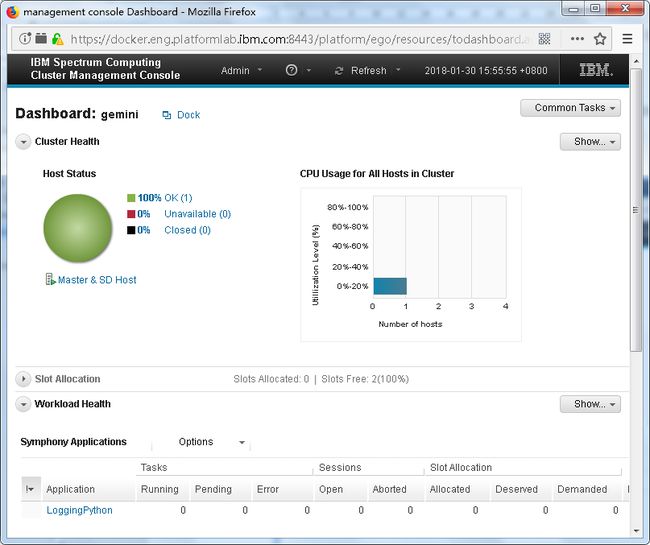
2. 部署一个Python application,实现蒙特•卡罗的Server端:
[root@docker sym]# soamview app LoggingPython
APPLICATION                   STATUS    SSM HOST      SSM PID CONSUMER
LoggingPython                 enabled   docker.eng.p* 25183   /SampleApplications/SOASamples
Server端的Python代码实现,对于Symphony每一个task会调用一次Server端的on_invoke方法,所以蒙特•卡罗的Server端代码就在on_invoke方法中实现:
import soamapiversion
import soamapi
import MyMessage
import MyLogger
import pickle
import time

import random
import math

class MyServiceContainer(soamapi.ServiceContainer):

    def __init___(self):
        self._logger = None

    def on_create_service(self, service_context):
        self._logger = MyLogger.MyLogger("LoggingServicePython", ".")
        return

    ######################################
    ### Handler to process common data ###
    ######################################
    def on_session_enter(self, session_context):
        self._logger.info("Enter on_session_enter")
        return

    ###############################
    ### Handler to process task ###
    ###############################
    def on_invoke(self, task_context):
        self._logger.info("Enter on_invoke")

        # Get the task input
        inMsg = MyMessage.MyMessage()
        task_context.populate_task_input(inMsg)

        # We simply echo the data back to the client
        out_msg = MyMessage.MyMessage()
        x, y = random.random(), random.random()
        out_msg.set_intX(round(x, 2))
        out_msg.set_intY(round(y, 2))
        out_msg.set_bool(x*x + y*y < 1)


        #Set our output message
        task_context.set_task_output(out_msg)
        self._logger.info("Exit on_invoke")


    ###########################################################
    ### Use this handler to do any session-specific cleanup ###
    ###########################################################
    def on_session_leave(self):
        self._logger.info("Enter on_session_leave")
        return

    ###########################################################
    ### Use this handler to do any session-specific cleanup ###
    ###########################################################
    def on_session_leave(self):
        self._logger.info("Enter on_session_leave")
        return

    #############################################################
    ### Use this handler to do your service uninitialization. ###
    #############################################################
    def on_destroy_service(self):
        self._logger.info("Enter on_destroy_service")
        return

############################################
### Create and run the service container ###
############################################
myContainer = MyServiceContainer()
myContainer.run()
3. 准备一个机器部署Jupyter环境
a) 通过以下命令在RedHat7.3上安装Docker:

$yum-config-manager --add-repo  https://download.docker.com/linux/centos/docker-ce.repo
$yum install policycoreutils-python -y
$rpm -ivh /home/jmlv/container-selinux-2.9-4.el7.noarch.rpm
$yum install docker-ce -y
$service docker start
$systemctl enable docker.service

b) 启动Jupyter Docker容器

这里选择tensorflow官方发布的Docker镜像,因为tensorflow已经将Jupyter作为入口,还有选择tensorflow镜像的好处就是该Jupyter同时具有tensorflow的环境,可以同时开发tensorflow和Symphony,以及程序。

$docker run -d --net=host -v /opt:/opt -v /home/jmlv:/jmlv --name tensorflow tensorflow/tensorflow

Docker会自动下载镜像并运行,这里用-d以Daemon容器的方式启动,同时使用host mode network,启动后Jupyter会监听8888端口。

[root@jupyter01 ~]# docker ps

CONTAINER ID        IMAGE                   COMMAND                  CREATED             STATUS              PORTS               NAMES

f426001e5535        tensorflow/tensorflow   "/run_jupyter.sh --a鈥   5 seconds ago       Up 5 seconds                            tensorflow

通过Docker容器可以看到,jupyter通过脚本“/run_jupyter.sh”启动,

c) 在Jupyter容器中安装Symphony Client包,以便集成Symphony环境

解压缩Symphony Client包:
root@jupyter01:/opt# tar zxvf symclnt-7.2.0.2.x86_64.tar.gz
root@jupyter01:/opt# cd ./ibm/spectrumcomputing/symphonyclient/client72/
配置Symphony Master host:
[root@jupyter01 client72]# vim conf/ego.conf
# EGO master candidate host
EGO_MASTER_LIST="docker.eng.platformlab.ibm.com"
# EGO VEMKD daemon port number
EGO_KD_PORT=34534

d) 修改Jupyter启动脚本,加入Symphony client环境

在/run_jupyter.sh文件中加入下面两行就会有Symphony环境
root@jupyter01:/opt# tail /run_jupyter.sh
export SOAM_HOME=/opt/ibm/spectrumcomputing/symphonyclient/client72
source /opt/ibm/spectrumcomputing/symphonyclient/client72/profile.platform
jupyter notebook "$@"
4. 重启Jupyter容器让Symphony环境生效
[root@jupyter01 ~]# docker stop tensorflow
tensorflow
[root@jupyter01 ~]# docker start tensorflow
tensorflow
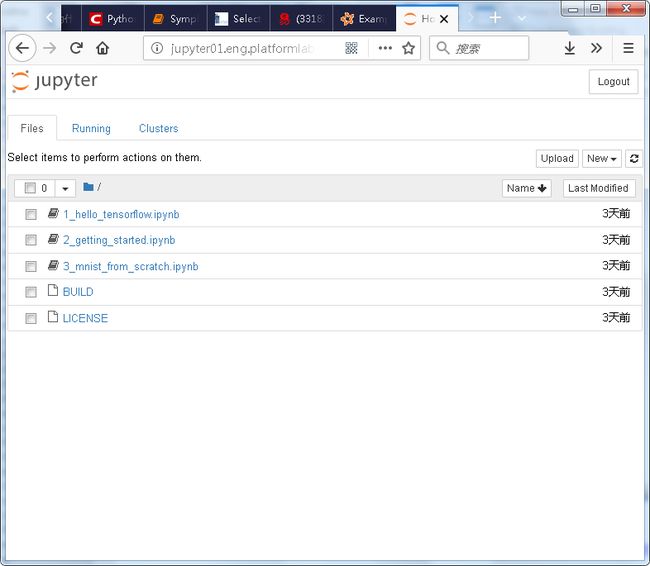
5. 访问Jupyter WEB portal
浏览Jupyter URL
http://jupyter01.eng.platformlab.ibm.com:8888
第一次登陆会提示输入密码:
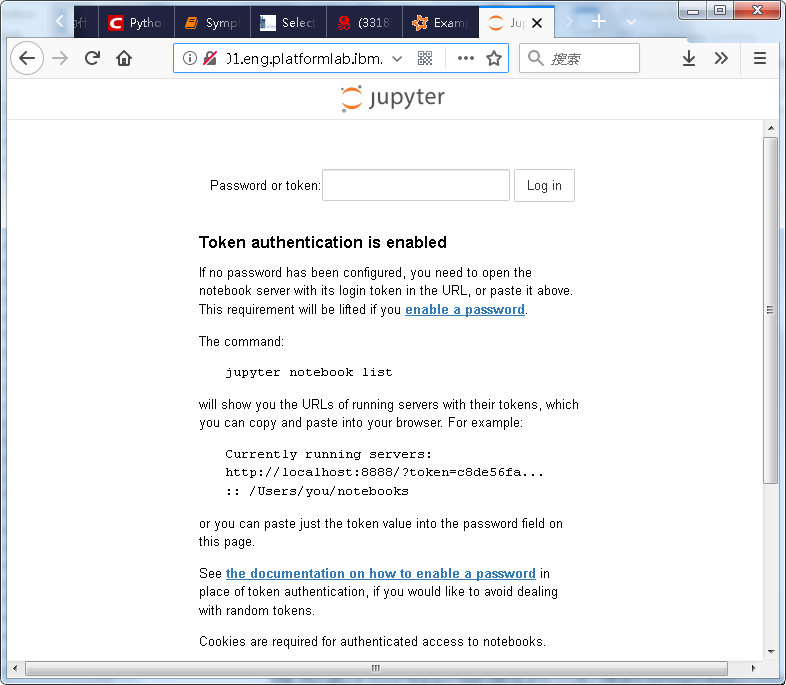
通过docker log tensorflow 查看容器log得到如下token作为登陆密码
http://localhost:8888/?token=7deb3db56a09c332fb13fb8b95969bd60f6fad2c1f306475
进入后见到庐山真面目:
6. 新建一个工作Notebook:
新建一个Python2的Notebook用来写Symphony程序
%matplotlib inline
import soamapiversion
import soamapi
import pickle
import math
from numpy import *
import numpy as np
import matplotlib.pyplot as plt
#########################################################
### Message Object transfer between client and server ###
#########################################################
class MyMessage(soamapi.Message):
def __init__(self, x = None, y = None, b = False):
self.__intX = x
self.__intY = y
self.__bool = b
def get_intX(self):
return self.__intX
def set_intX(self, x):
self.__intX = x
def get_intY(self):
return self.__intY
def set_intY(self, y):
self.__intY = y
def get_bool(self):
return self.__bool
def set_bool(self, b):
self.__bool = b
def on_serialize(self, stream):
stream.write_float(self.__intX)
stream.write_float(self.__intY)
stream.write_bool(self.__bool)
def on_deserialize(self, stream):
self.__intX = stream.read_float()
self.__intY = stream.read_float()
self.__bool = stream.read_bool()
##########################
### Initialize the API ###
##########################
soamapi.initialize()
#########################################
### Connect to a Symphony application ###
#########################################
application_name = "LoggingPython"
sec_cb = soamapi.DefaultSecurityCallback("Guest", "Guest")
connection = soamapi.connect(application_name, sec_cb)
prt_msg = "Connected to application:" + application_name + " Connection ID:" + connection.get_id()
print (prt_msg)
########################
### Create a session ###
########################
session_attr = soamapi.SessionCreationAttributes()
session_attr.set_session_type("RecoverableAllHistoricalData")
session_attr.set_session_name("MySessionName")
session = connection.create_session(session_attr)
prt_msg = "Created session:" + session.get_id()
print (prt_msg)
###################################
### Submit tasks to the session ###
###################################
tasks_to_Submit = 1000
prt_msg = "Submiting " + str(tasks_to_Submit) + " tasks"
print (prt_msg)
for count in range(0, tasks_to_Submit):
task_data = MyMessage(float(count), float(count), True)
task_attr = soamapi.TaskSubmissionAttributes()
task_attr.set_task_input(task_data)
task_input_handle = session.send_task_input(task_attr)
prt_msg = "Sent task:" + task_input_handle.get_id()
# print(prt_msg)
task_input_handle.release()
###################################
### Wait for all of the results ###
###################################
task_output_handle_list = session.fetch_task_output(tasks_to_Submit)
countInCircle = 0
countX = zeros(tasks_to_Submit)
countY = zeros(tasks_to_Submit)
for task_output_handle in task_output_handle_list:
if task_output_handle.is_successful():
out_msg = MyMessage()
task_output_handle.populate_task_output(out_msg)
# Display content of reply
prt_msg = "Task Succeeded [" + task_output_handle.get_id() + "] \n"
prt_msg += "Point Value : " + str(round(out_msg.get_intX(),2)) + "," + str(round(out_msg.get_intY(),2)) + " " + str(out_msg.get_bool())
if out_msg.get_bool():
countInCircle = countInCircle + 1
countX[int(task_output_handle.get_id())-1] = out_msg.get_intX()
countY[int(task_output_handle.get_id())-1] = out_msg.get_intY()
# print (prt_msg)
else:
ex = task_output_handle.get_exception()
prt_msg = "Task Not Succeeded : " + str(ex)
print (prt_msg)
task_output_handle.release()
#print countX, countY
plt.plot(countX, countY, '.')
#print circle
angles_circle = [i*pi/180 for i in range(0,360)]
x = cos(angles_circle)*0.5
y = sin(angles_circle)*0.5
plt.plot(x+0.5, y+0.5, 'r')
plt.axis('equal')
plt.axis('scaled')
print "Pi is roughly %f" % (4.0 * countInCircle / tasks_to_Submit)
#########################
### Close the session ###
#########################
print ("Closing session")
session.close()
session = None
############################
### Close the connection ###
############################
print ("Closing connection")
connection.close()
connection = None
############################
### Uninitialize the API ###
############################
soamapi.uninitialize()
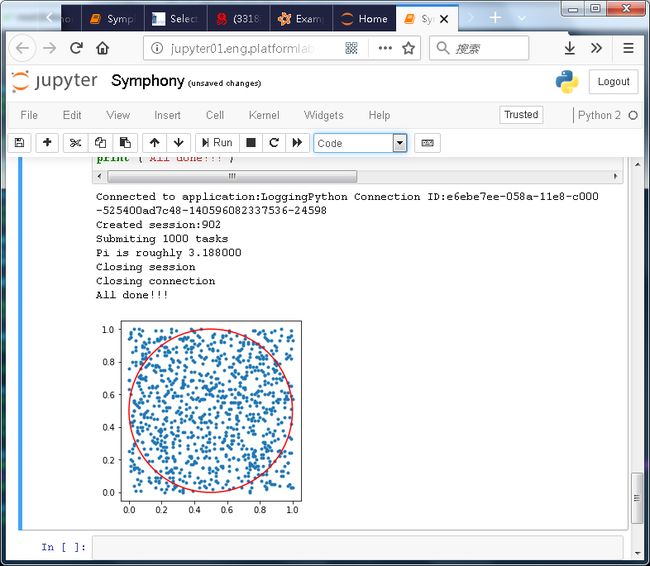
print ("All done!!!")本次测试发送1000个task模拟1000个随机点的位置,最终得到近似PI的结果,并且用matplotlib画出这些随机点的分布和圆的位置:
结束语
随着大数据和人工智能技术的发展,Jupyter作为一个桥梁和入口把各个开源技术和框架的价值连接在一起,带来一种全新的数据计算入口和体验。本文以IBM Spectrum Symphony为例,来说明如何将Jupyter集成大自己的大数据平台。Jupyter目前已经发展的比较成熟,最新版本是5.3.0,其中的Feature也是很多,本文没有一一阐述,大家可以关注Jupyter开源社区。
参考资源 (Resources)
- Jupyter官网
- SparkPI 源码
- Symphony官网
作者:吕金明,2011加入IBM至今,一直从事分布式计算以及大数据相关的研发工作,以及大数据产品的集成,如Spark,Docker, Kubernetes, Tensorflow等开源框架及技术。