新建项目
使用 npm init 快速生成一个 package.json 来创建一个新的 npm 项目:
{
  "name": "happyday",
  "version": "1.0.5",
  "description": "Happy every day",
  "main": "index.js",
  "scripts": {
    "test": "echo \"Error: no test specified\" && exit 1"
  },
  "keywords": [
    "Nodejs",
    "JavaScript",
    "bash",
    "shell"
  ],
  "repository": {
    "type": "git",
    "url": "git+https://github.com/HuangXiZhou/happyday.git"
  },
  "author": "[email protected]",
  "license": "MIT"
}
封装脚本
新建一个 index.js 包含我们的脚本
#!/usr/bin/env node // 说明这是一个可执行的应用

console.log('Happy everyday!')
在 package.json 中新建 bin 字段,用于存放一个可执行文件
"bin": {
    "happyday": "./index.js"
 }
接着执行 npm i -g && npm link 把 happyday 这个字段复制到 npm 的全局模块安装文件夹 node_modules 内,并创建符号链接(symbolic link,软链接),也就是将 index.js 的路径加入环境变量 PATH 中去
运行 happyday
可以看到我们已经成功打印出 Happy everyday!,现在我们可以开始开发 npm 包了
解析命令行参数
安装 tj 大神的commander: npm i commander -S
The complete solution for node.js command-line interfaces, inspired by Ruby's commander.
安装 chalk 使得你的命令行更漂亮: npm i chalk -S
现在让我们写一下 demo 测试一下:
#! /usr/bin/env node

const program = require('commander')
const chalk = require('chalk')

program
    .command('weather') // 命令行指令
    .alias('w') // 定义别名
    .description(chalk.green('Get weather forecast ;)')) // 这行文字变绿~
    // 注册一个 `callback` 函数
    .action(option => {
        console.log('biubiubiu~')
    })
    // 生成帮助信息
    .on('--help', () => {
        console.log('  Examples:')
        console.log('')
        console.log('$ happyday weather')
        console.log('$ happyday w')
    })
program.parse(process.argv) // 解析命令行
执行一下 happyday -h
  Usage: happyday [options] [command]


  Options:

    -h, --help  output usage information


  Commands:

    weather|w   Get weather forecast ;)
这样第一步就完成了,可以正式开发我们的 天气预报 小玩具了
使用百度地图 API 获取天气预报
先在百度开发者中心注册一个 KEY
因为懒... 所以我直接引入 axios 实行 GET 请求:
const URL_IP = 'http://api.map.baidu.com/location/ip'
const KEY = { ak: '...' }

...

.action(option => {
  axios.get(URL_IP, {
    params: KEY
  })
  .then(res => {
      console.log(res)
  })
  .catch(error => {
    console.log(chalk.red('emmmmm... I don\'t know what happened.'))
  })
})

...
先获取用户所在城市,再根据所在城市获取用户所在地的天气预报
const URL_FORECAST = 'http://api.map.baidu.com/telematics/v3/weather'

const KEY = { ak: '...' }

let getweatherModel = {
    location: '',
    output: 'json',
    ak: KEY.ak,
}

...

getweatherModel.location = res.data.content.address_detail.city
axios.get(URL_FORECAST, {
  params: getweatherModel
})
.then(res => {
  if(res.status !== 200) {
    console.log(chalk.red('Whoops!!! There is something wrong with your network.'))
  } else {
    let resource = res.data
    if(resource.status !== 'success') {
      console.log(chalk.red('emmmmm... I don\'t know what happened.'))
    } else {
      console.log(resource)
    }
  }
})
.catch(error => {
  console.log(chalk.red('emmmmm... I don\'t know what happened.'))
})

...
获取到数据之后,让我们处理一下数据
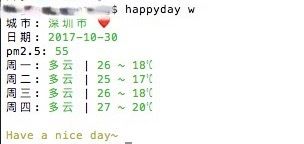
`城市: ${chalk.green(resource.results[0].currentCity)} ❤️`打印天气预报
resource.results[0].weather_data.forEach(item => {
  console.log(
    `${item.date.slice(0, 2)}: ${chalk.green(item.weather)} | ${chalk.green(item.temperature)}`
  )
}, this)
这样,我们的小玩具初步成型
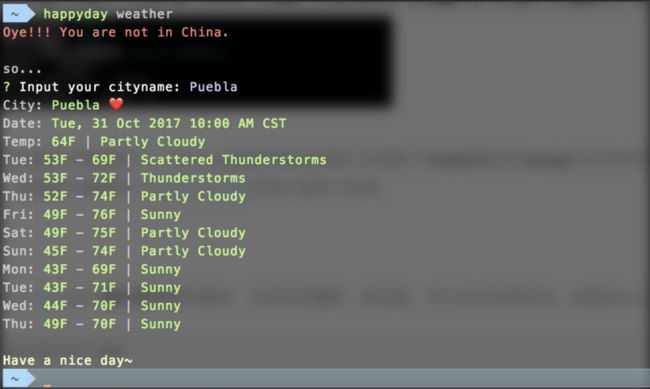
然而... 百度地图 API 只支持国内的天气预报,所以像我们这些海外党还是需要一些其他的手段
获取海外城市天气预报
我选择的是 Yahoo Weather API,因为很好奇他们家大名鼎鼎的 YQL ...
引入 lodash,inquirer, yql 这三个库
先上代码
let config = _.assign({
    cityName: ''
}, option)

let promps = []

if(config.cityName !== 'string') {
  promps.push({
    type: 'input',
    name: 'cityName',
    message: 'Input your cityname:',
    validate: input => {
      if(!input) {
        return chalk.red('You should input something here...')
      }
      return true
    }
  })
}
inquirer.prompt(promps).then(answers => {
  var query = new YQL(`select * from weather.forecast where woeid in (select woeid from geo.places(1) where text="${answers.cityName}")`)
  query.exec((err, data) => {
    if(err) {
      console.log(chalk.red('emmmmm... I don\'t know what happened.'))
    } else {
      if(!data.query.count) {
        console.log(chalk.red('Please... Enter the correct city name.'))
      } else {
        console.log(data)
      }
    }
  })
})
先来说说 inquirer 这个库
功能简介:
- input–输入
- validate–验证
- list–列表选项
- confirm–提示
- checkbox–复选框等等
YQL 可谓是有些惊人,它可以像 SQL 那样设计,然后整合至 URL 上,确实有点奇葩
这样,我们海外党就也可以使用 happyday 了
发布 npm 包
这个很简单啦
一步一步来:
- 在 npm 官网上 注册一个账号
- 在
bash中输入npm login登录 -
npm publish一个回车键搞定(每次 publish 之前都需要改一下包的版本号,不然报错)
就这样我们就拥有了自己的第一个 npm 包
本文代码均在 https://github.com/HuangXiZhou/happyday 欢迎各位 Star
使用 happyday:
npm i happyday -g && happday w 即可

