LNMP环境下安装DiscuzX3.3
假设lnmp搭建完成,且mysql、php-fpm、nginx都已启动。
搭建lnmp参看此文:http://blog.csdn.net/dinglinux/article/details/54092554。
下面详述如何在lnmp(centos6.8_nginx1.8_mysql5.6_php5.6)服务器上安装DiscuzX3.3。
域名 www.test.com,别名 www.test2.com ,IP 192.168.3.12 。
1.创建安装目录/data/www,将discuz包解压,upload/中的文件移入www/目录,删除多余文件。
$ mkdir -p /data/www
$ cd /data/www
$ wget http://download.comsenz.com/DiscuzX/3.3/Discuz_X3.3_SC_UTF8.zip
$ yum install unzip -y
$ unzip Discuz_X3.3_SC_UTF8.zip
$ mv upload/* .
$ rm -rf Discuz_X3.3_SC_UTF8.zip upload/ utility/ readme/
2.配置nginx
(1)编辑主配置文件 nginx.conf
$ vim /usr/local/nginx/conf/nginx.conf添加下行:
http {
    ......
    include vhosts/*.conf;
}
(2)编辑虚拟主机配置文件 vhosts/test.com.conf
$ vim /usr/local/nginx/conf/vhosts/test.com.confvhosts/test.com.conf 示例如下:
server
{
    #监听端口
    listen 80;
    #服务器文件目录
    root /data/www;
    #首页文件
    index index.html index.php;
    #域名
    server_name www.test.com www.test2.com;
    #php解析
    location ~ \.php$ {
        fastcgi_pass 127.0.0.1:9000;
        fastcgi_index index.php;
        fastcgi_param SCRIPT_FILENAME /data/www$fastcgi_script_name;
        include fastcgi_params;
    }
}
(3)编辑默认虚拟主机配置文件 vhosts/default.conf,将服务器文件目录设置为一个已存在的空目录,禁止通过本机IP和未定义的域名访问服务器。
$ vim /usr/local/nginx/conf/vhosts/test.com.confvhosts/default.conf 示例如下:
server
{
    listen 80 default_server;
    server_name localhost;
    index index.html index.php;
    root /tmp/123;
    deny all;
}
最后,检查语法是否存在错误:
$ /usr/local/nginx/sbin/nginx -t3.配置 php-fpm
$ vim /usr/local/php/etc/php-fpm.conf编辑 php-fpm.conf 的目的是使 test.com.conf 中用于php解析的 fastcgi_pass 参数与 php-fpm.conf 中关于FastCGI监听地址和端口的配置项保持一致。
上文中”fastcgi_pass 127.0.0.1:9000; “,相对应的,php-fpm.conf 相关配置为:
[www]
listen = 127.0.0.1:9000
如果FastCGI监听的是Unix Socket,例如”fastcgi_pass /tmp/php-fpm.sock”,则php-fpm.conf 相关配置为:
[www]
listen = /tmp/php-fpm.sock
listen.owner = nobody
listen.group = nobody
listen.mode = 0660
4.创建discuz数据库
创建数据库”discuz”,创建本地用户”user1”并设置密码”password”,准予user1对discuz库进行所有操作。
$ mysql -uroot -p
mysql> create database discuz;
mysql> grant all on discuz.* to 'user1'@'localhost' identified by 'password';
mysql> flush privileges;
5.修改客户端Windows的hosts文件
打开 C:\Windows\System32\drivers\etc\hosts 文件,添加下行:
192.168.3.12 www.test.com www.test2.com6.重启nginx、php-fpm
$ service nginx reload
$ service php-fpm restart
接下来就是web端安装了。
在客户端Windows主机上用浏览器打开地址”http://www.test.com/“或”http://www.test2.com/“,会跳转到discuz安装页面。
若是显示403 forbidden,更改或清除iptables规则。
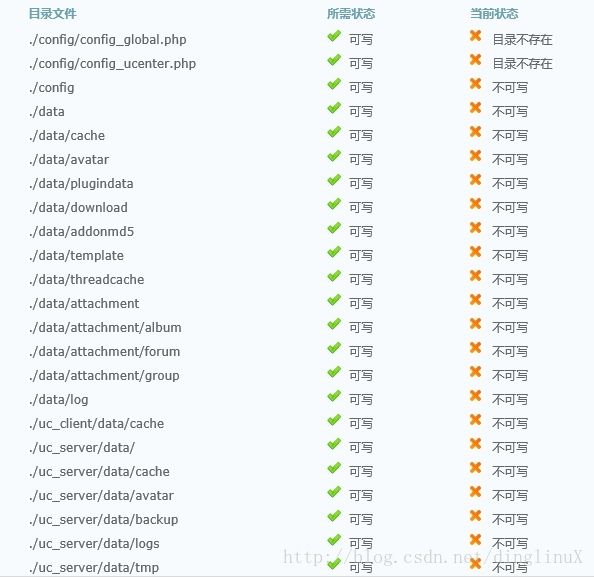
如果出现下图所示的情况,是权限问题,运行”chmod -R 777 /data/www”更改权限,刷新页面即可继续。
