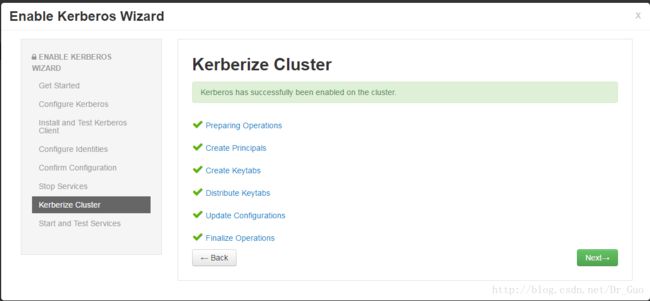
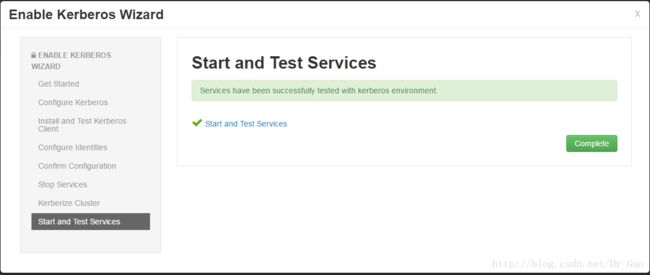
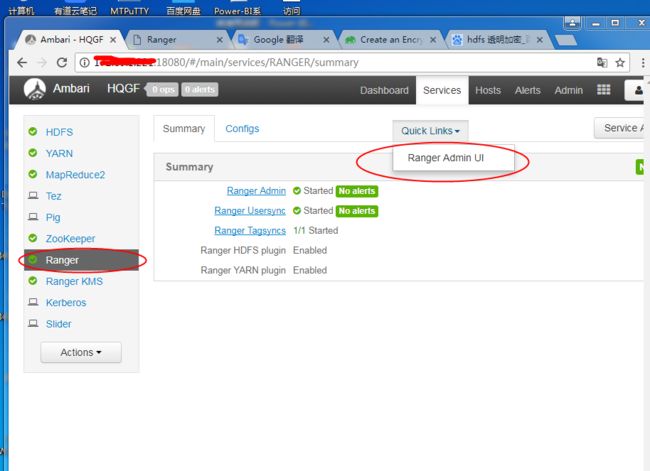
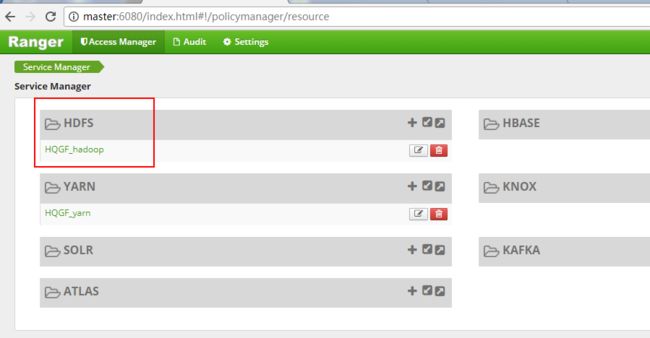
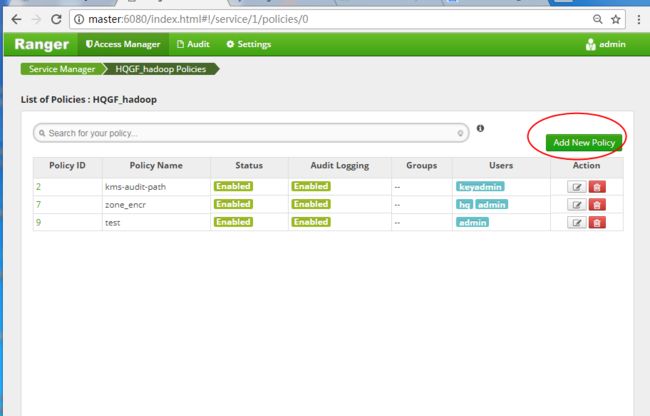
一、ranger权限管理安装
ranger安装参考:https://docs.hortonworks.com/HDPDocuments/HDP2/HDP-2.5.0/bk_security/content/ch03s01s03s01.html
二、rang kms 秘钥管理安装
ranger kms安装参考:https://docs.hortonworks.com/HDPDocuments/HDP2/HDP-2.5.0/bk_security/content/ch06s01s01s01.html
三、kerberos认证服务安装
kerberos 常用命令:
kadmin.local  //以超管身份进入kadmin

kadmin    //进入kadmin模式,需输入密码

kdb5_util create -r JENKIN.COM -s    //创建数据库

service krb5kdc start    //启动kdc服务

service kadmin start    //启动kadmin服务

service kprop start     //启动kprop服务

kdb5_util dump /var/kerberos/krb5kdc/slave_data    //生成dump文件

kprop -f /var/kerberos/krb5kdc/slave_data master2.com    //将master数据库同步是slave

kadmin模式下:

  addprinc -randkey root/[email protected]   //生成随机key的principal

  addprinc admin/admin    //生成指定key的principal

  listprincs    //查看principal

  change_password -pw xxxx admin/admin  //修改admin/admin的密码

  delete_principal  admin/admin    //删除principal

kinit admin/admin    //验证principal是否可用


ktadd -k /etc/security/keytabs/hdfs.keytab hdfs/[email protected]    //kadmin模式下使用
                                                                         //可生成keytab

kinit -k -t /var/kerberos/krb5kdc/keytab/root.keytab root/[email protected]     //测试keytab是否可用

klist -e -k -t /var/kerberos/krb5kdc/keytab/root.keytab    //查看keytab

kdestroy     //销毁当前获取的票
一,先升级再安装server,执行以下命令
yum install krb5-server krb5-libs krb5-workstation
二、修改三个配置文件
第一个文件 /etc/krb5.conf
[logging]
 default = FILE:/var/log/krb5libs.log
 kdc = FILE:/var/log/krb5kdc.log
 admin_server = FILE:/var/log/kadmind.log

[libdefaults]
 default_realm = HQGF.COM
 dns_lookup_realm = false
 dns_lookup_kdc = false
 ticket_lifetime = 24h
 renew_lifetime = 7d
 forwardable = true

[realms]
 HQGF.COM = {
  kdc = master
  admin_server = master
 }

[domain_realm]
 .example.com = HQGF.COM
 example.com = HQGF.COM
第二个文件 /var/kerberos/krb5kdc/kdc.conf
[kdcdefaults]
 kdc_ports = 88
 kdc_tcp_ports = 88

[realms]
 HQGF.COM = {
  #master_key_type = aes256-cts
  acl_file = /var/kerberos/krb5kdc/kadm5.acl
  dict_file = /usr/share/dict/words
  admin_keytab = /var/kerberos/krb5kdc/kadm5.keytab
  supported_enctypes = aes256-cts:normal aes128-cts:normal des3-hmac-sha1:normal arcfour-hmac:normal des-hmac-sha1:normal des-cbc-md5:normal des-cbc-crc:normal
 }
第三个文件 /var/kerberos/krb5kdc/kadm5.acl (注意后面的 “*” 号不可以跟前面的字符连接在一起必须空格)
*/[email protected] *
三、创建kerberos 应用
/usr/sbin/kdb5_util create -s -r HQGF.COM
四、启动服务
service krb5kdc start

service kadmin start
五、设置开机启动服务
chkconfig krb5kdc on

chkconfig kadmin on
六、添加principal
[root@ws1es ~]# kadmin.local
Authenticating as principal root/[email protected] with password.
kadmin.local:  addprinc admin/[email protected]
WARNING: no policy specified for admin/[email protected]; defaulting to no policy
Enter password for principal "admin/[email protected]":
Re-enter password for principal "admin/[email protected]":
Principal "admin/[email protected]" created.
kadmin.local:  listprincs
K/[email protected]
admin/[email protected]
kadmin/[email protected]
kadmin/[email protected]
kadmin/[email protected]
krbtgt/[email protected]
七、重启服务
service kadmin restart
八、
11.下载JCE
补充1:
JCE(Java Cryptography Extension)是一组包,它们提供用于加密、密钥生成和协商以及 Message Authentication Code(MAC)算法的框架和实现。
它提供对对称、不对称、块和流密码的加密支持,它还支持安全流和密封的对象。它不对外出口,用它开发完成封装后将无法调用。
补充2:
If you are using Oracle JDK, you must distribute and install the JCE on all hosts in the cluster, including the Ambari Server.
Be sure to restart Ambari Server after installng the JCE. If you are using OpenJDK, some distributions of the OpenJDK
 come with unlimited strength JCE automatically and therefore, installation of JCE is not required.

For Oracle JDK 1.8:

http://www.oracle.com/technetwork/java/javase/downloads/jce8-download-2133166.html

For Oracle JDK 1.7:

http://www.oracle.com/technetwork/java/javase/downloads/jce-7-download-432124.html
将下载的JCE解压并覆盖$JAVA_HOME/jre/lib/security/目录下的文件(所有节点)
九、
十、
十一、
十二、
十三、
十四、
十五、
十六、
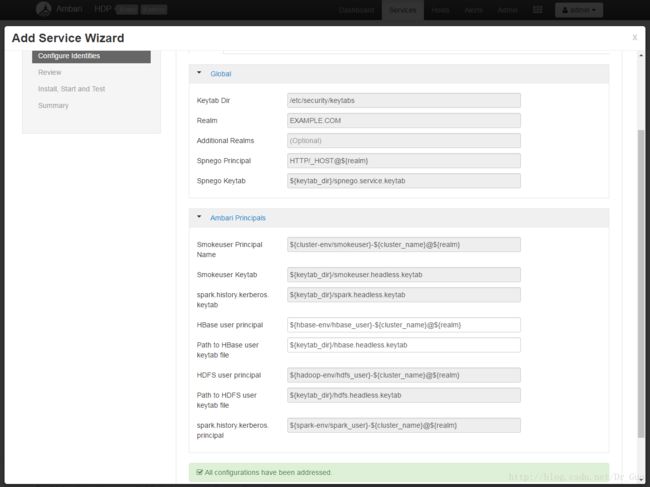
十七、安装成功后,查看它自动创建的principal和keytab
[root@master krb5kdc]# kadmin.local
Authenticating as principal root/[email protected] with password.
kadmin.local:  listprincs
HTTP/[email protected]
HTTP/[email protected]
HTTP/[email protected]
HTTP/[email protected]
HTTP/[email protected]
HTTP/[email protected]
K/[email protected]
activity_explorer/[email protected]
activity_explorer/[email protected]
admin/[email protected]
[email protected]
[email protected]
amshbase/[email protected]
amszk/[email protected]
dn/[email protected]
dn/[email protected]
dn/[email protected]
[email protected]
hbase/[email protected]
hbase/[email protected]
[email protected]
hive/[email protected]
hive/[email protected]
hive/[email protected]
hive/[email protected]
hive/[email protected]
jhs/[email protected]
jn/[email protected]
jn/[email protected]
jn/[email protected]
kadmin/[email protected]
kadmin/[email protected]
kadmin/[email protected]
kafka/[email protected]
kafka/[email protected]
kafka/[email protected]
kiprop/[email protected]
krbtgt/[email protected]
livy/[email protected]
livy/[email protected]
nfs/[email protected]
nfs/[email protected]
nm/[email protected]
nm/[email protected]
nm/[email protected]
nn/[email protected]
nn/[email protected]
oozie/[email protected]
rangeradmin/[email protected]
rangerkms/[email protected]
rangerlookup/[email protected]
rangertagsync/[email protected]
rangerusersync/[email protected]
rm/[email protected]
rm/[email protected]
[email protected]
yarn/[email protected]
zookeeper/[email protected]
zookeeper/[email protected]
zookeeper/[email protected]
zookeeper/[email protected]
四、ranger +kerberos+ranger kms 透明加密 实例
1.添加系统用户hadooptest
添加用户名:useradd hadooptest
设置用户密码为hadooptest:passwd hadooptest
2.把hadooptest用户添加到kerberos认证中
先进入admin/admin princ输入密码,执行:
kinit admin/admin
查看是否进入:
klist -e
进入后可以看到如下结果:
Ticket cache: FILE:/tmp/krb5cc_1040
Default principal: admin/[email protected]

Valid starting       Expires              Service principal
2018-05-17T09:51:47  2018-05-18T09:51:47  krbtgt/[email protected]
        Etype (skey, tkt): aes256-cts-hmac-sha1-96, aes256-cts-hmac-sha1-96

退出hadooptest用户使用root用户进入kadmin.local配置,执行:
su root
kadmin.local
进入后执行并输入密码hadooptest:
addprinc hadooptest
测试是否成功
kinit hadooptest
使用kadmin模式生成keytab执行
kdestroy
kadmin
ktadd -k /etc/security/keytabs/hadooptest.keytab [email protected]
测试kerberos 认证是否成功:
kinit hadooptest
hdfs dfs -ls / 是否可以查看hdfs文件目录,如果认证不成功会一直报错的
到此hadooptest 认证已完成
3.使用ranger 管理权限
权限分配完成后使用hadooptest上传文件到hdfs(具体读写操作用户自行测试):
hdfs dfs -put /usr/hqgf/hive_user.txt /tmp/input/
4.hdfs 使用ranger kms 创建加密区
1.添加系统用户hq
adduser hq
password hq

2.使用ranger 添加[email protected]
kinit kadmin
kadmin.local
addprinc [email protected]

3.kadmin模式下生成对应的keytab文件
kinit kadmin
kadmin
ktadd -k /etc/security/keytabs/hq.keytab [email protected]
4.修改[email protected]初始密码
kinit kadmin
kadmin
change_password -pw ambari hq

5.使用admin用户登录ranger 后台
  添加hq操作hdfs文件的权限,注意ranger+kerberos整合下hq用户不管在何种情况下
  都无法删除添加的文件和文件夹
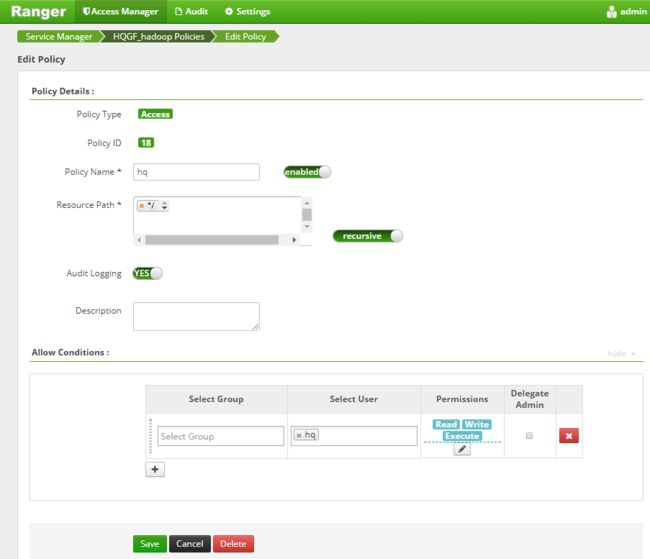
6.使用keyadmin用户登录ranger后台添加key管理(注意用户设置,用户必须拥有对加密区写的操作)
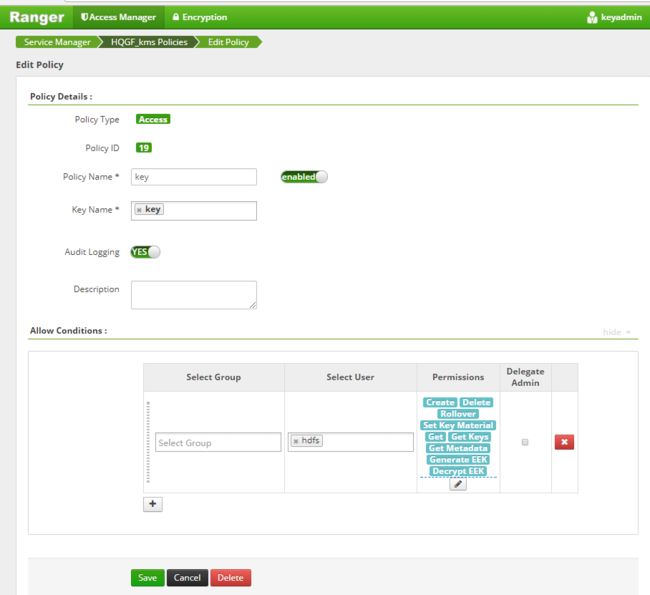
7.选择服务添加key

8.添加key

9.使用keyadmin用户查看hdfs上是否已经生成了key

 10.使用key创建加密区
    hadoop key list -metadata   //查看已添加的key
    hdfs dfs -mkdir /zone_encr
    hdfs crypto -createZone -keyName key -path /zone_encr
    hdfs crypto -listZones

  11.测试(效果怎么样自己去试)
    使用hq 用户在加密区上传下载文件
    再使用其他用户上传下载文件
