MyBatis是Java目前主流的ORM框架,在Spring Boot中使用MyBatis可以参考这篇文章:http://www.ityouknow.com/springboot/2016/11/06/spring-boot-mybatis.html
这篇文章来将介绍MyBatis Generator,(简称MBG,下文使用这个简称),该插件可以很方便的生成实体类、Mapper接口代码等,提高开发效率,它有点像.NET的EF框架中的DB First。另外,顺便介绍Spring Boot如何集成Swagger。
一、添加pom配置 (1)既然是像EF的DB First,那需要先建好数据库,可以先在MySQL中执行以下SQL脚本:
create database generatortest default character set utf8mb4 collate utf8mb4_unicode_ci;
use generatortest;
create user ' generatortest ' @' localhost ' identified by ' generatortest123 ' ;
grant all privileges on generatortest.* to ' generatortest ' @' localhost ' ;
flush privileges ;
CREATE TABLE `user `
(
id INT NOT NULL AUTO_INCREMENT COMMENT ' 用户ID ' ,
user_name VARCHAR (50 ) NOT NULL COMMENT ' 用户名 ' ,
`password` VARCHAR (50 ) NOT NULL COMMENT ' 密码 ' ,
email VARCHAR (50 ) COMMENT ' 邮箱 ' ,
avatar VARCHAR (255 ) COMMENT ' 头像 ' ,
create_time DATETIME NOT NULL COMMENT ' 创建时间 ' ,
update_time DATETIME NOT NULL COMMENT ' 更新时间 ' ,
deleted TINYINT (1 ) default 0 COMMENT ' 逻辑删除 ' ,
PRIMARY KEY (id)
);
ALTER TABLE `user ` COMMENT ' 用户表 ' ;
CREATE TABLE role
(
id INT NOT NULL AUTO_INCREMENT COMMENT ' 角色ID ' ,
role_name VARCHAR (50 ) NOT NULL COMMENT ' 角色名 ' ,
enabled TINYINT (1 ) default 1 NOT NULL COMMENT ' 有效标志 ' ,
create_time DATETIME NOT NULL COMMENT ' 创建时间 ' ,
update_time DATETIME NOT NULL COMMENT ' 更新时间 ' ,
deleted TINYINT (1 ) default 0 NOT NULL COMMENT ' 逻辑删除 ' ,
PRIMARY KEY (id)
);
ALTER TABLE role COMMENT ' 角色表 ' ;
CREATE TABLE permission
(
id INT NOT NULL AUTO_INCREMENT COMMENT ' 权限ID ' ,
permission_name VARCHAR (50 ) NOT NULL COMMENT ' 权限名称 ' ,
permission_value VARCHAR (200 ) NOT NULL COMMENT ' 权限值 ' ,
PRIMARY KEY (id)
);
ALTER TABLE permission COMMENT ' 权限表 ' ;
CREATE TABLE user_role
(
user_id INT NOT NULL COMMENT ' 用户ID ' ,
role_id INT NOT NULL COMMENT ' 角色ID '
);
ALTER TABLE user_role COMMENT ' 用户角色关联表 ' ;
CREATE TABLE role_permission
(
role_id INT NOT NULL COMMENT ' 角色ID ' ,
permission_id INT NOT NULL COMMENT ' 权限ID '
);
ALTER TABLE role_permission COMMENT ' 角色权限关联表 ' ;
View Code
(2)新建Maven项目,还不知道怎么用VS Code建Maven项目的可以参考这篇文章;
(3)添加相关Maven文件:
< dependency >
< groupId > mysqlgroupId >
< artifactId > mysql-connector-javaartifactId >
dependency >
< dependency >
< groupId > org.mybatisgroupId >
< artifactId > mybatisartifactId >
< version > 3.4.5version >
dependency >
< dependency >
< groupId > org.mybatis.generatorgroupId >
< artifactId > mybatis-generator-coreartifactId >
< version > 1.3.7version >
dependency >
二、添加MyBatis Generator配置文件 (1)在application.properties文件中添加MySQL数据连接配置:
spring.datasource.url=jdbc:mysql://localhost:3306/generatortest?serverTimezone=UTC&useUnicode =true&characterEncoding =utf-8&useSSL =true
spring.datasource.username=generatortest
spring.datasource.password=generatortest123
spring.datasource.driver-class-name=com.mysql.cj.jdbc.Driver
(2)在src\main\resources目录下新建generatorConfig.xml配置文件,添加如下配置:
xml version="1.0" encoding="UTF-8" ?>
DOCTYPE generatorConfiguration
PUBLIC "-//mybatis.org//DTD MyBatis Generator Configuration 1.0//EN"
"http://mybatis.org/dtd/mybatis-generator-config_1_0.dtd" >
< generatorConfiguration >
< properties resource ="application.properties" />
< context id ="MySqlContext" targetRuntime ="MyBatis3Simple" defaultModelType ="flat" >
< property name ="autoDelimitKeywords" value ="true" />
< property name ="beginningDelimiter" value ="`" />
< property name ="endingDelimiter" value ="`" />
< plugin type ="org.mybatis.generator.plugins.ToStringPlugin" />
< plugin type ="org.mybatis.generator.plugins.SerializablePlugin" />
< commentGenerator >
< property name ="suppressDate" value ="true" />
commentGenerator >
< jdbcConnection driverClass ="${spring.datasource.driver-class-name}"
connectionURL ="${spring.datasource.url}"
userId ="${spring.datasource.username}"
password ="${spring.datasource.password}" >
< property name ="nullCatalogMeansCurrent" value ="true" />
jdbcConnection >
< javaTypeResolver >
< property name ="useJSR310Types" value ="true" />
javaTypeResolver >
< javaModelGenerator targetPackage ="com.example.demo.model" targetProject ="src/main/java" />
< javaClientGenerator type ="ANNOTATEDMAPPER" targetPackage ="com.example.demo.mapper" targetProject ="src/main/java" />
< table tableName ="%" >
< generatedKey column ="id" sqlStatement ="Mysql" identity ="true" />
table >
context >
generatorConfiguration >
接下来分析generatorConfig.xml配置:
非必选元素,用于指定一个需要在配置中解析使用的外部属性文件。这里引入application.properties配置文件,下文<jdbcConnection > 元素用到;
必选元素,可以有多个,用必选属性id
targetRuntime
MyBatis3
MyBatis3Simple
defaultModelType
非必选元素,以下三个属性设置是针对MySQL数据库的:
< property name ="autoDelimitKeywords" value ="true" />
< property name ="beginningDelimiter" value ="`" />
< property name ="endingDelimiter" value ="`" />
假设在Mysql数据库中有一个表名为user detail,中间是一个空格,这种情况下如果写出select * from user detail这样的语句,是会报错的;
Mysql中,一般会写成样子:select * from `user detail `
以上三个配置属性就是当表名或者字段名为SQL关键字时,自动加 `
非必选元素,用来定义一个插件。插件用于扩展或修改MBG代码生成器生成的代码;
非必选元素,最多配置一个;
suppressAllComments 属性:值 为true时,阻止生成注释,默认为false;
suppressDate
必选元素,且只能有一个,用于指定数据库连接信息;
driverClass
connectionURL
userId
Password
非必选元素,最多配置一个,用于指定JDBC类型和Java类型如何转换;
useJSR310Types
JDBC Type
Resolved Java Type
DATE
java.time.LocalDate
TIME
java.time.LocalTime
TIMESTAMP
java.time.LocalDateTime
元素
必选元素,而且最多一个,用于控制生成的实体类;
targetPackage
targetProject targetPackage
非必选元素,最多配置一个,用于生成Mapper接口代码,不配置就不生成;
Type=” ANNOTATEDMAPPER”
Type=” XMLMAPPER”
targetPackage
targetProject targetPackage
元素
必选元素,可以有多个,tableName="%"
子元素
Column
sqlStatement
Identity
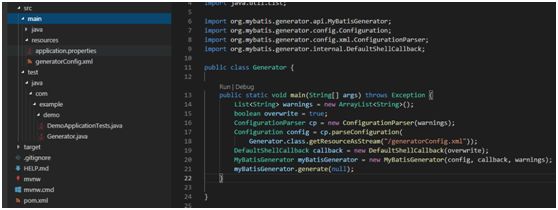
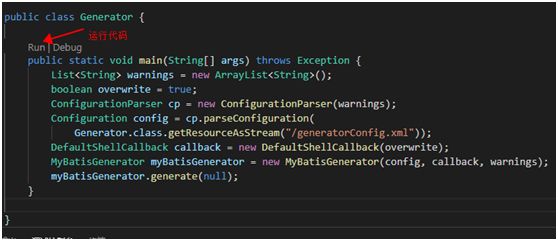
三、运行MBG (1)在项目中创建Generator类,添加一个main方法,写上如下代码:
public static void main(String[] args) throws Exception {
List warnings = new ArrayList();
boolean overwrite = true ;
ConfigurationParser cp = new ConfigurationParser(warnings);
Configuration config = cp.parseConfiguration(
Generator. class .getResourceAsStream("/generatorConfig.xml"));
DefaultShellCallback callback = new DefaultShellCallback(overwrite);
MyBatisGenerator myBatisGenerator = new MyBatisGenerator(config, callback, warnings);
myBatisGenerator.generate( null );
}
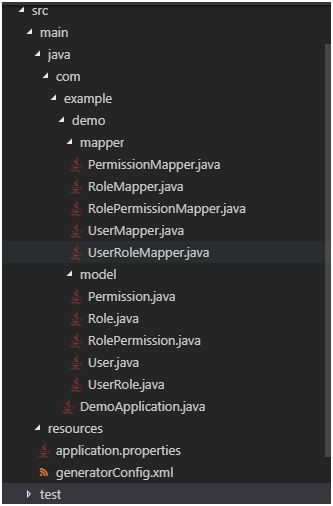
(2)点击Run,可以看到生成的实体类和Mapper接口代码
生成代码结构
四、使用MBG生成的代码 (1)pom.xml中添加如下配置,然后保存;
< dependency >
< groupId > org.springframework.bootgroupId >
< artifactId > spring-boot-starter-webartifactId >
dependency >
< dependency >
< groupId > org.mybatis.spring.bootgroupId >
< artifactId > mybatis-spring-boot-starterartifactId >
< version > 2.0.0version >
dependency >
(2)编写控制器代码,调用MBG生成的Mapper接口代码
@RestController
public class UserController {
@Autowired
private UserMapper userMapper;
@RequestMapping(value = "/getUsers", method=RequestMethod.GET)
public List getUsers() {
List users=userMapper.selectAll();
return users;
}
@RequestMapping(value = "/getUser/{id}", method=RequestMethod.GET)
public User getUser(@PathVariable("id") Integer id) {
User user =userMapper.selectByPrimaryKey(id);
return user;
}
@RequestMapping(value = "/add", method=RequestMethod.POST)
public void save(@RequestBody User user) {
if (user.getCreateTime()==null )
user.setCreateTime(LocalDateTime.now(Clock.system(ZoneId.of( "Asia/Shanghai"))));
if (user.getUpdateTime() == null )
user.setUpdateTime(LocalDateTime.now(Clock.system(ZoneId.of( "Asia/Shanghai"))));
userMapper.insert(user);
}
@RequestMapping(value = "/update", method=RequestMethod.PUT)
public void update(@RequestBody User user) {
userMapper.updateByPrimaryKey(user);
}
@RequestMapping(value = "/delete/{id}", method=RequestMethod.DELETE)
public void delete(@PathVariable("id") Integer id) {
userMapper.deleteByPrimaryKey(id);
}
}
其中UserMapper通过注解@Autowired 注入进来。
(3)在application.properties配置文件中加上:
mybatis.type-aliases-package=com.example.demo.model
(4)在启动类中添加对 mapper 包扫描@MapperScan
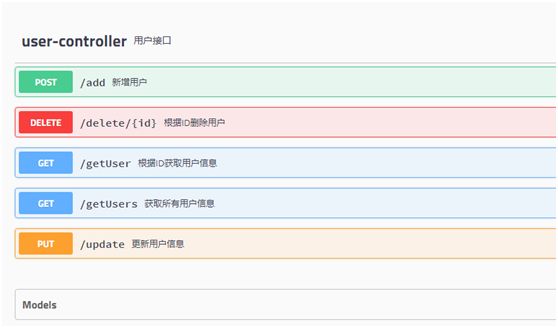
五、Spring Boot中集成Swagger,方便接口调用 (1)pom.xml中添加支持swagger的模块,然后保存。
< dependency >
< groupId > io.springfoxgroupId >
< artifactId > springfox-swagger2artifactId >
< version > 2.9.2version >
dependency >
< dependency >
< groupId > io.springfoxgroupId >
< artifactId > springfox-swagger-uiartifactId >
< version > 2.9.2version >
dependency >
(2)添加SwaggerConfig配置文件:
public class SwaggerConfig {
@Bean
public Docket swaggerSpringMvcPlugin() {
return new Docket(DocumentationType.SWAGGER_2).select()
.apis(RequestHandlerSelectors.withMethodAnnotation(ApiOperation. class )).build();
}
}
(3)为每个接口添加@ApiOperation 注解,如下:
@ApiOperation(value = "获取所有用户信息" , notes = "返回所有用户信息")
最后运行程序,浏览器打开:http://localhost:8080/swagger-ui.html
源码地址:https://github.com/Bingjian-Zhu/MybatisGeneatorDemo.git
你可能感兴趣的:(Spring Boot使用MyBatis Generator、Swagger)
leetcode501-二叉搜索树中的众数
记得早睡~
算法小课堂 leetcode 算法 javascript 数据结构
leetcode501思路由于是二叉搜索树,那么我们知道它的特性:使用中序遍历得到的是从小到大排序的,所以我们利用这个规则,使用count来统计每次出现一个新的数的总个数,maxCount统计最大的个数值,result来存储二叉树中的众数,也就是要得到的结果值,pre用于统计前一个节点值初始化定义好值以后,我们需要使用中序遍历,中间处理逻辑值当pre还不存在的时候或者前一个节点跟后一个节点不相同时
nvm 安装某个node.js版本后不能使用或者报错,或不能使用npm的问题
腥臭腐朽的日子熠熠生辉
node.js npm 前端
安装了nvm之后发现不能使用某个版本的node.js,报错之后,不能使用npm这个命令。可以这样解决:1、再node.js官网直接下载node.js的压缩包。找到nvm的安装目录2、直接将文件夹解压到这个安装目录中修改一下名字即可。
Vue2集成LuckExcel实现excel在线编辑及保存
冉成未来
Web excel vue.js
文章目录LuckSheetnpm安装相关依赖vue使用luckSheet第一步:通过CDN引入第二步:指定一个excel编辑容器第三步:创建一个表格通过文件url实现excel文件的加载Excel工具类export.jsLuckSheetgitee网址:https://gitee.com/mengshukeji/LuckysheetluckSheet文档网址:https://dream-num.g
通信之光接口
玖Yee
信息与通信
光接口即光纤接口,是用于连接光纤线缆的物理接口。常见类型FC接口(配线架):FerruleConnector的缩写,外部加强采用金属套,紧固方式为螺丝扣,是单模网络中常见连接设备,有牢靠、防灰尘的优点,但安装时间稍长。 SC接口:外形为矩形,采用插针与耦合套筒结构,尺寸与FC型相同,插针端面多采用PC或APC性研磨方式,紧固方式为插拔销闩式,无需旋转,使用方便,被广泛应用于光猫、光纤收发器等设备。
在Ubuntu上安装MEAN Stack的4个步骤
ubuntu
在Ubuntu上安装MEANStack的4个步骤为:1.安装MEAN;2.安装MongoDB;3.安装NodeJS,Git和NPM;4.安装剩余的依赖项。什么是MEANStack?平均堆栈一直在很大程度上升高为基于稳健的基于JavaScript的开发堆栈。名称的意思是指其组件;MongoDB,ExpressJS,Angularjs和NodeJS。第1步:安装MEAN对于此安装,我们将在本指南中使用
Ubuntu执行apt-get install xxx报错怎么办?
在Ubuntu系统中,使用apt-getinstall命令安装软件包时,可能会遇到各种报错。本文将详细介绍Ubuntu执行apt-getinstallxxx报错的解决方法,帮助您快速定位并解决问题。️常见报错及解决方法1.更新源和软件包问题:软件包信息过时,导致无法找到或安装最新的软件包。解决方法:首先确保系统源和软件包是最新的,执行以下命令更新:sudoaptupdatesudoaptupgra
2023年中职网络安全——SQL注入测试(PL)解析
旺仔Sec
网络安全职业技能大赛任务解析 服务器 运维 web安全 sql 网路安全
SQL注入测试(PL)任务环境说明:服务器场景:Server2312服务器场景操作系统:未知(关闭链接)已知靶机存在网站系统,使用Nmap工具扫描靶机端口,并将网站服务的端口号作为Flag(形式:Flag字符串)值提交。访问网站/admin/pinglun.asp页面,此页面存在SQL注入漏洞,使用排序语句进行列数猜测,将语句作为Flag(形式:URL无空格)值提交。页面没有返回任何有用信息,尝试
Amazon S3上传文件访问限制
MetaverseMan
aws
在AmazonS3中,直接通过clientID或类似的身份标识来限制访问并不是一个内置的功能。不过,您可以结合AWS的其他服务和功能来实现对特定终端或客户端的访问控制。以下是几种常见的方法:1.使用预签名URL和条件限制AWSS3预签名URL支持通过条件(Condition)来限制访问。虽然不能直接使用clientID,但可以通过IP地址、请求头等条件来限制访问。示例:通过IP地址限制访问pack
移动端IOS的H5页面被键盘顶起后,底部有一大片空白区域的解决方法
不怕麻烦的鹿丸
浏览器 HTML5 JavaScript 前端 html5 javascript
在移动端开发中,当使用HTML5(特别是在Vue.js框架下)构建应用时,经常会遇到键盘弹出导致页面内容被顶起的问题。当键盘收起后,页面未能自动恢复到原来的位置。当键盘弹出时,你可以通过JavaScript监听键盘的显示和隐藏事件,并相应地调整页面的滚动位置。exportdefault{mounted(){window.addEventListener('focusin',this.handleF
taro-vue2 如何使用国密加解密
周亚鑫
taro javascript 开发语言
taro-vue2如何使用国密加解密returnunescape(encodeURIComponent(str)).split("").map(val=>val.charCodeAt());returndecodeURIComponent(escape(String.fromCharCode(...strBuffer)));constsm2=require('miniprogram-sm-cry
【unity&Node.js篇】多人联机游戏开发代码规范
雅鸦
unity node.js 代码规范
多人联机游戏前端(Unity)与后端(Node.js)代码规范说明书这份代码规范旨在帮助多人联机游戏的开发团队建立一致性和高质量的代码标准,涵盖前端(Unity)和后端(Node.js)开发部分。无论是游戏逻辑的实现、多人同步机制、网络通信还是错误处理,都需要清晰的规范来确保代码的可维护性、可扩展性与高效性。1.Unity前端代码规范1.1命名规范变量、函数命名:使用PascalCase(大驼峰)
mkcert 极简安装及使用步骤
学亮编程手记
Linux ssl
1.安装mkcertmacOSbrewinstallmkcertLinuxsudoaptinstalllibnss3-toolscurl-JLO"https://dl.filippo.io/mkcert/latest?for=linux/amd64"chmod+xmkcert-v*-linux-amd64sudomvmkcert-v*-linux-amd64/usr/local/bin/mkcer
31天Python入门——第7天:集合·字典你真的懂了吗?
安然无虞
Python手把手教程 python 开发语言 后端
你好,我是安然无虞。文章目录1.集合1.1集合的定义1.2集合的常用操作1.3集合练习2.字典2.1字典的定义2.2嵌套字典和字典的取值2.3字典的常用操作补充知识:字典的优势是查找值效率高2.4字典推导式2.5字典练习很重要的补充练习:希望你能掌握练习一练习二1.集合在之前的章节中,我们学习了列表,元组,字符串.已经可以覆盖七成的使用场景了.那么为什么还要学习集合类型呢.列表:有序可变,元素可重
使用opencv鼠标回调函数选择ROI区域
开门儿大弟子
opencv 人工智能 c++ 计算机视觉
使用opencv绘制矩形ROI,点击鼠标左键开始绘制,鼠标右键退出绘制并返回矩形左上角和右下角坐标。可绘制多个ROI区域(图中红色区域)/****************************************函数名称:MouseCallbackDrawRect()函数功能:绘制矩形回调函数***************************************/booldrawin
flutter 使用xcodebuild 命令打包ipa
肥肥呀呀呀
flutter
苹果打ipa包(注意苹果打包需要连接真机)方式一、1.先执行flutterbuildios生成framework2.执行命令xcodebuild-exportArchive-archivePathbuild/ios/Runner.xcarchive-exportOptionsPlistexportOptions.plist-exportPathbuild/ios/ipaexportOptions.
java替换特殊字符,如何替换字符串中的特殊字符?
大禹昆仑
那取决于你的意思。如果您只是想摆脱它们,请执行以下操作:(更新:显然您也想保留数字,在这种情况下,请使用第二行)StringalphaOnly=input.replaceAll("[^a-zA-Z]+","");StringalphaAndDigits=input.replaceAll("[^a-zA-Z0-9]+","");或等效的:StringalphaOnly=input.replaceAl
【Kivy App】ToggleButton切换按钮实例
Botiway
移动APP Kivy python
在Kivy中,ToggleButton是一种特殊的按钮,它可以在“选中”和“未选中”两种状态之间切换。ToggleButton通常用于表示二进制状态(如开/关)。以下是ToggleButton的使用方法、常用属性以及实例。1.基本使用方法首先,确保你已经安装了Kivy库。如果没有安装,可以使用以下命令进行安装:pipinstallkivy然后,你可以在Kivy应用中创建一个ToggleButton
一款适用于 Windows 、Mac 和 Linux 的屏幕录制与截图软件。
Mbblovey
开发语言 开源软件 电脑 java
Screenrec是一款适用于Windows、Mac和Linux的屏幕录制与截图软件。软件本身可以免费使用,只需要登录即可使用全部功能。当咱们打开软件后,电脑右边就会出现一个小漂浮窗。点击上方的图标就能一键开启视频录制、截屏等功能。Screenrec很有意思的是可以在开始录制屏幕的同时录制咱们的网络摄像头视频和麦克风音频。在录制完成后大家可能会发现右下角软件会给大家发出一个提醒。这就是它的另一个特
数据结构-ArrayList
小豪GO!
java的养成方法 java
文章目录1.线性表2.顺序表3.ArrayList4.ArrayList的问题以及思考4.2增容的性能消耗问题4.3空间浪费问题1.线性表线性表(LinearList)是n个具有相同特性的数据元素的有限序列。线性表是一种在实际中广泛使用的数据结构,常见线性表:顺序表、链表、栈、队列…线性表在逻辑上是线性结构,也就是连续的一条直线。但是在物理上不一定是连续的,线性表在物理上存储时,通常以数组和链式结
flutter 专题 一百零三
leluckys
Flutter面试与实战 flutter cocoa macos
前不久,谷歌官方正式发布了Flutter的首个发布预览版(ReleasePreview1),这标志着谷歌进入了Flutter正式版(1.0)发布前的最后阶段,同时作为Google的重量级跨平台开发方案,此次更新也吸引了多数的移动开发者的关注。使用Flutter从头开始写一个App是一件非常轻松惬意的事情,但在原生APP中接入Flutter会是什么效果呢,似乎并不是一件容易的事情,下面就讲解在iOS
使用 EchoAPI 实现 API 断言的全面指南
Kairo_01
postman
API断言是API测试中的一个关键部分。通过执行API断言,您可以验证API响应数据的准确性,从而增强API的可靠性和稳定性。在本文中,我们将介绍API断言的基础知识,并演示如何通过用户友好的API测试工具Apipost来轻松执行响应断言。什么是API断言?API断言是指验证API响应返回的数据是否正确并符合预期的过程。具体而言,主要包括以下检查:验证响应状态码是否在预期范围内。确保响应体内容与规
使用Java爬虫根据关键词获取Shopee商品列表?
小爬虫程序猿
java 爬虫 开发语言
在跨境电商领域,Shopee作为东南亚及中国台湾地区领先的电商平台,拥有海量的商品信息。无论是进行市场调研、数据分析,还是寻找热门商品,根据关键词获取Shopee商品列表都是一项极具价值的任务。然而,手动浏览和整理这些信息显然是低效且容易出错的。幸运的是,通过编写Java爬虫程序,我们可以高效地完成这一任务。本文将详细介绍如何利用Java爬虫根据关键词获取Shopee商品列表,并提供完整的代码示例
Selenium实战-模拟登录淘宝并爬取商品信息_使用selenium模拟真实登录行为,并爬取商品评论数据。
2401_84009899
程序员 selenium python 测试工具
模拟淘宝登录deflogin_taobao():print(‘开始登录…’)try:login_url=‘https://login.taobao.com/member/login.jhtml’driver.get(login_url)input_login_id=wait.until(EC.presence_of_element_located((By.ID,‘fm-login-id’)))in
【阿里百炼大模型-使用】
y_dd
深度学习 语言模型 人工智能
参照阿里云百炼网址服务配置开通服务如果没有注册阿里云账号,先注册一个https://www.aliyun.com/?spm=5176.account-console-pc.console-base_top-nav.dlogo.10d24bab70FmIm,注册完毕用它登录阿里云百炼,然后开通服务(即使是免费的开元模型也需要开通)获取API-key在账户这里选择API-KEY,进入这个页面,创建一个
21.11 《ChatGLM3-6B+Gradio工业级落地:多模态交互+60%性能优化,手把手实现生产部署》
少林码僧
AI大模型应用实战专栏 人工智能 gpt 语言模型 性能优化 交互
《ChatGLM3-6B+Gradio工业级落地:多模态交互+60%性能优化,手把手实现生产部署》关键词:ChatGLM3-6B应用开发,Gradio界面集成,模型交互优化,Web服务容器化,多模态输入支持使用Gradio赋能ChatGLM3-6B图形化界面通过Gradio实现大模型服务的可视化交互,是生产级AI应用落地的关键环节。本节将深入解析如何构建适配ChatGLM3-6B的工业级交互界面。
Cookies 详解:工作原理、使用方法及安全性
才华是浅浅的耐心
python java javascript
1.什么是Cookie?Cookie是存储在用户浏览器中的小型文本数据,通常用于保存用户会话信息、个性化设置以及跨页面的数据共享。它是Web服务器与客户端浏览器之间的一种状态管理机制,常用于爬虫的会话凭证。查看方式:打开网站-登录-打开开发正工具-点击网络-刷新-点击一个包-查看表头(有的需要禁用缓存才能看见)2.Cookie的作用会话管理:如用户登录状态的保持。个性化设置:存储用户偏好,如主题、
uniapp微信小程序分享给好友朋友圈-封装全局分享
不法
uniapp 小程序 uni-app 小程序 前端
不封装直接使用onLoad同级onLoad(){},//1.发送给朋友onShareAppMessage(res){console.log("res",res);console.log("page",uni.$u.page());if(res.from==='button'){//来自页面内分享按钮return{title:'首页',path:'/pages/home/home',imageUrl
uniapp接口请求封装api(超简单)
不法
uniapp javascript 前端 json uni-app
最下面有使用方法进阶点击查看进阶封装根目录创建api.jsconstcommoneUrl="http://192.168...";//公共路径//post请求封装functionpostRequest(url,data){varpromise=newPromise((resolve,reject)=>{varpostData=data;uni.request({url:commoneUrl+url
纳米尺度仿真软件:Quantum Espresso_(21).并行计算与性能优化
kkchenjj
分子动力学2 性能优化 模拟仿真 分子动力学 仿真模拟
并行计算与性能优化在纳米尺度仿真中,计算资源的需求往往非常庞大。为了提高计算效率和缩短计算时间,并行计算和性能优化成为不可或缺的技术手段。QuantumEspresso作为一个开源的量子力学仿真软件,提供了多种并行计算的机制和性能优化的方法。本节将详细介绍如何在QuantumEspresso中实现并行计算和性能优化,以提升仿真任务的效率。并行计算的基本概念并行计算是指同时使用多个计算资源(如多核处
纳米尺度仿真软件:Quantum Espresso_(19).输运性质计算
kkchenjj
分子动力学2 模拟仿真 仿真模拟 分子动力学
输运性质计算在纳米尺度仿真软件中,输运性质计算是研究材料和器件中电荷和热能输运的重要工具。QuantumEspresso提供了多种方法来计算输运性质,包括使用非平衡格林函数(NEGF)和传输矩阵方法(TMM)。本节将详细介绍如何使用QuantumEspresso及其相关模块进行输运性质的计算,包括设置计算参数、运行模拟以及分析结果。1.非平衡格林函数(NEGF)方法1.1.原理非平衡格林函数(NE
Hadoop(一)
朱辉辉33
hadoop linux
今天在诺基亚第一天开始培训大数据,因为之前没接触过Linux,所以这次一起学了,任务量还是蛮大的。
首先下载安装了Xshell软件,然后公司给了账号密码连接上了河南郑州那边的服务器,接下来开始按照给的资料学习,全英文的,头也不讲解,说锻炼我们的学习能力,然后就开始跌跌撞撞的自学。这里写部分已经运行成功的代码吧.
在hdfs下,运行hadoop fs -mkdir /u
maven An error occurred while filtering resources
blackproof
maven 报错
转:http://stackoverflow.com/questions/18145774/eclipse-an-error-occurred-while-filtering-resources
maven报错:
maven An error occurred while filtering resources
Maven -> Update Proje
jdk常用故障排查命令
daysinsun
jvm
linux下常见定位命令:
1、jps 输出Java进程
-q 只输出进程ID的名称,省略主类的名称;
-m 输出进程启动时传递给main函数的参数;
&nb
java 位移运算与乘法运算
周凡杨
java 位移 运算 乘法
对于 JAVA 编程中,适当的采用位移运算,会减少代码的运行时间,提高项目的运行效率。这个可以从一道面试题说起:
问题:
用最有效率的方法算出2 乘以8 等於几?”
答案:2 << 3
由此就引发了我的思考,为什么位移运算会比乘法运算更快呢?其实简单的想想,计算机的内存是用由 0 和 1 组成的二
java中的枚举(enmu)
g21121
java
从jdk1.5开始,java增加了enum(枚举)这个类型,但是大家在平时运用中还是比较少用到枚举的,而且很多人和我一样对枚举一知半解,下面就跟大家一起学习下enmu枚举。先看一个最简单的枚举类型,一个返回类型的枚举:
public enum ResultType {
/**
* 成功
*/
SUCCESS,
/**
* 失败
*/
FAIL,
MQ初级学习
510888780
activemq
1.下载ActiveMQ
去官方网站下载:http://activemq.apache.org/
2.运行ActiveMQ
解压缩apache-activemq-5.9.0-bin.zip到C盘,然后双击apache-activemq-5.9.0-\bin\activemq-admin.bat运行ActiveMQ程序。
启动ActiveMQ以后,登陆:http://localhos
Spring_Transactional_Propagation
布衣凌宇
spring transactional
//事务传播属性
@Transactional(propagation=Propagation.REQUIRED)//如果有事务,那么加入事务,没有的话新创建一个
@Transactional(propagation=Propagation.NOT_SUPPORTED)//这个方法不开启事务
@Transactional(propagation=Propagation.REQUIREDS_N
我的spring学习笔记12-idref与ref的区别
aijuans
spring
idref用来将容器内其他bean的id传给<constructor-arg>/<property>元素,同时提供错误验证功能。例如:
<bean id ="theTargetBean" class="..." />
<bean id ="theClientBean" class=&quo
Jqplot之折线图
antlove
js jquery Web timeseries jqplot
timeseriesChart.html
<script type="text/javascript" src="jslib/jquery.min.js"></script>
<script type="text/javascript" src="jslib/excanvas.min.js&
JDBC中事务处理应用
百合不是茶
java JDBC编程 事务控制语句
解释事务的概念; 事务控制是sql语句中的核心之一;事务控制的作用就是保证数据的正常执行与异常之后可以恢复
事务常用命令:
Commit提交
[转]ConcurrentHashMap Collections.synchronizedMap和Hashtable讨论
bijian1013
java 多线程 线程安全 HashMap
在Java类库中出现的第一个关联的集合类是Hashtable,它是JDK1.0的一部分。 Hashtable提供了一种易于使用的、线程安全的、关联的map功能,这当然也是方便的。然而,线程安全性是凭代价换来的――Hashtable的所有方法都是同步的。此时,无竞争的同步会导致可观的性能代价。Hashtable的后继者HashMap是作为JDK1.2中的集合框架的一部分出现的,它通过提供一个不同步的
ng-if与ng-show、ng-hide指令的区别和注意事项
bijian1013
JavaScript AngularJS
angularJS中的ng-show、ng-hide、ng-if指令都可以用来控制dom元素的显示或隐藏。ng-show和ng-hide根据所给表达式的值来显示或隐藏HTML元素。当赋值给ng-show指令的值为false时元素会被隐藏,值为true时元素会显示。ng-hide功能类似,使用方式相反。元素的显示或
【持久化框架MyBatis3七】MyBatis3定义typeHandler
bit1129
TypeHandler
什么是typeHandler?
typeHandler用于将某个类型的数据映射到表的某一列上,以完成MyBatis列跟某个属性的映射
内置typeHandler
MyBatis内置了很多typeHandler,这写typeHandler通过org.apache.ibatis.type.TypeHandlerRegistry进行注册,比如对于日期型数据的typeHandler,
上传下载文件rz,sz命令
bitcarter
linux命令rz
刚开始使用rz上传和sz下载命令:
因为我们是通过secureCRT终端工具进行使用的所以会有上传下载这样的需求:
我遇到的问题:
sz下载A文件10M左右,没有问题
但是将这个文件A再传到另一天服务器上时就出现传不上去,甚至出现乱码,死掉现象,具体问题
解决方法:
上传命令改为;rz -ybe
下载命令改为:sz -be filename
如果还是有问题:
那就是文
通过ngx-lua来统计nginx上的虚拟主机性能数据
ronin47
ngx-lua 统计 解禁ip
介绍
以前我们为nginx做统计,都是通过对日志的分析来完成.比较麻烦,现在基于ngx_lua插件,开发了实时统计站点状态的脚本,解放生产力.项目主页: https://github.com/skyeydemon/ngx-lua-stats 功能
支持分不同虚拟主机统计, 同一个虚拟主机下可以分不同的location统计.
可以统计与query-times request-time
java-68-把数组排成最小的数。一个正整数数组,将它们连接起来排成一个数,输出能排出的所有数字中最小的。例如输入数组{32, 321},则输出32132
bylijinnan
java
import java.util.Arrays;
import java.util.Comparator;
public class MinNumFromIntArray {
/**
* Q68输入一个正整数数组,将它们连接起来排成一个数,输出能排出的所有数字中最小的一个。
* 例如输入数组{32, 321},则输出这两个能排成的最小数字32132。请给出解决问题
Oracle基本操作
ccii
Oracle SQL总结 Oracle SQL语法 Oracle基本操作 Oracle SQL
一、表操作
1. 常用数据类型
NUMBER(p,s):可变长度的数字。p表示整数加小数的最大位数,s为最大小数位数。支持最大精度为38位
NVARCHAR2(size):变长字符串,最大长度为4000字节(以字符数为单位)
VARCHAR2(size):变长字符串,最大长度为4000字节(以字节数为单位)
CHAR(size):定长字符串,最大长度为2000字节,最小为1字节,默认
[强人工智能]实现强人工智能的路线图
comsci
人工智能
1:创建一个用于记录拓扑网络连接的矩阵数据表
2:自动构造或者人工复制一个包含10万个连接(1000*1000)的流程图
3:将这个流程图导入到矩阵数据表中
4:在矩阵的每个有意义的节点中嵌入一段简单的
给Tomcat,Apache配置gzip压缩(HTTP压缩)功能
cwqcwqmax9
apache
背景:
HTTP 压缩可以大大提高浏览网站的速度,它的原理是,在客户端请求网页后,从服务器端将网页文件压缩,再下载到客户端,由客户端的浏览器负责解压缩并浏览。相对于普通的浏览过程HTML ,CSS,Javascript , Text ,它可以节省40%左右的流量。更为重要的是,它可以对动态生成的,包括CGI、PHP , JSP , ASP , Servlet,SHTML等输出的网页也能进行压缩,
SpringMVC and Struts2
dashuaifu
struts2 springMVC
SpringMVC VS Struts2
1:
spring3开发效率高于struts
2:
spring3 mvc可以认为已经100%零配置
3:
struts2是类级别的拦截, 一个类对应一个request上下文,
springmvc是方法级别的拦截,一个方法对应一个request上下文,而方法同时又跟一个url对应
所以说从架构本身上 spring3 mvc就容易实现r
windows常用命令行命令
dcj3sjt126com
windows cmd command
在windows系统中,点击开始-运行,可以直接输入命令行,快速打开一些原本需要多次点击图标才能打开的界面,如常用的输入cmd打开dos命令行,输入taskmgr打开任务管理器。此处列出了网上搜集到的一些常用命令。winver 检查windows版本 wmimgmt.msc 打开windows管理体系结构(wmi) wupdmgr windows更新程序 wscrip
再看知名应用背后的第三方开源项目
dcj3sjt126com
ios
知名应用程序的设计和技术一直都是开发者需要学习的,同样这些应用所使用的开源框架也是不可忽视的一部分。此前《
iOS第三方开源库的吐槽和备忘》中作者ibireme列举了国内多款知名应用所使用的开源框架,并对其中一些框架进行了分析,同样国外开发者
@iOSCowboy也在博客中给我们列出了国外多款知名应用使用的开源框架。另外txx's blog中详细介绍了
Facebook Paper使用的第三
Objective-c单例模式的正确写法
jsntghf
单例 ios iPhone
一般情况下,可能我们写的单例模式是这样的:
#import <Foundation/Foundation.h>
@interface Downloader : NSObject
+ (instancetype)sharedDownloader;
@end
#import "Downloader.h"
@implementation
jquery easyui datagrid 加载成功,选中某一行
hae
jquery easyui datagrid 数据加载
1.首先你需要设置datagrid的onLoadSuccess
$(
'#dg'
).datagrid({onLoadSuccess :
function
(data){
$(
'#dg'
).datagrid(
'selectRow'
,3);
}});
2.onL
jQuery用户数字打分评价效果
ini
JavaScript html jquery Web css
效果体验:http://hovertree.com/texiao/jquery/5.htmHTML文件代码:
<!DOCTYPE html>
<html xmlns="http://www.w3.org/1999/xhtml">
<head>
<title>jQuery用户数字打分评分代码 - HoverTree</
mybatis的paramType
kerryg
DAO sql
MyBatis传多个参数:
1、采用#{0},#{1}获得参数:
Dao层函数方法:
public User selectUser(String name,String area);
对应的Mapper.xml
<select id="selectUser" result
centos 7安装mysql5.5
MrLee23
centos
首先centos7 已经不支持mysql,因为收费了你懂得,所以内部集成了mariadb,而安装mysql的话会和mariadb的文件冲突,所以需要先卸载掉mariadb,以下为卸载mariadb,安装mysql的步骤。
#列出所有被安装的rpm package rpm -qa | grep mariadb
#卸载
rpm -e mariadb-libs-5.
利用thrift来实现消息群发
qifeifei
thrift
Thrift项目一般用来做内部项目接偶用的,还有能跨不同语言的功能,非常方便,一般前端系统和后台server线上都是3个节点,然后前端通过获取client来访问后台server,那么如果是多太server,就是有一个负载均衡的方法,然后最后访问其中一个节点。那么换个思路,能不能发送给所有节点的server呢,如果能就
实现一个sizeof获取Java对象大小
teasp
java HotSpot 内存 对象大小 sizeof
由于Java的设计者不想让程序员管理和了解内存的使用,我们想要知道一个对象在内存中的大小变得比较困难了。本文提供了可以获取对象的大小的方法,但是由于各个虚拟机在内存使用上可能存在不同,因此该方法不能在各虚拟机上都适用,而是仅在hotspot 32位虚拟机上,或者其它内存管理方式与hotspot 32位虚拟机相同的虚拟机上 适用。
SVN错误及处理
xiangqian0505
SVN提交文件时服务器强行关闭
在SVN服务控制台打开资源库“SVN无法读取current” ---摘自网络 写道 SVN无法读取current修复方法 Can't read file : End of file found
文件:repository/db/txn_current、repository/db/current
其中current记录当前最新版本号,txn_current记录版本库中版本


