TensorFlow入门深度学习–10.VGGNets16(slim实现)
文章列表
1.TensorFlow入门深度学习–01.基础知识. .
2.TensorFlow入门深度学习–02.基础知识. .
3.TensorFlow入门深度学习–03.softmax-regression实现MNIST数据分类. .
4.TensorFlow入门深度学习–04.自编码器(对添加高斯白噪声后的MNIST图像去噪).
5.TensorFlow入门深度学习–05.多层感知器实现MNIST数据分类.
6.TensorFlow入门深度学习–06.可视化工具TensorBoard.
7.TensorFlow入门深度学习–07.卷积神经网络概述.
8.TensorFlow入门深度学习–08.AlexNet(对MNIST数据分类).
9.TensorFlow入门深度学习–09.tf.contrib.slim用法详解.
10.TensorFlow入门深度学习–10.VGGNets16(slim实现).
11.TensorFlow入门深度学习–11.GoogLeNet(Inception V3 slim实现).
…
- TensorFlow入门深度学习–10.VGGNets16(slim实现)
TensorFlow入门深度学习–10.VGGNets16(slim实现)
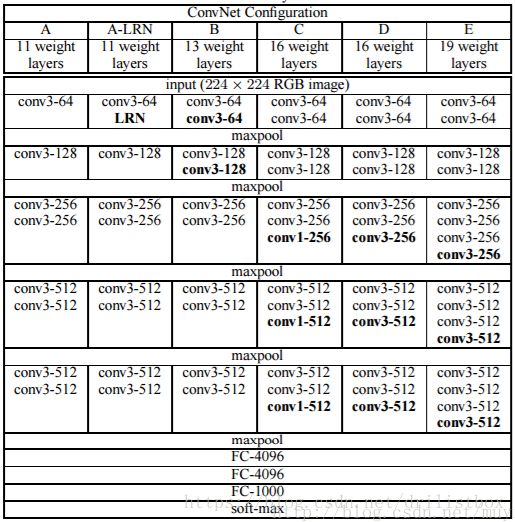
VGGnets可以看做是AlexNet在深度上的扩展,和AlexNet相似,其网络结构同样可以由8个层次组成,也是5组卷积层、3组全连接层。但是VGGNet中每个卷积层都连续卷积2-4次,且卷积核都为3*3的小型卷积核,通过反复堆叠3*3的卷积核及2*2的池化核来加深网络,从而优化性能。根据卷积配置的不同,VGGNets又被细分为A~E这5种网络模型(如下图所示),仅有C中多了卷积核为1*1的卷积层,该卷积层的意义主要在于线性变换,输入输出通道不变,也没有降维。
虽然A到E网络逐渐变深,但网络的数量并没有增长太多,这是因为主要的参数都集中在全连接层,但计算量随着网络的变深而逐渐变大,这是因为计算量主要集中在卷积层。VGGNet的主要特点是多个3*3的卷积核连续堆叠在一起,好处主要有2个:一是可以用更少的参数学习更多的特征,如下图所示,左边为2个3*3卷积核堆叠在一起的情况,其视野为5*5,与单独用一个5*5的卷积核观察到的视野一样,但参数却少了(1-3*3*2/5*5)=28%;二是有跟多的非线性变换,使得对特征的学习能力更强,如下图所示,对相同视野,左边可做两次非线性变换,而右边只能做一次。
下面给出了slim实现的VGGNet 16,网络构建也就21行:
    def vgg16(inputs):
      with slim.arg_scope([slim.conv2d, slim.fully_connected],
                activation_fn=tf.nn.relu,
                weights_initializer=tf.truncated_normal_initializer(0.0, 0.01),
                weights_regularizer=slim.l2_regularizer(0.0005)):
        net = slim.repeat(inputs, 2, slim.conv2d, 64, [3, 3], scope='conv1')
        net = slim.max_pool2d(net, [2, 2], scope='pool1')
        net = slim.repeat(net, 2, slim.conv2d, 128, [3, 3], scope='conv2')
        net = slim.max_pool2d(net, [2, 2], scope='pool2')
        net = slim.repeat(net, 3, slim.conv2d, 256, [3, 3], scope='conv3')
        net = slim.max_pool2d(net, [2, 2], scope='pool3')
        net = slim.repeat(net, 3, slim.conv2d, 512, [3, 3], scope='conv4')
        net = slim.max_pool2d(net, [2, 2], scope='pool4')
        net = slim.repeat(net, 3, slim.conv2d, 512, [3, 3], scope='conv5')
        net = slim.max_pool2d(net, [2, 2], scope='pool5')
         net = slim.flatten(net)
        net = slim.fully_connected(net, 4096, scope='fc6')
        net = slim.dropout(net, 0.5, scope='dropout6')
        net = slim.fully_connected(net, 4096, scope='fc7')
        net = slim.dropout(net, 0.5, scope='dropout7')
        net = slim.fully_connected(net, 1000, activation_fn=None, scope='fc8')
      return net
在vgg16中,我们定义了卷积及全连接的默认参数,如激活函数全为relu,卷积核及权重矩阵全部初始化为0均值、标准差为0.01的截断正态分布,并且卷积核及权重系数全都考虑了L2正则化,正则项系数为0.0005。
训练模型。由于我自己电脑的计算能力有限,我随机生成了图像数据和标签数据,计算出在top1分类上小批数据迭代所需要的时间。
    #image_size = 224
    image_size = 56
    batch_size = 32
    x_image = tf.placeholder(tf.float32, shape=[None, image_size, image_size, 3])
    y_ = tf.placeholder(tf.float32, shape=[None, 1000])
    predictions = vgg16(x_image)
    #cross_entropy = slim.losses.softmax_cross_entropy(predictions, y_)
    classification_loss = tf.reduce_mean(tf.nn.softmax_cross_entropy_with_logits(logits=predictions, labels=y_))
    regularization_loss = tf.add_n(tf.losses.get_regularization_losses())
    train_step = tf.train.AdamOptimizer(1e-4).minimize(classification_loss + regularization_loss)
    correct_prediction = tf.equal(tf.argmax(predictions,1), tf.argmax(y_,1))
    accuracy = tf.reduce_mean(tf.cast(correct_prediction, tf.float32))
    sess = tf.InteractiveSession()
    sess.run(tf.global_variables_initializer())
    for ind in range(20000):
        labels = np.random.randint(0,1000,size=[batch_size,1])
        labels_one_hot = np.zeros([batch_size, 1000],dtype = np.int32)
        for i in range(batch_size):
            labels_one_hot[i,labels[i]] = 1
        if not ind%10 and ind > 0:
            train_accuracy = accuracy.eval(feed_dict={
                x_image:np.random.rand(batch_size, image_size, image_size, 3),
                y_     :labels_one_hot})
            print("step %d, training accuracy %g"%(ind, train_accuracy))
        startTime = time.time()
        train_step.run(feed_dict={
            x_image:np.random.rand(batch_size, image_size, image_size, 3),
            y_     :labels_one_hot})
        endTime = time.time()
        print("step %d costTime:%0.2f" %(ind, endTime - startTime))
TensorFlow实现 :https://pan.baidu.com/s/14A91inmZmSC55dgDv8ZZ3Q


