vue-router在项目中的应用总结
我们要实现单页应用程序,所以我们要学习路由。
1.0 前端路由
1. hash 模式
随着 ajax 的流行,异步数据请求交互运行在不刷新浏览器的情况下进行。而异步交互体验的更高级版本就是 SPA —— 单页应用。单页应用不仅仅是在页面交互是无刷新的,连页面跳转都是无刷新的,为了实现单页应用,所以就有了前端路由。 类似于服务端路由,前端路由实现起来其实也很简单,就是匹配不同的 url 路径,进行解析,然后动态的渲染出区域 html 内容。但是这样存在一个问题,就是 url 每次变化的时候,都会造成页面的刷新。那解决问题的思路便是在改变 url 的情况下,保证页面的不刷新。在 2014 年之前,大家是通过 hash 来实现路由,url hash 就是类似于:
http://www.xxx.com/#/login这种 #后面 hash 值的变化,并不会导致浏览器向服务器发出请求,浏览器不发出请求,也就不会刷新页面。另外每次 hash 值的变化,还会触发 hashchange 这个事件,通过这个事件我们就可以知道 hash 值发生了哪些变化。然后我们便可以监听 hashchange 来实现更新页面部分内容的操作:
function matchAndUpdate () {
// todo 匹配 hash 做 dom 更新操作
}

window.addEventListener('hashchange', matchAndUpdate)
2. history 模式
14年后,因为HTML5标准发布。多了两个 API, pushState 和 replaceState ,通过这两个 API 可以改变 url 地址且不会发送请求。同时还有 popstate 事件。通过这些就能用另一种方式来实现前端路由了,但原理都是跟 hash 实现相同的。用了 HTML5 的实现,单页路由的 url 就不会多出一个#,变得更加美观。但因为没有 # 号,所以当用户刷新页面之类的操作时,浏览器还是会给服务器发送请求。为了避免出现这种情况,所以这个实现需要服务器的支持,需要把所有路由都重定向到根页面。
function matchAndUpdate () {
// todo 匹配路径 做 dom 更新操作
}

window.addEventListener('popstate', matchAndUpdate)
1.1. SPA
single-page application,单页应用。一个应用程序只有一个页面。
单页 Web 应用 (single-page application 简称为 SPA) 是一种特殊的 Web 应用。它将所有的活动局限于一个Web页面中,仅在该Web页面初始化时加载相应的HTML、JavaScript 和 CSS。一旦页面加载完成了,SPA不会因为用户的操作而进行页面的重新加载或跳转。而是利用 JavaScript 动态的变换HTML的内容(通过div切换显示和隐藏,或者是数据的渲染),从而实现UI与用户的交互。由于避免了页面的重新加载,SPA 可以提供较为流畅的用户体验。得益于ajax,我们可以实现无跳转刷新,又多亏了浏览器的histroy机制,我们用hash的变化从而可以实现推动界面变化。
优点:提供流畅的用户体验,避免了不必要的跳转和重新渲染,服务器压力小。
缺点:不利于seo; 初次加载页面更耗时; 历史管理需要编程实现
1.2. spa的实现
页面只有一个,但是,你要根据用户的地址栏中的信息去展示不同的内容给用户,怎么办?
两种方法:
Ø 动态组件
Ø 路由
1.2.1. 动态组件
动态组件的功能有限(例如,不能传参),我们可以去使用另一种方法--路由。
1.3. vue-router
vue-router基本实现原理就是指定DOM元素的显示隐藏;通过监控url的变化;通过方法展示指定的DOM。
一个典型的vue-router配置文件如下:
import Login from './views/Login.vue'
import NotFound from './views/404.vue'
import Home from './views/Home.vue'
import Main from './views/Main.vue'
import Table from './views/nav1/Table.vue'
import Form from './views/nav1/Form.vue'
import user from './views/nav1/user.vue'
import Page4 from './views/nav2/Page4.vue'
import Page5 from './views/nav2/Page5.vue'
import Page6 from './views/nav3/Page6.vue'
import echarts from './views/charts/echarts.vue'

let routes = [
    {
        path: '/login',
        component: Login,
        name: '',
        hidden: true
    },
    {
        path: '/404',
        component: NotFound,
        name: '',
        hidden: true
    },
    //{ path: '/main', component: Main },
    {
        path: '/',
        component: Home,
        name: '导航一',
        iconCls: 'el-icon-message',//图标样式class
        children: [
            { path: '/main', component: Main, name: '主页', hidden: true },
            { path: '/table', component: Table, name: 'Table' },
            { path: '/form', component: Form, name: 'Form' },
            { path: '/user', component: user, name: '列表' },
        ]
    },
    {
        path: '/',
        component: Home,
        name: '导航二',
        iconCls: 'fa fa-id-card-o',
        children: [
            { path: '/page4', component: Page4, name: '页面4' },
            { path: '/page5', component: Page5, name: '页面5' }
        ]
    },
    {
        path: '/',
        component: Home,
        name: '',
        iconCls: 'fa fa-address-card',
        leaf: true,//只有一个节点
        children: [
            { path: '/page6', component: Page6, name: '导航三' }
        ]
    },
    {
        path: '/',
        component: Home,
        name: 'Charts',
        iconCls: 'fa fa-bar-chart',
        children: [
            { path: '/echarts', component: echarts, name: 'echarts' }
        ]
    },
    {
        path: '*',
        hidden: true,
        redirect: { path: '/404' }
    }
];

export default routes;
element-ui菜单代码:
		    {{item.name}}
		    {{child.name}}

			{{item.children[0].name}}
1.3.1 重定向配置
重定向:当我们在地址栏中访问一个a网址时,会跳转到b网址。
直接通过路由设置来完成:
const router = new VueRouter({
  routes: [
    { path: '/a', redirect: '/b' }
  ]
})
示例:
1.3.2 编程式路由-实现页面跳转
对比理解:页面跳转有两种方法
Ø a标签可以设置href之后,实现页面跳转。
Ø 另外,还有一种方法去实现页面跳转:写代码
Window.location = “”
如下:
百度
添加click之后:
document.getElementById("btn").onclick = function() { window.location = "http://www.baidu.com"}
就可以实现点击跳转了。
编程式路由:就像通过用代码设置location一样,去进行页面的跳转。
格式:
router.push({ path: 'home' })
示例
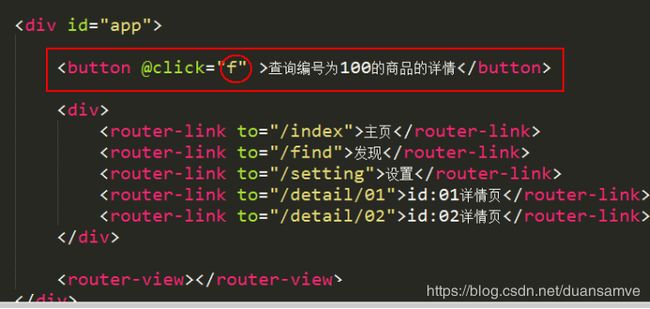
点击上面的按钮,直接打开商品编号为100的详情页。
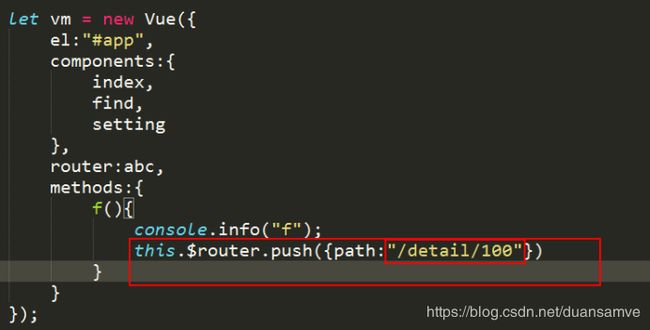
方法f()如下:
注意:这里是$router ,而在获取参数时, this.$route.params.abc
1.3.3 路由懒加载
懒加载也叫延迟加载,即在需要的时候进行加载,随用随载。
在单页应用中,如果没有应用懒加载,运用webpack打包后的文件将会异常的大。
造成进入首页时,需要加载的内容过多,延时过长,不利于用户体验。
运用懒加载可以将页面进行划分,按需加载页面,可以分担首页所承担的加载压力,减少加载用时。
import Vue from 'vue'                                       // 引入Vue
import Router from 'vue-router'                             // 引入Vue_router
*************************************************
const HelloWorld = () => import('@/components/HelloWorld')  // 懒加载引入组件
*************************************************
Vue.use(Router)                                             // 关联Vue

export default new Router({                                 // 创建router实例
  routes: [
    {
      path: '/',                                            // 路由地址
      name: 'HelloWorld',
      component: HelloWorld
    }
  ]
})
1.3.4 路由的mode属性
import Vue from 'vue'                                       // 引入Vue
import Router from 'vue-router'                             // 引入Vue_router
const HelloWorld = () => import('@/components/HelloWorld')  // 懒加载引入组件
Vue.use(Router)                                             // 关联Vue

export default new Router({                                 // 创建router实例
  ******************************************
  mode: hash,                                               // 路由模式
  *******************************************
  routes: [
    {
      path: '/',                                            // 路由地址
      name: 'HelloWorld',
      component: HelloWorld
    }
  ]
})
常用的mode模式有两种:
默认为hash模式,最明显的标志是,URL上有#号 localhost:8080/#/,路由会监听#后面的信息变化进行路由匹配。
另一种为history模式,不会有#出现,很大程度上对URL进行了美化。需要**注意**history模式在打包后的路由跳转需要服务器配合。
1.3.5 使用动画
在路由中可以使用animate.css动画库,使用前需要先将资源引入进来。
首先在src文件夹下面的assets这个文件夹下面新建一个文件css文件,然后将前面下载的animate.css放在css文件夹下面。
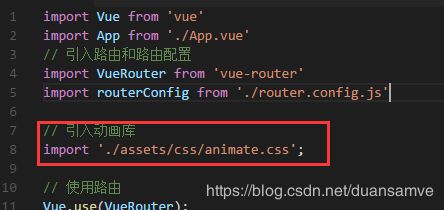
然后在main.js中引入这个样式文件。
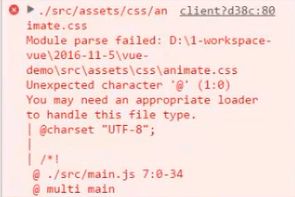
有的版本中直接这样引入外部样式的时候会报下面的这样的错误。
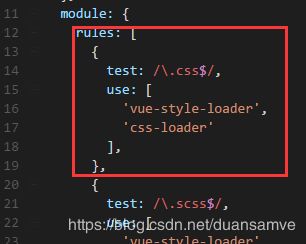
这是因为项目中缺少css-loader和style-loader,所以需要在项目跟目录中执行命令 npm intsall css-loader style-loader --save-dev来下载相关依赖,然后在webpack.config.js中进行配置。
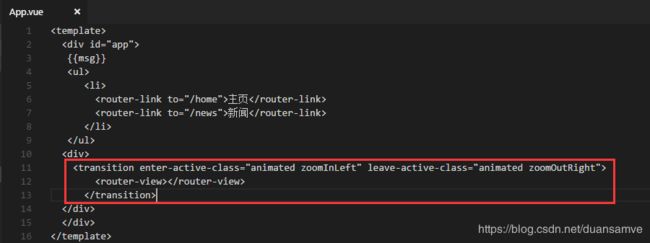
如果上面的不报错,再继续在需要使用动画的位置进行添加动画组件和动画样式就可以了。
此时就实现了最基本的路由配合脚手架和动画的项目了。
1.3.6 Vue-Router导航钩子
Vue-Router提供了三个级别的路由钩子,即全局钩子、特定路由独享的钩子和组件内的钩子。通过“导航钩子”, 可以非常方便对整个路由响应过程进行控制。
1、全局钩子影响全局,所有路由跳转都会触发使用router.beforeEach 注册全局的before钩子:
import Vue from 'vue'
import App from './App'
import router from './router'

console.log(router)
router.beforeEach((to, from, next) => {
  console.log('这是一个全局钩子')
  console.log(to)
  console.log(from)
  console.log(next)
  next(true)
})

/* eslint-disable no-new */
new Vue({
  router,
  render: h => h(App)
}).$mount('#app')
2、特定路由独享钩子只影响该特定路由
特定路由独享钩子在路由配置上直接定义,如下面的 beforeEnter 钩子:
import Vue from 'vue'
import VueRouter from 'vue-router'
Vue.use(VueRouter)

import Home from './components/Home'
import About from './components/About'
import AboutOne from './components/AboutOne'
import AboutTwo from './components/AboutTwo'
import AboutThree from './components/AboutThree'
import Service from './components/Service'
import ServiceDetail from './components/ServiceDetail'
import Hello from './components/Hello'
import NotFoundPage from './components/NotFoundPage'

const routes = [
  {path: '/home', name: 'home', component: Home, alias: '/'},
  {
    path: '/about',
    name: 'about',
    component: About,
    beforeEnter: (to, from, next) => {
      console.log('这是一个路由钩子,进入了about')
      console.log(to)
      console.log(from)
      console.log(next)
      next(true)
    },
    children: [
      {path: '/about/aboutone', component: AboutOne, alias: '/about'},
      {path: '/about/abouttwo', component: AboutTwo},
      {path: '/about/aboutthree', component: AboutThree}
    ]
  },
  {path: '/service', name: 'service', component: Service},
  {path: '/service/:id', name: 'servicedetail', component: ServiceDetail},
  {path: '/hello', name: 'hello', component: Hello},
  {path: '*', component: NotFoundPage}
]

export default new VueRouter({
  // mode: 'history',
  base: '/',
  scrollBehavior: function (to, from, savedPosition) {
    return savedPosition
  },
  routes
})
3、组件内钩子定义于组件内部
组件内钩子直接在组件内定义,有beforeRouteEnter、beforeRouteUpdate和beforeRouteLeave三种组件内钩子。
      {{ msg }}


export default {
  name: 'AboutOne',
  data () {
    return {
      msg: 'About页面的第一个页面'
    }
  },
  methods: {
  },
  beforeRouteEnter (to, from, next) {
    console.log('这是一个组件内钩子:beforeRouteEnter,进入了about页面第一个子页面')
    console.log(to)
    console.log(from)
    console.log(next)
    next(true)
  },
  beforeRouteUpdate (to, from, next) {
    console.log('这是一个组件内钩子:beforeRouteUpdate,进入了about页面第一个子页面更新了')
    console.log(to)
    console.log(from)
    console.log(next)
    next(true)
  },
  beforeRouteLeave (to, from, next) {
    console.log('这是一个组件内钩子:beforeRouteLeave,离开了about页面第一个子页面')
    console.log(to)
    console.log(from)
    console.log(next)
    let sureClose = confirm('确定关闭吗?')
    next(sureClose)
  }
}


$color: #dd3333;
h1 {
  text-align: center;
  font-weight: normal;
  color: $color;
}
注意点:
(1)在完成路由操作时,要调用next方法,以使路由钩子继续执行下去,完成路由导航;
(2)组件内路由钩子的beforeRouteEnter是在渲染组件前就已经调用,因此在这个方法下,$this无法使用。
1.3.7 数据获取
使用过AngularJS的ui-router的都知道,我们可以根据实际项目需要,在路由页面(导航)“进入前”或“进入后”去获取远程数据。
1、在路由页面进入后请求数据
      {{ msg }}
      正在加载数据...
      {{posts}}


import axios from 'axios'
export default {
  name: 'AboutTwo',
  data () {
    return {
      msg: 'About页面的第二个页面',
      posts: []
    }
  },
  mounted () {
    this.fetchData()
  },
  methods: {
    fetchData () {
      let that = this
      axios.get('http://localhost:3000/posts')
        .then(function (response) {
          console.log(response)
          that.posts = response.data.data
        })
        .catch(function (error) {
          console.log(error)
        })
    }
  }
}


$color: #dd3333;
h1 {
  text-align: center;
  font-weight: normal;
  color: $color;
}
2、在路由页面进入前请求数据
      {{ msg }}
      {{posts}}


import axios from 'axios'
export default {
  name: 'AboutThree',
  data () {
    return {
      msg: 'About页面的第三个页面',
      posts: []
    }
  },
  methods: {
  },
  beforeRouteEnter (to, from, next) {
    axios.get('http://localhost:3000/posts')
      .then(function (response) {
        console.log(response)
        if (response.status === 200 && response.data.status) {
          next(vm => {
            vm.posts = response.data.data
          })
        } else {
          next(false)
        }
      })
      .catch(function (error) {
        console.log(error)
        next(false)
      })
  }
}


$color: #dd3333;
h1 {
  text-align: center;
  font-weight: normal;
  color: $color;
}

