java线程池--ThreadPoolExecutor
写了一个发邮件的代码,但是发邮件花的时间很长,需要11s左右,这样使得请求响应时间也很长,所以就想到了用线程去做,所以就去看了一下线程池的东西。
查到的博客很多是比较老的,而我用的jdk是1.8,线程池的jdk源码和博客里讲的不一样
而且看到别人看源码,自己也想试着看
所以这主要是一篇基于jdk1.8的ThreadPoolExecutor源码分析
- 类结构
- Executor
- ExecutorService
- AbstractExecutorService
- ThreadPoolExecutor
- ThreadPoolExecutor详解
- 构造方法及属性
- ThreadPoolExecutor中的核心域
- execute方法实现
- execute执行分三步:
- addWorker的源码分析
- runWorker()
- 后记
类结构
分析源码第一步最好先理清楚类结构,这样可以有一个整体的概念。
idea查看类的继承关系,快捷键ctrl+h
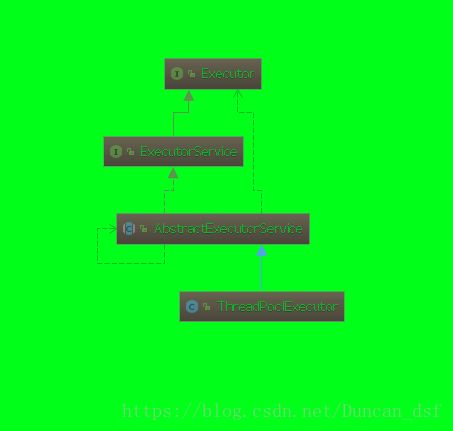
uml类图ctrl+shift+alt+u
从上面的uml类图可以看出来
ThreadPoolExecutor继承AbstractExecutorService,AbstractExecutorService是一个抽象类
AbstractExecutorService实现ExecutorService接口,
ExecutorService又继承了Executor接口
接下来我们从上到下看一下每个类定义了什么方法
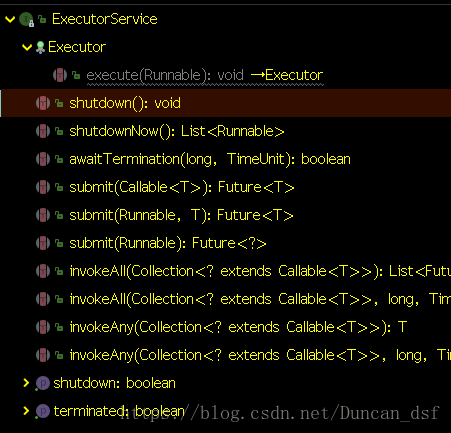
我这用的是idea的structure视图,视图上面一排功能按钮可以完成很强大的功能
Executor

只定义类一个execute接口,用来执行线程。
这是本文的重点,也是理解java线程池的重点,由ThreadPoolExecutor实现。
ExecutorService
亮色的意味着当前类定义的,暗色的——executor代表继承Executor的方法。
ExecutorService在Executor的基础上定义了许多新的接口方法。
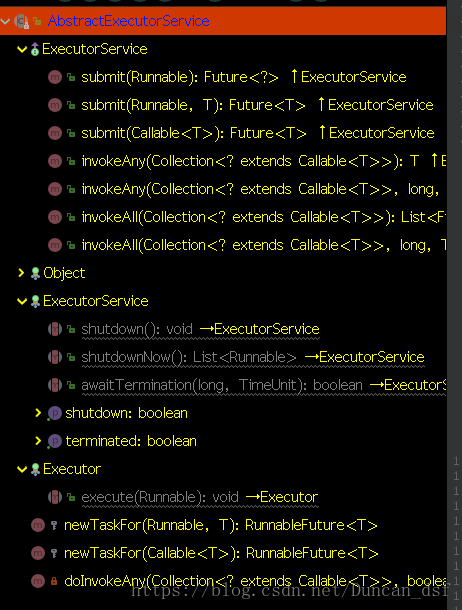
AbstractExecutorService
AbstractExecutorService实现了ExecutorService接口的submit,invokeAny等几个接口,
以及新定义了newTaskFor,doInvokeAny等几个方法——注意是实现了的方法,
AbstractExecutorService没有定义新的抽象方法。
下面是jdk源码中submit的其中一个实现
    public Future submit(Runnable task) {
        if (task == null) throw new NullPointerException();
        RunnableFuture ftask = newTaskFor(task, null);
        execute(ftask);
        return ftask;
    }
可以看到newTaskFor是为了实现submit方法而定义的。
同样,观察源码可以发现AbstractExecutorService新定义的doInvokeAny也是为了实现接口的invokeAny等抽象方法而定义的。
到这里为止,还剩Executor接口的execute方法和ExecutorService接口的shutdown等几个方法没实现,这些是由ThreadPoolExecutor实现的,而其中execute是核心方法,理解了execute基本就可以理解ThreadPoolExecutor。
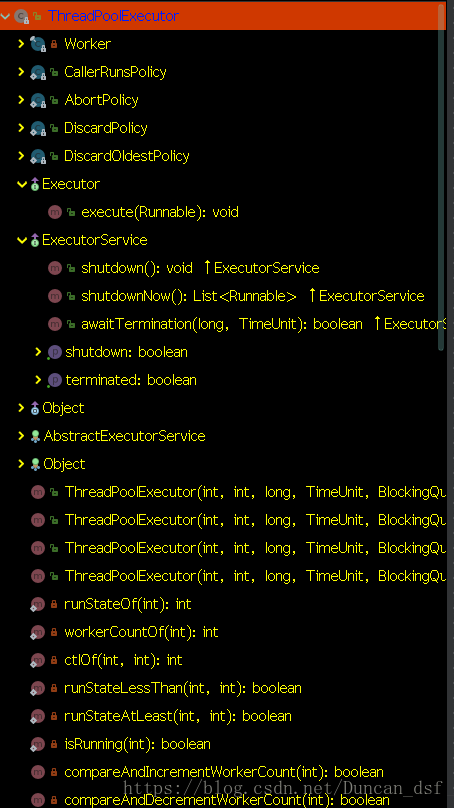
ThreadPoolExecutor
这个类的结构图我没截完整,这个类太大了
ThreadPoolExecutor新定义了很多方法,我这里只说一下核心的,与executor实现相关的一些东西
ThreadPoolExecutor详解
构造方法及属性
理解execute方法的实现,首先需要知道ThreadPoolExecutor中的相关属性。

4个构造方法,前三个其实都是调用的最后一个,前三个中缺省的参数,由ThreadPoolExecutor内部提供默认的
所以我们直接来看第4个构造方法。
    public ThreadPoolExecutor(int corePoolSize,
                              int maximumPoolSize,
                              long keepAliveTime,
                              TimeUnit unit,
                              BlockingQueue workQueue,
                              ThreadFactory threadFactory,
                              RejectedExecutionHandler handler) {
        if (corePoolSize < 0 ||
            maximumPoolSize <= 0 ||
            maximumPoolSize < corePoolSize ||
            keepAliveTime < 0)
            throw new IllegalArgumentException();
        if (workQueue == null || threadFactory == null || handler == null)
            throw new NullPointerException();
        this.acc = System.getSecurityManager() == null ?
                null :
                AccessController.getContext();
        this.corePoolSize = corePoolSize;
        this.maximumPoolSize = maximumPoolSize;
        this.workQueue = workQueue;
        this.keepAliveTime = unit.toNanos(keepAliveTime);
        this.threadFactory = threadFactory;
        this.handler = handler;
    }
这些参数的含义
- corePoolSize核心池大小
下面这是jdk源码的注释
corePoolSize the number of threads to keep in the pool,
even if they are idle, unless {@code allowCoreThreadTimeOut} is set
意思是核心池大小意味着在线程池中保存的线程池,即使他们是空闲的也不会被杀死。
除非定义了allowCoreThreadTimeOut。具体的请看参数keepAliveTime的介绍
- maximumPoolSize 池的最大容量
the maximum number of threads to allow in the pool
池中允许的最大线程数
当池中线程数大于或等于maximumPoolSize时,新加进来的任务需要在队列中等待。
- keepAliveTime 生存时间
keepAliveTime when the number of threads is greater than the core,
this is the maximum time that excess idle threads wait for new tasks before terminating.
也就是当现在的池大小大于核心池大小时,空闲的线程会在等待keepAliveTime时间后过期,被终止。
上面这是在未设置allowCoreThreadTimeOut的情况下, 假如通过allowCoreThreadTimeOut(true)设置了允许核心池超时,那么核心池的线程在空闲keepAliveTime时间后也会被终止。
- unit
时间格式,用来确定上一个参数keepAliveTime的单位——秒?毫秒?等等
- workQueue 工作队列
the queue to use for holding tasks before they are executed.
This queue will hold only the {@code Runnable} tasks submitted by the {@code execute} method.
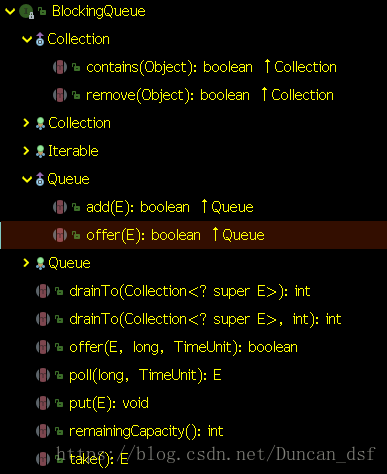
| 方法 | 功能 | 特点 |
|---|---|---|
| add(E) | 添加 | 成功返回true 没空间时直接抛出异常 |
| offer(E) | 添加 | 成功返回true 没空间时返回false |
| offer(E, long, TimeUni) | 添加 | 没空间时等待一定时间内,有可用空间就插入,没有等到空间时返回false |
| put(E) | 添加 | 一直等待直到有可用空间 |
| poll(long, TimeUnit) | 移除队首元素并返回 | 等待一定时间,操作成功返回队首元素,否则超时返回null |
| take() | 移除队首元素并返回 | 一直等待直到有队首元素 |
接口的实现有
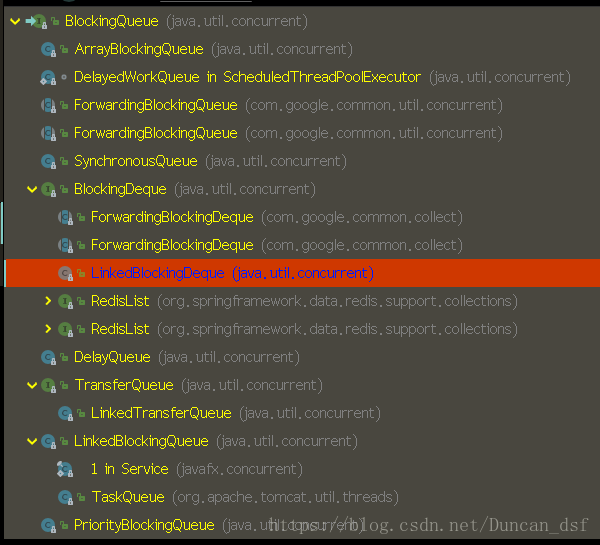
我们只考虑jdk的实现,即java.util.concurrent包中的类
常用的有下面三种:
ArrayBlockingQueue
SynchronousQueue
LinkedBlockingQueue

BlockingDeque这是一个双向队列接口,这里不考虑
更详细的工作流程会在execute方法处讲。
- ThreadFactory
这是一个接口,接口方法如下
Thread newThread(Runnable r);只有一个newThread。
可以选择自己实现这个接口,并设置这个属性;不设置这个属性时,采用默认实现———Executors.DefaultThreadFactory,注意是Executors,这是一个工具类,包装了一下ThreadPoolExecutor,可以帮我们创建线程池,他的核心是ThreadPoolExecutor,所以弄懂ThreadPoolExecutor看Executors会很轻松。
阿里开发手册中讲:
【强制】线程池不允许使用 Executors 去创建,而是通过 ThreadPoolExecutor 的方式,这样
的处理方式让写的同学更加明确线程池的运行规则,规避资源耗尽的风险。
- RejectedExecutionHandler
the handler to use when execution is blocked because the thread bounds and queue capacities are reached
这是当线程数达到边界和队列容量达到最大时,执行任务的方法。
RejectedExecutionHandler是一个接口,只有一个接口方法,
void rejectedExecution(Runnable r, ThreadPoolExecutor executor);表示拒绝执行时的具体操作。
ThreadPoolExecutor有4种具体实现:
CallerRunsPolicy 除非线程池关闭,否则执行任务
AbortPolicy 抛出异常
DiscardPolicy 什么都不做
DiscardOldestPolicy 移除队列中的队首元素,并执行当前任务
如果不设置的花,会采用默认实现——AbortPolicy。
ThreadPoolExecutor中的核心域
execute的实现依赖于两个核心域(field),当前线程池的运行状态runstate和工人数量workerCount(当前线程数)
而这两个值由一个AtomicInteger类型的值ctl控制:
ctl共32位(二进制)
高3位存储运行状态
剩余29位存储workerCount
    private final AtomicInteger ctl = new AtomicInteger(ctlOf(RUNNING, 0));

    // Integer.SIZE=32 COUNT_BITS=29
    private static final int COUNT_BITS = Integer.SIZE - 3;

    // 1左移29位,16进制表示为20000000 再-1 为1fffffff workerCount最大值为后29位全1
    private static final int CAPACITY   = (1 << COUNT_BITS) - 1;


    // 左移29位 后29位肯定是全0
    // -1 左移29位 前三位为全1
    private static final int RUNNING    = -1 << COUNT_BITS;
    // 0 还是0 也就是前三位全0
    private static final int SHUTDOWN   =  0 << COUNT_BITS;
    // 前三位为001
    private static final int STOP       =  1 << COUNT_BITS;
    // 前三位为010
    private static final int TIDYING    =  2 << COUNT_BITS;
    // 前三位为011
    private static final int TERMINATED =  3 << COUNT_BITS;

    // Packing and unpacking ctl
    // CAPACITY为低29位全1 取反结果为高三位全1 低29为全0 &c结果就是取c的高三位 这就是runState
    private static int runStateOf(int c)     { return c & ~CAPACITY; }

    // 同理取低29位 为workerCount
    private static int workerCountOf(int c)  { return c & CAPACITY; }

    // 由runState和workerState 按位或得到ctl
    private static int ctlOf(int rs, int wc) { return rs | wc; }
execute方法实现
接下来就开始看execute的代码了
源码如下:
    public void execute(Runnable command) {
        if (command == null)
            throw new NullPointerException();
        /*
         * Proceed in 3 steps:
         *
         * 1. If fewer than corePoolSize threads are running, try to
         * start a new thread with the given command as its first
         * task.  The call to addWorker atomically checks runState and
         * workerCount, and so prevents false alarms that would add
         * threads when it shouldn't, by returning false.
         *
         * 2. If a task can be successfully queued, then we still need
         * to double-check whether we should have added a thread
         * (because existing ones died since last checking) or that
         * the pool shut down since entry into this method. So we
         * recheck state and if necessary roll back the enqueuing if
         * stopped, or start a new thread if there are none.
         *
         * 3. If we cannot queue task, then we try to add a new
         * thread.  If it fails, we know we are shut down or saturated
         * and so reject the task.
         */
        int c = ctl.get();
        if (workerCountOf(c) < corePoolSize) {
            if (addWorker(command, true))
                return;
            c = ctl.get();
        }
        if (isRunning(c) && workQueue.offer(command)) {
            int recheck = ctl.get();
            if (! isRunning(recheck) && remove(command))
                reject(command);
            else if (workerCountOf(recheck) == 0)
                addWorker(null, false);
        }
        else if (!addWorker(command, false))
            reject(command);
    }
execute执行分三步:
源码的注释其实讲的挺好的,我这里是结合源码的注释和自己的理解讲的,希望让你们更容易理解一点
- 第一步:也就是第一个if语句。先获取ctl,通过ctl获取workerCount,上面刚讲了的。如果当前工作线程数小于核心池大小,那么就新建一个核心线程。添加失败的话执行第二步。
- 第二步:也就是第二个if语句。判断线程池是否还在运行,如果是:将当前任务——command入队,入队成功后,再判断当前线程池是否在运行:
- 没有运行:就将command移除队列,由reject处理——依据设置的reject策略进行
- 如果在运行,但是workerCount == 0, 新加一个firstTask空的非核心工作线程。
- 第三步:也就会是else if语句。如果入队失败(队列满了),或者线程池没在运行,会尝试添加一个以command为firstTask的非核心线程,
如果添加失败,会rejeck command。
addWorker的源码分析
private boolean addWorker(Runnable firstTask, boolean core) {
        retry:
        for (;;) {
            int c = ctl.get();
            int rs = runStateOf(c);

            // Check if queue empty only if necessary.
            if (rs >= SHUTDOWN &&
                ! (rs == SHUTDOWN &&
                   firstTask == null &&
                   ! workQueue.isEmpty()))
                return false;

            for (;;) {
                int wc = workerCountOf(c);
                if (wc >= CAPACITY ||
                    wc >= (core ? corePoolSize : maximumPoolSize))
                    return false;
                if (compareAndIncrementWorkerCount(c))
                    break retry;
                c = ctl.get();  // Re-read ctl
                if (runStateOf(c) != rs)
                    continue retry;
                // else CAS failed due to workerCount change; retry inner loop
            }
        }

        boolean workerStarted = false;
        boolean workerAdded = false;
        Worker w = null;
        try {
            w = new Worker(firstTask);
            final Thread t = w.thread;
            if (t != null) {
                final ReentrantLock mainLock = this.mainLock;
                mainLock.lock();
                try {
                    // Recheck while holding lock.
                    // Back out on ThreadFactory failure or if
                    // shut down before lock acquired.
                    int rs = runStateOf(ctl.get());

                    if (rs < SHUTDOWN ||
                        (rs == SHUTDOWN && firstTask == null)) {
                        if (t.isAlive()) // precheck that t is startable
                            throw new IllegalThreadStateException();
                        workers.add(w);
                        int s = workers.size();
                        if (s > largestPoolSize)
                            largestPoolSize = s;
                        workerAdded = true;
                    }
                } finally {
                    mainLock.unlock();
                }
                if (workerAdded) {
                    t.start();
                    workerStarted = true;
                }
            }
        } finally {
            if (! workerStarted)
                addWorkerFailed(w);
        }
        return workerStarted;
    }
参数含义:
firstTask 新建线程的第一个任务
core 是否新建的是核心池线程 调用addWorker方法前会判断,如果当前核心池线程没满,会设置core为ture。
retry代码块是用来在并发的情况下使workerCount++的:
第一重for循环:
获取当前运行状态,如果当前状态大于等于SHUTDOWN(只有RUNNING小于SHUTDOWN)且不是(正在SHUTDOWN,firstTask为空且工作队列非空)这种情况,返回false。
第二重循环:
检查当前工作线程数wc,当wc大于类本身限制的最大workerCount数——CAPACITY,或者wc大于(core为true的设置的核心池大小 或者 core为false时手动设置的最大线程池小),返回false;否则说明可以新建worker:先增加workerCount——调用compareAndIncrementWorkerCount:这个方法是通过原子类型AtomicInteger的CAS增加workerCount,假如添加失败,就一直重试第二重循环,添加成功时跳出retry代码块。
余下的代码就是往workers集合中真正添加worker,并运行worker。
- 首先用firstTask新建一个worker,再拿到它的线程。
- 用重入锁加锁加锁,将worker加入workers集合中,之后解锁。
- 如果worker添加成功,启动线程(此时会调用worker的run方法)。
- 函数返回线程启动状态。
runWorker()
上一节讲了如何添加一个worker,但是worker该怎么样运行以及销毁呢?
这是由runWorker方法控制的。
上面第三点讲到了启动线程时会运行worker的run,而run方法实际调用了runWorker。
run源码:
    public void run() {
        runWorker(this);
    }
runWorker源码:
    final void runWorker(Worker w) {
        Thread wt = Thread.currentThread();
        Runnable task = w.firstTask;
        w.firstTask = null;
        w.unlock(); // allow interrupts
        boolean completedAbruptly = true;
        try {
            while (task != null || (task = getTask()) != null) {
                w.lock();
                // If pool is stopping, ensure thread is interrupted;
                // if not, ensure thread is not interrupted.  This
                // requires a recheck in second case to deal with
                // shutdownNow race while clearing interrupt
                if ((runStateAtLeast(ctl.get(), STOP) ||
                     (Thread.interrupted() &&
                      runStateAtLeast(ctl.get(), STOP))) &&
                    !wt.isInterrupted())
                    wt.interrupt();
                try {
                    beforeExecute(wt, task);
                    Throwable thrown = null;
                    try {
                        task.run();
                    } catch (RuntimeException x) {
                        thrown = x; throw x;
                    } catch (Error x) {
                        thrown = x; throw x;
                    } catch (Throwable x) {
                        thrown = x; throw new Error(x);
                    } finally {
                        afterExecute(task, thrown);
                    }
                } finally {
                    task = null;
                    w.completedTasks++;
                    w.unlock();
                }
            }
            completedAbruptly = false;
        } finally {
            processWorkerExit(w, completedAbruptly);
        }
    }
runWorker的主要步骤:
1. 获取当前worker的firstTask赋值给task,并将firstTask置null,worker解锁以允许被打断;
2. 判断task是否为空,为空时调用getTask从阻塞队列中获取被阻塞的任务,如果getTask也为空,执行第四步;
3. 运行task;
4. 最后调用processWorkerExit。
其中第二步和第四步很重要:
- getTask方法从阻塞队列的获取task,如果超时还没有获取到task,就会将workerCount减一并返回null。
- getTask返回null就会调用processWorkerExit,将当前worker移除workers集合。
- 如果getTask没有超时,则会一直阻塞直到获取到task,而不会减少workerCount以及将当前worker删除。
- 复习一下超时的策略:
- 没有设置允许核心池超时时,只有当当前池大小大于核心池大小时允许超时——等一段时间获取不到新任务,执行超时操作
- 设置了允许核心池超时,那么当当前池不大于核心池大小时也允许超时。
- processWorkerExit中删除worker之后还会判断当前worker数,如果workerCount不足了,会添加一个新的worker;因为允许核心池超时时,可能使线程池大小变为0。
getTask源码:
    private Runnable getTask() {
        boolean timedOut = false; // Did the last poll() time out?

        for (;;) {
            int c = ctl.get();
            int rs = runStateOf(c);

            // Check if queue empty only if necessary.
            if (rs >= SHUTDOWN && (rs >= STOP || workQueue.isEmpty())) {
                decrementWorkerCount();
                return null;
            }

            int wc = workerCountOf(c);

            // Are workers subject to culling?
            boolean timed = allowCoreThreadTimeOut || wc > corePoolSize;

            if ((wc > maximumPoolSize || (timed && timedOut))
                && (wc > 1 || workQueue.isEmpty())) {
                if (compareAndDecrementWorkerCount(c))
                    return null;
                continue;
            }

            try {
                Runnable r = timed ?
                    workQueue.poll(keepAliveTime, TimeUnit.NANOSECONDS) :
                    workQueue.take();
                if (r != null)
                    return r;
                timedOut = true;
            } catch (InterruptedException retry) {
                timedOut = false;
            }
        }
    }
processWorkerExit源码:
    private void processWorkerExit(Worker w, boolean completedAbruptly) {
        if (completedAbruptly) // If abrupt, then workerCount wasn't adjusted
            decrementWorkerCount();

        final ReentrantLock mainLock = this.mainLock;
        mainLock.lock();
        try {
            completedTaskCount += w.completedTasks;
            workers.remove(w);
        } finally {
            mainLock.unlock();
        }

        tryTerminate();

        int c = ctl.get();
        if (runStateLessThan(c, STOP)) {
            if (!completedAbruptly) {
                int min = allowCoreThreadTimeOut ? 0 : corePoolSize;
                if (min == 0 && ! workQueue.isEmpty())
                    min = 1;
                if (workerCountOf(c) >= min)
                    return; // replacement not needed
            }
            addWorker(null, false);
        }
    }
后记
写这篇博客花了我挺长时间的(手动笑哭),一方面自己最近状态不好,一方面自己并发编程方面的水平实在有限,
想看懂源码并讲出来,中间要看很多东西——原子类型、volatile、synchronized、BlockingQueue、ReentranLock、Thread、Runnable,但确实学到了很多;
中间还抽时间去看了HashMap、ConcurrentHashMap的实现HashMap懂了一点,ConcurrentHashMap实在是复杂,只是大概知道实现思路;
还作死去找了openJDK的源码,想看看某些native方法,发现果真是作死(无语了),果然隔行如隔山,c/c++不是那么容易看的。
