Tomcat8源码分析系列-启动分析(三) Catalina启动
在上一篇文章中,我们分析了tomcat的初始化过程,是由Bootstrap反射调用Catalina的load方法完成tomcat的初始化,包括server.xml的解析、实例化各大组件、初始化组件等逻辑。那么tomcat又是如何启动webapp应用,又是如何加载应用程序的ServletContextListener,以及Servlet呢?我们将在这篇文章进行分析
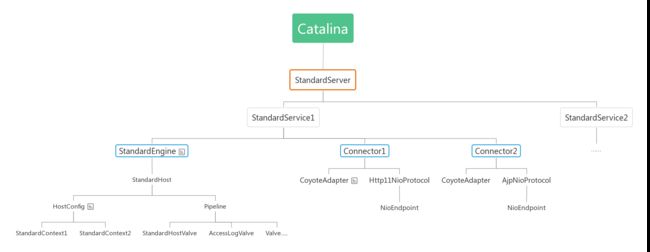
我们先来看下整体的启动逻辑,tomcat由上往下,挨个启动各个组件:

针对如此复杂的组件关系,tomcat 又是如何将各个组件串联起来,实现统一的生命周期管控呢?在这篇文章中,我们将分析 Service、Engine、Host、Pipeline、Valve 组件的启动逻辑,进一步理解tomcat的架构设计
1、Bootstrap
启动过程和初始化一样,由Bootstrap反射调用Catalina的start方法
public void start() throws Exception {
    if( catalinaDaemon==null ) init();
    Method method = catalinaDaemon.getClass().getMethod("start", (Class [] )null);
    method.invoke(catalinaDaemon, (Object [])null);
}
2、Catalina
主要分为以下三个步骤,其核心逻辑在于Server组件:
1. 调用Server的start方法,启动Server组件
2. 注册jvm关闭的勾子程序,用于安全地关闭Server组件,以及其它组件
3. 开启shutdown端口的监听并阻塞,用于监听关闭指令
public void start() {
    // 省略若干代码......
    // Start the new server
    try {
        getServer().start();
    } catch (LifecycleException e) {
        // 省略......
        return;
    }

    // 注册勾子,用于安全关闭tomcat
    if (useShutdownHook) {
        if (shutdownHook == null) {
            shutdownHook = new CatalinaShutdownHook();
        }
        Runtime.getRuntime().addShutdownHook(shutdownHook);
    }

    // Bootstrap中会设置await为true,其目的在于让tomcat在shutdown端口阻塞监听关闭命令
    if (await) {
        await();
        stop();
    }
}
3、Server
在前面的Lifecycle文章中,我们介绍了StandardServer重写了startInternal方法,完成自己的逻辑,如果对tomcat的Lifecycle还不熟悉的童鞋,先学习下Lifecycle,《Tomcat8源码分析系列-启动分析(一) Lifecycle》
StandardServer的代码如下所示:
protected void startInternal() throws LifecycleException {

    fireLifecycleEvent(CONFIGURE_START_EVENT, null);
    setState(LifecycleState.STARTING);

    globalNamingResources.start();

    // Start our defined Services
    synchronized (servicesLock) {
        for (int i = 0; i < services.length; i++) {
            services[i].start();
        }
    }
}
先是由LifecycleBase统一发出STARTING_PREP事件,StandardServer额外还会发出CONFIGURE_START_EVENT、STARTING事件,用于通知LifecycleListener在启动前做一些准备工作,比如NamingContextListener会处理CONFIGURE_START_EVENT事件,实例化tomcat相关的上下文,以及ContextResource资源
然后,启动内部的NamingResourcesImpl实例,这个类封装了各种各样的数据,比如ContextEnvironment、ContextResource、Container等等,它用于Resource资源的初始化,以及为webapp应用提供相关的数据资源,比如 JNDI 数据源(对应ContextResource)
接着,启动Service组件,这一块的逻辑将在下面进行详细分析,最后由LifecycleBase发出STARTED事件,完成start
4、Service
StandardService的start代码如下所示:
1. 启动Engine,Engine的child容器都会被启动,webapp的部署会在这个步骤完成;
2. 启动Executor,这是tomcat用Lifecycle封装的线程池,继承至java.util.concurrent.Executor以及tomcat的Lifecycle接口
3. 启动Connector组件,由Connector完成Endpoint的启动,这个时候意味着tomcat可以对外提供请求服务了
protected void startInternal() throws LifecycleException {

    setState(LifecycleState.STARTING);

    // 启动Engine
    if (engine != null) {
        synchronized (engine) {
            engine.start();
        }
    }

    // 启动Executor线程池
    synchronized (executors) {
        for (Executor executor: executors) {
            executor.start();
        }
    }

    // 启动MapperListener
    mapperListener.start();

    // 启动Connector
    synchronized (connectorsLock) {
        for (Connector connector: connectors) {
            try {
                // If it has already failed, don't try and start it
                if (connector.getState() != LifecycleState.FAILED) {
                    connector.start();
                }
            } catch (Exception e) {
                // logger......
            }
        }
    }
}
5、Engine
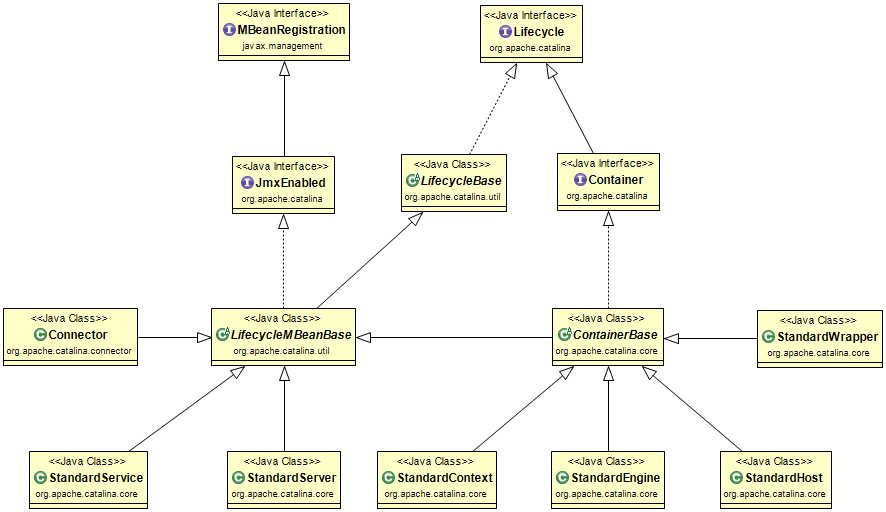
在Server调用startInternal启动的时候,首先会调用start启动StandardEngine,而StandardEngine继承至ContainerBase,我们再来回顾下Lifecycle类图,关于Container,我们只需要关注右下角的部分即可。
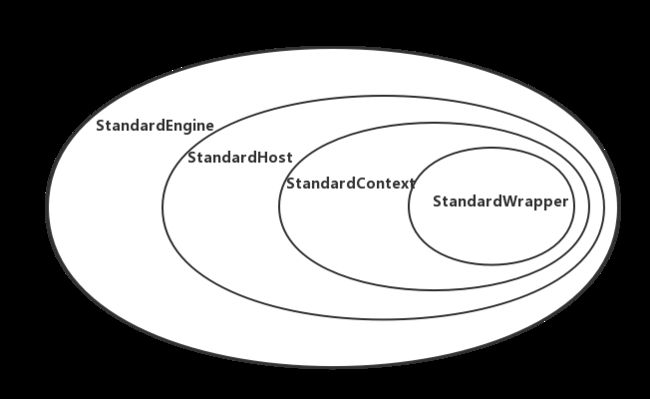
StandardEngine、StandardHost、StandardContext、StandardWrapper各个容器存在父子关系,一个父容器包含多个子容器,并且一个子容器对应一个父容器。Engine是顶层父容器,它不存在父容器,关于各个组件的详细介绍,请参考《tomcat框架设计》。各个组件的包含关系如下图所示,默认情况下,StandardEngine只有一个子容器StandardHost,一个StandardContext对应一个webapp应用,而一个StandardWrapper对应一个webapp里面的一个 Servlet
由类图可知,StandardEngine、StandardHost、StandardContext、StandardWrapper都是继承至ContainerBase,各个容器的启动,都是由父容器调用子容器的start方法,也就是说由StandardEngine启动StandardHost,再StandardHost启动StandardContext,以此类推。
由于它们都是继续至ContainerBase,当调用 start 启动Container容器时,首先会执行 ContainerBase 的 start 方法,它会寻找子容器,并且在线程池中启动子容器,StandardEngine也不例外。
5.1、ContainerBase
ContainerBase的startInternal方法如下所示,主要分为以下3个步骤:
1. 启动子容器
2. 启动Pipeline,并且发出STARTING事件
3. 如果backgroundProcessorDelay参数 >= 0,则开启ContainerBackgroundProcessor线程,用于调用子容器的backgroundProcess
protected synchronized void startInternal() throws LifecycleException {
    // 省略若干代码......

    // 把子容器的启动步骤放在线程中处理,默认情况下线程池只有一个线程处理任务队列
    Container children[] = findChildren();
    List> results = new ArrayList<>();
    for (int i = 0; i < children.length; i++) {
        results.add(startStopExecutor.submit(new StartChild(children[i])));
    }

    // 阻塞当前线程,直到子容器start完成
    boolean fail = false;
    for (Future result : results) {
        try {
            result.get();
        } catch (Exception e) {
            log.error(sm.getString("containerBase.threadedStartFailed"), e);
            fail = true;
        }
    }

    // 启用Pipeline
    if (pipeline instanceof Lifecycle)
        ((Lifecycle) pipeline).start();
    setState(LifecycleState.STARTING);

    // 开启ContainerBackgroundProcessor线程用于调用子容器的backgroundProcess方法,默认情况下backgroundProcessorDelay=-1,不会启用该线程
    threadStart();
}
5.2、启动子容器
startStopExecutor是在init阶段创建的线程池,默认情况下 coreSize = maxSize = 1,也就是说默认只有一个线程处理子容器的 start,通过调用 Container.setStartStopThreads(int startStopThreads) 可以改变默认值 1
。如果我们有4个webapp,希望能够尽快启动应用,我们只需要设置Host的startStopThreads值即可,如下所示。
server.xml

"localhost"  appBase="webapps"
            unpackWARs="true" autoDeploy="true" startStopThreads="4">
  "org.apache.catalina.valves.AccessLogValve" directory="logs"
         prefix="localhost_access_log" suffix=".txt"
         pattern="%h %l %u %t "%r" %s %b" />
</Host> ContainerBase会把StartChild任务丢给线程池处理,得到Future,并且会遍历所有的Future进行阻塞result.get(),这个操作是将异步启动转同步,子容器启动完成才会继续运行。我们再来看看submit到线程池的StartChild任务,它实现了java.util.concurrent.Callable接口,在call里面完成子容器的start动作
private static class StartChild implements Callable<Void> {

    private Container child;

    public StartChild(Container child) {
        this.child = child;
    }

    @Override
    public Void call() throws LifecycleException {
        child.start();
        return null;
    }
}
5.2.1、启动Pipeline
pipeline是什么?
Pipeline是管道组件,用于封装了一组有序的Valve,便于Valve顺序地传递或者处理请求
Pipeline的接口定义如下,定义了 Valve 的常用操作,以及 Container 的 getter/setter 方法,它的默认实现类是 org.apache.catalina.core.StandardPipeline,同时它也是一个Lifecycle组件
public interface Pipeline {
    public Valve getBasic();
    public void setBasic(Valve valve);
    public void addValve(Valve valve);
    public Valve[] getValves();
    public void removeValve(Valve valve);
    public Valve getFirst();
    public boolean isAsyncSupported();
    public Container getContainer();
    public void setContainer(Container container);
    public void findNonAsyncValves(Set result);
}
Valve是什么?
Valve 是阀门组件,穿插在 Container 容器中,可以把它理解成请求拦截器,在 tomcat 接收到网络请求与触发 Servlet 之间执行
Valve的接口如下所示,我们主要关注它的invoke方法,Request、Response分别是HttpServletRequest、HttpServletResponse的实现类
public interface Valve {
    public Valve getNext();
    public void backgroundProcess();
    public void invoke(Request request, Response response) throws IOException, ServletException;
    public boolean isAsyncSupported();
}
我们再来看看 Pipeline 启动过程,默认使用 StandardPipeline 实现类,它也是一个Lifecycle。在容器启动的时候,StandardPipeline 会遍历 Valve 链表,如果 Valve 是 Lifecycle 的子类,则会调用其 start 方法启动 Valve 组件,代码如下
public class StandardPipeline extends LifecycleBase
        implements Pipeline, Contained {

    // 省略若干代码......

    protected synchronized void startInternal() throws LifecycleException {

        Valve current = first;
        if (current == null) {
            current = basic;
        }
        while (current != null) {
            if (current instanceof Lifecycle)
                ((Lifecycle) current).start();
            current = current.getNext();
        }

        setState(LifecycleState.STARTING);
    }

}
tomcat为我们提供了一系列的Valve
- AccessLogValve,记录请求日志,默认会开启
- RemoteAddrValve,可以做访问控制,比如限制IP黑白名单
- RemoteIpValve,主要用于处理 X-Forwarded-For 请求头,用来识别通过HTTP代理或负载均衡方式连接到Web服务器的客户端最原始的IP地址的HTTP请求头字段
关于更详细的说明,请参考tomcat官方文档
6、StandardHost
前面我们分析了 StandardEngine 的启动逻辑,它会启动其子容器 StandardHost,接下来我们看下 StandardHost 的 start 逻辑。其实, StandardHost 重写的 startInternal 方法主要是为了查找报告错误的 Valve 阀门
protected synchronized void startInternal() throws LifecycleException {

    // errorValve默认使用org.apache.catalina.valves.ErrorReportValve
    String errorValve = getErrorReportValveClass();
    if ((errorValve != null) && (!errorValve.equals(""))) {
        try {
            boolean found = false;

            // 如果所有的阀门中已经存在这个实例,则不进行处理,否则添加到  Pipeline 中
            Valve[] valves = getPipeline().getValves();
            for (Valve valve : valves) {
                if (errorValve.equals(valve.getClass().getName())) {
                    found = true;
                    break;
                }
            }

            // 如果未找到则添加到 Pipeline 中,注意是添加到 basic valve 的前面
            // 默认情况下,first valve 是 AccessLogValve,basic 是 StandardHostValve
            if(!found) {
                Valve valve =
                    (Valve) Class.forName(errorValve).getConstructor().newInstance();
                getPipeline().addValve(valve);
            }
        } catch (Throwable t) {
            // 处理异常,省略......
        }
    }

    // 调用父类 ContainerBase,完成统一的启动动作
    super.startInternal();
}
StandardHost Pipeline 包含的 Valve 组件:
1. basic:org.apache.catalina.core.StandardHostValve
2. first:org.apache.catalina.valves.AccessLogValve
需要注意的是,在往 Pipeline 中添加 Valve 阀门时,是添加到 first 后面,basic 前面
由上面的代码可知,在 start 的时候,StandardHost 并没有做太多的处理,那么 StandardHost 又是怎么知道它有哪些 child 容器需要启动呢?
tomcat 在这块的逻辑处理有点特殊,使用 HostConfig 加载子容器,而这个 HostConfig 是一个 LifecycleListener,它会处理 start、stop 事件通知,并且会在线程池中启动、停止 Context 容器,接下来看下 HostConfig 是如何工作的
6.1、HostConfig
以下是 HostConfig 处理事件通知的代码,我们着重关注下 start 方法,这个方法里面主要是做一些应用部署的准备工作,比如过滤无效的webapp、解压war包等,而主要的逻辑在于 deployDirectories 中,它会往线程池中提交一个 DeployDirectory 任务,并且调用 Future#get() 阻塞当前线程,直到 deploy 工作完成
public void lifecycleEvent(LifecycleEvent event) {

    // (省略若干代码) 判断事件是否由 Host 发出,并且为 HostConfig 设置属性

    if (event.getType().equals(Lifecycle.PERIODIC_EVENT)) {
        check();
    } else if (event.getType().equals(Lifecycle.BEFORE_START_EVENT)) {
        beforeStart();
    } else if (event.getType().equals(Lifecycle.START_EVENT)) {
        start();
    } else if (event.getType().equals(Lifecycle.STOP_EVENT)) {
        stop();
    }
}

public void start() {
    // (省略若干代码)
    if (host.getDeployOnStartup())
        deployApps();
}

protected void deployApps() {

    File appBase = host.getAppBaseFile();
    File configBase = host.getConfigBaseFile();

    // 过滤出 webapp 要部署应用的目录
    String[] filteredAppPaths = filterAppPaths(appBase.list());

    // 部署 xml 描述文件
    deployDescriptors(configBase, configBase.list());

    // 解压 war 包,但是这里还不会去启动应用
    deployWARs(appBase, filteredAppPaths);

    // 处理已经存在的目录,前面解压的 war 包不会再行处理
    deployDirectories(appBase, filteredAppPaths);

}
而这个 DeployDirectory 任务很简单,只是调用 HostConfig#deployDirectory(cn, dir)
private static class DeployDirectory implements Runnable {
    // (省略若干代码)

    @Override
    public void run() {
        config.deployDirectory(cn, dir);
    }

}
我们再回到 HostConfig,看看 deployDirectory 的具体逻辑,分为以下几个步骤:
1. 使用 digester,或者反射实例化 StandardContext
2. 实例化 ContextConfig,并且为 Context 容器注册事件监听器,和 StandardHost 的套路一样,借助 XXXConfig 完成容器的启动、停止工作
3. 将当前 Context 实例作为子容器添加到 Host 容器中,添加子容器的逻辑在 ContainerBase 中已经实现了,如果当前 Container 的状态是 STARTING_PREP 并且 startChildren 为 true,则还会启动子容器
protected void deployDirectory(ContextName cn, File dir) {

    Context context = null;
    File xml = new File(dir, Constants.ApplicationContextXml);
    File xmlCopy = new File(host.getConfigBaseFile(), cn.getBaseName() + ".xml");

    // 实例化 StandardContext
    if (deployThisXML && xml.exists()) {
        synchronized (digesterLock) {
            // 省略若干异常处理的代码
            context = (Context) digester.parse(xml);
        }

        // (省略)为 Context 设置 configFile
    } else if (!deployThisXML && xml.exists()) {
        // 异常处理
        context = new FailedContext();
    } else {
        context = (Context) Class.forName(contextClass).getConstructor().newInstance();
    }

    // 实例化 ContextConfig,作为 LifecycleListener 添加到 Context 容器中,这和 StandardHost 的套路一样,都是使用 XXXConfig
    Class clazz = Class.forName(host.getConfigClass());
    LifecycleListener listener = (LifecycleListener) clazz.getConstructor().newInstance();
    context.addLifecycleListener(listener);

    context.setName(cn.getName());
    context.setPath(cn.getPath());
    context.setWebappVersion(cn.getVersion());
    context.setDocBase(cn.getBaseName());

    // 实例化 Context 之后,为 Host 添加子容器
    host.addChild(context);

}
现在有两个疑问:
1. 为什么要使用 HostConfig 组件启动 Context 容器呢,不可以直接在 Host 容器中直接启动吗?
HostConfig 不仅仅是启动、停止 Context 容器,还封装了很多应用部署的逻辑,此外,还会对 web.xml、context.xml 文件的改动进行监听,默认情况会重新启动 Context 容器。而这个 Host 只是负责管理 Context 的生命周期,基于单一职责的原则,tomcat 利用事件通知的方式,很好地解决了藕合问题,Context 容器也是如此,它会对应一个 ContextConfig
- Context 容器又是如何启动的?
前面我们也提到了,HostConfig 将当前 Context 实例作为子容器添加到 Host 容器中(调用 ContainerBase.addChild 方法 ),而 Context 的启动就是在添加的时候调用的,ContainerBase 的关键代码如下所示,Context 启动的时候会解析web.xml,以及启动 Servlet、Listener,Servlet3.0还支持注解配置,等等这一系列逻辑将在下一篇文章进行分析
@Override
public void addChild(Container child) {
    if (Globals.IS_SECURITY_ENABLED) {
        PrivilegedAction dp = new PrivilegedAddChild(child);
        AccessController.doPrivileged(dp);
    } else {
        addChildInternal(child);
    }
}

private void addChildInternal(Container child) {
    synchronized(children) {
        // 省略部分代码,避免重复添加子容器
    }

    try {
        if ((getState().isAvailable()
                || LifecycleState.STARTING_PREP.equals(getState()))
                && startChildren) {
            // 启动添加的子容器
            child.start();
        }
    } catch (LifecycleException e) {
        throw new IllegalStateException("ContainerBase.addChild: start: " + e);
    } finally {
        fireContainerEvent(ADD_CHILD_EVENT, child);
    }
} 
