Halcon12在VS2015下的配置问题
1 新建一个MFC项目,选择“基于对话框”,点击下一步,点击完成,至此MFC项目建立完成。

2 将平台改为x64

3 进入属性管理器,选择debug | x64,Microsoft.Cpp.x64.user右键属性。

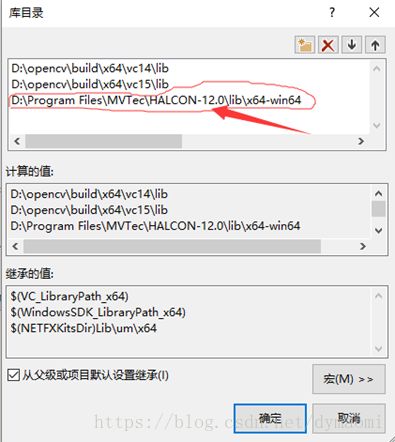
4 VC++目录下,包含目录,库目录设置

5 C/C++ 附加包含目录设置

6 链接器-常规-附加库目录设置

7 链接器-输入-附加依赖项设置

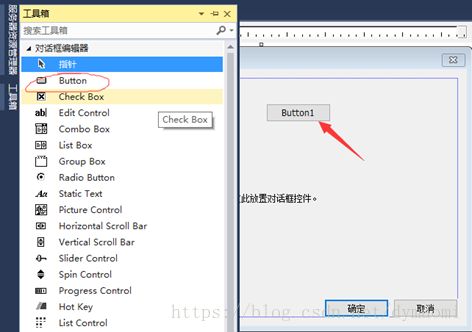
8 打开MFC程序,在资源视图中打开

9 从左边的工具箱中放置一个Button在对话框中,此时你双击button1会去到MFCApplication1Dlg.cpp中,且出现了button1的事件响应函数,但是里面需要自己添加Halcon程序。

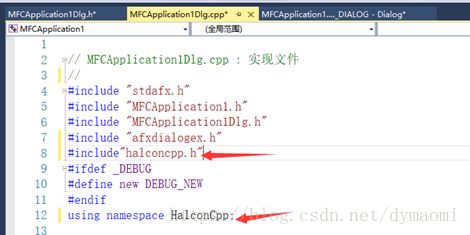
10 在MFCApplication1Dlg.h、MFCApplication1Dlg.cpp中添加头文件和命名空间:
#include”halcon.hpp” 和using namespace HalconCpp

11 去HDevelop中导出程序放到响应函数处。在HDevelop中写入一段打开图片的程序,如:

然后将程序保存后,再导出,点击文件-导出,然后在保存路径的文件夹下就有了导出来的cpp文件。


12 打开导出的cpp文件,将action中的程序复制到button1的响应函数中去


并将导出程序中剩下的程序也要复制过去到MFCApplication1Dlg.cpp中去,放在void CMFCApplication1Dlg::OnBnClickedButton1()之前,最后运行该程序,就可以会出来MFC的对话框,点击按钮button就可以显示出图片。
// Procedure declarations
// Chapter: Develop
// Short Description: Open a new graphicswindow that preserves the aspect ratio of the given image.
voiddev_open_window_fit_image (HObject ho_Image, HTuple hv_Row, HTuple hv_Column,
HTuple hv_WidthLimit, HTuplehv_HeightLimit, HTuple *hv_WindowHandle);
// Procedures
// Chapter: Develop
// Short Description: Open a new graphicswindow that preserves the aspect ratio of the given image.
voiddev_open_window_fit_image (HObject ho_Image, HTuple hv_Row, HTuple hv_Column,
HTuple hv_WidthLimit, HTuplehv_HeightLimit, HTuple *hv_WindowHandle)
{
// Local iconic variables
// Local control variables
HTuple hv_MinWidth, hv_MaxWidth,hv_MinHeight;
HTuple hv_MaxHeight,hv_ResizeFactor, hv_ImageWidth, hv_ImageHeight;
HTuple hv_TempWidth,hv_TempHeight, hv_WindowWidth, hv_WindowHeight;
//This procedure opens a new graphics window and adjuststhe size
//such that it fits into the limits specified byWidthLimit
//and HeightLimit, but also maintains the correct imageaspect ratio.
//
//If it is impossible to match the minimum and maximumextent requirements
//at the same time (f.e. if the image is very long butnarrow),
//the maximum value gets a higher priority,
//
//Parse input tuple WidthLimit
if (0 != (HTuple((hv_WidthLimit.TupleLength())==0).TupleOr(hv_WidthLimit<0)))
{
hv_MinWidth = 500;
hv_MaxWidth = 800;
}
elseif (0 != ((hv_WidthLimit.TupleLength())==1))
{
hv_MinWidth = 0;
hv_MaxWidth = hv_WidthLimit;
}
else
{
hv_MinWidth = ((const HTuple&)hv_WidthLimit)[0];
hv_MaxWidth = ((const HTuple&)hv_WidthLimit)[1];
}
//Parse input tuple HeightLimit
if (0 != (HTuple((hv_HeightLimit.TupleLength())==0).TupleOr(hv_HeightLimit<0)))
{
hv_MinHeight = 400;
hv_MaxHeight = 600;
}
elseif (0 != ((hv_HeightLimit.TupleLength())==1))
{
hv_MinHeight = 0;
hv_MaxHeight = hv_HeightLimit;
}
else
{
hv_MinHeight = ((const HTuple&)hv_HeightLimit)[0];
hv_MaxHeight = ((const HTuple&)hv_HeightLimit)[1];
}
//
//Test, if window size has to be changed.
hv_ResizeFactor = 1;
GetImageSize(ho_Image,&hv_ImageWidth, &hv_ImageHeight);
//First, expand window to the minimum extents (ifnecessary).
if (0 !=(HTuple(hv_MinWidth>hv_ImageWidth).TupleOr(hv_MinHeight>hv_ImageHeight)))
{
hv_ResizeFactor =(((hv_MinWidth.TupleReal())/hv_ImageWidth).TupleConcat((hv_MinHeight.TupleReal())/hv_ImageHeight)).TupleMax();
}
hv_TempWidth = hv_ImageWidth*hv_ResizeFactor;
hv_TempHeight = hv_ImageHeight*hv_ResizeFactor;
//Then, shrink window to maximum extents (if necessary).
if (0 !=(HTuple(hv_MaxWidth
{
hv_ResizeFactor =hv_ResizeFactor*((((hv_MaxWidth.TupleReal())/hv_TempWidth).TupleConcat((hv_MaxHeight.TupleReal())/hv_TempHeight)).TupleMin());
}
hv_WindowWidth = hv_ImageWidth*hv_ResizeFactor;
hv_WindowHeight = hv_ImageHeight*hv_ResizeFactor;
//Resize window
SetWindowAttr("background_color","black");
OpenWindow(hv_Row,hv_Column,hv_WindowWidth,hv_WindowHeight,0,"","",&(*hv_WindowHandle));
HDevWindowStack::Push((*hv_WindowHandle));
if(HDevWindowStack::IsOpen())
SetPart(HDevWindowStack::GetActive(),0, 0, hv_ImageHeight-1,hv_ImageWidth-1);
return;