shopfiy 的 product 在添加产品时,如果要将产品详情页面与购物车关联,就是在详情页里面直接下单,而不是从详情页通过点击购买按钮,跳到 shopfy stroe ,再从这个位置再跳转到下单页。为了改变这种不停的跳转,且如果网络不好的情况下,很容易流失客户。
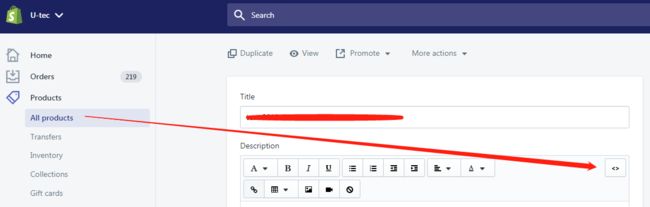
操作方法可以简单描述成这样:先在 Product 中添加一个产品模板,在当前产品模板中,关联 Product template 中的 自定义模板,这个自定义模板来自 Online Store 的 Templates:
建立自义定义模板:product.customize.liquid
//这个自定义模板包含通用的产品模板页中的内容,主要是通用的css / js / 布局以及购物车相关的代码块 /> "prefetch prerender stylesheet" type="text/css" href="{{ 'ulbolt-font.css' | asset_url }}"/> /> {% assign selectedVariant = product.selected_or_first_available_variant | default: product %} //通用的 video 弹层"opendiv video">"fluid-width-video-wrapper">"opendivmask">
//这是通用描述插入方法 {% if product.description.size > 0 %}"product-description rte" itemprop="description"> {{ product.description }}{% endif %}
//通用的 产品价格插入,这样写的目的是如果 shopfiy 的后台将该产品改掉后,详情页也会一起改掉
//product.compare_at_price 原价
//product.price 售价
//需要了解 shopfiy 模板语言的使用方法 {{ 变量名称 | 变量单位 }}
//产品购物车内容是以 json 格式存在的,不同产品,json 内容不同,而购物车的json是根据 id="product-json" 进行关联的,而 购物车的 json 名称定义为 buyingOptions,为数组
//下面这个方法,是调取不同产品详情页定义的关于购物车的 json
关联自义定义模板:product.customize.liquid
在 product 中新建一个产品,在它的 Description 的 代码块中添加 productOption 相关内容以及产品页面布局
//这个代码块中的 productOption 的内容都是写死的,是根据销售自己定义的不同名称(buyingOptionName),但是 colorOptions 的内容是根据 Variants 中设置的颜色来定义的:
//通过查看 Variants 中设置好的颜色 4个, 可以自定义 名称为 BBkey 可以关联前两种颜色,而名称为 BBkey + wifi 可以关联后两种颜色
//每种颜色可以定义它的 id / colorOptionName / color / imageUrl
Variants设置产品属性及不同价格

通过以上的关联与操作,就可以在当前产品的详情页中点击购买按钮,会有一个下面这样的弹层出现,可以直接添加购物车进行购买。

附shopfiy 相关教程供参考:
Liquid 文档: https://liquid.bootcss.com/
shopfiy 中文文档: https://help.shopify.com/zh-CN
shopfiy api : https://help.shopify.com/en/themes/development/getting-started/using-ajax-api#change-cart
价格脚本api: https://help.shopify.com/zh-CN/manual/apps/apps-by-shopify/script-editor/update-liquid-templates-for-scripts
自定义 css : https://help.shopify.com/zh-CN/manual/apps/apps-by-shopify/product-reviews/advanced-customization
自定义 模板: https://help.shopify.com/en/themes/customization
Shopify 脚本 API : https://help.shopify.com/zh-CN/manual/apps/apps-by-shopify/script-editor/shopify-scripts
{% assign product = all_products['bbk'] %}

{% assign selectedVariant = product.selected_or_first_available_variant | default: product %}

//selectedVariant  默认选中的第一个产品属性,比如默认选择为 黑色

//从 all_products 中获取 combo 的名称并赋值给变量 product,每个产品都必须获取对应的产品名称,用这个产品名称来获取以下几种数据:
1.  不同产品对应的售价与原价
2.  不同产品对应的 selectedVariant ,选择到购物车的产品属性列表

相关属性为:
"title": {{ product.title | json }},
"price": {{ product.price | money }},
"compare_at_price":  {{product.compare_at_price | money}}
获取Liquid对象的属性
{{ pages.about-us.content }}
{{ pages["about-us"].title }}
标记符
{% ... %}
{% for i in (1..5) %}
    {% if i == 4 %}
      {% break %}
    {% else %}
      {{ i }}
    {% endif %}
{% endfor %}
用于插入某片段,使用with赋值,使用 include
例如有一片段 color.liquid
color: '{{ color }}' shape: '{{ shape }}'

将 color.liquid 插入到 theme.liquid 中
{% include 'color' %}
{% include 'color' with 'red' %}
{% include 'color' with 'blue' %}
Cart 对象属性:
* cart.total_discount
* cart.original_total_price

订单商品属性:
* line_item.discounts
* line_item.message
* line_item.original_price
* line_item.original_line_price
* line_item.total_discount

* line_item.total_discount 返回已应用于订单商品的折扣金额
* line_item.original_line_price 返回应用折扣前的订单项目价格
* line_item.message 返回用于描述应用于订单项目的折扣的消息。
shopfiy Ajax Api
所有请求网址都是以 js 结尾
-
GET /products/
.js 获取产品 json -
POST /cart/add.js
-
GET /cart.js
-
POST /cart/update.js
-
POST /cart/change.js
-
POST /cart/clear.js
-
GET /cart/shipping_rates.json
-
GET /recommendations/products.json?product_id=