在本教程中,我将向您展示我用来制作这个Squirt的场景的过程。 我们将从收集参考和灵感开始,继续到如何雕刻角色,然后看看照明和阴影,最后我们要渲染它并组成它。我也会谈论什么使一个好的组成,也许有点颜色。
- 软件名称:
- AutoDesk maya 2015 64位中文破解版(附序列号和密钥)
- 软件大小:
- 1.52GB
- 更新时间:
- 2016-01-21
Inthis tutorial I will show you how the process I used to make this scene ofSquirt. We will start by gathering references and inspiration, moving on to howto sculpt the character, then look at the lighting and shading, and finally weare going to render it and compose it. I will also to talk about what makes agood composition and maybe a bit about colors.
Inspiration
Ifind that when you first start a new artwork you must have an impulse orinspiration that will push you to do it; for me this was two artists, AaronBlaise and Jeremy Vickery. Their understanding of light, composition, and coloris so mind blowing that makes their work look amazing. They have led me to takesome courses on lighting and color and I have begun to microscopically analyzetheir work to try to gain a better understand, and learn from, what makes theirwork stand out. The work of these two geniuses is so amazing that I it hasinspired me to do something in their style - but in 3D because they are mainly2D guys!
灵感
我发现,当你第一次开始一个新的艺术品,你必须有一个冲动或灵感,将推动你做它;这是两个艺术家,亚伦布莱斯和杰里米维克里。 他们对光,组成和颜色的理解是如此令人兴奋,使他们的工作看起来惊人。 他们带领我参加了一些关于照明和颜色的课程,我已经开始微观分析他们的工作,尝试更好地了解和学习,是什么使他们的作品脱颖而出。这两个天才的工作是如此惊人,我也启发了我在自己的风格做什么但是3D,因为他们主要是2D。
Hereyou can see Jeremy has a good understanding of color and light
在这里你可以看到Jeremy对颜色和光有很好的理解
Findingreference
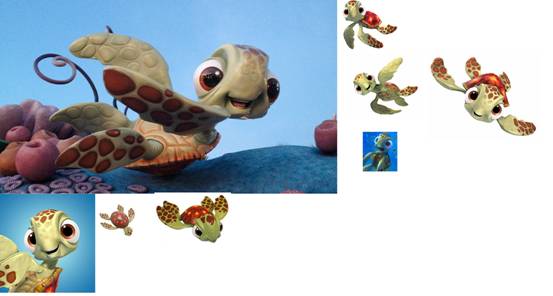
Onceyou have the inspiration, your next step should always be to find referenceimages of what you are going to create. For me this was an existing character(Squirt the turtle) which makes the reference gathering a bit easier; althoughI intended to do a new, completely different scene and lighting from whatexists in the film Finding Nemo. I started to gather references from the filmto help with the modeling and also reference of lighting and composition. Iusually put together a collage of the images and I keep it open, to refer to,until I have finished.
寻找参考
一旦你有了灵感,你的下一步应该是找到你要创造的参考图像。对我来说,这是一个现有的角色(Squirt乌龟),使参考资料的收集更容易一点; 虽然我打算做一个新的,完全不同的场景和所存在的Finding Nemo在电影中的照明。我开始收集电影的参考,以帮助建模和照明和组成的参考。 我通常把一个拼贴的图像,我保持开放,参考,直到我完成了。
Iusually collect as many references as I can, from lots of angles
我通常收集尽可能多的参考,我可以从许多角度
Modeling
Whenyou have collected together the references you can move on to the fun part -modeling the character. Since this is a personal project done for fun, and isnot going to be animated, I don't need to worry too much about topology andposing for animation. This allows me to have more artistic freedom, so I gostraight to sculpting in the pose and expression of the final look. If this wasfor production, we would need to model first in a neutral pose, do someretopology and then in ZBrush or Maya rig it in a pose.
建模
当你收集了这些引用之后,你就可以进入到有趣的部分--角色建模。因为这是一个为了乐趣而做的个人项目,并且不会是动画,我不需要担心太多的拓扑和摆动动画。 这让我有更多的艺术自由,所以我直接雕刻的姿势和表达的最后的样子。如果这是为了生产,我们将需要首先在一个中立的姿势,做一些重构,然后在ZBrush或maya钻机它的姿势。
Sculpting
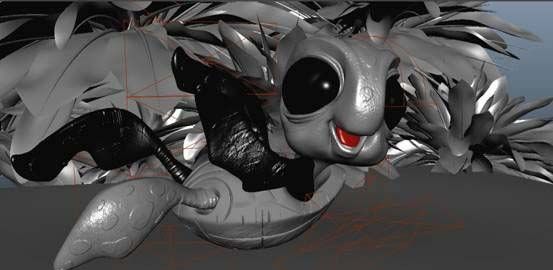
Iusually start with a sphere. This is my personal preference when starting a newsculpt but you can start whichever way suits your work best. I like to put thereferences side by side to help match the sculpt to the character. I define theoverall shapes and proportions, which always looks ugly at first because theshapes are not yet defined and the personality of the character has not yetemerged, but by working slowly and paying attention to the forms and shapes youwill start to get it right! I work with DynaMesh until I have all the correctoverall volumes and proportions, then use ZRemesher before I start defining allthe shapes, planes, volumes, etc.
雕刻
我通常从一个球开始。 这是我个人的喜好,当开始一个新的雕塑,但你可以开始,无论哪种方式适合你的工作最好。我喜欢把参考并排,以帮助匹配雕刻的字符。 我定义的总体形状和比例,它总是看起来丑陋,因为形状尚未定义,人物的个性还没有出现,但通过工作缓慢,注意到形式和形状,你会开始得到它对! 我使用DynaMesh,直到我有所有正确的总体积和比例,然后使用ZRemesher之前,我开始定义所有的形状,飞机,卷等。
Istart from the basic form, define the planes and start to refine the forms
我从基本形式开始,定义平面并开始细化形式
UVs
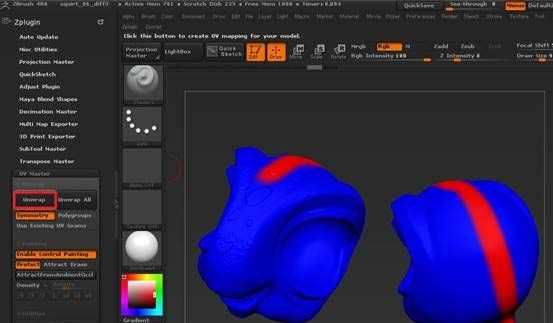
Imade the UVs in ZBrush, which is very easy. You only have to grab the SubTool,go to ZPlugin > UV master, then click ?Work on Clone'. With the Standardbrush, enable control painting, then click Attract and fill the SubTool withblue. Then click Protect and mark the seam in red. Now the only thing left todo is click Unwrap, and there you have it! Now copy the UVs from the Clone tothe original SubTool , you have the UVs!
Again,if this was for production, I would have done the UVs in Maya and laid them outcorrectly; but doing work for myself is the only time when I don't need to beworried about all that technical stuff.
UVs
我在ZBrush做了UVs,这是很容易。 你只需要抓住SubTool,转到ZPlugin> UV master,然后单击“工作在克隆”。使用标准画笔,启用控制绘画,然后单击吸引并用蓝色填充子工具。 然后单击保护并用红色标记接缝。 现在唯一剩下要做的就是点击Unwrap,你有它!现在复制UVs从克隆到原来的SubTool,你有UVs!
再次,如果这是为了生产,我会在Maya完成UVs并正确地布置它们; 但为自己做的工作是唯一的时候,我不需要担心所有的技术的东西。
Theblue color represents the UV space and the red one the seam
蓝色代表UV空间,红色代表接缝
Paintingtime!
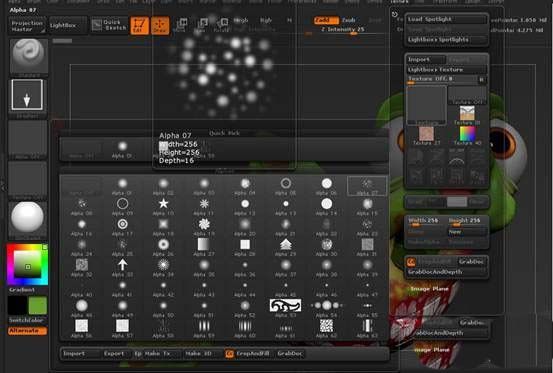
Forpainting I use the Standard brush with different alphas. I start by giving it aflat base color, and then define some opaque spots. Afterwards I add somehighlights and finally a layer of little freckles.
绘画时间!
对于绘画我使用具有不同阿尔法的标准画笔。我开始给它一个平基色,然后定义一些不透明的斑点。 之后,我添加一些亮点,最后一层小雀斑。
Alphasare a great help when creating skin patterns, markings, and freckles
当创建皮肤图案,标记和雀斑时,Alphas是一个很大的帮助
Exporting
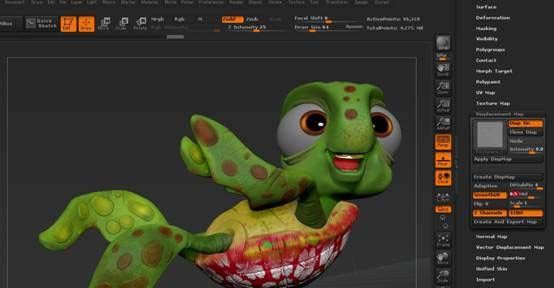
AsI said since this is a personal project and I was not going to animate this, Idid not retopologize it (it would have been the correct thing and a goodpractice), so for exporting this to Maya, what I did was export a 4kDisplacement Map from ZBrush and a bum map and then import it into Maya withthe lowest subdivision mesh of the turtle model, I exported the displacementmainly for the wrinkles and the skin texture in the fins.
出口
正如我所说,因为这是一个个人项目,我不会动画这个,我没有retopologize它(这将是正确的事情和良好的做法),所以出口到Maya,我做的是出口 4k位移地图从ZBrush和一个地图,然后导入到龟甲模型的最低细分网格Maya,我导出位移主要是为了皱纹和皮肤纹理的鳍。
Iexported a 4k displacement map to apply it in Maya and have the same level ofdetail
我导出了一个4k的位移贴图,在Maya中应用它,并具有相同的细节水平
Lightingand composition
Iused a Dome light with an HDRi to give overall warmth to the fill light; Iadded a key light, and afterwards, some bounce lights. Once all the lights arein you can play with the color and temperature of the lights. I wanted tocreate a kind of "sunset" lighting, so I started to move lightsaround to match something like a sunset. One important light here is the directionallight; this is because it gives you the same feeling as the setting sun, withhard shadows and nice colors.
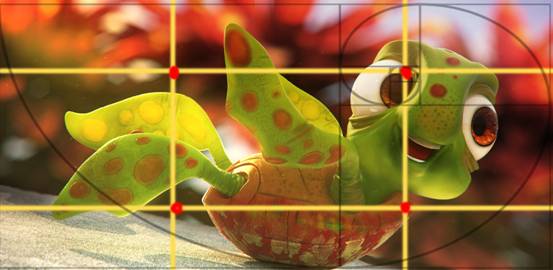
Tofind a pleasant composition you can apply the Rule of Thirds and use the GoldenRatio, which helps to give a balanced composition with places were the eye canrest and move around the page.
照明和组成
我使用了一个圆顶灯与HDRi给整体的温暖的填充光; 我添加了一个钥匙灯,然后,一些反弹灯。 一旦所有的灯都在你可以玩的颜色和灯的温度。我想创造一种“日落”的照明,所以我开始移动灯光,以匹配像日落的东西。 这里一个重要的光是定向光; 这是因为它给你与夕阳相同的感觉,硬阴影和漂亮的颜色。
要找到一个愉快的组成,你可以应用三分法,使用黄金比例,这有助于给一个平衡的组成与地方是眼睛可以休息和移动的页面。
Mylighting set up is simple HDRi, key light, fill light and the most importantthe bounce lights
我的照明设置是简单的HDRi,钥匙灯,补光和最重要的反光灯
Youcan see the golden ratio and the rules of three applied to my composition
你可以看到黄金比例和三个规则适用于我的构图
Shading
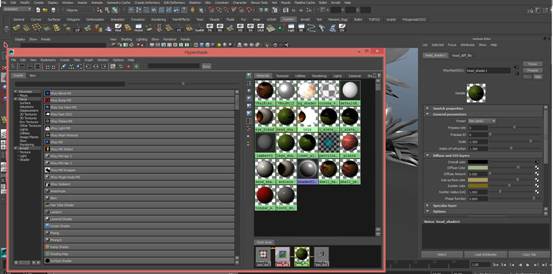
Iused mainly the V-Ray FastSSS2 shader material which gives you a very niceorganic feeling because of the SSS. Creating a nice shader is a matter ofobservation and keep tweaking until you find something that you like, alsotweak the lighting to make the shader behave the way you want. The mostimportant parameters in FastSSS2 are the prepass rate, scale, the Specular andthe Scatter color. With the prepass rate you control the "quality" ofthe shader so something around 0 or 1 is finding. The scale is like amultiplier of the scatter radius it controls the amount of light is scattered.The Specular palette controls the specular parameters such as the amount andthe gloss. And the scatter color controls the color of the shader when thelight is scattered.
底纹
我主要使用V-Ray FastSSS2着色材料,它给你一个非常好的有机感觉,因为SSS。创建一个漂亮的着色器是一个观察的问题,并持续调整,直到你找到你喜欢的东西,也调整照明,使着色器的行为方式是你想要的。FastSSS2中最重要的参数是准波率,标度,镜面反射和散射色。 使用prepass速率你控制着色器的“质量”,所以大约0或1的东西被发现。 尺度就像散射半径的乘数,它控制光的散射量。 镜面调色板控制镜面参数,如光量和光泽。 散射颜色控制光散射时着色器的颜色。
Hereyou can see the overall parameters I used for the skin shading
在这里你可以看到我用于皮肤阴影的总体参数
Compositing
Igave this scene several passes. Try to render out the turtle and the plants andsand separately this gives you much more control. I like to use After Effectsto do my compositing; I usually start by giving it some contrast, then I blurthe background. I apply a color correction layer with Magic Bullet Suite by RedGiant, which has a lot of cool tools for color correcting a scene. In PhotoshopI make a few final tweaks and touches, such as accentuating the bright spots bypainting in the image with the brush in Color Dodge mode ? its gives a moreappealing light effect. I try to give the scene a "volumetricatmosphere" with depth.
合成
我给这个场景几遍。尝试把龟和植物和沙子分开,这给你更多的控制。我喜欢使用After Effects做我的合成; 我通常开始给它一些对比,然后模糊我的背景。我应用红色巨人魔术子弹套件的颜色校正层,它有很多很酷的工具,用于颜色校正场景。 在Photoshop中,我做了一些最后的调整和触摸,例如通过在颜色模型中用画笔在图像中绘制亮点来突出亮点?它给出了更有吸引力的光效果。 我试着给场景一个“体积大气”深度。
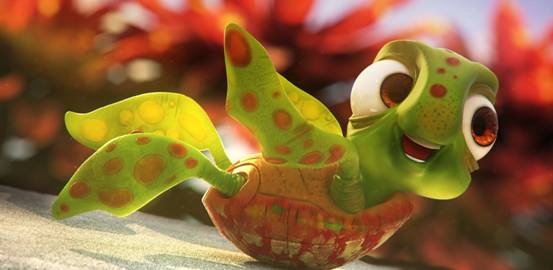
Thefinished piece 成品
相关推荐:
Maya怎么绘制一辆逼真的汽车?
maya怎么制作法线贴图? maya法线贴图的制作方法
maya怎么给凸凹的物体贴图? maya凸凹贴图的教程


