Network Monitoring
SNMP
command
remote script(ssh)
SNMP(监控工具)
RRDTool(绘图)
cacti(php)
展示
时间序列数据
Nagios
on->Off
Simple Network Management Protocol(SNMP)
The core of SNMP is a simple set of operations (and the information these operations gather)that gives administrators the ability to get or change the state of some SNMP-based device
SNMPv1
the initial version of the SNMP protocol
SNMPv1's security is based on communities,which are nothing more than passwords:plain-text strings that allow any SNMP-based application that knows the strings to goin access to a device's management information
There are typically three communities in SNMPv1:read-only(只读) read-write(读写,关机),and trap(捕获,通知,被监控端主动发送信息给监控端)
SNMPv2
It is often referred to as community-string-based SNMPv2
This version of SNMP is technically called SNMPv2c
SNMPv3
It adds support for strong authentication and private communication between managed entities
Managers and Agents
A manager is a server running some kind of software system that can handle management tasks for a network
A poll,in the context of network management,is the act of querying an agent(router,switch,Unix server,etc.)for some piece of informaiton
A trap is a way for the agent to tell the NMS that some thing has happened
Traps are sent asynchronously,not in response to queries from the NMS
MIBs(管理信息库)
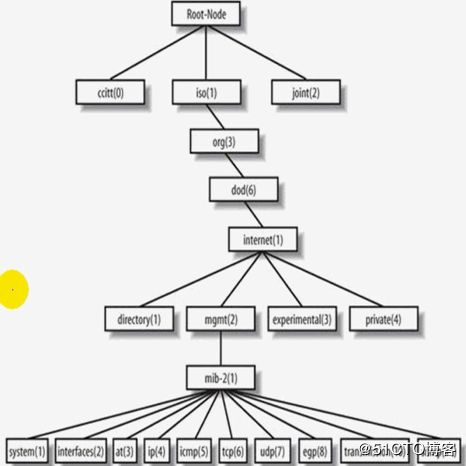
The Structur of Management Information(SMI) defines how management information is grouped and named;allowed operations;permitted data types;and the syntax for specifying MIBs
The Management Information Base(MIB) can be thought of as a database of managed objects that the agent tracks
An agent may implement many MIBs,but all agents implement a particular MIB clled MIB-II
The Concept of Network Management
Fault Management(故障管理)
To detect,log,and notify users of systems or networks of problems
Configuration Management(配置管理)
To monitor network and system configuration information
Such as the number of hard disks
Accounting Management(记账管理)
To ensure that computing and network resources are used fairly by all groups or individuals who access them
Performance Mnagement(性能管理)
To measure and report on various aspects of network or system performance
Security Management(安全管理)
TCP/IP communication model and SNMP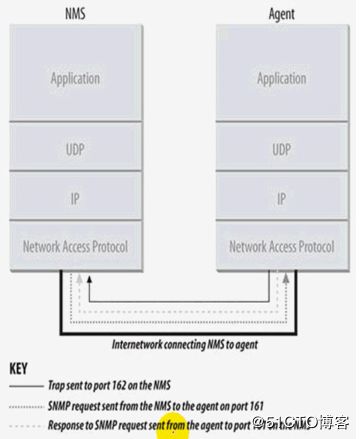
SNMP Communities
SNMPv1 and SNMPv2 use the notion of communities to establish trust between managers and agents
An agent is configured with three community names: read-only, read-write, and trap
The community names are essentially passwords
public and private
Brief description of the MIB-II groups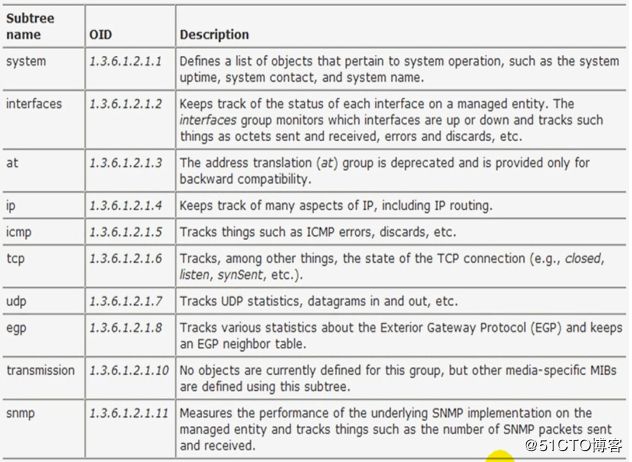
SNMP Operations
Each of the following SNMP operations has a standard PDU format
get (获取一个指定oid的信息)
getnext(获取指定节点下的所有子节点的相关信息)
getbulk(SNMPv2 and SNMPv3)(获取指定节点下的所有子节点及子子节点相关信息,递归)
set(发去控制指令)
getresponse(客户端发起的获取响应)
trap(由trap端发起)
notification(SNMPv2 and SNMPv3)
inform(SNMPv2 and SNMPv3)
report(SNMPv2 and SNMPv3)
The getnext Operation
The getnext operation lets you issue a sequence of commands to retrieve a group of values from a MIB
# snmpwalk -v 1 -c public 127.0.0.1 system
The getbulk Operation
SNMPv2 defines the getbulk operation,which allows a management application to retrieve a large section of a table at once
The standard get operation can attempt to retrieve more than one MIB object at ance,but message sizes are limited by the agent's capabilities
Host Management Revisited
Managing your hosts is an important part of network management
The Host Resources MIB deines the fllowing seven groups:
hrsystem: 系统
hrstorage: 存储
hrdevice: 设备
hrswrun: 获取操作系统版本
hrswrunperf: 系统性能
hrswinstalled: 操作系统安装那些软件;
Host Management Revisited
The host OID is 1.3.6.1.2.1.25
The hrSystem(1.3.6.1.2.1.25.1) group deines objects that pertion to the system itself.These objects include uptime.system date,system users,and system processes
The hrDevice(1.3.6.1.2.1.25.3) and Storate(1.3.6.1.2.1.25.2) groups define objects pertaining to filesystems and system storage,such as system memory,disk utilization,and CPU nonidle percentage
The hrSWRun(1.3.6.1.2.1.25.4),hrSWRunPerf(1.3.6.1.2.1.25.5),and hrSWInstalled(1.3.6.1.2.1.25.6) groups deine objects that represent various aspects of software running or installed on the system
From these groups,you can determine what operating system is running on the host,as well as what programs the host is currently running
The hrSWInstalled group can be used to track which software packages are installed
net-snmp(Agent)被监控端
net-snmp-utils(NMS::command)监控端,监控端要使用trap功能还要安装net-snmp,并启用snmptrapd服务;
RRDTool:
RRA: Round Robin Archive 轮转归档信息
About RRDTool
Round Robin Database Tool
It aims to handle time-series data like network bandwidth,temperatures,CPU load,etc
The data are stored in a round-robin database(circular buffer),thus the system storage footprint remains constant over time
It also includes tools to extract RRD data in a graphical format,for which it was originally intended
300s, PDP: Primary Data Ponit 主数据节点
CDP: Consolidation Data Point 聚合数据节点
解析度:resolution
rrdtool
rrdtool - [workdir]| function
create(创建空的轮转数据库)
Set up a new Round Robin Database(RRD)
update(向空库填充数据)
Store new data values into an RRD
updatev
Operationally equivalent to update except for output
graph(做绘图)
Create a graph from data stored in one or several RRDs
Apart from generating graphs,data can also be extracted to stdout
dump(将数据取出来)
Dump the contents of an RRD in plain ASCII.In connection with restore you can use this to move an RRD from one computer architecture to another
restore
Restore an RRD in XML format to a binary RRD
fetch(只取一个数据)
Get data for a certain time period from a RRD.The graph function uses fetch to retrieve its data from an RRD
tune
Alter setup of an RRD
last(只看上个数据)
Find the last update time of an RRD
info
Get information about an RRD
rrdresize
Change the size of individual RRAs
xport
Export data retrieved from one or several RRDs
flushcached
Flush the values for a specific RRD file from memory
rrdcgi
This is a standalone tool for producing RRD graphs on the fly
rrdtool create(创建初始化的rrd数据库文件)
rrdtool create filname(文件名字路径) [--start|-b start time](指定起始时间) [--step|-s step](解析度,时间跨度)[--no-overwrite]
[DS:ds-name:DST:dst arguments](指定数据源)
[RRA(关键字):CF(聚合函数):cf arguments(聚合函数参数)](如何做聚合)
--start|-b start time(default: now - 10s)
--step|-s step(default:300 seconds)
DS(关键字):ds-name(数据源名字):DST(数据源类型):dst arguments(数据源类型参数)
A single RRD can accept input from several data sources(DS)
ds-name is the name you will use to reference this particular data source from anRRD
A ds-name must be 1 to 19 characters long in the characters[a-zA-Z0-9](ds-name最长19个字符,只能包含字母和数字下划线)
DST define the Data Source Type
For GAUGE,(没做任何修改的值)COUNTER,(保存相对值,相对上个值而言,必须处于一直递增的数据)DERIVE,(保存相对值,相对上个值而言,无所谓增减)and ABSOLUTE(初始值最最原始的值来取得一个相对值) the format for a data source entry is:(数据源类型GAUGE,COUNTER,DERIVE,and ABSOLUTE)
DS:ds-name:GAUGE|COUNTER|DERIVE|ABSOLUTE:heartbeat(当我们数据来了以后在最长多长时间内认为是对应时间槽的数据,如果在规定时间内没有到来就标记为UNKNOWN):min(最小值):max(最大值)
heartbeat defines the maximum number of seconds that may pass between two updates of this data source before the value of the data source is assumed to be UNKNOWN
min and max define the expected range vlues for data supplied by a data source
For COMPUTE data sources,the format is:
DS:ds-name:COMPUTE:rpn-expression
RRA:CF:cf arguments
The purpose of an RRD is to store data in the round robin archives(RRA)
RRA:AVERAGE(指定聚合函数)|MIN|MAX|LAST:xff(定义unknown比例是多大的时候把它定义为unknown):steps(用于定义聚合函数对几个pdp组合起来进行聚合的):rows(计算过去每59秒为一个平均,而且保存两天平均)
xff The xfiles factor defines what part of a consolidation interval may be mode up from UNKNOWN data while the consolidated value is still regarded as known
It is given as the ratio of allowed UNKNOWN PDPs to the number of PDPs in the interval.Thus,it ranges from 0 to 1(exclusive)
steps defines how many of these primary data points are used to build a consolidated data point which then goes into the archive
rows defines how many generations of data values are kept in an RRA
5s, 生成随机数-->
5s
50s
100s
02 3 6 9
GAUGE: 2 3 6 9
COMPUTE: 2 1 3 3(每个在前面基础上减去的结果,不能接受负值)
DERIVE: 2 1 3 3(每个在前面基础上减去的结果,可以接受负值)
ABSOLUTE: 2 3 6 9(相对于初始值减去的结果,初始值为0,所以还是2 3 6 9,如果初始值为1结果为1 2 5 8)
5s,PDP
10,RRA
rrdtool update(在指定时间间隔内向rrdtool create所创建的数据库文件提供数据)
rrdtool {update | updatev} filename(数据库文件) [--template|-t ds-name[:ds-name]...]
[--]N|timestamp(时间戳):value[:value...(值)]
filename
--template|-t ds-name[:ds-name]...
rrd,
DS
DS
rrdtool update test.rrd timestamp:32:24
rrdtool create test.rrd DS:ds1 DS:ds2
rrdtool update test.rrd N:30:40
rrdtool update test.rrd -t ds2:ds1 40:30
rrdtool graph(绘图命令)
rrdtool graph|graphy filename(生成图片的文件名) [option ...]
[data definition ...](取得数据) [data calculation ...](运算)
[variable definition ...](变量) [graph element ...](图形元素)
[print element ...](显示图形)
[-s|--start time] [-e|--end time](多长时间内的数据)[-S|--step seconds](解析度)
[-t|--title string](图形名称标题)[-v|--vertical-label string](竖向标签)
[-w|--width pixels](宽度)[-h|--height pixels](高度)[-j|--only-graph](只绘制预览)[-D|--full-size-mode](可以自动缩放)
Graph Limits(图形绘制多大)
[-u|--upper-limit value](数值上限)[-l|--lower-limit value](数值下限)[-r|--rigid](固定不变,不会自动缩放)
[-A|--alt-autoscale](自动缩放)
[-J|--alt-autoscale-min](自动缩放最小值)
[-M|--alt-autoscale-max](自动缩放最大值)
[-N|--no-gridfit](不显示网格线)
X-Axis(指定横轴使用标识)
[-x|--x-grid GTM:GST(基准网格线):MTM:MST(主网格线):LTM:LST(横轴网格线对应标志多久显示一次):LPR:LFM](时间显示格式)
[-x|--x-grid none]
e.g --x-grid MINUTE:10:HOUR:1:HOUR:4:0:%X
Y-Axis(指定纵轴刻度)
[-y|--y-grid grid step:label factor](多长时间显示纵轴刻度,卷表显示时间)
[-y|--y-grid none]
[-Y|--alt-y-grid]
Miscellaneous
[-c--color COLORTAG#rrggbb[aa]](指定线槽颜色)
BACK backgroud(背景色)
CANVAS for the background of the actual graph(画布色)
SHADEA for the left and top border(左边和上边边界线颜色)
SHADEB for the right and bottom border(下边和右边边界线颜色)
GRID,MGRID for the major grid(主网格线颜色)
FONT for the color of the font(字体色)
AXIS for the axis of the graph(坐标色)
FRAME for the line around the color spots(边框色)
ARROW for the arrow head pointing up and forward(箭头色)
-n|--font FONTTAG:size:[font](指定字体)
[-R|--font-render-mode {normal,light,mono}](字体格式)
[-a|--imgformat PNG|SVG|EPS|PDF](图片输出格式)
[-W|--watermark string](图片加水印)
Data and variables(获取数据)
DEF:vname=rrdfile:ds-(定义数据获取方式)
name(数据源名称):CF[:step=step][:start=time][:end=time]
CDEF:vname=RRN expression
VDEF:vname=RPN expression
You need at least one DEF and
one LINE,AREA,GPRINT,PRINT statement to generate anything useful
graph
LINE(线状图)[width]:value(变量内容绘图)[#color](线条颜色)[:[legend][:STACK]][:dashes[=on_s[,off_s[,on_s,off_s]...]][:dash-offset=offsef]]
AREA(面积图):value[#color][:[legend][:STACK]]
width can be a floating point number
If the color is not specified,the drawing is done 'invisibly'
Also optional is the legend box and string which will be printed in the legend section if specified
The valuecan be generated by DEF,VDEF,and CDEF
If the optional STACK modifier is used,this line is stacked on top of the previous element which can be a LINE or an AREA
GPRINT(在图上打印字符串):vname(变量值):CF(聚合函数):format(格式)
COMMENT:text
cacti
rrdtool create
周期性执行能够取得数据的命令,并将取回的数据保存至刚创建的rrd文件当中
利用rrdtool绘图并展示
php开发网页程序
LAMP, LNMP
--enable-sockets php安装选项
插件机制
thold 报警功能
模版:
图形模版 定义图是如何绘制
数据模版 定义如何获得数据,获得以后怎么保存,保存到什么文件中
主机模版 归好类的图形模版和数据模版
cacti
脚本
SNMP
ssh
保存数据
图形模版
/var/www/html/cacti
http://172.16.100.1/cacti/
/web/vhosts/cacti
http://cacti.magedu.com/cacti
poller.php单线程,速度慢,在大批量要将poller.php缓存spine(官网提供)
收集方法:数据收集方法
数据查询:一些事先定义好的xml格式数据手机方法
数据输入方法:命令或者脚本
脚本:
只需要指定如何获取数据,并且获取到的数据经过处理后要按规定格式输出;
TAG:data TAG:data(标签加数据格式,不能有多余空格)
input:30 output:40
cacti官网:https://www.cacti.net
cacti论坛:https://forums.cacti.net #Scripts and Templates别人定义好的模板脚本可以使用
snmp:
[root@cacti ~]# yum -y install net-snmp net-snmp-utils
[root@cacti ~]# service snmpd start
正在启动 snmpd:                                           [确定]
[root@cacti ~]# netstat -unlp
Active Internet connections (only servers)
Proto Recv-Q Send-Q Local Address               Foreign Address             State       PID/Program name
udp        0      0 0.0.0.0:68                  0.0.0.0:*                               1500/dhclient
udp        0      0 0.0.0.0:161                 0.0.0.0:*                               1645/snmpd
[root@cacti ~]# snmpwalk -v 2c -c public localhost host
HOST-RESOURCES-MIB::hrSystemUptime.0 = Timeticks: (144158) 0:24:01.58
HOST-RESOURCES-MIB::hrSystemUptime.0 = No more variables left in this MIB View (It is past the end of the MIB tree)
[root@cacti ~]# vim /etc/snmp/snmpd.conf
view    systemview    included   .1.3.6.1.2.1.1
view    systemview    included   .1.3.6.1.2.1.25.1.1
[root@cacti ~]# snmpget -v 2c -c public localhost HOST-RESOURCES-MIB::hrSystemUptime.0
[root@cacti ~]# vim /etc/snmp/snmpd.conf
view    systemview    included   .1.3.6.1.2.1.1
view    systemview    included   .1.3.6.1.2.1.25.1.1
view    systemview    included   .1.3.6.1.2.1.6
[root@cacti ~]# service snmpd restart
停止 snmpd:                                               [确定]
正在启动 snmpd:                                           [确定]
[root@cacti ~]# snmpwalk -v 2c -c public localhost tcp
[root@cacti ~]# snmpwalk -v 2c -c public localhost tcp | grep established | wc -l
[root@cacti ~]# vim /etc/snmp/snmpd.conf
\#       sec.name  source          community
#com2sec notConfigUser  default       public
com2sec notConfigUser  127.0.0.1       mypublic
com2sec notConfigUser  172.16.100.0/24       mypublic
[root@cacti ~]# service snmpd restart
停止 snmpd:                                               [确定]
正在启动 snmpd:                                           [确定]
[root@cacti ~]# snmpwalk -v 2c -c mypublic 172.16.100.1 tcp
[root@cacti ~]# snmpnetstat -v 2c -c mypublic -Can -Cp tcp 172.16.100.1
Active Internet (tcp) Connections (including servers)
Proto Local Address          Remote Address         (state)
tcp   *.22                   *.*                   LISTEN
tcp   127.0.0.1.25           *.*                   LISTEN
tcp   127.0.0.1.199          *.*                   LISTEN
tcp   127.0.0.1.6010         *.*                   LISTEN
tcp   127.0.0.1.6011         *.*                   LISTEN
tcp   172.16.100.1.22        172.16.100.254.6230   ESTABLISHED
tcp   172.16.100.1.22        172.16.100.254.6231   ESTABLISHED
tcp   172.16.100.1.22        172.16.100.254.14263  ESTABLISHED
tcp   172.16.100.1.22        172.16.100.254.14264  ESTABLISHED
[root@cacti ~]# chkconfig snmpd on
rrdtool:
[root@cacti ~]# ll
总用量 1228
-rw-------. 1 root root    1010 7月  25 18:59 anaconda-ks.cfg
-rw-r--r--. 1 root root   13111 7月  25 18:59 install.log
-rw-r--r--. 1 root root    3482 7月  25 18:57 install.log.syslog
-rw-r--r--. 1 root root 1159701 7月  27 18:36 rrdtool-1.4.5-1.el5.wrl.i386.rpm
-rw-r--r--. 1 root root   11917 7月  27 18:36 rrdtool-devel-1.4.5-1.el5.wrl.i386.rpm
-rw-r--r--. 1 root root   55940 7月  27 18:36 rrdtool-perl-1.4.5-1.el5.wrl.i386.rpm
[root@cacti ~]# yum -y --nogpgcheck install rrdtool-1.4.5-1.el5.wrl.i386.rpm rrdtool-perl-1.4.5-1.el5.wrl.i386.rpm
[root@cacti ~]# rrdtool create test.rrd --step 5 DS:testds:GAUGE:8:0:U RRA:AVERAGE:0.5:1:17280 RRA:AVERAGE:0.5:10:3456 RRA:AVERAGE:0.5:100:1210(创建test.rrd文件,--step 5每5秒接受一个值,不指定300秒,--start指定开始时间,不指定从10秒之前开始,DS数据源,testds数据源名称自己取,GAUGE数据源类型,8所能接受数据最长时间,8秒内来就接受,来不了就不接受,0最小值,U最大值不确定,RRA做聚合,AVERAGE求平均值,0.5每5秒平均一次,1每一个平均一次,17280=86400/5保存一天的,)
[root@cacti ~]# rrdtool info test.rrd
filename = "test.rrd"
rrd_version = "0003"
step = 5
last_update = 1469616594
header_size = 932
ds[testds].index = 0
ds[testds].type = "GAUGE"
ds[testds].minimal_heartbeat = 8
ds[testds].min = 0.0000000000e+00
ds[testds].max = NaN
ds[testds].last_ds = "U"
ds[testds].value = 0.0000000000e+00
ds[testds].unknown_sec = 4
rra[0].cf = "AVERAGE"
rra[0].rows = 17280
rra[0].cur_row = 10592
rra[0].pdp_per_row = 1
rra[0].xff = 5.0000000000e-01
rra[0].cdp_prep[0].value = NaN
rra[0].cdp_prep[0].unknown_datapoints = 0
rra[1].cf = "AVERAGE"
rra[1].rows = 3456
rra[1].cur_row = 1171
rra[1].pdp_per_row = 10
rra[1].xff = 5.0000000000e-01
rra[1].cdp_prep[0].value = NaN
rra[1].cdp_prep[0].unknown_datapoints = 8
rra[2].cf = "AVERAGE"
rra[2].rows = 1210
rra[2].cur_row = 515
rra[2].pdp_per_row = 100
rra[2].xff = 5.0000000000e-01
rra[2].cdp_prep[0].value = NaN
rra[2].cdp_prep[0].unknown_datapoints = 18
[root@cacti ~]# rrdtool update test.rrd N:$RANDOM(给test.rrd数据文件提供随机数据,N当前时间,$RANDOM随机值,环境变量)
[root@cacti ~]# rrdtool fetch test.rrd AVERAGE(从test.rrd取得数据做聚合函数)
[root@cacti ~]# vim genval.sh
#!/bin/bash
\#
while true;do
  rrdtool update test.rrd N:$RANDOM
  sleep 5
done
[root@cacti ~]# bash -x genval.sh
[root@cacti ~]# rrdtool fetch -r 5 test.rrd AVERAGE(从test.rrd取得数据做聚合函数,-r指定每5秒平均值)
1469704440: 8.0566083688e+03
1469704445: 2.2388294860e+04
1469704450: 2.5708090118e+04
1469704455: 1.7025331697e+04
1469704460: 1.3199633971e+04
1469704465: 2.3700131829e+04
1469704470: 2.5429701728e+04
1469704475: 2.6962323128e+04
1469704480: 1.2382106555e+04
1469704485: 6.3431372328e+03
1469704490: 1.6555205005e+04
1469704495: 2.1484472517e+04
1469704500: 8.4028245818e+03
1469704505: 1.5710498867e+04
1469704510: 6.3045618384e+03
1469704515: 1.6441063176e+04
1469704520: 1.7218126726e+04
1469704525: 4.5320233830e+03
1469704530: 1.6073711416e+04
1469704535: 2.2368801388e+04
1469704540: 2.1513770316e+04
1469704545: 6.3628359270e+03
1469704550: 1.4628699328e+04
1469704555: 9.7876476548e+03
1469704560: 1.2794460491e+04
1469704565: 4.9265956646e+03
1469704570: 1.6089015496e+04
1469704575: 6.7290863496e+03
1469704580: 7.2770784148e+03
1469704585: 2.0019338304e+04
1469704590: 1.1439154560e+04
1469704595: 9.4721386748e+03
1469704600: 1.4290655953e+04
1469704605: 1.7942355416e+04
[root@cacti ~]# rrdtool graph a.png --step 5 -s 1469704440 -t Test -v vtest DEF:vtest=test.rrd:testds:AVERAGE LINE1:vtest#ff0000:testline(--step指定解析度,-s指定起始时间,DEF:vtest=test.rrd从test.rrd取得数据,AVERAGE聚合函数)[root@cacti ~]# rrdtool graph a.png --step 50 -s 1469704440 -t Test -v vtest DEF:vtest=test.rrd:testds:AVERAGE LINE1:vtest#ff0000:testline
[root@cacti ~]# rrdtool graph a.png -s 1469704440 DEF:vartest=/root/test.rrd:testds:AVERAGE:step=5 DEF:vartest2=/root/test.rrd:testds:AVERAGE:step=50 LINE1:vartest#FF0000:"testline" LINE1:vartest2#00FF00:"testline2"
监控mysql服务器查询次数:
[root@cacti ~]# yum -y install mysql-server
[root@cacti ~]# service mysqld start
[root@cacti ~]# mysql
Welcome to the MySQL monitor.  Commands end with ; or \g.
Your MySQL connection id is 2
Server version: 5.1.73 Source distribution

Copyright (c) 2000, 2013, Oracle and/or its affiliates. All rights reserved.

Oracle is a registered trademark of Oracle Corporation and/or its
affiliates. Other names may be trademarks of their respective
owners.

Type 'help;' or '\h' for help. Type '\c' to clear the current input statement.

mysql> SHOW GLOBAL STATUS LIKE 'com_select';
+---------------+-------+
| Variable_name | Value |
+---------------+-------+
| Com_select    | 1     |
+---------------+-------+
1 row in set (0.00 sec)

mysql> \q
Bye
[root@cacti ~]# rrdtool create mysql.rrd --step 3 DS:myselect:COUNTER:5:0:U RRA:AVERAGE:0.5:1:28800 RRA:AVERAGE:0.5:10:2880 RRA:MAX:0.5:10:2880 RRA:LAST:0.5:10:2880
[root@cacti ~]# mysql -e "SHOW GLOBAL STATUS LIKE 'com_select'"
+---------------+-------+
| Variable_name | Value |
+---------------+-------+
| Com_select    | 2     |
+---------------+-------+
[root@cacti ~]# mysql --batch -e "SHOW GLOBAL STATUS LIKE 'com_select'" | awk '/Com_select/{print $2}'
4
[root@cacti ~]# vim getselect.sh
#!/bin/bash
\#
while true;do
    SELECT=`mysql --batch -e "SHOW GLOBAL STATUS LIKE 'com_select'" | awk '/Com_select/{print $2}'`
    rrdtool update mysql.rrd N:$SELECT
    sleep 3
done
[root@cacti ~]# bash -x getselect.sh
[root@cacti ~]# mysql
Welcome to the MySQL monitor.  Commands end with ; or \g.
Your MySQL connection id is 45
Server version: 5.1.73 Source distribution

Copyright (c) 2000, 2013, Oracle and/or its affiliates. All rights reserved.

Oracle is a registered trademark of Oracle Corporation and/or its
affiliates. Other names may be trademarks of their respective
owners.

Type 'help;' or '\h' for help. Type '\c' to clear the current input statement.

mysql> SHOW DATABASES;
+--------------------+
| Database           |
+--------------------+
| information_schema |
| mysql              |
| test               |
+--------------------+
3 rows in set (0.00 sec)

mysql> CREATE DATABASE testdb;
Query OK, 1 row affected (0.00 sec)

mysql> use testdb;
Database changed

mysql> create table tb1 (ID INT UNSIGNED NOT NULL AUTO_INCREMENT PRIMARY KEY,NAME CHAR(50) NOT NULL);
Query OK, 0 rows affected (0.00 sec)
mysql> \q
Bye
[root@cacti ~]# vim insert.sh
#!/bin/bash
\#
for I in {1..200000}; do
    mysql -e "INSERT INTO testdb.tb1(NAME) VALUES('stu$I')"
    mysql -e "SELECT * FROM testdb.tb1" &> /dev/null
done
[root@cacti ~]# bash -x insert.sh
[root@cacti ~]# rrdtool fetch -r 5 mysql.rrd AVERAGE
1469957529: 2.9837339687e-01
1469957532: 3.2181712970e-01
1469957535: 3.2343980395e-01
1469957538: 3.3089452232e-01
1469957541: 3.3136706520e-01
1469957544: 3.3143597315e-01
1469957547: 3.3136063962e-01
1469957550: 3.3138705285e-01
1469957553: 3.3145877373e-01
1469957556: 3.3150179197e-01
1469957559: 3.3138071758e-01
1469957562: 3.3082609826e-01
1469957565: 3.3062010994e-01
1469957568: 3.3104893277e-01
1469957571: 3.3138828236e-01
1469957574: 3.3138914218e-01
1469957577: 3.3135592832e-01
1469957580: 3.3131133687e-01
1469957583: 3.3123565565e-01
[root@cacti ~]# rrdtool fetch -r 30 mysql.rrd AVERAGE
[root@cacti ~]# rrdtool fetch -r 30 mysql.rrd MAX
[root@cacti ~]# rrdtool fetch -r 30 mysql.rrd LAST
[root@cacti ~]# rrdtool last test.rrd
1469959125
[root@cacti ~]# rrdtool fetch -r 30 mysql.rrd AVERAGE
1469957550: 3.2500944796e-01
1469957580: 3.3122811140e-01
1469957610: 3.2958492725e-01
1469957640: 3.6457436309e-01
1469957670: 3.3128660797e-01
1469957700: 3.3118720753e-01
1469957730: 3.3123294942e-01
1469957760: 3.3128939526e-01
1469957790: 3.3115955983e-01
1469957820: 3.3130235715e-01
1469957850: 3.3112590681e-01
1469957880: 3.3113505672e-01
1469957910: 3.3106232851e-01
1469957940: 3.3129985202e-01
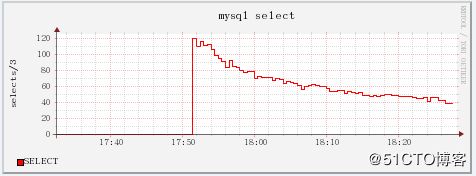
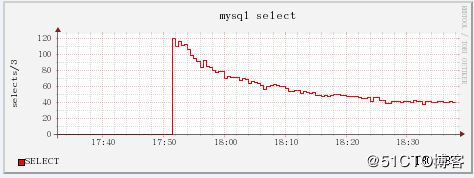
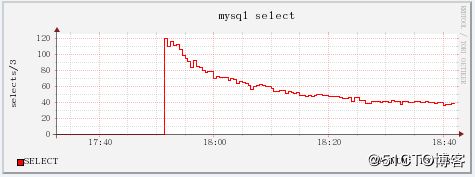
[root@cacti ~]# rrdtool graph mysql.png -s 1469957550 -t "mysql select" -v "selects/3" DEF:select3=mysql.rrd:myselect:AVERAGE:step=3 LINE1:select3#FF0000:"SELECT"[root@cacti ~]# rrdtool graph mysql.png -s 1469957550 -t "mysql select" -v "selects/3" DEF:select30=mysql.rrd:myselect:AVERAGE:step=30 LINE1:select30#FF0000:"SELECT"
[root@cacti ~]# rrdtool graph mysql.png -s 1469957550 -t "mysql select" -v "selects/3" DEF:select30=mysql.rrd:myselect:AVERAGE:step=30 DEF:max30=mysql.rrd:myselect:MAX:step=30 LINE1:select30#FF0000:"SELECT" GPRINT:max30:MAX:"%6.3lf"
[root@cacti ~]# rrdtool graph mysql.png -s 1469957550 -t "mysql select" -v "selects/3" DEF:select30=mysql.rrd:myselect:AVERAGE:step=30 DEF:max30=mysql.rrd:myselect:MAX:step=30 LINE1:select30#FF0000:"SELECT" GPRINT:max30:MAX:"MAXMUM\: %6.3lf"
[root@cacti ~]# rrdtool graph mysql.png -s 1469957550 -t "mysql select" -v "selects/3" DEF:select30=mysql.rrd:myselect:AVERAGE:step=30 DEF:max30=mysql.rrd:myselect:MAX:step=30 DEF:last30=mysql.rrd:myselect:LAST:step=30 LINE1:select30#FF0000:"SELECT" GPRINT:last30:LAST:"CURRENT\: %10.2lf" GPRINT:max30:MAX:"MAXMUM\: %6.3lf"
cacti安装:
操作系统:centos6.5
内核:2.6.32-431.el6.i686
网卡1:vm0 172.16.100.1
网卡2:vm8 dhcp
安装snmp和rrd-tools:
[root@cacti ~]#  yum -y install net-snmp net-snmp-utils
[root@cacti ~]# service snmpd start
[root@cacti ~]# chkconfig snmpd on
[root@cacti ~]# vim /etc/snmp/snmpd.conf
view    systemview    included   .1.3.6.1.2.1.1
view    systemview    included   .1.3.6.1.2.1.25.1.1
view    systemview    included   .1.3.6.1.2.1.6
[root@cacti ~]# service snmpd start
[root@cacti ~]# ll
总用量 196480
-rw-------. 1 root root      1010 7月  25 18:59 anaconda-ks.cfg
-rw-r--r--. 1 root root    785724 7月  25 19:34 apr-1.4.6.tar.bz2
-rw-r--r--. 1 root root    693258 7月  25 19:34 apr-util-1.5.2.tar.bz2
-rw-r--r--. 1 root root   2273280 7月  25 19:36 cacti-0.8.8a.tar.gz
-rw-r--r--. 1 root root   4780289 7月  25 19:40 httpd-2.4.4.tar.bz2
-rw-r--r--. 1 root root     13111 7月  25 18:59 install.log
-rw-r--r--. 1 root root      3482 7月  25 18:57 install.log.syslog
-rw-r--r--. 1 root root    126663 7月  25 19:40 libmcrypt-2.5.7-5.el5.i386.rpm
-rw-r--r--. 1 root root    105196 7月  25 19:41 libmcrypt-devel-2.5.7-5.el5.i386.rpm
-rw-r--r--. 1 root root 179907710 7月  25 19:41 mysql-5.5.28-linux2.6-i686.tar.gz
-rw-r--r--. 1 root root  11545777 7月  25 19:41 php-5.4.13.tar.bz2
-rw-r--r--. 1 root root    893831 7月  25 19:42 rrdtool-1.4.7-1.el5.wrl.i386.rpm
-rw-r--r--. 1 root root     12168 7月  25 19:42 rrdtool-devel-1.4.7-1.el5.wrl.i386.rpm
-rw-r--r--. 1 root root     31739 7月  25 19:42 rrdtool-perl-1.4.7-1.el5.wrl.i386.rpm
[root@cacti ~]# yum -y --nogpgcheck install rrdtool-1.4.7-1.el5.wrl.i386.rpm rrdtool-perl-1.4.7-1.el5.wrl.i386.rpm
安装LAMP平台:
[root@cacti ~]# yum -y groupinstall "Development Libraries" "Development Tools"
[root@cacti ~]# tar jvxf apr-1.4.6.tar.bz2
[root@cacti ~]# cd apr-1.4.6
[root@cacti apr-1.4.6]# vim configure    #修改配置文件,否则编译报错;
RM='$RM -f'
[root@cacti apr-1.4.6]# ./configure --prefix=/usr/local/apr
[root@cacti apr-1.4.6]# make && make install
[root@cacti ~]# tar jvxf apr-util-1.5.2.tar.bz2
[root@cacti ~]# cd apr-util-1.5.2
[root@cacti apr-util-1.5.2]# ./configure --prefix=/usr/local/apr-util --with-apr=/usr/local/apr
[root@cacti apr-util-1.5.2]# make && make install
[root@cacti ~]# tar jvxf httpd-2.4.4.tar.bz2
[root@cacti ~]# cd httpd-2.4.4
[root@cacti httpd-2.4.4]# yum -y install pcre-devel
[root@cacti httpd-2.4.4]# yum -y install openssl-devel
[root@cacti httpd-2.4.4]# ./configure --prefix=/usr/local/apache --sysconfdir=/etc/httpd --enable-so --enable-ssl --enable-cgi --enable-rewrite --with-zlib --with-pcre --with-apr=/usr/local/apr --with-apr-util=/usr/local/apr-util --enable-modules=most --enable-mpms-shared=all --with-mpm=event(编译httpd,--prefix指定安装路径,--sysconfdir指定配置文件路径,--enable-so支持动态共享模块,--enable-rewirte支持url重写,--enable-ssl启用ssl功能,--enable-cgi支持cgi,--enable-cgid支持cgid,被线程MPM使用,使用event或worker用MPM需要启用cgid,--enable-modules支持模块,--enable-mods是否启用共享模块,--enable-mpm-shared启用那些MPM,而且以共享方式启用,--with-apr指定apr安装路径,--with-apr-util指定apr-util安装路径,)
[root@cacti httpd-2.4.4]# make && make install
[root@cacti httpd-2.4.4]# vim /etc/httpd/httpd.conf
PidFile "/var/run/httpd.pid"
[root@cacti httpd-2.4.4]# vim /etc/rc.d/init.d/httpd
#!/bin/bash
\#
\# httpd        Startup script for the Apache HTTP Server
\#
\# chkconfig: - 85 15
\# description: Apache is a World Wide Web server.  It is used to serve \
#          HTML files and CGI.
\# processname: httpd
\# config: /etc/httpd/conf/httpd.conf
\# config: /etc/sysconfig/httpd
\# pidfile: /var/run/httpd.pid

\# Source function library.
. /etc/rc.d/init.d/functions

if [ -f /etc/sysconfig/httpd ]; then
        . /etc/sysconfig/httpd
fi

\# Start httpd in the C locale by default.
HTTPD_LANG=${HTTPD_LANG-"C"}

\# This will prevent initlog from swallowing up a pass-phrase prompt if
\# mod_ssl needs a pass-phrase from the user.
INITLOG_ARGS=""

\# Set HTTPD=/usr/sbin/httpd.worker in /etc/sysconfig/httpd to use a server
\# with the thread-based "worker" MPM; BE WARNED that some modules may not
\# work correctly with a thread-based MPM; notably PHP will refuse to start.

\# Path to the apachectl script, server binary, and short-form for messages.
apachectl=/usr/local/apache/bin/apachectl
httpd=${HTTPD-/usr/local/apache/bin/httpd}
prog=httpd
pidfile=${PIDFILE-/var/run/httpd.pid}
lockfile=${LOCKFILE-/var/lock/subsys/httpd}
RETVAL=0

start() {
        echo -n $"Starting $prog: "
        LANG=$HTTPD_LANG daemon --pidfile=${pidfile} $httpd $OPTIONS
        RETVAL=$?
        echo
        [ $RETVAL = 0 ] && touch ${lockfile}
        return $RETVAL
}

stop() {
    echo -n $"Stopping $prog: "
    killproc -p ${pidfile} -d 10 $httpd
    RETVAL=$?
    echo
    [ $RETVAL = 0 ] && rm -f ${lockfile} ${pidfile}
}
reload() {
    echo -n $"Reloading $prog: "
    if ! LANG=$HTTPD_LANG $httpd $OPTIONS -t >&/dev/null; then
        RETVAL=$?
        echo $"not reloading due to configuration syntax error"
        failure $"not reloading $httpd due to configuration syntax error"
    else
        killproc -p ${pidfile} $httpd -HUP
        RETVAL=$?
    fi
    echo
}

\# See how we were called.
case "$1" in
  start)
    start
    ;;
  stop)
    stop
    ;;
  status)
        status -p ${pidfile} $httpd
    RETVAL=$?
    ;;
  restart)
    stop
    start
    ;;
  condrestart)
    if [ -f ${pidfile} ] ; then
        stop
        start
    fi
    ;;
  reload)
        reload
    ;;
  graceful|help|configtest|fullstatus)
    $apachectl $@
    RETVAL=$?
    ;;
 \*)
    echo $"Usage: $prog {start|stop|restart|condrestart|reload|status|fullstatus|graceful|help|configtest}"
    exit 1
esac

exit $RETVAL
[root@cacti httpd-2.4.4]# chmod +x /etc/rc.d/init.d/httpd
[root@cacti httpd-2.4.4]# chkconfig --add httpd
[root@cacti httpd-2.4.4]# vim /etc/profile.d/httpd.sh
export PATH=$PATH:/usr/local/apache/bin/
[root@cacti httpd-2.4.4]# . /etc/profile.d/httpd.sh
[root@cacti ~]#  fdisk /dev/sda

WARNING: DOS-compatible mode is deprecated. It's strongly recommended to
         switch off the mode (command 'c') and change display units to
         sectors (command 'u').

Command (m for help): p

Disk /dev/sda: 53.7 GB, 53687091200 bytes
255 heads, 63 sectors/track, 6527 cylinders
Units = cylinders of 16065 * 512 = 8225280 bytes
Sector size (logical/physical): 512 bytes / 512 bytes
I/O size (minimum/optimal): 512 bytes / 512 bytes
Disk identifier: 0x0003ee34

   Device Boot      Start         End      Blocks   Id  System
/dev/sda1   *           1          13      102400   83  Linux
Partition 1 does not end on cylinder boundary.
/dev/sda2              13        2624    20971520   83  Linux
/dev/sda3            2624        2755     1048576   82  Linux swap / Solaris

Command (m for help): n
Command action
   e   extended
   p   primary partition (1-4)
e
Selected partition 4
First cylinder (2755-6527, default 2755):
Using default value 2755
Last cylinder, +cylinders or +size{K,M,G} (2755-6527, default 6527):
Using default value 6527

Command (m for help): n
First cylinder (2755-6527, default 2755):
Using default value 2755
Last cylinder, +cylinders or +size{K,M,G} (2755-6527, default 6527): +20G

Command (m for help): t
Partition number (1-5): 5
Hex code (type L to list codes): 8e
Changed system type of partition 5 to 8e (Linux LVM)

Command (m for help): p

Disk /dev/sda: 53.7 GB, 53687091200 bytes
255 heads, 63 sectors/track, 6527 cylinders
Units = cylinders of 16065 * 512 = 8225280 bytes
Sector size (logical/physical): 512 bytes / 512 bytes
I/O size (minimum/optimal): 512 bytes / 512 bytes
Disk identifier: 0x0003ee34

   Device Boot      Start         End      Blocks   Id  System
/dev/sda1   *           1          13      102400   83  Linux
Partition 1 does not end on cylinder boundary.
/dev/sda2              13        2624    20971520   83  Linux
/dev/sda3            2624        2755     1048576   82  Linux swap / Solaris
/dev/sda4            2755        6527    30304607+   5  Extended
/dev/sda5            2755        5366    20978843+  8e  Linux LVM

Command (m for help): w
The partition table has been altered!

Calling ioctl() to re-read partition table.

The kernel still uses the old table. The new table will be used at
the next reboot or after you run partprobe(8) or kpartx(8)
Syncing disks.
[root@cacti ~]# partx /dev/sda
[root@cacti ~]# pvcreate /dev/sda5
[root@cacti ~]# vgcreate myvg /dev/sda5
[root@cacti ~]# lvcreate -n mydata -L 5G myvg
[root@cacti ~]# mkfs.ext4 /dev/myvg/mydata
[root@localhost ~]# mkdir /mydata
[root@cacti ~]# vim /etc/fstab
/dev/myvg/mydata        /mydata                 ext4    defaults        0 0
[root@cacti ~]# mount -a
[root@cacti ~]# mkdir -pv /mydata/data
[root@cacti ~]# groupadd -r mysql
[root@cacti ~]# useradd -g mysql -r -s /sbin/nologin -M -d /mydata/data mysql
[root@cacti ~]# chown -R mysql:mysql /mydata/data/
[root@cacti ~]# tar zvxf mysql-5.5.28-linux2.6-i686.tar.gz -C /usr/local/
[root@cacti ~]# cd /usr/local/
[root@cacti local]# ln -sv mysql-5.5.28-linux2.6-i686 mysql
[root@cacti local]# cd mysql
[root@cacti mysql]# chown -R mysql:mysql ./\*
[root@cacti mysql]# scripts/mysql_install_db --user=mysql --datadir=/mydata/data
[root@cacti mysql]# chown -R root ./\*
[root@cacti mysql]# cp support-files/my-large.cnf /etc/my.cnf
[root@cacti mysql]# vim /etc/my.cnf
thread_concurrency = 4
datadir = /mydata/data
[root@cacti mysql]# cp support-files/mysql.server /etc/rc.d/init.d/mysqld
[root@cacti mysql]# chmod +x /etc/rc.d/init.d/mysqld
[root@cacti mysql]# chkconfig --add mysqld
[root@cacti mysql]# chkconfig mysqld on
[root@cacti mysql]# vim /etc/man.config
MANPATH /usr/man
MANPATH /usr/share/man
MANPATH /usr/local/man
MANPATH /usr/local/share/man
MANPATH /usr/X11R6/man
MANPATH /usr/local/mysql/man
[root@cacti mysql]# ln -sv /usr/local/mysql/include/ /usr/include/mysql
[root@cacti mysql]# echo '/usr/local/mysql/lib/' > /etc/ld.so.conf.d/mysql.conf
[root@cacti mysql]# ldconfig
[root@cacti mysql]# vim /etc/profile.d/mysql.sh
export PATH=$PATH:/usr/local/mysql/bin
[root@cacti mysql]# . /etc/profile.d/mysql.sh
[root@cacti ~]# yum -y groupinstall "Desktop Platform Development"
[root@cacti ~]# yum -y localinstall --nogpgcheck libmcrypt-2.5.7-5.el5.i386.rpm libmcrypt-devel-2.5.7-5.el5.i386.rpm
[root@cacti ~]# yum -y install bzip2 bzip2-devel
[root@cacti ~]# tar jvxf php-5.4.13.tar.bz2
[root@cacti ~]# cd php-5.4.13
[root@cacti php-5.4.13]# make
[root@cacti php-5.4.13]# make install
[root@cacti php-5.4.13]# cp php.ini-production /etc/php.ini
[root@cacti php-5.4.13]# vim /etc/httpd/httpd.conf
    AddType application/x-httpd-php  .php
    AddType application/x-httpd-php-source  .phps

    DirectoryIndex index.php index.html

[root@cacti ~]# service httpd start
[root@cacti ~]# service mysqld start
[root@cacti ~]# vim /etc/httpd/httpd.conf
#DocumentRoot "/usr/local/apache/htdocs"
\# Virtual hosts
Include /etc/httpd/extra/httpd-vhosts.conf
[root@cacti ~]# vim /etc/httpd/extra/httpd-vhosts.conf

    ServerName cacti.com
    DocumentRoot /web/vhosts/cacti

        Options Indexes
        AllowOverride none
        Require all granted

    ErrorLog "logs/cacti-error_log"
    CustomLog "logs/cacti-access_log" common

[root@cacti ~]# mkdir -pv /web/vhosts
[root@cacti ~]# tar zxvf cacti-0.8.8a.tar.gz -C /web/vhosts/
[root@cacti ~]# cd /web/vhosts/
[root@cacti vhosts]# ln -sv cacti-0.8.8a cacti
[root@cacti vhosts]# service httpd restart
[root@cacti vhosts]# cd cacti
[root@cacti cacti]# mysqladmin create cactidb
[root@cacti cacti]# mysql cactidb < cacti.sql
[root@cacti cacti]# mysql -e "GRANT ALL ON cactidb.\* TO cactiuser@localhost IDENTIFIED BY 'cactiuser'"
[root@cacti cacti]# mysqladmin flush-privileges
[root@cacti cacti]# mysql -ucactiuser -pcactiuser
Welcome to the MySQL monitor.  Commands end with ; or \g.
Your MySQL connection id is 5
Server version: 5.5.28-log MySQL Community Server (GPL)

Copyright (c) 2000, 2012, Oracle and/or its affiliates. All rights reserved.

Oracle is a registered trademark of Oracle Corporation and/or its
affiliates. Other names may be trademarks of their respective
owners.

Type 'help;' or '\h' for help. Type '\c' to clear the current input statement.

mysql> SHOW DATABASES;
+--------------------+
| Database           |
+--------------------+
| information_schema |
| cactidb            |
| test               |
+--------------------+
3 rows in set (0.00 sec)

mysql> \q
Bye
[root@cacti cacti]# cd include/
[root@cacti include]# vim config.php
$database_type = "mysql";
$database_default = "cactidb";
$database_hostname = "localhost";
$database_username = "cactiuser";
$database_password = "cactiuser";
$database_port = "3306";
$database_ssl = false;
$url_path = "/";
[root@cacti include]# useradd cactiuser
[root@cacti include]# cd ..
[root@cacti cacti]# chown -R cactiuser:cactiuser rra/ log/    #提示:最好事先将cacti目录文件及子目录更改为root用户root组;
安装cacti:
通过编辑windows的hosts文件解析172.16.100.1对应的域名cacti.com,在windows的ie浏览器输入http://cacti.com;
点击下一步,新安装还是升级,选择New Install点击Next;
设置完正确的路径,点击完成;
RRDTool Binary Path:/usr/local/bin/rrdtool rrdtool路径
PHP Binary Path:/usr/local/php/bin/php php执行程序路径
snmpwalk Binary Path:/usr/local/bin/snmpwalk snmp工具当中所提供命令的路径;
snmpget Binary Path:/usr/local/bin/snmpget
snmpbulkwalk Binary Path:/usr/local/bin/snmpbulkwalk
snmpgetnext Binary Path:/usr/local/bin/snmpgetnext
Cacti Log File Path: /web/vhosts/cacti-0.8.8a/log/cacti.log cactil日志;
SNMP Utility Version:snmp utility 版本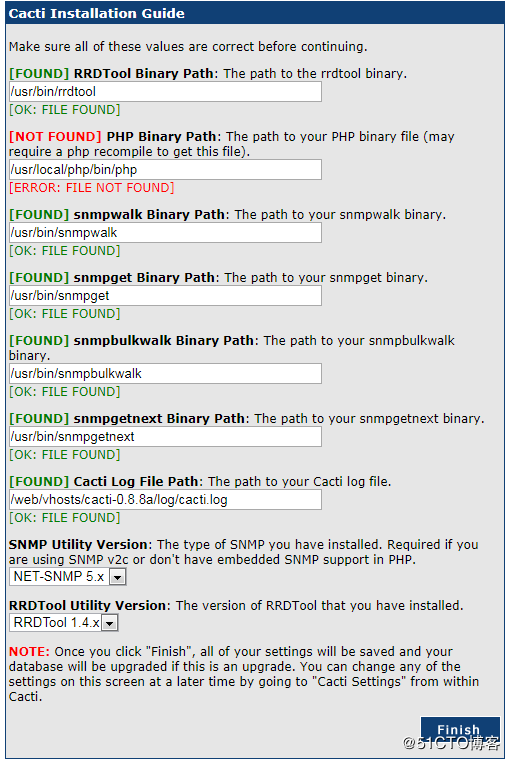
安装完成,默认用户名admin,密码admin,点击Login;
console:控制台,所有编辑控制都在控制台;
graphs:监控那些主机,每台主机图形;
Create:创建内容
New Graphs:创建新图像
Management: 管理
Collection Methods:数据收集定义;
Templates: 模版;
Import/Export: 导入导出模版;
Configuration: 配置cacti的工作特性的;
Utilities: 管理cacti工具;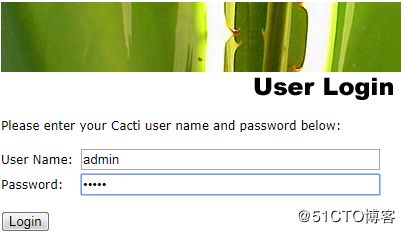
[root@cacti cacti]# ls
about.php                data_templates.php          graph_templates.php  log                  scripts
auth_changepassword.php  docs                        graph_view.php       logout.php           script_server.php
auth_login.php           gprint_presets.php          graph_xport.php      plugins              script_server.pl
cacti.sql                graph_image.php             host.php             plugins.php          settings.php
cdef.php                 graph.php                   host_templates.php   poller_commands.php  templates_export.php
cli                      graph_settings.php          images               poller_export.php    templates_import.php
cmd.php                  graphs_items.php            include              poller.php(周期性任务计划脚本,会把定义好的数据查询和数据输入方法已经被确定要收集数据的,而且知道收集完以后保存到什么地方的数据每隔一段时间执行一次,php写的功能很弱,而且只支持单线程,建议换成spine,官网下载)           tree.php
color.php                graphs_new.php              index.php            README               user_admin.php
data_input.php           graphs.php                  install              resource             utilities.php
data_queries.php         graph_templates_inputs.php  lib                  rra
data_sources.php         graph_templates_items.php   LICENSE              rra.php
[root@cacti ~]# echo '\*/5 * * * * /usr/local/php/bin/php /web/vhosts/cacti/poller.php &> /dev/null' > /var/spool/cron/cactiuser
[root@cacti ~]# crontab -u cactiuser -e
\*/5 * * * * /usr/local/php/bin/php /web/vhosts/cacti/poller.php &> /dev/null
[root@cacti ~]# su - cactiuser
[cactiuser@cacti ~]$ /usr/local/php/bin/php /web/vhosts/cacti/poller.php
[root@cacti ~]# vim /etc/php.ini
date.timezone = Asia/Shanghai
[root@cacti ~]# service httpd restart
[root@cacti ~]# su - cactiuser
[cactiuser@cacti ~]$ /usr/local/php/bin/php /web/vhosts/cacti/poller.php
[cactiuser@cacti ~]$ cd /web/vhosts/cacti/log
[cactiuser@cacti log]$ tail cacti.log
03/22/2019 07:59:53 PM - SYSTEM STATS: Time:0.3902 Method:cmd.php Processes:1 Threads:N/A Hosts:2 HostsPerProcess:2 DataSources:0 RRDsProcessed:0
[root@cacti ~]# hwclock -s
da[root@cacti ~]# date
2019年 03月 26日 星期二 05:07:37 CST
[root@cacti ~]# date 0325210819
[root@cacti ~]# service httpd restart
[root@cacti ~]# su - cactiuser
[cactiuser@cacti ~]$ /usr/local/php/bin/php /web/vhosts/cacti/poller.php
03/25/2019 09:09:43 PM - POLLER: Poller[0] WARNING: Cron is out of sync with the Poller Interval!  The Poller Interval is '300' seconds, with a maximum of a '300' second Cron, but 234590 seconds have passed since the last poll!
03/25/2019 09:09:44 PM - SYSTEM STATS: Time:0.2583 Method:cmd.php Processes:1 Threads:N/A Hosts:2 HostsPerProcess:2 DataSources:0 RRDsProcessed:0
Graph Management: 管理此前的图像
Graph Trees: 图形树,能够将监控的所有对象进行分类存放;
DataSources:数据源
Devices: 设备,所监控的主机,要监控主机先添加设备,默认添加localhost;
点击Device,status为unknown,因为还没配置监控状态,点击localhost;
Description: 当前主机描述
Hostname: 主机名字为IP地址;
Host Template: 主机模版,Local Linux Machine 本地linux主机;
Number of Collection Threads: 几个收集线程,只能有1个,使用poller.php,如果使用spine可以使用n个线程,现在使用poller最好不要调整;
Disable Host: 禁用当前主机;
Downed Device Detection: 检查当前主机是否在线;
Downed Device Detection: 设备检测;
Ping Method:ping方法;
Ping Timeout Value: ping超时值;
Ping Retry Count: ping重试计数;
SNMP Version: SNMP版本;
SNMP Community: SNMP团体字;
SNMP Port: SNMP端口;
SNMP Timeout: SNMP超时时间;
Maximum OID' per Get Request: OID查询机制;
选择snmp版本为version2,点击保存;
点击Devices,过一会Status可能会变成up,当这里变成up以后,localhost底下附加的数据源;
Associated Graph Templates:相关图模版;
Graph Template Name:图模版名称;
Associated Data Queries:相关数据查询;
Data Query Name:数据查询名称;
[root@cacti ~]# vim /etc/snmp/snmpd.conf
com2sec notConfigUser  127.0.0.1       public
com2sec notConfigUser  172.16.0.0/16       public
点击Data Sources,已有五个数据源,这五个数据源就是为这个设备localhost这几个图形提供数据的,所以只有定义好的数据源所产生的以后才能画图的;
点击Localhost-Processes;
Selected Data Template:数据模版
Host: 关联到那个主机上;
Data Source Path:数据源路径
点击Turn On Data Source Debug Mode(开启数据源调试模式),这是模版自动生成的命令,把数据方法结合数据模版应用到主机上这就叫数据源
Data Source Debug
/usr/bin/rrdtool create \
/web/vhosts/cacti-0.8.8a/rra/localhost_proc_7.rrd \(数据文件是什么)
--step 300 \(解析度)
DS:proc:GAUGE:600:0:1000 \(数据源,数据源类型)
RRA:AVERAGE:0.5:1:600 \(每1个进行平均,每个数据300秒,过去5分钟的平均值,一共创建600个)
RRA:AVERAGE:0.5:6:700 \(每半小时平均值)
RRA:AVERAGE:0.5:24:775 \(每两小时平均值)
RRA:AVERAGE:0.5:288:797 \(每天12小时平均值,保存797个)
RRA:MAX:0.5:1:600 \(每5分钟最大值)
RRA:MAX:0.5:6:700 \(每半小时平均值)
RRA:MAX:0.5:24:775 \(每两小时平均值)
RRA:MAX:0.5:288:797 \(每12小时平均值)
如果图形存在字符乱码,将windows的字体拷贝到linux,在cacti选项Setting -- Path -- RRDTool Default Font填写放置字体正确路径;[root@cacti ~]# cp simsun.ttc /usr/share/fonts/
[root@cacti ~]# cd /web/vhosts/cacti/rra/
[root@cacti rra]# ls
localhost_load_1min_5.rrd  localhost_mem_buffers_3.rrd  localhost_mem_swap_4.rrd  localhost_proc_7.rrd  localhost_users_6.rrd
[root@cacti rra]# rrdtool fetch -r 300 localhost_mem_buffers_3.rrd AVERAGE
为本地主机监控别的数据:
1、首先获取数据;
2、数据收集怎么保存,要有数据模版;
3、有了数据模版再应用到主机上就是数据源;
4、接下来绘图;
定义数据源,点击Data Sources,点击Add添加数据源,点击create;
Selected Data Template(数据收集方法模版)
Host:指定主机;
Name:文件名字;
Data Source Path:数据源路径rrd文件保存到什么位置;
Data Source Item Fields [traffic_in]:数据源in的最大值;
Maximum Value('U' for No Maximum):所能接受最大值,U未知;
Data Source Item Fields [traffic_out]: 数据源out的最大值;
点击New Graphs(创建新图像)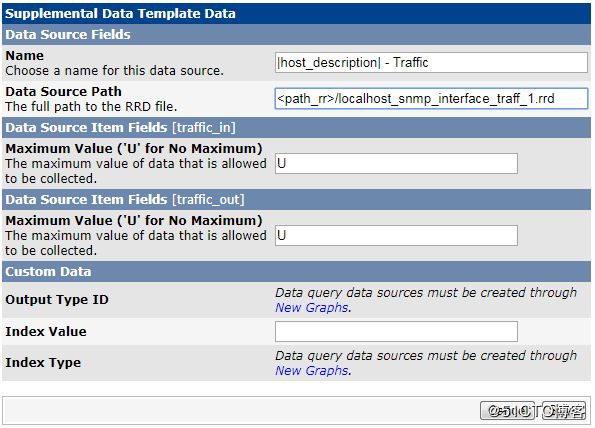
创建数据收集方法,做成模板,给其提供图形模板,应用某主机实现主机监控;
[root@cacti ~]# snmpnetstat -v 2c -c public -Can -Cp tcp localhost
Active Internet (tcp) Connections (including servers)
Proto Local Address          Remote Address         (state)
tcp   *.22                   *.*                   LISTEN
tcp   *.3306                 *.*                   LISTEN
tcp   127.0.0.1.25           *.*                   LISTEN
tcp   127.0.0.1.199          *.*                   LISTEN
tcp   172.16.100.1.22        172.16.100.254.1715   ESTABLISHED
tcp   172.16.100.1.22        172.16.100.254.8061   ESTABLISHED
[root@cacti ~]# which snmpnetstat
/usr/bin/snmpnetstat
[root@cacti ~]# vim tcpconn.sh
#!/bin/bash
#
# $1: hostname or IP
# $2: snmp community
SNMPNETSTAT=/usr/bin/snmpnetstat

$SNMPNETSTAT -v 2c -c $2 -Can -Cp tcp $1 | grep -i 'established' | wc -l

echo -n "established:$ESTABLISHED"
[root@cacti ~]# chmod +x tcpconn.sh
[root@cacti ~]# ./tcpconn.sh localhost public
[root@cacti ~]# cp tcpconn.sh /web/vhosts/cacti/scripts/
打开console(控制台)--Data Input Methods;
点击Add,
Name: 名字
Input Type: 类型选择Script/Command
Input String: 脚本路径,
点击Create;
在Input Fields处点击Add;
Input Fields:参数;
Output Fields:
Field [Input]: 参数;
Friendly Name:给用户一个能够看懂的名字;
Allow Empty Input: 是否允许为空;
Special Type Code: 如果用户不填写到那里继承参数;
点击Create;
在Output Fields(输出数据)处点击Add;
Field [Output]: 输出那个值
点击Create;
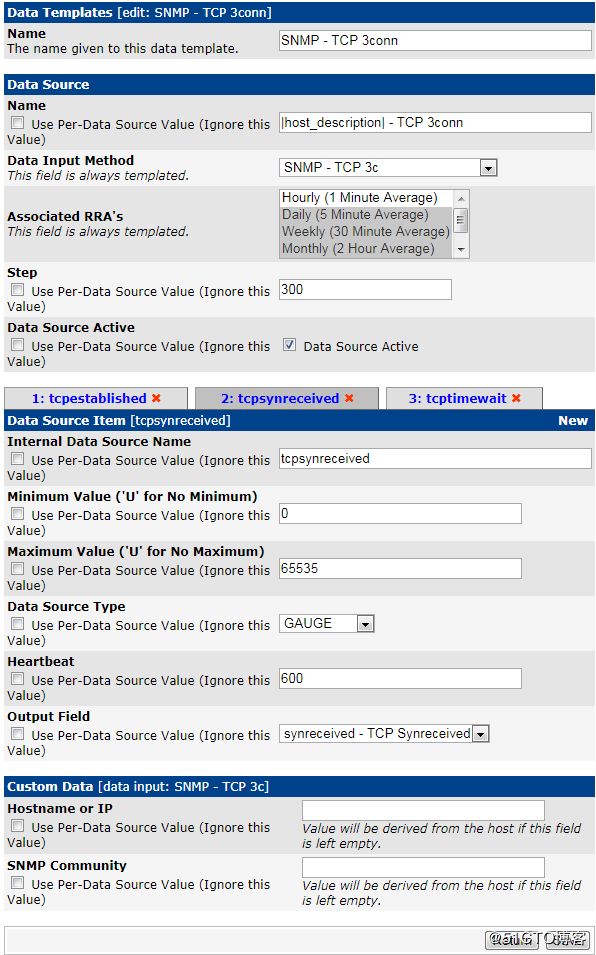
点击Data Templates(定义数据模版)--Add;
Data Templates[new]: 数据模版
Name: 模版名字
Data Source: 数据源
Name: 数据源名字,|host_descrition|因为主机描述;
Data Input Method:数据源方法;
Associated RRA's:聚合函数如何聚合;
Use Per-Data Source Value(Ignore this Value): 数据生成时间;
Internal Data Source Name:数据源名字,tcpestablished,DS名称;
Minimum Value('U' for No Minimum):能够接受的最小值;
Maximum Value ('U' for No Maximum):能够接受最大值;
Data Source Type: 数据源类型;
Hearbeat:能接受的值在多少范围内;
点击Create;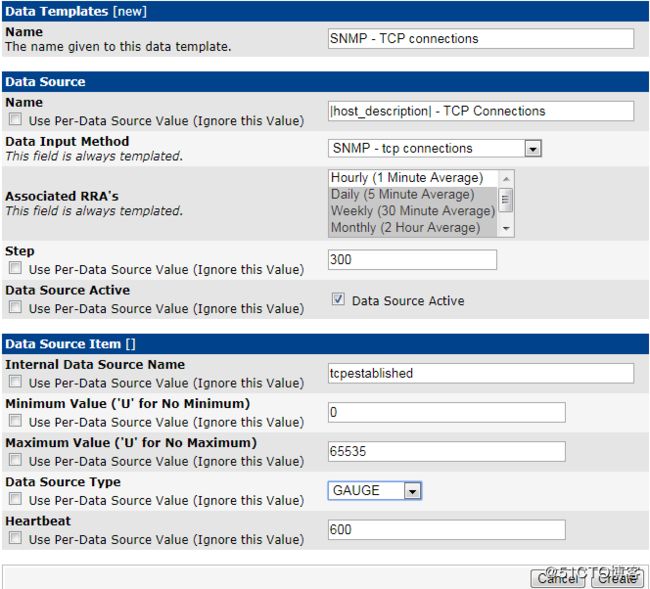
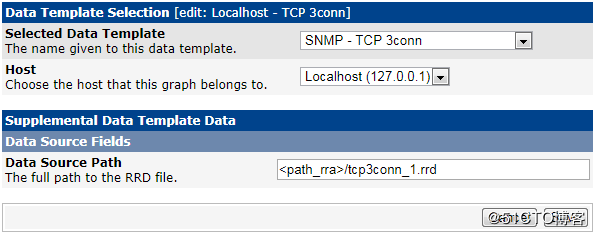
点击Data Sources(开始添加数据源)--Add;
Selected Data Template:指定数据模版;
Host:指定主机;
点击Create;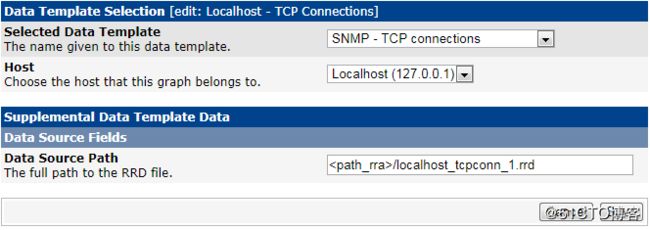
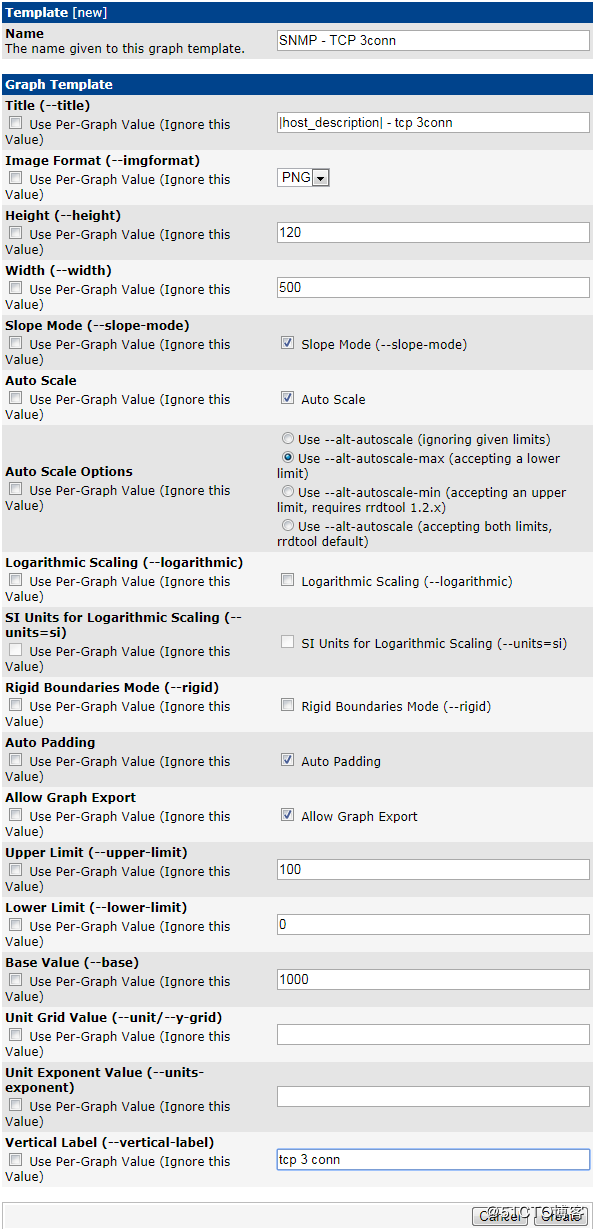
点击Graph Templates(图片模版)--Add;
Name:模版名称;
Title(--title):图片名字
Image Format(--imgformat):图像格式;
Auto Scale:自动大小;
Vertical Label(--vertical-label):纵轴名称;
点击Create;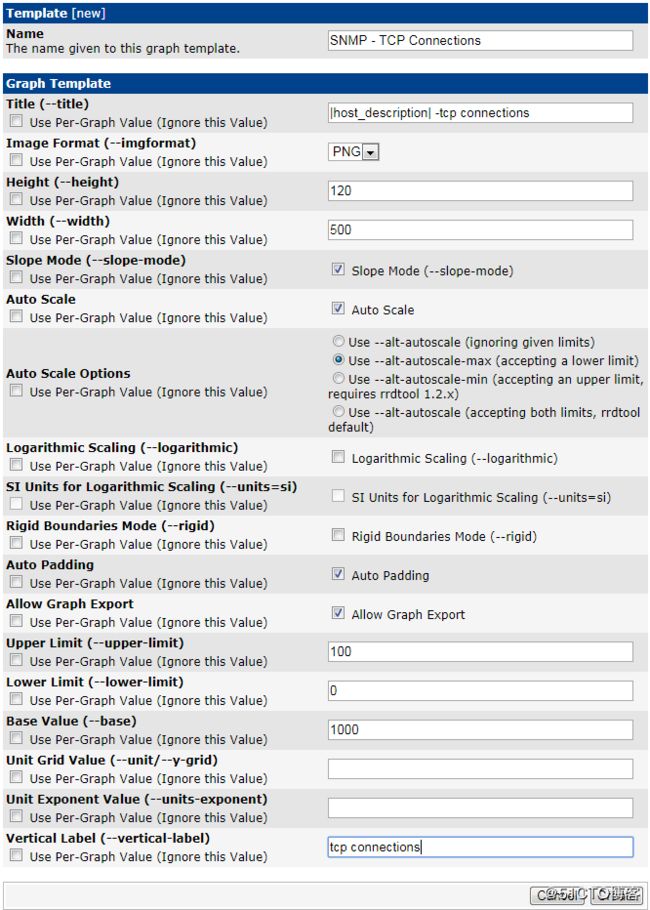
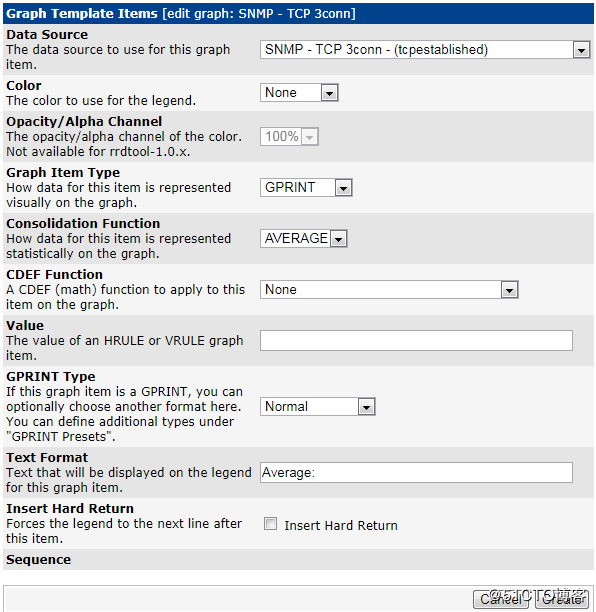
在Graph Template Items[edit: SNMP-TCP Connections]--Add;
Data Source:数据源;
Color:图片颜色;
Graph Item Type:图像类型;
Consolidation Function: 关联的函数;
点击Create;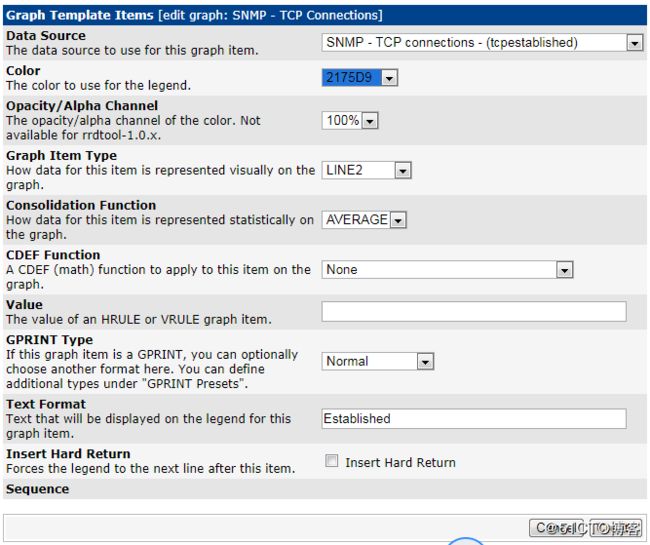
点击Graph Management--Add;
点击Create;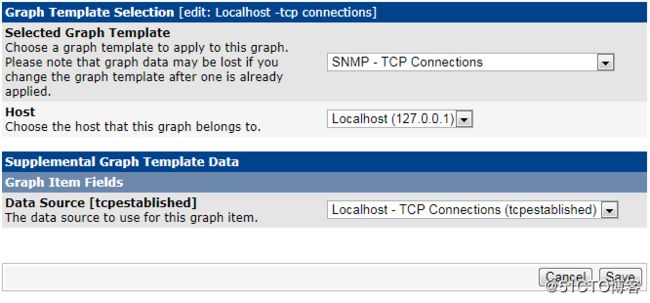
点击console--Graph Templates;找到TCP Connections;
在Graph Template Items[edit:SNMP-TCP Connections]点击Add;
点击Create;
点击console--Graph Templates;找到TCP Connections;
在Graph Template Items[edit:SNMP-TCP Connections]点击Add;
点击Create;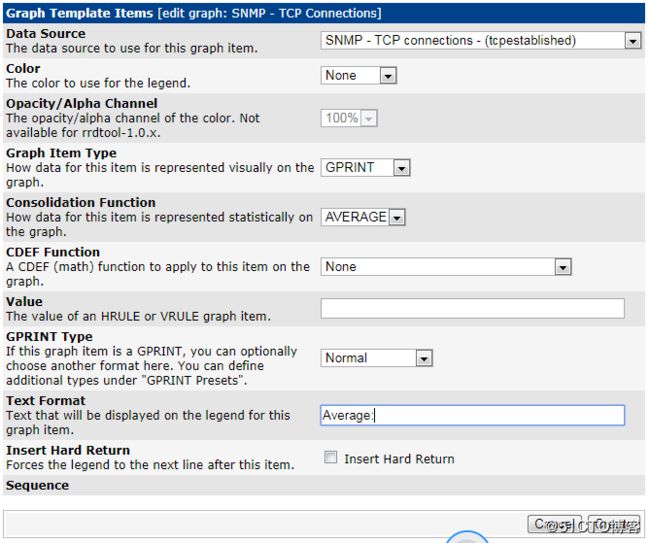
点击console--Graph Templates;找到TCP Connections;
在Graph Template Items[edit:SNMP-TCP Connections]点击Add;
点击Create;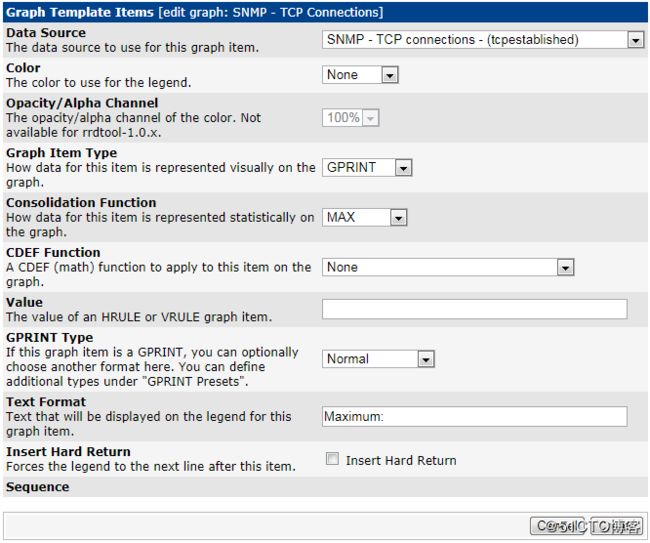
[root@cacti ~]# cd /web/vhosts/cacti/rra
[root@cacti rra]# ll
总用量 380
-rw-r--r--. 1 cactiuser cactiuser 141488 3月  27 00:45 localhost_load_1min_5.rrd
-rw-r--r--. 1 cactiuser cactiuser  47840 3月  27 00:45 localhost_mem_buffers_3.rrd
-rw-r--r--. 1 cactiuser cactiuser  47840 3月  27 00:45 localhost_mem_swap_4.rrd
-rw-r--r--. 1 cactiuser cactiuser  47840 3月  27 00:45 localhost_proc_7.rrd
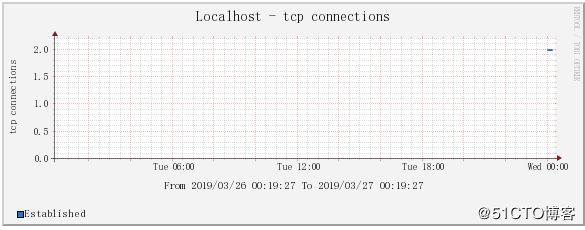
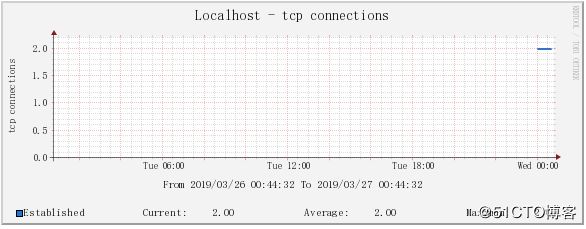
-rw-r--r--. 1 cactiuser cactiuser  47840 3月  27 00:45 localhost_tcpconn_1.rrd
-rw-r--r--. 1 cactiuser cactiuser  47840 3月  27 00:45 localhost_users_6.rrd
[root@cacti rra]# rrdtool fetch localhost_tcpconn_1.rrd AVERAGE
[root@cacti rra]# date +%s
1553619751
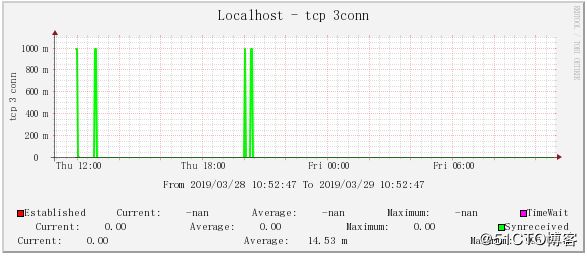
[root@cacti rra]# ab -c 2 -n 1000 http://172.16.100.1/index.php[root@cacti ~]# vim tcpconn.sh
#!/bin/bash
#
# $1: hostname or IP
# $2: snmp community
SNMPNETSTAT=/usr/bin/snmpnetstat
TEMPFILE=`mktemp /tmp/$1_tcpconn.XXXXXXXX`
$SNMPNETSTAT -v 2c -c $2 -Can -Cp tcp $1 > $TEMPFILE
ESTABLISHED=`grep -i "ESTABLISHED" $TEMPFILE | wc -l`
TIMEWAIT=`grep -i "TIMEWAIT" $TEMPFILE | wc -l`
SYNRECEIVED=`grep -i "SYNRECEIVED" $TEMPFILE | wc -l`
echo -n "established:$ESTABLISHED timewait:$TIMEWAIT synreceived:$SYNRECEIVED"
[root@cacti ~]# ./tcpconn.sh localhost public
established:5 timewait:0 synreceived:0[root@cacti ~]#
[root@cacti ~]# ab -c 2 -n 10000 http://172.16.100.1/index.php
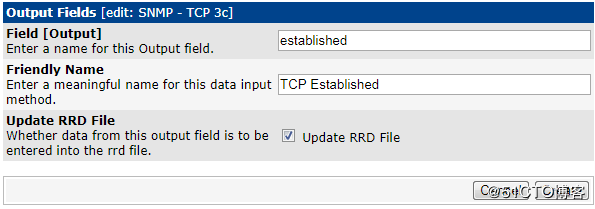
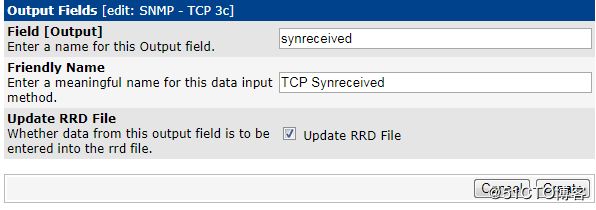
[root@cacti ~]# cp tcpconn.sh /web/vhosts/cacti/scripts/tcp3.sh点击console--Data Input Methods(数据输入方法)--Add,填写完成,点击Create;
在Input Fields--Add,添加完成点击Create;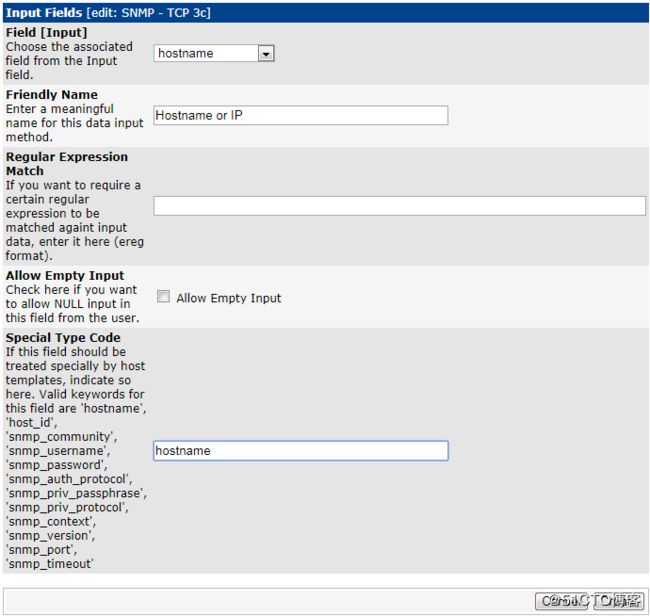
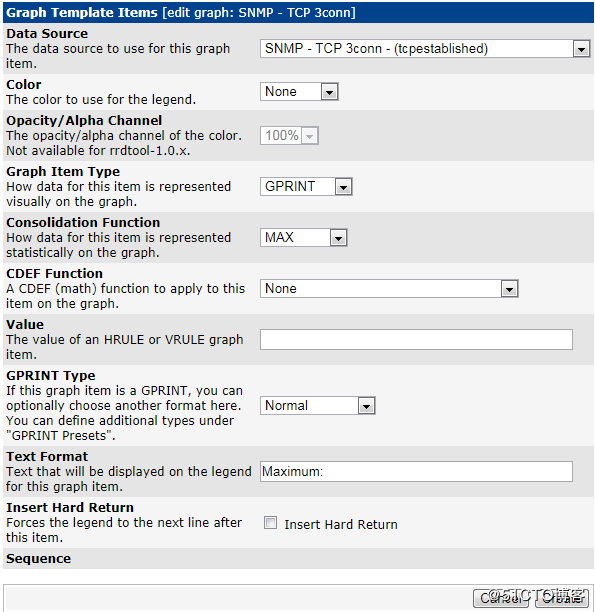
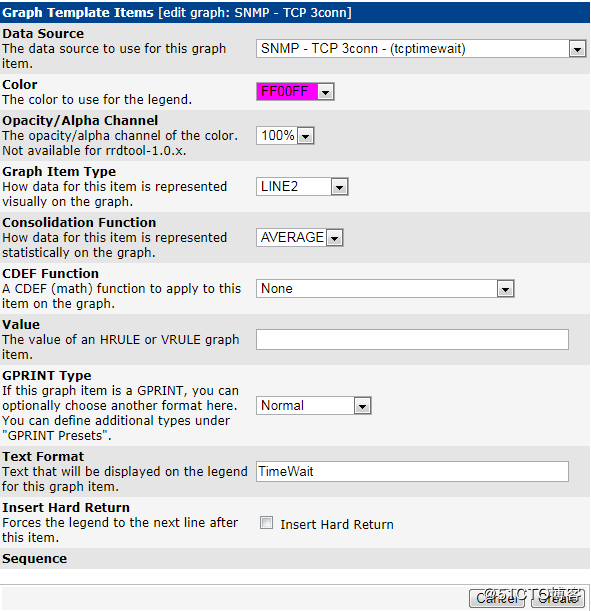
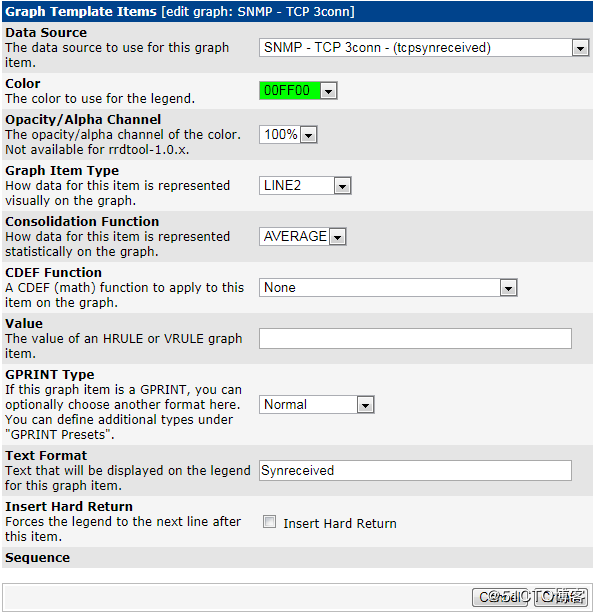
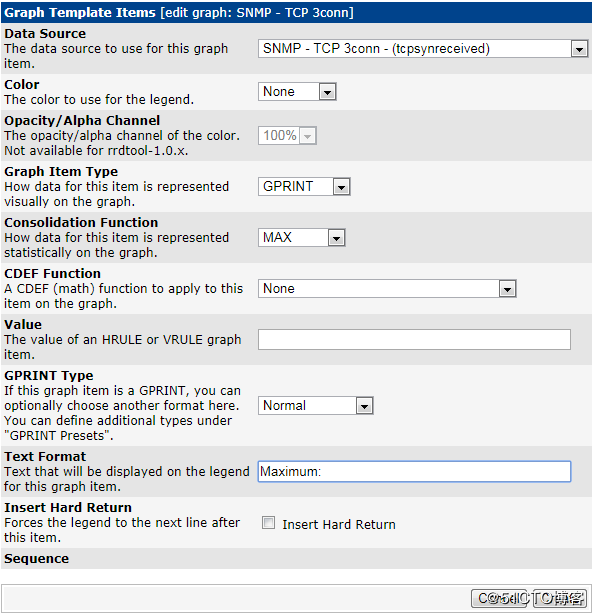
在Graph Template ITems[edit:SNMP-TCP 3conn]--Add;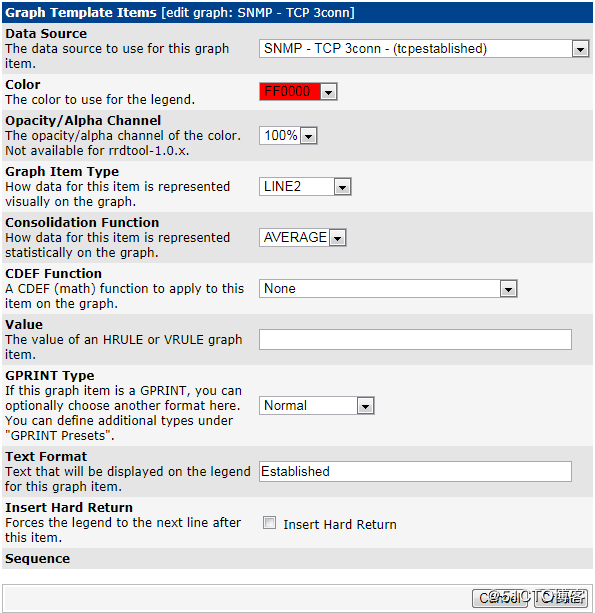
点击console--Export Templates(导出模版)
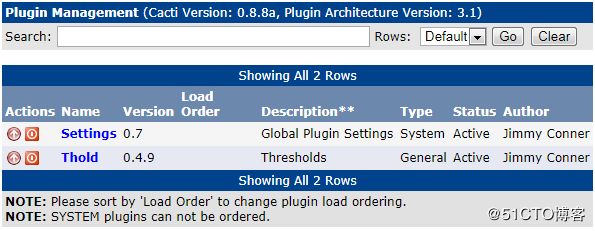
报警插件安装:
[root@cacti ~]# tar xf thold-v0.4.9-3.tgz -C /web/vhosts/cacti/plugins/
[root@cacti ~]# tar xf settings-v0.7-1.tgz -C /web/vhosts/cacti/plugins/
[root@cacti ~]# ls /web/vhosts/cacti/plugins/
index.php  settings  thold
